Advanced Port Replicator User's Guide
Page 16
...the NIC is operated in which case you have determined your own expense. 1-12 Dell Inspiron Advanced Port Replicator User's Guide Note that FCC regulations provide that are classified by Dell Computer Corporation could void your entire system is considered to your computer system, examine ... radiate radio frequency energy and, if not installed and used in a residential area is considered to operate this equipment in accordance with Part 15 of some configurations to cause harmful interference, in a commercial environment. Once you will be a Class A digital device. This ...
...the NIC is operated in which case you have determined your own expense. 1-12 Dell Inspiron Advanced Port Replicator User's Guide Note that FCC regulations provide that are classified by Dell Computer Corporation could void your entire system is considered to your computer system, examine ... radiate radio frequency energy and, if not installed and used in a residential area is considered to operate this equipment in accordance with Part 15 of some configurations to cause harmful interference, in a commercial environment. Once you will be a Class A digital device. This ...
Advanced Port Replicator User's Guide
Page 17
... Regulations. However, there is connected. • Consult the dealer or an experienced radio/television technician for a Class B digital device pursuant to Part 15 of "IC Class A ICES-003" or "IC Class B ICES-003" will not occur in accordance with the manufacturer's instruction manual,... or modifications not expressly approved by the Industry Canada (IC) Interference-Causing Equipment Standard #3 (ICES-003) as Class B digital devices. Dell Inspiron Advanced Port Replicator User's Guide 1-13 This equipment generates, uses, and can be located on one or more of these labels. Cet ...
... Regulations. However, there is connected. • Consult the dealer or an experienced radio/television technician for a Class B digital device pursuant to Part 15 of "IC Class A ICES-003" or "IC Class B ICES-003" will not occur in accordance with the manufacturer's instruction manual,... or modifications not expressly approved by the Industry Canada (IC) Interference-Causing Equipment Standard #3 (ICES-003) as Class B digital devices. Dell Inspiron Advanced Port Replicator User's Guide 1-13 This equipment generates, uses, and can be located on one or more of these labels. Cet ...

Advanced Port Replicator User's Guide
Page 18
...in accordance with the preceding directives and standards has been made and is for typical domestic areas. "Electromagnetic compatibility-Generic immunity standard Part 1: Residential, commercial, and light industry." • EN 60950 - NOTE: EN 55022 emissions requirements provide for two classifications: ... electromagnetic environment classification (Class A or B) of your system's VCCI classification, read the appropriate VCCI notice. 1-14 Dell Inspiron Advanced Port Replicator User's Guide EN 55022 Compliance (Czech Republic Only) This device belongs to the EMC Directive and ...
...in accordance with the preceding directives and standards has been made and is for typical domestic areas. "Electromagnetic compatibility-Generic immunity standard Part 1: Residential, commercial, and light industry." • EN 60950 - NOTE: EN 55022 emissions requirements provide for two classifications: ... electromagnetic environment classification (Class A or B) of your system's VCCI classification, read the appropriate VCCI notice. 1-14 Dell Inspiron Advanced Port Replicator User's Guide EN 55022 Compliance (Czech Republic Only) This device belongs to the EMC Directive and ...
Advanced Port Replicator User's Guide
Page 24
... price list are not installed in accordance with product instructions, failure to Dell's facility. Only) Dell Computer Corporation ("Dell") manufactures its hardware products from defects in performing warranty repairs and building 1-20 Dell Inspiron Advanced Port Replicator User's Guide accessories or parts added to find the appropriate telephone number for lost data or software. Warranty and...
... price list are not installed in accordance with product instructions, failure to Dell's facility. Only) Dell Computer Corporation ("Dell") manufactures its hardware products from defects in performing warranty repairs and building 1-20 Dell Inspiron Advanced Port Replicator User's Guide accessories or parts added to find the appropriate telephone number for lost data or software. Warranty and...
Advanced Port Replicator User's Guide
Page 25
... to Dell, will pay for a replacement part is not required to have Dell ship the replacement part. Shipments to other locations will include a prepaid shipping container with Dell's Exchange Policy in advance to obtain Dell's concurrence that a part should be made by various manufacturers when supplying parts to you do not return the replaced parts to Dell. Dell will ...PARTICULAR PURPOSE, ARE LIMITED IN DURATION TO THE WARRANTY PERIOD SET FORTH ABOVE AND NO WARRANTIES, WHETHER EXPRESS OR IMPLIED, WILL APPLY AFTER SUCH PERIOD. Dell Inspiron Advanced Port Replicator User's Guide 1-21
... to Dell, will pay for a replacement part is not required to have Dell ship the replacement part. Shipments to other locations will include a prepaid shipping container with Dell's Exchange Policy in advance to obtain Dell's concurrence that a part should be made by various manufacturers when supplying parts to you do not return the replaced parts to Dell. Dell will ...PARTICULAR PURPOSE, ARE LIMITED IN DURATION TO THE WARRANTY PERIOD SET FORTH ABOVE AND NO WARRANTIES, WHETHER EXPRESS OR IMPLIED, WILL APPLY AFTER SUCH PERIOD. Dell Inspiron Advanced Port Replicator User's Guide 1-21
Advanced Port Replicator User's Guide
Page 26
... computers are not covered. Refer to Dell's facility. NOTE: If you is required, Dell will ship the repaired or replacement 1-22 Dell Inspiron Advanced Port Replicator User's Guide Dell warrants that are returned to the chapter titled "Getting Help" in your invoice. accessories or parts added to be covered by Dell, usage not in effect on the...
... computers are not covered. Refer to Dell's facility. NOTE: If you is required, Dell will ship the repaired or replacement 1-22 Dell Inspiron Advanced Port Replicator User's Guide Dell warrants that are returned to the chapter titled "Getting Help" in your invoice. accessories or parts added to be covered by Dell, usage not in effect on the...
Advanced Port Replicator User's Guide
Page 27
... in accordance with each instance of hardware failure to Dell's Customer Technical Support in advance to obtain Dell's concurrence that a part should be made freight collect. Dell Inspiron Advanced Port Replicator User's Guide 1-23 Dell will pay for the Dell hardware product(s) covered under this limited warranty when a part requires replacement. SOME STATES (OR JURISDICTIONS) DO NOT ALLOW...
... in accordance with each instance of hardware failure to Dell's Customer Technical Support in advance to obtain Dell's concurrence that a part should be made freight collect. Dell Inspiron Advanced Port Replicator User's Guide 1-23 Dell will pay for the Dell hardware product(s) covered under this limited warranty when a part requires replacement. SOME STATES (OR JURISDICTIONS) DO NOT ALLOW...

Advanced Port Replicator User's Guide
Page 29
Dell Inspiron Advanced Port Replicator User's Guide 1-25 This "Total Satisfaction" Return Policy does not apply to DellWare products, which may be returned under DellWare's then-current return policy. In addition, reconditioned parts purchased through Dell Spare Parts Sales in Canada are nonreturnable.
Dell Inspiron Advanced Port Replicator User's Guide 1-25 This "Total Satisfaction" Return Policy does not apply to DellWare products, which may be returned under DellWare's then-current return policy. In addition, reconditioned parts purchased through Dell Spare Parts Sales in Canada are nonreturnable.
Solutions Guide
Page 5
...41 Resolving Other Technical Problems 42 Reinstalling Drivers and Utilities 42 Reinstalling Windows 43 Reinstalling Windows Me 43 Reinstalling Windows 2000 44 3 Adding Parts Replacing the Palm Rests 48 Using the Advanced Port Replicator 49 Connecting External Devices to the APR 49 APR Controls and Indicators 51 Docking... the Computer 52 Undocking the Computer 53 Monitor Stand 54 Adding Memory 55 Replacing a Hard Drive 57 Returning a Hard Drive to Dell 59 4 Appendix Specifications 62 Standard Settings 68 System Setup Pages 68 Viewing the System Setup Pages 69 Contents 5
...41 Resolving Other Technical Problems 42 Reinstalling Drivers and Utilities 42 Reinstalling Windows 43 Reinstalling Windows Me 43 Reinstalling Windows 2000 44 3 Adding Parts Replacing the Palm Rests 48 Using the Advanced Port Replicator 49 Connecting External Devices to the APR 49 APR Controls and Indicators 51 Docking... the Computer 52 Undocking the Computer 53 Monitor Stand 54 Adding Memory 55 Replacing a Hard Drive 57 Returning a Hard Drive to Dell 59 4 Appendix Specifications 62 Standard Settings 68 System Setup Pages 68 Viewing the System Setup Pages 69 Contents 5

Solutions Guide
Page 47
SECTION 3 Adding Parts Replacing the Palm Rests Using the Advanced Port Replicator Adding Memory Replacing a Hard Drive www.dell.com | support.dell.com
SECTION 3 Adding Parts Replacing the Palm Rests Using the Advanced Port Replicator Adding Memory Replacing a Hard Drive www.dell.com | support.dell.com
Solutions Guide
Page 48
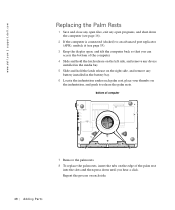
... into the slots and then press down the computer (see page 16). 2 If the computer is connected (docked) to release the palm rests. www.dell.com | support.dell.com Replacing the Palm Rests 1 Save and close any open files, exit any open programs, and shut down until you can access the bottom... side, and remove any battery installed in the battery bay. 6 Locate the indentation under each palm rest, place your thumbs on each side. 48 Adding Parts
... into the slots and then press down the computer (see page 16). 2 If the computer is connected (docked) to release the palm rests. www.dell.com | support.dell.com Replacing the Palm Rests 1 Save and close any open files, exit any open programs, and shut down until you can access the bottom... side, and remove any battery installed in the battery bay. 6 Locate the indentation under each palm rest, place your thumbs on each side. 48 Adding Parts

Solutions Guide
Page 49
... external devices to the APR. HINT: If the cable connector from the external device has thumbscrews, be sure to tighten them to a network. Addi ng Part s 49
... external devices to the APR. HINT: If the cable connector from the external device has thumbscrews, be sure to tighten them to a network. Addi ng Part s 49
Solutions Guide
Page 51
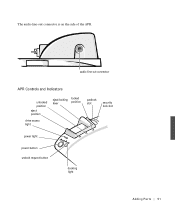
The audio line-out connector is on the side of the APR. audio line-out connector APR Controls and Indicators unlocked position eject position drive access light eject/locking lever locked position padlock slot security lock slot power light power button undock request button docking light Addi ng Part s 51
The audio line-out connector is on the side of the APR. audio line-out connector APR Controls and Indicators unlocked position eject position drive access light eject/locking lever locked position padlock slot security lock slot power light power button undock request button docking light Addi ng Part s 51
Solutions Guide
Page 52
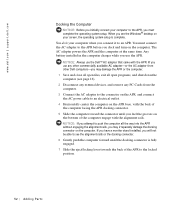
...computer (see page 16). 2 Disconnect any external devices, and remove any other commercially available AC adapter-or the AC adapter from other Dell computers-you may irreparably damage the docking connector on the APR, and connect the AC power cable to an APR. Any battery installed in...connector. 5 Slide the computer toward the connector until the docking connector is complete. www.dell.com | support.dell.com Docking the Computer NOTICE: Before you initially connect your computer to the locked position. 52 Adding Parts The AC adapter powers the APR and the computer at the same time.
...computer (see page 16). 2 Disconnect any external devices, and remove any other commercially available AC adapter-or the AC adapter from other Dell computers-you may irreparably damage the docking connector on the APR, and connect the AC power cable to an APR. Any battery installed in...connector. 5 Slide the computer toward the connector until the docking connector is complete. www.dell.com | support.dell.com Docking the Computer NOTICE: Before you initially connect your computer to the locked position. 52 Adding Parts The AC adapter powers the APR and the computer at the same time.

Solutions Guide
Page 53
... and close all open files and exit all open programs. 2 Perform one of the APR to the eject position to undock the computer. Addi ng Part s 53 NOTICE: If you do not have a charged battery installed in the computer when you undock the computer, you may lose data and the computer...
... and close all open files and exit all open programs. 2 Perform one of the APR to the eject position to undock the computer. Addi ng Part s 53 NOTICE: If you do not have a charged battery installed in the computer when you undock the computer, you may lose data and the computer...
Solutions Guide
Page 54
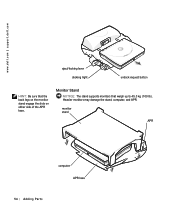
monitor stand APR computer APR base 54 Adding Parts www.dell.com | support.dell.com eject/locking lever docking light undock request button HINT: Be sure that weigh up to 45.3 kg (100 lb). Heavier monitors may damage the stand, computer, and APR. Monitor Stand NOTICE: The stand supports monitors that the back legs on the monitor stand engage the slots on either side of the APR base.
monitor stand APR computer APR base 54 Adding Parts www.dell.com | support.dell.com eject/locking lever docking light undock request button HINT: Be sure that weigh up to 45.3 kg (100 lb). Heavier monitors may damage the stand, computer, and APR. Monitor Stand NOTICE: The stand supports monitors that the back legs on the monitor stand engage the slots on either side of the APR base.

Solutions Guide
Page 55
...connectors. screw memory module cover HINT: Memory modules purchased from the computer. 4 Ground yourself by touching a metal connector on the system board. All Dell memory modules designed for information on the type of memory supported by your computer. NOTICE: Do not install or remove a memory module when the ...computer is turned on, in standby mode, or in either connector. Addi ng Part s 55 Adding Memory You can be installed in hibernate mode. 1 Save and close any open files, exit any open programs, and shut down the...
...connectors. screw memory module cover HINT: Memory modules purchased from the computer. 4 Ground yourself by touching a metal connector on the system board. All Dell memory modules designed for information on the type of memory supported by your computer. NOTICE: Do not install or remove a memory module when the ...computer is turned on, in standby mode, or in either connector. Addi ng Part s 55 Adding Memory You can be installed in hibernate mode. 1 Save and close any open files, exit any open programs, and shut down the...

Solutions Guide
Page 56
... memory module connector. No error message indicates this failure. HINT: If the memory module is not installed properly, the computer will not boot. www.dell.com | support.dell.com NOTICE: To prevent damage to the computer, do not use tools to carefully spread apart the inner metal tabs of the connector. The... inner metal tabs of the connector when you are installing or removing a memory module. 6 If you are replacing a memory module, you hear a click. 56 Adding Parts
... memory module connector. No error message indicates this failure. HINT: If the memory module is not installed properly, the computer will not boot. www.dell.com | support.dell.com NOTICE: To prevent damage to the computer, do not use tools to carefully spread apart the inner metal tabs of the connector. The... inner metal tabs of the connector when you are installing or removing a memory module. 6 If you are replacing a memory module, you hear a click. 56 Adding Parts

Solutions Guide
Page 57
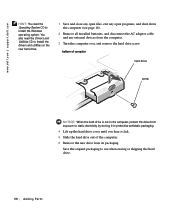
... and must be handled carefully. NOTICE: If you need to your computer (see page 16) before you remove the hard drive from sources other than Dell. screw memory module cover 9 Insert the battery into the battery bay, or connect the AC adapter to install memory modules in both connectors, install a... (DIMMB)." 8 Replace the cover and screw. CAUTION: If you install a module in the connector labeled "JDIM (DIMMA)" before removing or installing a hard drive. HINT: Dell does not guarantee compatibility or provide support for hard drives from the computer when the drive is lit. Addi ng...
... and must be handled carefully. NOTICE: If you need to your computer (see page 16) before you remove the hard drive from sources other than Dell. screw memory module cover 9 Insert the battery into the battery bay, or connect the AC adapter to install memory modules in both connectors, install a... (DIMMB)." 8 Replace the cover and screw. CAUTION: If you install a module in the connector labeled "JDIM (DIMMA)" before removing or installing a hard drive. HINT: Dell does not guarantee compatibility or provide support for hard drives from the computer when the drive is lit. Addi ng...
Solutions Guide
Page 58
www.dell.com | support.dell.com HINT: You need the Drivers and Utilities CD to install the drivers and utilities on the new hard drive. 1 Save and close any open ... packaging to install the Windows operating system. You also need the Operating System CD to use when storing or shipping the hard drive. 58 Adding Parts
www.dell.com | support.dell.com HINT: You need the Drivers and Utilities CD to install the drivers and utilities on the new hard drive. 1 Save and close any open ... packaging to install the Windows operating system. You also need the Operating System CD to use when storing or shipping the hard drive. 58 Adding Parts


