

Owner's Manual
Page 9
... 143 FCC Identification Information 144 Macrovision Product Notice 144 Contents 9 Keyboard 125 Removing the Keyboard 126 Replacing the Keyboard 127 Internal Card With Bluetooth® Wireless Technology 127 Coin-Cell Battery 128 Removing the Coin-Cell Battery 128 Replacing the Coin-Cell Battery 129 13 Appendix Specifications 131 Using the System Setup Program 137 ...Travel Tips 140 Traveling by Air 140 If Your Computer Is Lost or Stolen 141 Cleaning Your Computer 141 Computer, Keyboard, and Display 141 Touch Pad 142 Floppy Drive 142 CDs and DVDs 142 FCC Notices (U.S.
... 143 FCC Identification Information 144 Macrovision Product Notice 144 Contents 9 Keyboard 125 Removing the Keyboard 126 Replacing the Keyboard 127 Internal Card With Bluetooth® Wireless Technology 127 Coin-Cell Battery 128 Removing the Coin-Cell Battery 128 Replacing the Coin-Cell Battery 129 13 Appendix Specifications 131 Using the System Setup Program 137 ...Travel Tips 140 Traveling by Air 140 If Your Computer Is Lost or Stolen 141 Cleaning Your Computer 141 Computer, Keyboard, and Display 141 Touch Pad 142 Floppy Drive 142 CDs and DVDs 142 FCC Notices (U.S.

Owner's Manual
Page 84
...keyboard or the mouse during the boot routine. Try copying the file to a different disk or use these characters in the Dell Diagnostics (see page 77). A memory module may be loose. Reinstall the memory modules and, if necessary, replace them. The message is trying to boot to fit... VE C O N T R O L L E R F A I V E - The hard drive does not respond to carry out the command. KEYBOARD CONTROLLER FA ILURE - Run the Keyboard Controller test in the Dell Diagnostics (see page 77). 84 Solving Problems www.dell.com | support.dell.com T H E F I L E B E I N G C O P I E D I S T O O L A R G ...
...keyboard or the mouse during the boot routine. Try copying the file to a different disk or use these characters in the Dell Diagnostics (see page 77). A memory module may be loose. Reinstall the memory modules and, if necessary, replace them. The message is trying to boot to fit... VE C O N T R O L L E R F A I V E - The hard drive does not respond to carry out the command. KEYBOARD CONTROLLER FA ILURE - Run the Keyboard Controller test in the Dell Diagnostics (see page 77). 84 Solving Problems www.dell.com | support.dell.com T H E F I L E B E I N G C O P I E D I S T O O L A R G ...
Owner's Manual
Page 85
... program that the drive is conflicting with the operating system, another program, or a utility. OPTIONAL ROM BAD CH ECKSU M - Contact Dell. M E M O R Y W R I T E / R E A D F A I L U R E A T A D D R E S S , R E A D V A L U E E X P E C T I N G V A L U E - KEYBOARD D ATA LI NE FAI LURE - KEYBOARD STUCK KEY FA ILURE - Reinstall the memory modules and, if necessary, replace them (see page 112). The software you want to run the program again. Contact...
... program that the drive is conflicting with the operating system, another program, or a utility. OPTIONAL ROM BAD CH ECKSU M - Contact Dell. M E M O R Y W R I T E / R E A D F A I L U R E A T A D D R E S S , R E A D V A L U E E X P E C T I N G V A L U E - KEYBOARD D ATA LI NE FAI LURE - KEYBOARD STUCK KEY FA ILURE - Reinstall the memory modules and, if necessary, replace them (see page 112). The software you want to run the program again. Contact...

Owner's Manual
Page 86
... Dell Diagnostics (see page 77). TI MER CHIP COUNTER 2 FAIL ED - A chip on page 145. UN E X P EC T E D I N T ER R U P T I S N O T R E A D Y - Run the System Memory tests and the Keyboard Controller test in the system setup program does not match the system clock. X : \ I S N O T A C C E S S I B L E . WA RNING : B ATTERY IS C R IT IC A L L Y LO W - The battery is missing an essential file. Replace...
... Dell Diagnostics (see page 77). TI MER CHIP COUNTER 2 FAIL ED - A chip on page 145. UN E X P EC T E D I N T ER R U P T I S N O T R E A D Y - Run the System Memory tests and the Keyboard Controller test in the system setup program does not match the system clock. X : \ I S N O T A C C E S S I B L E . WA RNING : B ATTERY IS C R IT IC A L L Y LO W - The battery is missing an essential file. Replace...

Owner's Manual
Page 97
... your operating system. Identifying Drivers If you are not on your computer after you install or update a driver, use Windows XP Device Driver Rollback to replace the driver with the previously installed version. 1 Click the Start button and click Control Panel. 2 Under Pick a Category... new driver. Many drivers, such as the keyboard driver, come with a [!]) on page 97. Ensure that are installing software appropriate for Dell™ computers. Reinstalling Drivers and Utilities NOTICE: The Dell Support website at support.dell.com and your Drivers and Utilities CD provide ...
... your operating system. Identifying Drivers If you are not on your computer after you install or update a driver, use Windows XP Device Driver Rollback to replace the driver with the previously installed version. 1 Click the Start button and click Control Panel. 2 Under Pick a Category... new driver. Many drivers, such as the keyboard driver, come with a [!]) on page 97. Ensure that are installing software appropriate for Dell™ computers. Reinstalling Drivers and Utilities NOTICE: The Dell Support website at support.dell.com and your Drivers and Utilities CD provide ...
Owner's Manual
Page 112
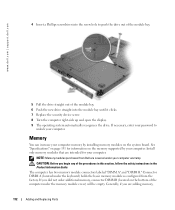
... The computer has two memory module connectors labeled "DIMM A" and "DIMM B." Connector DIMM A (located under the keyboard) holds the basic memory module as configured from Dell are covered under the memory module cover) will be empty. Generally, if you are intended for information on the ...system board. Install only memory modules that are adding memory, 112 Adding and Replacing Parts NOTE: Memory modules purchased from...
... The computer has two memory module connectors labeled "DIMM A" and "DIMM B." Connector DIMM A (located under the keyboard) holds the basic memory module as configured from Dell are covered under the memory module cover) will be empty. Generally, if you are intended for information on the ...system board. Install only memory modules that are adding memory, 112 Adding and Replacing Parts NOTE: Memory modules purchased from...

Owner's Manual
Page 115
... Information. NOTICE: If the cover is located under the keyboard. 1 Follow the procedures in Connector DIMM A The memory module connector labeled "DIMM A" is difficult to close may damage your computer. 7 Insert the battery into the battery bay, or connect the AC adapter to your computer and... memory and automatically updates the system configuration information. Adding and Replacing Parts 115 Forcing the cover to the computer. See "Hard Drive" on page 108. 9 Turn on the back of memory installed in connector slot 6 Replace the memory module cover and tighten the screws.
... Information. NOTICE: If the cover is located under the keyboard. 1 Follow the procedures in Connector DIMM A The memory module connector labeled "DIMM A" is difficult to close may damage your computer. 7 Insert the battery into the battery bay, or connect the AC adapter to your computer and... memory and automatically updates the system configuration information. Adding and Replacing Parts 115 Forcing the cover to the computer. See "Hard Drive" on page 108. 9 Turn on the back of memory installed in connector slot 6 Replace the memory module cover and tighten the screws.
Owner's Manual
Page 116
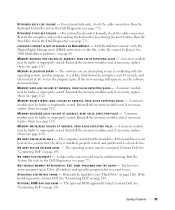
... 116 Adding and Replacing Parts www.dell.com | support.dell.com 3 Remove the hinge cover. NOTE: Ensure that you are replacing a memory module, remove the existing module: a Use your fingertips to carefully spread apart the securing clips on each end of the hinge removal procedure. 4 Remove the keyboard. See "Hinge Cover... module connector, do not use tools to spread the memorymodule securing clips. 6 If you remove the two screws in the battery bay as part of the memory module connector until the module pops up. See "Keyboard" on page 125. 5 Loosen the captive screws on page 123.
... 116 Adding and Replacing Parts www.dell.com | support.dell.com 3 Remove the hinge cover. NOTE: Ensure that you are replacing a memory module, remove the existing module: a Use your fingertips to carefully spread apart the securing clips on each end of the hinge removal procedure. 4 Remove the keyboard. See "Hinge Cover... module connector, do not use tools to spread the memorymodule securing clips. 6 If you remove the two screws in the battery bay as part of the memory module connector until the module pops up. See "Keyboard" on page 125. 5 Loosen the captive screws on page 123.

Owner's Manual
Page 118
...the hinge replacement procedure. 11 Insert the battery into the battery bay, or connect the AC adapter to your computer. 9 Replace the keyboard. www.dell.com | support.dell.com 1 1 tab in the computer, click the Start button, click Help and Support, and then click Computer Information. 118 Adding and Replacing Parts ...it . See "Hard Drive" on page 108. 13 Turn on page 123. See "Hinge Cover" on the computer. See "Keyboard" on page 125. 10 Replace the hinge cover. NOTICE: If the cover is difficult to close , remove the module and reinstall it detects the additional memory ...
...the hinge replacement procedure. 11 Insert the battery into the battery bay, or connect the AC adapter to your computer. 9 Replace the keyboard. www.dell.com | support.dell.com 1 1 tab in the computer, click the Start button, click Help and Support, and then click Computer Information. 118 Adding and Replacing Parts ...it . See "Hard Drive" on page 108. 13 Turn on page 123. See "Hinge Cover" on the computer. See "Keyboard" on page 125. 10 Replace the hinge cover. NOTICE: If the cover is difficult to close , remove the module and reinstall it detects the additional memory ...
Owner's Manual
Page 125
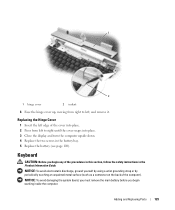
Keyboard CAUTION: Before you begin any of the procedures in this section, follow the safety instructions in the battery bay. 5 Replace the battery (see page 108). Replacing the Hinge Cover 1 Insert the left edge of the computer). NOTICE: To avoid damaging the system board, you must remove the main battery before you begin working inside the computer...
Keyboard CAUTION: Before you begin any of the procedures in this section, follow the safety instructions in the battery bay. 5 Replace the battery (see page 108). Replacing the Hinge Cover 1 Insert the left edge of the computer). NOTICE: To avoid damaging the system board, you must remove the main battery before you begin working inside the computer...

Owner's Manual
Page 126
www.dell.com | support.dell.com Removing the Keyboard 1 Follow the procedures in "Before You Begin" on page 123. Be careful when removing and handling the keyboard. 3 Lift the keyboard and hold it up and slightly forward to allow access to the keyboard connector. 4 Release the lever on system board connector 126 Adding and Replacing Parts NOTICE: The...
www.dell.com | support.dell.com Removing the Keyboard 1 Follow the procedures in "Before You Begin" on page 123. Be careful when removing and handling the keyboard. 3 Lift the keyboard and hold it up and slightly forward to allow access to the keyboard connector. 4 Release the lever on system board connector 126 Adding and Replacing Parts NOTICE: The...

Owner's Manual
Page 127
... the system board, you must remove the main battery before you begin working inside the computer. Replacing the Keyboard NOTICE: To avoid scratching the palm rest when replacing the keyboard, hook the six tabs along the front edge of the keyboard into the palm rest. 3 Fasten the keyboard cable with the lever on the system board connector...
... the system board, you must remove the main battery before you begin working inside the computer. Replacing the Keyboard NOTICE: To avoid scratching the palm rest when replacing the keyboard, hook the six tabs along the front edge of the keyboard into the palm rest. 3 Fasten the keyboard cable with the lever on the system board connector...

Owner's Manual
Page 128
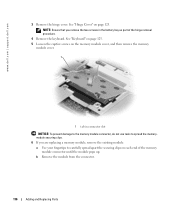
... procedures, see page 125). 4 Use a plastic scribe to lift the battery upward to remove it from the system board. 128 Adding and Replacing Parts www.dell.com | support.dell.com 1 2 4 3 1 screw 2 card carrier 3 card 4 card connector Coin-Cell Battery Removing the Coin-Cell Battery CAUTION: Before you begin working inside the computer. 1 Follow the procedures... by periodically touching an unpainted metal surface (such as the back panel) on page 105. 2 Remove the hinge cover (see page 123). 3 Remove the keyboard (see the safety instructions in "Before You Begin" on the computer.
... procedures, see page 125). 4 Use a plastic scribe to lift the battery upward to remove it from the system board. 128 Adding and Replacing Parts www.dell.com | support.dell.com 1 2 4 3 1 screw 2 card carrier 3 card 4 card connector Coin-Cell Battery Removing the Coin-Cell Battery CAUTION: Before you begin working inside the computer. 1 Follow the procedures... by periodically touching an unpainted metal surface (such as the back panel) on page 105. 2 Remove the hinge cover (see page 123). 3 Remove the keyboard (see the safety instructions in "Before You Begin" on the computer.
