
Owner's Manual
Page 4
... Removing and Installing Devices While the Computer Is Running 38 4 Using the Keyboard and Touch Pad Numeric Keypad 41 Keyboard Shortcuts 42 System Functions 42 Battery 42 CD or DVD Tray 42 Display Functions 42 Radios (Including Wireless Networking and Bluetooth® Wireless Technology 42 Power Management 43 Speaker Functions 43...
... Removing and Installing Devices While the Computer Is Running 38 4 Using the Keyboard and Touch Pad Numeric Keypad 41 Keyboard Shortcuts 42 System Functions 42 Battery 42 CD or DVD Tray 42 Display Functions 42 Radios (Including Wireless Networking and Bluetooth® Wireless Technology 42 Power Management 43 Speaker Functions 43...

Owner's Manual
Page 10
...technology is an optional feature, so the light turns on when Bluetooth® wireless technology is flashing. Turns on steadily or blinks to indicate battery charge status. To quickly enable or disable all wireless devices, press . 10 A Tour of Your Computer Turns on when the computer reads... or writes data. For more information, see the documentation that came with your card. www.dell.com | support.dell.com DEVICE STATUS LIGHTS Turns on when you ordered the internal card with Bluetooth wireless technology with your computer.
...technology is an optional feature, so the light turns on when Bluetooth® wireless technology is flashing. Turns on steadily or blinks to indicate battery charge status. To quickly enable or disable all wireless devices, press . 10 A Tour of Your Computer Turns on when the computer reads... or writes data. For more information, see the documentation that came with your card. www.dell.com | support.dell.com DEVICE STATUS LIGHTS Turns on when you ordered the internal card with Bluetooth wireless technology with your computer.
Owner's Manual
Page 11
.... V O L U M E C O N T R O L B U T T O N S - Flashing orange: The battery charge is critically low. Solid orange: The battery charge is low. - To adjust the volume of a mouse. Provide the functionality of the integrated speakers, press the volume control buttons, mute... A D B U T T O N S - If the computer is running on a battery, the light operates as follows: - For more information. M U T E B U T T O N - KEYBOARD STATUS LIGHTS A Tour of a mouse. Off: The battery is adequately charged (or the computer is turned off the volume. See "Using the Keyboard and ...
.... V O L U M E C O N T R O L B U T T O N S - Flashing orange: The battery charge is critically low. Solid orange: The battery charge is low. - To adjust the volume of a mouse. Provide the functionality of the integrated speakers, press the volume control buttons, mute... A D B U T T O N S - If the computer is running on a battery, the light operates as follows: - For more information. M U T E B U T T O N - KEYBOARD STATUS LIGHTS A Tour of a mouse. Off: The battery is adequately charged (or the computer is turned off the volume. See "Using the Keyboard and ...

Owner's Manual
Page 19
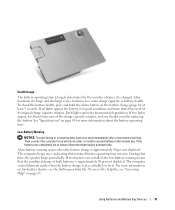
...computer. Fan noise is normal and does not indicate a problem with your computer to an electrical outlet. Releases the battery. B A T T E R Y - B A T T E R Y - When a battery is running. The computer uses an internal fan to accumulate in a low-airflow environment, such as a closed ...Bottom View memory module cover hard drive Mini PCI card cover battery-bay latch release battery charge gauge battery fan docking device slot M E M O R Y M O D U L E C O V E R - See "Adding Memory" on page 29. See "Using a Battery" on page 81. Stores software and data. Restricting the ...
...computer. Fan noise is normal and does not indicate a problem with your computer to an electrical outlet. Releases the battery. B A T T E R Y - B A T T E R Y - When a battery is running. The computer uses an internal fan to accumulate in a low-airflow environment, such as a closed ...Bottom View memory module cover hard drive Mini PCI card cover battery-bay latch release battery charge gauge battery fan docking device slot M E M O R Y M O D U L E C O V E R - See "Adding Memory" on page 29. See "Using a Battery" on page 81. Stores software and data. Restricting the ...

Owner's Manual
Page 27
...other devices, such as described next, rather than by Underwriters Laboratories (UL). See the UPS manufacturer documentation for information on battery operating time and to connected devices when AC power is approved by pressing the power button. The computer turns off your computer...by performing a Microsoft® Windows® operating system shutdown, as a printer, to a UPS. UPS devices contain a battery that provides temporary power to ensure that provides surge protection. Setting Up Your Computer 27 A UPS protects against power fluctuations and interruptions.
...other devices, such as described next, rather than by Underwriters Laboratories (UL). See the UPS manufacturer documentation for information on battery operating time and to connected devices when AC power is approved by pressing the power button. The computer turns off your computer...by performing a Microsoft® Windows® operating system shutdown, as a printer, to a UPS. UPS devices contain a battery that provides temporary power to ensure that provides surge protection. Setting Up Your Computer 27 A UPS protects against power fluctuations and interruptions.

Owner's Manual
Page 29
... safety instructions for advice on the bottom of a lithium-ion battery. Using Batteries and Module Bay Devices 29 NOTE: Battery operating time (the time it is recommended that you connect your Dell™ computer. You can hold a charge) decreases over time. You can check the battery charge on disposing of the computer. NOTE: It is...
... safety instructions for advice on the bottom of a lithium-ion battery. Using Batteries and Module Bay Devices 29 NOTE: Battery operating time (the time it is recommended that you connect your Dell™ computer. You can hold a charge) decreases over time. You can check the battery charge on disposing of the computer. NOTE: It is...

Owner's Manual
Page 30
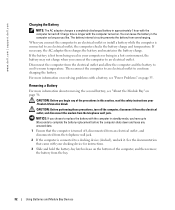
...risk of fire or chemical burn. Checking the Battery Charge The Dell QuickSet Battery Meter, Microsoft® Windows® Power Meter window and icon, the battery charge gauge and health gauge, and the low-battery warning provide information on the battery charge gauge to illuminate the charge-level lights.... appears. To check the Power Meter, double-click the icon on . Do not puncture, incinerate, disassemble, or expose the battery to display the QuickSet Battery Meter. NOTE: Dell recommends that you connect your computer. To access the help file, see the Dell Inspiron help file.
...risk of fire or chemical burn. Checking the Battery Charge The Dell QuickSet Battery Meter, Microsoft® Windows® Power Meter window and icon, the battery charge gauge and health gauge, and the low-battery warning provide information on the battery charge gauge to illuminate the charge-level lights.... appears. To check the Power Meter, double-click the icon on . Do not puncture, incinerate, disassemble, or expose the battery to display the QuickSet Battery Meter. NOTE: Dell recommends that you connect your computer. To access the help file, see the Dell Inspiron help file.
Owner's Manual
Page 31
... periodically. The computer enters hibernate mode when the battery charge is approximately 90 percent depleted. If five lights appear, less than 80 percent of its original charge capacity remains. To access the help file, see the Dell Inspiron help file. Then connect the computer to an ...electrical outlet, or install a second battery in good condition, and more information on low-battery alarms, see "Accessing Help" on page 65. The computer beeps once...
... periodically. The computer enters hibernate mode when the battery charge is approximately 90 percent depleted. If five lights appear, less than 80 percent of its original charge capacity remains. To access the help file, see the Dell Inspiron help file. Then connect the computer to an ...electrical outlet, or install a second battery in good condition, and more information on low-battery alarms, see "Accessing Help" on page 65. The computer beeps once...
Owner's Manual
Page 32
... it . Then connect the computer to an electrical outlet to continue charging the battery. The battery internal circuitry prevents the battery from the telephone wall jack. www.dell.com | support.dell.com Charging the Battery NOTE: The AC adapter charges a completely discharged battery in this section, read the safety instructions your Product Information Guide. You can leave...
... it . Then connect the computer to an electrical outlet to continue charging the battery. The battery internal circuitry prevents the battery from the telephone wall jack. www.dell.com | support.dell.com Charging the Battery NOTE: The AC adapter charges a completely discharged battery in this section, read the safety instructions your Product Information Guide. You can leave...

Owner's Manual
Page 33
... For more information about installing the second battery, see "About the Module Bay" on page 36. Do not use a battery from Dell. Using Batteries and Module Bay Devices 33 Slide the battery into the bay until the latch release clicks. Installing a Battery CAUTION: Before you begin any of fire... or explosion. CAUTION: Using an incompatible battery may increase the risk of the ...
... For more information about installing the second battery, see "About the Module Bay" on page 36. Do not use a battery from Dell. Using Batteries and Module Bay Devices 33 Slide the battery into the bay until the latch release clicks. Installing a Battery CAUTION: Before you begin any of fire... or explosion. CAUTION: Using an incompatible battery may increase the risk of the ...

Owner's Manual
Page 34
... the procedures in this section, read the safety instructions in your computer does not use a reserve battery, it uses a coin-cell battery. www.dell.com | support.dell.com Removing and Installing a Reserve Battery CAUTION: Before you begin any of its compartment, and disconnect the reserve battery cable from the connector. NOTE: If your Product Information Guide.
... the procedures in this section, read the safety instructions in your computer does not use a reserve battery, it uses a coin-cell battery. www.dell.com | support.dell.com Removing and Installing a Reserve Battery CAUTION: Before you begin any of its compartment, and disconnect the reserve battery cable from the connector. NOTE: If your Product Information Guide.

Owner's Manual
Page 35
.... Turn off , press the power button to the connector in the reserve battery compartment. 5 Place the reserve battery in standby mode. The battery charge may be depleted. 1 Reinstall the battery. 2 Use the AC adapter to connect the computer to exit standby mode. Using Batteries and Module Bay Devices 35 Power Problems C H E C K T H E P O W E R L I G H T - Press the power button...
.... Turn off , press the power button to the connector in the reserve battery compartment. 5 Place the reserve battery in standby mode. The battery charge may be depleted. 1 Reinstall the battery. 2 Use the AC adapter to connect the computer to exit standby mode. Using Batteries and Module Bay Devices 35 Power Problems C H E C K T H E P O W E R L I G H T - Press the power button...

Owner's Manual
Page 36
... that the light is designed to illuminate the charge-level lights. See the Dell Inspiron help see "Adding Memory" on . See "Contacting Dell" on . A D J U S T T H E P O W E R P R O P E R T I C A L O U T L E T - R E S E A T T H E M E M O R Y M O D U L E S - You can install devices such as a lamp. E L I M I N A T E P O S S I B L E I C A L O U T L E T - If no lights appear, the battery has no charge. 36 Using Batteries and Module Bay Devices Ensure that is on page 81. Make sure...
... that the light is designed to illuminate the charge-level lights. See the Dell Inspiron help see "Adding Memory" on . See "Contacting Dell" on . A D J U S T T H E P O W E R P R O P E R T I C A L O U T L E T - R E S E A T T H E M E M O R Y M O D U L E S - You can install devices such as a lamp. E L I M I N A T E P O S S I B L E I C A L O U T L E T - If no lights appear, the battery has no charge. 36 Using Batteries and Module Bay Devices Ensure that is on page 81. Make sure...
Owner's Manual
Page 37
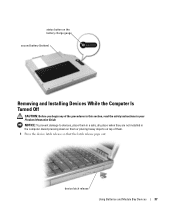
Avoid pressing down on them or placing heavy objects on the battery charge gauge second battery (bottom) Removing and Installing Devices While the Computer Is Turned Off CAUTION: Before you begin any of them. 1 Press the device latch release so that the latch release pops out. device latch release Using Batteries and Module Bay Devices 37 NOTICE: To prevent damage to devices, place them in a safe, dry place when they are not installed in your Product Information Guide. status button on top of the procedures in this section, read the safety instructions in the computer.
Avoid pressing down on them or placing heavy objects on the battery charge gauge second battery (bottom) Removing and Installing Devices While the Computer Is Turned Off CAUTION: Before you begin any of them. 1 Press the device latch release so that the latch release pops out. device latch release Using Batteries and Module Bay Devices 37 NOTICE: To prevent damage to devices, place them in a safe, dry place when they are not installed in your Product Information Guide. status button on top of the procedures in this section, read the safety instructions in the computer.

Owner's Manual
Page 38
...or placing heavy objects on the taskbar. 2 Click Stop and wait for the operating system to confirm that the latch release pops out. 38 Using Batteries and Module Bay Devices Removing and Installing Devices While the Computer Is Running CAUTION: Before you begin any of them. 4 Press the device latch release... so that the device has stopped. 3 Click the device you want to eject. www.dell.com | support.dell.com 2 Pull the device by the latch release to remove the device from the module bay. 3 Insert the new device into the bay, push...
...or placing heavy objects on the taskbar. 2 Click Stop and wait for the operating system to confirm that the latch release pops out. 38 Using Batteries and Module Bay Devices Removing and Installing Devices While the Computer Is Running CAUTION: Before you begin any of them. 4 Press the device latch release... so that the device has stopped. 3 Click the device you want to eject. www.dell.com | support.dell.com 2 Pull the device by the latch release to remove the device from the module bay. 3 Insert the new device into the bay, push...

Owner's Manual
Page 39
Windows XP automatically recognizes the new device. 7 If necessary, enter your password to remove the device from the module bay. 6 Insert the new device into the bay, push the device until you feel a click, and push the device latch release in so that it is flush with the computer. Using Batteries and Module Bay Devices 39 device latch release 5 Pull the device by the latch release to unlock your computer.
Windows XP automatically recognizes the new device. 7 If necessary, enter your password to remove the device from the module bay. 6 Insert the new device into the bay, push the device until you feel a click, and push the device latch release in so that it is flush with the computer. Using Batteries and Module Bay Devices 39 device latch release 5 Pull the device by the latch release to unlock your computer.
Owner's Manual
Page 42
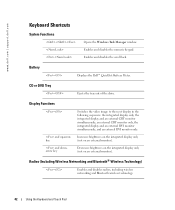
...Technology) Enables and disables radios, including wireless networking and Bluetooth wireless technology. PRELIMINARY 4/27/05 - Battery Displays the Dell™ QuickSet Battery Meter. www.dell.com | support.dell.com FILE LOCATION: C:\data\Temp\Benz\T8109c42.fm Keyboard Shortcuts System Functions Opens the Windows Task ...monitor). Enables and disables the numeric keypad. Decreases brightness on the integrated display only (not on an external monitor). DELL CONFIDENTIAL - CD or DVD Tray Ejects the tray out of the drive. Display Functions and up-arrow key and ...
...Technology) Enables and disables radios, including wireless networking and Bluetooth wireless technology. PRELIMINARY 4/27/05 - Battery Displays the Dell™ QuickSet Battery Meter. www.dell.com | support.dell.com FILE LOCATION: C:\data\Temp\Benz\T8109c42.fm Keyboard Shortcuts System Functions Opens the Windows Task ...monitor). Enables and disables the numeric keypad. Decreases brightness on the integrated display only (not on an external monitor). DELL CONFIDENTIAL - CD or DVD Tray Ejects the tray out of the drive. Display Functions and up-arrow key and ...

Owner's Manual
Page 66
... working by testing it is recommended that the electrical outlet is on , your power management settings may have caused the display to your computer, the battery charge may be depleted. C H E C K T H E B A T T E R Y - TE S T T H E E L E C T R I B L E . X : \ I S N O T A C C E S S I C A L O U T L E T -...missing an essential file. Connect the computer to an electrical outlet using a battery to open is on . 66 Solving Problems T H E D E V I C E I R E D . CHECK THE has power. www.dell.com | support.dell.com A R E Q U I S N O T R E A D Y - Check...
... working by testing it is recommended that the electrical outlet is on , your power management settings may have caused the display to your computer, the battery charge may be depleted. C H E C K T H E B A T T E R Y - TE S T T H E E L E C T R I B L E . X : \ I S N O T A C C E S S I C A L O U T L E T -...missing an essential file. Connect the computer to an electrical outlet using a battery to open is on . 66 Solving Problems T H E D E V I C E I R E D . CHECK THE has power. www.dell.com | support.dell.com A R E Q U I S N O T R E A D Y - Check...

Owner's Manual
Page 71
... a safe place to remove the power cables from the electrical outlet. 2 Turn off AC power at the circuit breaker before attempting to dry. 5 Remove the battery. See the software documentation. Solving Problems 71 Ensure that it is no longer responding. 3 Click End Task. A program stops responding END THE PROGRAM - 1 Simultaneously press...
... a safe place to remove the power cables from the electrical outlet. 2 Turn off AC power at the circuit breaker before attempting to dry. 5 Remove the battery. See the software documentation. Solving Problems 71 Ensure that it is no longer responding. 3 Click End Task. A program stops responding END THE PROGRAM - 1 Simultaneously press...

Owner's Manual
Page 72
... module cover, and the screw(s). 12 Replace the hard drive. 13 Replace the module bay device and any PC Cards you removed. 14 Replace the battery. 15 Turn on the computer. If You Drop or Damage Your Computer 1 Save and close any open files, exit any open programs, and shut down... disconnect them from their power sources and then from the electrical outlet. 3 Turn off the battery and put it . If the computer does not start , or if you cannot identify the damaged components, contact Dell (see "Contacting Dell" on page 81). 9 Open the display and place the computer right-side up across two...
... module cover, and the screw(s). 12 Replace the hard drive. 13 Replace the module bay device and any PC Cards you removed. 14 Replace the battery. 15 Turn on the computer. If You Drop or Damage Your Computer 1 Save and close any open files, exit any open programs, and shut down... disconnect them from their power sources and then from the electrical outlet. 3 Turn off the battery and put it . If the computer does not start , or if you cannot identify the damaged components, contact Dell (see "Contacting Dell" on page 81). 9 Open the display and place the computer right-side up across two...


