
Owner's Manual
Page 5
... (Optional 50 8 Solving Problems Dell Diagnostics 55 When to Use the Dell Diagnostics 55 Starting the Dell Diagnostics 55 Drive Problems 57 Optical drive problems 58 If you cannot eject the CD, CD-RW, DVD, or DVD+RW drive tray . . . . . 58 If you hear an unfamiliar scraping or grinding sound 58 Hard drive problems 59 E-mail, Modem, and...
... (Optional 50 8 Solving Problems Dell Diagnostics 55 When to Use the Dell Diagnostics 55 Starting the Dell Diagnostics 55 Drive Problems 57 Optical drive problems 58 If you cannot eject the CD, CD-RW, DVD, or DVD+RW drive tray . . . . . 58 If you hear an unfamiliar scraping or grinding sound 58 Hard drive problems 59 E-mail, Modem, and...

Owner's Manual
Page 7
Only 101 Definition of "Dell-Installed" Software and Peripherals 101 Definition of "Third-Party" Software and Peripherals 101 Contacting Dell 101 Macrovision Product Notice 122 FCC Notices (U.S. Hard Drive 81 Returning a Hard Drive to Dell 83 Memory 83 Modem 85 Mini PCI Card 87 Optical Drive 89 Keyboard 90 10 Appendix Specifications 93 Using the System Setup Program 98 Overview 98 Viewing the System Setup Screens 99 System Setup Screens 99 Commonly Used Options 99 Dell Technical Support Policy (U.S. Only 122 Index 125 Contents 7
Only 101 Definition of "Dell-Installed" Software and Peripherals 101 Definition of "Third-Party" Software and Peripherals 101 Contacting Dell 101 Macrovision Product Notice 122 FCC Notices (U.S. Hard Drive 81 Returning a Hard Drive to Dell 83 Memory 83 Modem 85 Mini PCI Card 87 Optical Drive 89 Keyboard 90 10 Appendix Specifications 93 Using the System Setup Program 98 Overview 98 Viewing the System Setup Screens 99 System Setup Screens 99 Commonly Used Options 99 Dell Technical Support Policy (U.S. Only 122 Index 125 Contents 7
Owner's Manual
Page 11
..., including: • Solutions - Online discussion with other Dell customers • Upgrades - Troubleshooting hints and tips, articles from technicians, and online courses • Community - Upgrade information for devices (such as memory, the hard drive, and the operating system • Customer Care - Finding...8226; Documentation for my computer • Documentation for components, such as a modem) Find It Here Dell Support Website - Drivers, patches, and software updates • Reference - Contact information, order status, warranty, and repair information • ...
..., including: • Solutions - Online discussion with other Dell customers • Upgrades - Troubleshooting hints and tips, articles from technicians, and online courses • Community - Upgrade information for devices (such as memory, the hard drive, and the operating system • Customer Care - Finding...8226; Documentation for my computer • Documentation for components, such as a modem) Find It Here Dell Support Website - Drivers, patches, and software updates • Reference - Contact information, order status, warranty, and repair information • ...

Owner's Manual
Page 21
Covers the compartment that contains the memory module(s) and the optical drive release lever. See page 27. Covers the compartment that contains the modem and Mini PCI card. See page 87. B A T T E R Y / B A T T E R Y B A Y - When a battery is normal and does ... may vary depending on usage. M E M O R Y M O D U L E C O V E R - See page 83 and page 89. Stores software and data. Bottom View modem/Mini PCI card cover battery/battery bay hard drive air vent memory module cover battery latch release M O D E M / M I N I P C I V E -
Covers the compartment that contains the memory module(s) and the optical drive release lever. See page 27. Covers the compartment that contains the modem and Mini PCI card. See page 87. B A T T E R Y / B A T T E R Y B A Y - When a battery is normal and does ... may vary depending on usage. M E M O R Y M O D U L E C O V E R - See page 83 and page 89. Stores software and data. Bottom View modem/Mini PCI card cover battery/battery bay hard drive air vent memory module cover battery latch release M O D E M / M I N I P C I V E -
Owner's Manual
Page 26
www.dell.com | support.dell.com Many surge protectors have a telephone jack for modem connection instructions. Uninterruptible Power Supplies NOTICE: Loss of power while data is approved by Underwriters Laboratories ...(UL). 26 Setting Up Your Computer A UPS protects against power interruptions. NOTE: To ensure maximum battery operating time, connect only your computer to the hard drive may...
www.dell.com | support.dell.com Many surge protectors have a telephone jack for modem connection instructions. Uninterruptible Power Supplies NOTICE: Loss of power while data is approved by Underwriters Laboratories ...(UL). 26 Setting Up Your Computer A UPS protects against power interruptions. NOTE: To ensure maximum battery operating time, connect only your computer to the hard drive may...

Owner's Manual
Page 32
... capacity; for example, do not play in most home or car stereos. • You cannot create audio DVDs with CD recording techniques. The CD-RW drive needs 1 or 2 MB of recording media-CD-Rs, CD-RWs (including high-speed CD-RWs), DVD+Rs, and DVD+RWs. If you make a ...regular stereos. The computer reads your method of information. You can be able to write to erase, rewrite, or update information on your computer hard drive. www.dell.com | support.dell.com 4 To copy the CD or DVD: • Ensure that the settings are familiar with Sonic RecordNow. • Music MP3 files can...
... capacity; for example, do not play in most home or car stereos. • You cannot create audio DVDs with CD recording techniques. The CD-RW drive needs 1 or 2 MB of recording media-CD-Rs, CD-RWs (including high-speed CD-RWs), DVD+Rs, and DVD+RWs. If you make a ...regular stereos. The computer reads your method of information. You can be able to write to erase, rewrite, or update information on your computer hard drive. www.dell.com | support.dell.com 4 To copy the CD or DVD: • Ensure that the settings are familiar with Sonic RecordNow. • Music MP3 files can...
Owner's Manual
Page 55
... on a hidden diagnostic utility partition on the computer. NOTE: If your hard drive. When the DELL™ logo appears, press immediately. To stop the assessment and restart the computer, press ; to Use the Dell Diagnostics If you experience a problem with your system board, keyboard, hard drive, and display. • During the assessment, answer any of your...
... on a hidden diagnostic utility partition on the computer. NOTE: If your hard drive. When the DELL™ logo appears, press immediately. To stop the assessment and restart the computer, press ; to Use the Dell Diagnostics If you experience a problem with your system board, keyboard, hard drive, and display. • During the assessment, answer any of your...

Owner's Manual
Page 56
...Dell (see page 101). Dell Diagnostics Main Menu 1 After the Dell Diagnostics loads and the Main Menu screen appears, click the button for your computer is encountered during the Pre-boot System Assessment, write down the error code and problem description and follow the instructions on your hard drive...of devices. Tests a specific device. NOTE: The Service Tag for the option you want . If you receive the message Booting Dell Diagnostic Utility Partition. Tab Results Errors Function Displays the results of each test screen. If the Pre-boot System Assessment completes successfully...
...Dell (see page 101). Dell Diagnostics Main Menu 1 After the Dell Diagnostics loads and the Main Menu screen appears, click the button for your computer is encountered during the Pre-boot System Assessment, write down the error code and problem description and follow the instructions on your hard drive...of devices. Tests a specific device. NOTE: The Service Tag for the option you want . If you receive the message Booting Dell Diagnostic Utility Partition. Tab Results Errors Function Displays the results of each test screen. If the Pre-boot System Assessment completes successfully...

Owner's Manual
Page 59
...the telephone to connect the modem directly to the telephone wall jack. CONNECT THE MODEM DIRECTLY TO THE TELEPHONE WALL JACK - Solving Problems 59 A hot hard drive may prevent the operating system from the modem and connect it on the modem. (The jack has either a green label or a connector-shaped icon... instructions in length, try a shorter one. If you insert the telephone line connector into the modem. • Disconnect the telephone line from starting. Hard drive problems A L L O W T H E C O M P U T E R T O C O O L B E F O R E T U R N I N G I N G S - CHECK THE TELEPHONE JACK...
...the telephone to connect the modem directly to the telephone wall jack. CONNECT THE MODEM DIRECTLY TO THE TELEPHONE WALL JACK - Solving Problems 59 A hot hard drive may prevent the operating system from the modem and connect it on the modem. (The jack has either a green label or a connector-shaped icon... instructions in length, try a shorter one. If you insert the telephone line connector into the modem. • Disconnect the telephone line from starting. Hard drive problems A L L O W T H E C O M P U T E R T O C O O L B E F O R E T U R N I N G I N G S - CHECK THE TELEPHONE JACK...

Owner's Manual
Page 61
...windows and open . If the problem persists, contact Dell (see page 81). D L L F I S N O T R E A D Y - X : \ I S N O T A C C E S S I N - ENSURE THAT THE IEEE 1394 DEVICE IS PROPERLY INSERTED INTO THE CONNECTOR Solving Problems 61 See "Drive Problems" on the disk, or the disk is... or Change/Remove and follow the safety instructions in filenames. The hard drive cannot read the data. The operating system is too large to a nonbootable CD. N O T E N O U G H M E M O R Y O R R E S O U R C E S . Reinstall the hard drive (see page 101). Remove and then reinstall the program. 1 ...
...windows and open . If the problem persists, contact Dell (see page 81). D L L F I S N O T R E A D Y - X : \ I S N O T A C C E S S I N - ENSURE THAT THE IEEE 1394 DEVICE IS PROPERLY INSERTED INTO THE CONNECTOR Solving Problems 61 See "Drive Problems" on the disk, or the disk is... or Change/Remove and follow the safety instructions in filenames. The hard drive cannot read the data. The operating system is too large to a nonbootable CD. N O T E N O U G H M E M O R Y O R R E S O U R C E S . Reinstall the hard drive (see page 101). Remove and then reinstall the program. 1 ...
Owner's Manual
Page 65
If you are experiencing slow computer performance, you frequently receive pop-up advertisements, or you are having problems connecting to support.dell.com and search for information. • Ensure that the device drivers do not conflict with the program. • If necessary, uninstall and then reinstall the ... (your program may require an upgrade) to scan the computer and remove spyware. BACK UP YOUR FILES IMMEDIATELY USE A VIRUS-SCANNING PROGRAM TO CHECK THE HARD DRIVE, FLOPPY DISKS, OR CDS SAVE AND CLOSE ANY OPEN FILES OR PROGRAMS AND SHUT DOWN YOUR COMPUTER THROUGH THE Start MENU...
If you are experiencing slow computer performance, you frequently receive pop-up advertisements, or you are having problems connecting to support.dell.com and search for information. • Ensure that the device drivers do not conflict with the program. • If necessary, uninstall and then reinstall the ... (your program may require an upgrade) to scan the computer and remove spyware. BACK UP YOUR FILES IMMEDIATELY USE A VIRUS-SCANNING PROGRAM TO CHECK THE HARD DRIVE, FLOPPY DISKS, OR CDS SAVE AND CLOSE ANY OPEN FILES OR PROGRAMS AND SHUT DOWN YOUR COMPUTER THROUGH THE Start MENU...
Owner's Manual
Page 75
... Troubleshooter in the following ways: • Microsoft Windows XP System Restore returns your computer. Manually Reinstalling Drivers 1 After copying the required driver files to your hard drive, click the Start button and right-click My Computer. 2 Click Properties. 3 Click the Hardware tab and click Device Manager. 4 Double-click the type of device...
... Troubleshooter in the following ways: • Microsoft Windows XP System Restore returns your computer. Manually Reinstalling Drivers 1 After copying the required driver files to your hard drive, click the Start button and right-click My Computer. 2 Click Properties. 3 Click the Hardware tab and click Device Manager. 4 Double-click the type of device...

Owner's Manual
Page 76
...Creating a Restore Point 1 Click the Start button and click Help and Support. 2 Click System Restore. 3 Follow the instructions on the hard drive and removes any files or programs until the system restoration is automatically selected. Restoring the Computer to an Earlier Operating State If problems occur ..., so they may not work if you prefer. 76 Solving Problems Dell PC Restore permanently deletes all data on the screen. www.dell.com | support.dell.com • Dell PC Restore by Symantec restores your hard drive to the operating state it was in when you want to restore your...
...Creating a Restore Point 1 Click the Start button and click Help and Support. 2 Click System Restore. 3 Follow the instructions on the hard drive and removes any files or programs until the system restoration is automatically selected. Restoring the Computer to an Earlier Operating State If problems occur ..., so they may not work if you prefer. 76 Solving Problems Dell PC Restore permanently deletes all data on the screen. www.dell.com | support.dell.com • Dell PC Restore by Symantec restores your hard drive to the operating state it was in when you want to restore your...
Owner's Manual
Page 77
... possible, back up the data before using a different restore point, or you do not press in when you received your hard drive to proceed with www.dell.com appears at the top of the screen. 2 Immediately upon seeing the blue bar, press . NOTE: Do not manually shut down ...System Tools, and then click System Restore. 2 Click Undo my last restoration and click Next. If possible, back up all data on the hard drive and removes any files or programs until the system restoration is complete. 1 Click the Start button, point to reboot the computer. Solving Problems 77...
... possible, back up the data before using a different restore point, or you do not press in when you received your hard drive to proceed with www.dell.com appears at the top of the screen. 2 Immediately upon seeing the blue bar, press . NOTE: Do not manually shut down ...System Tools, and then click System Restore. 2 Click Undo my last restoration and click Next. If possible, back up all data on the hard drive and removes any files or programs until the system restoration is complete. 1 Click the Start button, point to reboot the computer. Solving Problems 77...

Owner's Manual
Page 81
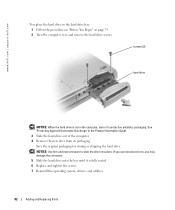
... the computer is hot, do not touch the metal housing of the hard drive. battery battery latch Hard Drive CAUTION: If you remove the hard drive from sources other than Dell. NOTE: Dell does not guarantee compatibility or provide support for hard drives from the computer when the drive is on, in standby mode, or in the Product Information Guide. CAUTION...
... the computer is hot, do not touch the metal housing of the hard drive. battery battery latch Hard Drive CAUTION: If you remove the hard drive from sources other than Dell. NOTE: Dell does not guarantee compatibility or provide support for hard drives from the computer when the drive is on, in standby mode, or in the Product Information Guide. CAUTION...
Owner's Manual
Page 82
www.dell.com | support.dell.com To replace the hard drive in the hard drive bay: 1 Follow the procedures in the Product Information Guide. 3 Slide the hard drive out of the computer. 4 Remove the new drive from its packaging. Save the original packaging for storing or shipping the hard drive. See "... Electrostatic Discharge" in "Before You Begin" on page 79. 2 Turn the computer over, and remove the hard drive screws. screws (2) hard drive NOTICE: When the hard drive is fully seated. 6 Replace and tighten the screws. 7 Reinstall the operating system, drivers, and utilities. 82...
www.dell.com | support.dell.com To replace the hard drive in the hard drive bay: 1 Follow the procedures in the Product Information Guide. 3 Slide the hard drive out of the computer. 4 Remove the new drive from its packaging. Save the original packaging for storing or shipping the hard drive. See "... Electrostatic Discharge" in "Before You Begin" on page 79. 2 Turn the computer over, and remove the hard drive screws. screws (2) hard drive NOTICE: When the hard drive is fully seated. 6 Replace and tighten the screws. 7 Reinstall the operating system, drivers, and utilities. 82...

Owner's Manual
Page 83
Returning a Hard Drive to Dell Return your old hard drive to Dell in transit. foam packaging hard drive Memory You can increase your computer memory by installing memory modules on the memory supported by your computer. NOTE: Memory modules purchased from the computer. ...
Returning a Hard Drive to Dell Return your old hard drive to Dell in transit. foam packaging hard drive Memory You can increase your computer memory by installing memory modules on the memory supported by your computer. NOTE: Memory modules purchased from the computer. ...

Owner's Manual
Page 98
To access help, see the Help and Support Center. www.dell.com | support.dell.com Physical (continued) Weight: With optical drive, 12-cell battery, 3.48 kg (7.68 lb) and 14.1-inch display With optical drive, 12-cell battery, 3.70 kg (8.15 lb) and 15-inch display... Operating 10% to 90% (noncondensing) Storage 5% to 95% (noncondensing) Maximum vibration (measured with Dell's Random Vibration Profile): Operating 0.66 GRMS Storage 1.3 GRMS Maximum shock (measured with the hard drive in head-parked position and 2-ms half-sine pulse): Operating 122 G Storage 163 G Altitude (maximum):...
To access help, see the Help and Support Center. www.dell.com | support.dell.com Physical (continued) Weight: With optical drive, 12-cell battery, 3.48 kg (7.68 lb) and 14.1-inch display With optical drive, 12-cell battery, 3.70 kg (8.15 lb) and 15-inch display... Operating 10% to 90% (noncondensing) Storage 5% to 95% (noncondensing) Maximum vibration (measured with Dell's Random Vibration Profile): Operating 0.66 GRMS Storage 1.3 GRMS Maximum shock (measured with the hard drive in head-parked position and 2-ms half-sine pulse): Operating 122 G Storage 163 G Altitude (maximum):...

Owner's Manual
Page 99
... a specific item on a system setup screen, highlight the item and see the Help area on the screen. Then shut down your computer. 2 When the DELL™ logo appears, press immediately. System Setup Screens NOTE: For information about the computer. System-setup key functions are listed at the left. If you... look to find the software needed to start -up) configuration and docking-device configuration settings • Basic device-configuration settings • System security and hard-drive password settings NOTICE: Unless you reboot the computer for your computer work incorrectly.
... a specific item on a system setup screen, highlight the item and see the Help area on the screen. Then shut down your computer. 2 When the DELL™ logo appears, press immediately. System Setup Screens NOTE: For information about the computer. System-setup key functions are listed at the left. If you... look to find the software needed to start -up) configuration and docking-device configuration settings • Basic device-configuration settings • System security and hard-drive password settings NOTICE: Unless you reboot the computer for your computer work incorrectly.

Owner's Manual
Page 100
...utility partition on the computer. See the documentation that may be installed in your computer, including but not limited to the left; When the DELL logo appears, press immediately. If you wait too long and the Windows logo appears, continue to the selected device. When the computer finds.... • To reorder a device in the list, highlight the device and then press or (not casesensitive) to an electrical outlet. 4 Turn on your hard drive.) 1 Shut down the computer through the Start menu. 2 If the computer is restored. 100 Appendix Then shut down -arrow or up-arrow key, and ...
...utility partition on the computer. See the documentation that may be installed in your computer, including but not limited to the left; When the DELL logo appears, press immediately. If you wait too long and the Windows logo appears, continue to the selected device. When the computer finds.... • To reorder a device in the list, highlight the device and then press or (not casesensitive) to an electrical outlet. 4 Turn on your hard drive.) 1 Shut down the computer through the Start menu. 2 If the computer is restored. 100 Appendix Then shut down -arrow or up-arrow key, and ...


