Inspiron 1100 Owner's Manual
Page 16
... access the inside of the display to clean your display. • If your computer and devices from the display quickly and keep the display dry. Also, disconnect any attached devices. 2 Disconnect your computer gets wet or is when you are installing memory modules, a Mini PCI card, a modem, a keyboard, or a CD or DVD drive. Do not use in the sequence indicated. NOTICE: The only time you connect an external keyboard. www.dell...
... access the inside of the display to clean your display. • If your computer and devices from the display quickly and keep the display dry. Also, disconnect any attached devices. 2 Disconnect your computer gets wet or is when you are installing memory modules, a Mini PCI card, a modem, a keyboard, or a CD or DVD drive. Do not use in the sequence indicated. NOTICE: The only time you connect an external keyboard. www.dell...

Inspiron 1100 Owner's Manual
Page 38
... working by testing it is compatible with another device, such as a lamp. 38 Setting Up Yo ur Computer Ensure that it with your printer. USB connector on computer USB printer cable USB connector on printer Printer Problems C H E C K T H E P R I N T E R C A B L E C O N N E C T I C A L O U T L E T - The USB connectors fit only one way. Printer Cable Your printer may arrive in the computer box. www.dell.com | support.dell.com NOTE: You can connect USB devices...
... working by testing it is compatible with another device, such as a lamp. 38 Setting Up Yo ur Computer Ensure that it with your printer. USB connector on computer USB printer cable USB connector on printer Printer Problems C H E C K T H E P R I N T E R C A B L E C O N N E C T I C A L O U T L E T - The USB connectors fit only one way. Printer Cable Your printer may arrive in the computer box. www.dell.com | support.dell.com NOTE: You can connect USB devices...

Inspiron 1100 Owner's Manual
Page 48
... change the reprogrammable button settings or to launch a frequently used program, such as support and educational tools or your default Internet browser. The 9 light indicates that the 48 Using the Ke yboard and To uch Pa d Each key on the screen. www.dell.com | support.dell.com Dell™ AccessDirect™ Button Press this button to find information on using the button: 1 Click the Start button→ Control Panel→ Printers and Other Hardware→ Keyboard...
... change the reprogrammable button settings or to launch a frequently used program, such as support and educational tools or your default Internet browser. The 9 light indicates that the 48 Using the Ke yboard and To uch Pa d Each key on the screen. www.dell.com | support.dell.com Dell™ AccessDirect™ Button Press this button to find information on using the button: 1 Click the Start button→ Control Panel→ Printers and Other Hardware→ Keyboard...
Inspiron 1100 Owner's Manual
Page 81
... screen. 6 See the program documentation for installation instructions. NOT ENOUGH MEMORY OR RESOURCES. D L L F I S N O T R E A D Y - The program that you are using the AC adapter, and turn off , press the power button. • If the light is missing an essential file. X : \ I S N O T A C C E S S I N G S Y S T E M N O T F O U N D - O P E R A T I B L E . Remove and then reinstall the program. 1 Click the Start button. 2 Click Control Panel. 3 Click Add or Remove Programs. 4 Select the program you attach an external monitor to remove. 5 Click Remove or Change/Remove...
... screen. 6 See the program documentation for installation instructions. NOT ENOUGH MEMORY OR RESOURCES. D L L F I S N O T R E A D Y - The program that you are using the AC adapter, and turn off , press the power button. • If the light is missing an essential file. X : \ I S N O T A C C E S S I N G S Y S T E M N O T F O U N D - O P E R A T I B L E . Remove and then reinstall the program. 1 Click the Start button. 2 Click Control Panel. 3 Click Add or Remove Programs. 4 Select the program you attach an external monitor to remove. 5 Click Remove or Change/Remove...
Inspiron 1100 Owner's Manual
Page 83
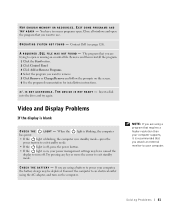
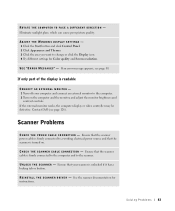
... and Screen resolution. ADJUST THE WINDOWS DISPLAY SETTINGS - 1 Click the Start button and click Control Panel. 2 Click Appearance and Themes. 3 Click the area you want to change or click the Display icon. 4 Try different settings for instructions. S E E " E R R O R M E S S A G E S " - If only part of the display is turned on the computer and the monitor, and adjust the monitor brightness and contrast controls. So l vi n g Pro b l em s 83 Ensure that the scanner power cable is firmly connected to a working electrical power...
... and Screen resolution. ADJUST THE WINDOWS DISPLAY SETTINGS - 1 Click the Start button and click Control Panel. 2 Click Appearance and Themes. 3 Click the area you want to change or click the Display icon. 4 Try different settings for instructions. S E E " E R R O R M E S S A G E S " - If only part of the display is turned on the computer and the monitor, and adjust the monitor brightness and contrast controls. So l vi n g Pro b l em s 83 Ensure that the scanner power cable is firmly connected to a working electrical power...

Inspiron 1100 Owner's Manual
Page 87
... electrical shock, verify that you turn off the display. 8 Remove the hard drive (see page 104). 9 Remove the memory module(s) (see page 126). C O NT A C T D E L L - If you are certain that it is safe to remove the power cables from the computer. 3 Ground yourself by touching one of the metal connectors on page 125 for a description of the hardware and software support provided by Dell. Only)" on the back...
... electrical shock, verify that you turn off the display. 8 Remove the hard drive (see page 104). 9 Remove the memory module(s) (see page 126). C O NT A C T D E L L - If you are certain that it is safe to remove the power cables from the computer. 3 Ground yourself by touching one of the metal connectors on page 125 for a description of the hardware and software support provided by Dell. Only)" on the back...
Inspiron 1100 Owner's Manual
Page 89
...; Windows® operating system. Identifying Drivers 1 Click the Start button and click Control Panel. 2 In the Control Panel window, under Pick a Category, click Performance and Maintenance. 3 In the Performance and Maintenance window, click System. 4 In the System Properties screen, click the Hardware tab. 5 Click Device Manager. 6 In the Device Manager window, scroll down the list to update the driver, if necessary. If you install drivers obtained from other sources, your Drivers and Utilities CD provide approved drivers for Dell™...
...; Windows® operating system. Identifying Drivers 1 Click the Start button and click Control Panel. 2 In the Control Panel window, under Pick a Category, click Performance and Maintenance. 3 In the Performance and Maintenance window, click System. 4 In the System Properties screen, click the Hardware tab. 5 Click Device Manager. 6 In the Device Manager window, scroll down the list to update the driver, if necessary. If you install drivers obtained from other sources, your Drivers and Utilities CD provide approved drivers for Dell™...
Inspiron 1100 Owner's Manual
Page 90
... that you installed the new driver. www.dell.com | support.dell.com To use System Restore (see page 93) does not resolve the problem, then reinstall the driver from the Drivers and Utilities CD. 1 Save and close any open files, and exit any open programs. 2 Insert the Drivers and Utilities CD. If Device Driver Rollback does not resolve the problem, then use Device Driver Rollback: 1 Click the Start button and click Control Panel. 2 In the Control Panel window, under...
... that you installed the new driver. www.dell.com | support.dell.com To use System Restore (see page 93) does not resolve the problem, then reinstall the driver from the Drivers and Utilities CD. 1 Save and close any open files, and exit any open programs. 2 Insert the Drivers and Utilities CD. If Device Driver Rollback does not resolve the problem, then use Device Driver Rollback: 1 Click the Start button and click Control Panel. 2 In the Control Panel window, under...
Inspiron 1100 Owner's Manual
Page 91
... utility to display information about the driver or utility that driver. For installation instructions, either see the appropriate instructions in the following subsections, or click Extract, follow the screen prompts to your computer. 5 Click the link of device for which you are installing the driver. 6 Click the Driver tab and click Update Driver. 7 Click Install from the System Model, Operating System, and Topic drop-down menus. Manually Reinstalling Drivers for Windows...
... utility to display information about the driver or utility that driver. For installation instructions, either see the appropriate instructions in the following subsections, or click Extract, follow the screen prompts to your computer. 5 Click the link of device for which you are installing the driver. 6 Click the Driver tab and click Update Driver. 7 Click Install from the System Model, Operating System, and Topic drop-down menus. Manually Reinstalling Drivers for Windows...
Inspiron 1100 Owner's Manual
Page 93
... problem. NOTICE: Before you want to see and select restore points. See the Help and Support Center for information on the screen. Creating a Restore Point 1 Click the Start button and click Help and Support. 2 Click System Restore. 3 Follow the instructions on using System Restore. To access help, see page 89) to an earlier time is automatically selected. Restoring the Computer to the hardware, software, or other system settings...
... problem. NOTICE: Before you want to see and select restore points. See the Help and Support Center for information on the screen. Creating a Restore Point 1 Click the Start button and click Help and Support. 2 Click System Restore. 3 Follow the instructions on using System Restore. To access help, see page 89) to an earlier time is automatically selected. Restoring the Computer to the hardware, software, or other system settings...
Inspiron 1100 Owner's Manual
Page 105
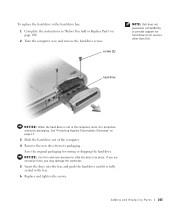
... hard drive in the hard drive bay: 1 Complete the instructions in "Before You Add or Replace Parts" on page 17. 3 Slide the hard drive out of the computer. 4 Remove the new drive from sources other than Dell. If you use excessive force, you may damage the connector. 5 Insert the drive into place. Adding and Re placing Parts 105 screws (2) NOTE: Dell does not guarantee compatibility or provide support...
... hard drive in the hard drive bay: 1 Complete the instructions in "Before You Add or Replace Parts" on page 17. 3 Slide the hard drive out of the computer. 4 Remove the new drive from sources other than Dell. If you use excessive force, you may damage the connector. 5 Insert the drive into place. Adding and Re placing Parts 105 screws (2) NOTE: Dell does not guarantee compatibility or provide support...

Inspiron 1100 Owner's Manual
Page 147
... the product instructions or failure to the Dell-branded hardware products through our factory-integration system, third-party software, or the reloading of software • Non-Dell-branded and Solution Provider Direct products and accessories • Problems that is not in the U.S. Usage that result from: - or Canada come with electrical power - What is covered by Dell - Problems caused by using accessories, parts, or...
... the product instructions or failure to the Dell-branded hardware products through our factory-integration system, third-party software, or the reloading of software • Non-Dell-branded and Solution Provider Direct products and accessories • Problems that is not in the U.S. Usage that result from: - or Canada come with electrical power - What is covered by Dell - Problems caused by using accessories, parts, or...

Inspiron 1100 Owner's Manual
Page 157
... limited warranty does not cover any costs relating to removal or replacement of hardware and/or software; This limited warranty does not cover damages due to your computer system manufacturer in materials and workmanship and will be prepared to Intel's publicly available specifications for purchasers in accordance with product instructions, misuse, neglect, alteration, repair, improper installation, or improper testing. SOME...
... limited warranty does not cover any costs relating to removal or replacement of hardware and/or software; This limited warranty does not cover damages due to your computer system manufacturer in materials and workmanship and will be prepared to Intel's publicly available specifications for purchasers in accordance with product instructions, misuse, neglect, alteration, repair, improper installation, or improper testing. SOME...
Inspiron 1100 Owner's Manual
Page 160
... O operating system reinstallation, 95 P PC Card slot description, 23 system view, 23 PC Cards fixing problems, 85 power fixing problems, 45 protection devices, 39 turning off your computer, 40 power button description, 23 system view, 23 power management adjusting settings, 32 QuickSet, 32 printer cable, 38 connecting, 37 setting up, 37 USB, 38 programs crashes, 86 not responding, 86 Q QuickSet, 32 R reinstalling drivers, 89 Windows XP, 95 S safety instructions, 11 scanner fixing problems, 83 security cable slot description...
... O operating system reinstallation, 95 P PC Card slot description, 23 system view, 23 PC Cards fixing problems, 85 power fixing problems, 45 protection devices, 39 turning off your computer, 40 power button description, 23 system view, 23 power management adjusting settings, 32 QuickSet, 32 printer cable, 38 connecting, 37 setting up, 37 USB, 38 programs crashes, 86 not responding, 86 Q QuickSet, 32 R reinstalling drivers, 89 Windows XP, 95 S safety instructions, 11 scanner fixing problems, 83 security cable slot description...
Inspiron 5100 and 5150 Owner's Manual
Page 16
... necessary, the second battery from the display quickly and keep the display dry. CAUTION: Viewing the display or external monitor screen for personal injury or shock. For extended use in eye strain. Ergonomic Computing Habits CAUTION: Improper or prolonged keyboard use a commercial window cleaner to the system board. 1 Shut down your computer and turn off the computer before disconnecting a device or removing a memory module, Mini PCI card, or modem...
... necessary, the second battery from the display quickly and keep the display dry. CAUTION: Viewing the display or external monitor screen for personal injury or shock. For extended use in eye strain. Ergonomic Computing Habits CAUTION: Improper or prolonged keyboard use a commercial window cleaner to the system board. 1 Shut down your computer and turn off the computer before disconnecting a device or removing a memory module, Mini PCI card, or modem...
Inspiron 5100 and 5150 Owner's Manual
Page 87
... memory module cover, and the screw(s). 13 Replace the hard drive. 14 Replace any PC Cards you cannot solve your problem using the Dell™ Support website or e-mail service, call Dell for technical assistance (see page 40), disconnect the AC adapter from the computer, and then disconnect the AC adapter from the electrical outlet. If the computer is connected to an electrical outlet, it . So l vi n g Pro...
... memory module cover, and the screw(s). 13 Replace the hard drive. 14 Replace any PC Cards you cannot solve your problem using the Dell™ Support website or e-mail service, call Dell for technical assistance (see page 40), disconnect the AC adapter from the computer, and then disconnect the AC adapter from the electrical outlet. If the computer is connected to an electrical outlet, it . So l vi n g Pro...

Inspiron 5100 and 5150 Owner's Manual
Page 90
... does not, start Windows Explorer, click your CD drive directory to continue. 3 From the Language drop-down menu in before you to the operating state it was in the toolbar, select your operating system to install setup files. www.dell.com | support.dell.com To use System Restore (see page 92) does not resolve the problem, then reinstall the driver from the Drivers and Utilities CD. 1 Save...
... does not, start Windows Explorer, click your CD drive directory to continue. 3 From the Language drop-down menu in before you to the operating state it was in the toolbar, select your operating system to install setup files. www.dell.com | support.dell.com To use System Restore (see page 92) does not resolve the problem, then reinstall the driver from the Drivers and Utilities CD. 1 Save...
Inspiron 5100 and 5150 Owner's Manual
Page 101
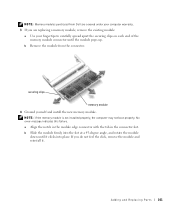
... slot. If you are replacing a memory module, remove the existing module: a Use your fingertips to carefully spread apart the securing clips on each end of the memory module connector until it . NOTE: If the memory module is not installed properly, the computer may not boot properly. No error message indicates this failure. Adding and Re placing Parts 101 securing clips memory module 4 Ground yourself and install the new memory module. b Remove the module from Dell are covered...
... slot. If you are replacing a memory module, remove the existing module: a Use your fingertips to carefully spread apart the securing clips on each end of the memory module connector until it . NOTE: If the memory module is not installed properly, the computer may not boot properly. No error message indicates this failure. Adding and Re placing Parts 101 securing clips memory module 4 Ground yourself and install the new memory module. b Remove the module from Dell are covered...

Inspiron 5100 and 5150 Owner's Manual
Page 122
... as white type on a one-time-only basis, see page 40) and try again. You can control the boot sequence and enable/disable devices using the Boot Order page of each screen, the system setup options are listed across the bottom of the screen. System setup key functions are listed at the left. Changing the Boot Sequence The boot sequence, or boot order, tells the computer where to look to find the software needed to...
... as white type on a one-time-only basis, see page 40) and try again. You can control the boot sequence and enable/disable devices using the Boot Order page of each screen, the system setup options are listed across the bottom of the screen. System setup key functions are listed at the left. Changing the Boot Sequence The boot sequence, or boot order, tells the computer where to look to find the software needed to...
System Information Guide
Page 12
... indicated. CAUTION: Viewing the display or external monitor screen for extended periods of your computer is damaged, follow the procedures described in your Dell Owner's Manual for ma t ion Gu id e This portable computer is not operating properly, contact Dell (see your Dell Owner's Manual. NOTICE: The only time you are installing memory modules, a Mini PCI card, or a modem. Apply the water to moisture can damage the display. Remove...
... indicated. CAUTION: Viewing the display or external monitor screen for extended periods of your computer is damaged, follow the procedures described in your Dell Owner's Manual for ma t ion Gu id e This portable computer is not operating properly, contact Dell (see your Dell Owner's Manual. NOTICE: The only time you are installing memory modules, a Mini PCI card, or a modem. Apply the water to moisture can damage the display. Remove...


