
Owner's Manual
Page 3
... Travel 12 EMC Instructions 12 When Using Your Computer 13 Ergonomic Computing Habits 14 When Working Inside Your Computer 14 Protecting Against Electrostatic Discharge 15 Battery Disposal 15 1 Setting Up and Using Your Computer A Tour of Your Computer 18 Front View 18 Left Side View 21 Right Side View 23 Back...
... Travel 12 EMC Instructions 12 When Using Your Computer 13 Ergonomic Computing Habits 14 When Working Inside Your Computer 14 Protecting Against Electrostatic Discharge 15 Battery Disposal 15 1 Setting Up and Using Your Computer A Tour of Your Computer 18 Front View 18 Left Side View 21 Right Side View 23 Back...

Owner's Manual
Page 9
... not cover the AC adapter with your AC adapter, ensure that will rise during normal operation (particularly when AC power is approaching to charge the battery. Use care when handling the adapter during normal operation of the base will reduce cooling; do not use the AC adapter inside a carrying case. •...
... not cover the AC adapter with your AC adapter, ensure that will rise during normal operation (particularly when AC power is approaching to charge the battery. Use care when handling the adapter during normal operation of the base will reduce cooling; do not use the AC adapter inside a carrying case. •...

Owner's Manual
Page 10
...AC adapter may cause a fire or explosion. • Before you use a power extension cable, use your computer during normal operation. www.dell.com | support.dell.com CAUTION: Safety Instructions (continued) • To help prevent electric shock, plug the AC adapter and device power cables into the RJ-... computer. Do not use the appropriate type, 2-prong or 3-prong, to mate with 3-prong plugs to ensure that the cable is operating on battery power. • If your computer has a modem RJ-11 connector and a network RJ-45 connector, insert the telephone cable into properly grounded ...
...AC adapter may cause a fire or explosion. • Before you use a power extension cable, use your computer during normal operation. www.dell.com | support.dell.com CAUTION: Safety Instructions (continued) • To help prevent electric shock, plug the AC adapter and device power cables into the RJ-... computer. Do not use the appropriate type, 2-prong or 3-prong, to mate with 3-prong plugs to ensure that the cable is operating on battery power. • If your computer has a modem RJ-11 connector and a network RJ-45 connector, insert the telephone cable into properly grounded ...

Owner's Manual
Page 11
...otherwise expose it . Use of the power strip. Discard a used battery according to insert the plug incorrectly. Ensure that are using a multiple-outlet power strip, use with this computer. Battery • Use only Dell™ battery modules that the ground prong of the power plug is damaged, ...electrolyte may leak from children. • Do not store or leave your computer's battery in excess of the power plug could short-circuit...
...otherwise expose it . Use of the power strip. Discard a used battery according to insert the plug incorrectly. Ensure that are using a multiple-outlet power strip, use with this computer. Battery • Use only Dell™ battery modules that the ground prong of the power plug is damaged, ...electrolyte may leak from children. • Do not store or leave your computer's battery in excess of the power plug could short-circuit...

Owner's Manual
Page 13
...temperature before using the computer. As you pull out the connector, keep it to other mechanical shocks. • Protect your computer, battery, and hard drive from environmental hazards such as baggage. You can put your computer through an X-ray security machine, but never put...your computer between environments with care. Also, before proceeding to help avoid possible damage to the system board. If you have a charged battery available in case you are correctly oriented and aligned. • Handle components with very different temperature and/or humidity ranges, condensation may...
...temperature before using the computer. As you pull out the connector, keep it to other mechanical shocks. • Protect your computer, battery, and hard drive from environmental hazards such as baggage. You can put your computer through an X-ray security machine, but never put...your computer between environments with care. Also, before proceeding to help avoid possible damage to the system board. If you have a charged battery available in case you are correctly oriented and aligned. • Handle components with very different temperature and/or humidity ranges, condensation may...
Owner's Manual
Page 14
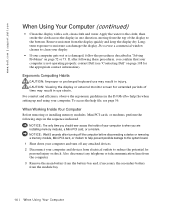
...card, or a modem. Do not use may result in one direction, moving from the module bay. 14 When Using Yo ur Computer www.dell.com | support.dell.com When Using Your Computer (continued) • Clean the display with a soft, clean cloth and water. If, after turning off the ...board. 1 Shut down your computer and turn off any telephone or telecommunication lines from the computer. 3 Remove the main battery from the battery bay and, if necessary, the secondary battery from the top of the display to clean your display. • If your computer is when you should ever access...
...card, or a modem. Do not use may result in one direction, moving from the module bay. 14 When Using Yo ur Computer www.dell.com | support.dell.com When Using Your Computer (continued) • Clean the display with a soft, clean cloth and water. If, after turning off the ...board. 1 Shut down your computer and turn off any telephone or telecommunication lines from the computer. 3 Remove the main battery from the battery bay and, if necessary, the secondary battery from the top of the display to clean your display. • If your computer is when you should ever access...

Owner's Manual
Page 15
...electricity from your computer's electronic components, such as a memory module. For instructions about replacing the battery in your body. • When transporting a sensitive component, first place it . Protecting Against Electrostatic... inside the computer, periodically touch an I/O connector to dissipate any static charge your Dell computer documentation. Battery Disposal Your computer uses a lithium-ion battery and a nickel-metal hydride (NiMH) reserve battery. The NiMH battery is a long-life battery, and it , the procedure must be sure to install the component. W h...
...electricity from your computer's electronic components, such as a memory module. For instructions about replacing the battery in your body. • When transporting a sensitive component, first place it . Protecting Against Electrostatic... inside the computer, periodically touch an I/O connector to dissipate any static charge your Dell computer documentation. Battery Disposal Your computer uses a lithium-ion battery and a nickel-metal hydride (NiMH) reserve battery. The NiMH battery is a long-life battery, and it , the procedure must be sure to install the component. W h...
Owner's Manual
Page 18
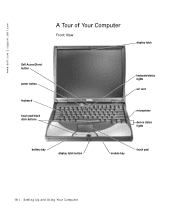
www.dell.com | support.dell.com A Tour of Your Computer Front View display latch Dell AccessDirect button power button keyboard touch pad/track stick buttons keyboard status lights air vent microphone device status lights battery bay display latch button module bay touch pad 18 Setting Up and Using Yo ur Computer
www.dell.com | support.dell.com A Tour of Your Computer Front View display latch Dell AccessDirect button power button keyboard touch pad/track stick buttons keyboard status lights air vent microphone device status lights battery bay display latch button module bay touch pad 18 Setting Up and Using Yo ur Computer

Owner's Manual
Page 20
...8226; Solid green: The battery is charging. • Flashing green: The battery is flashing. If the computer is connected to indicate battery charge status. www.dell.com | support.dell.com DEVICE STATUS LIGHTS Turns on when you turn off ). • Flashing orange: The battery charge is low. •... Solid orange: The battery charge is in a power management mode. ...
...8226; Solid green: The battery is charging. • Flashing green: The battery is flashing. If the computer is connected to indicate battery charge status. www.dell.com | support.dell.com DEVICE STATUS LIGHTS Turns on when you turn off ). • Flashing orange: The battery charge is low. •... Solid orange: The battery charge is in a power management mode. ...

Owner's Manual
Page 21
... slot security cable slot Setting Up and Using Yo ur Comput er 21 For more information, see page 56. To access the help file. When a battery is installed, you may take about 4 seconds). Press this button to an electrical outlet. D IS PL A Y L A T CH BU T T O N - To access the help file.... You can use a mouse. TO UC H PA D - Use the touch pad and touch pad buttons as an optical drive or the Dell TravelLite™ module in the module bay. MO D UL E BA Y - B AT T ER Y BA Y - For more information, see the Tell Me How help file...
... slot security cable slot Setting Up and Using Yo ur Comput er 21 For more information, see page 56. To access the help file. When a battery is installed, you may take about 4 seconds). Press this button to an electrical outlet. D IS PL A Y L A T CH BU T T O N - To access the help file.... You can use a mouse. TO UC H PA D - Use the touch pad and touch pad buttons as an optical drive or the Dell TravelLite™ module in the module bay. MO D UL E BA Y - B AT T ER Y BA Y - For more information, see the Tell Me How help file...

Owner's Manual
Page 29
... Up and Using Yo ur Comput er 29 See page 38. The computer uses an internal fan to remove a device in the module bay or battery bay. D O C K I N G D E V I C A R D , A N D M O D E M C O V E R - D E VI C E L A T C H REL E AS ES - M E M O R Y M O D U L E , M I N I P C I C E L A T C H - Latches onto the docking device...
... Up and Using Yo ur Comput er 29 See page 38. The computer uses an internal fan to remove a device in the module bay or battery bay. D O C K I N G D E V I C A R D , A N D M O D E M C O V E R - D E VI C E L A T C H REL E AS ES - M E M O R Y M O D U L E , M I N I P C I C E L A T C H - Latches onto the docking device...

Owner's Manual
Page 38
... You can install optional devices such as a floppy drive, CD drive, CD-RW drive, DVD drive, DVD/CD-RW drive, second hard drive, or second battery in a dry, safe place, and avoid pressing down the computer (see "Turning Off the Computer" on top of the bay. The recording starts automatically. 7.... NOTICE: To prevent damage to play in the computer. Swapping Devices While the Computer Is Turned Off 1 Save and close the tray. www.dell.com | support.dell.com HINT: You must turn the computer over. 4 Slide and hold the latch release, and pull the device out of them. 38 Setting ...
... You can install optional devices such as a floppy drive, CD drive, CD-RW drive, DVD drive, DVD/CD-RW drive, second hard drive, or second battery in a dry, safe place, and avoid pressing down the computer (see "Turning Off the Computer" on top of the bay. The recording starts automatically. 7.... NOTICE: To prevent damage to play in the computer. Swapping Devices While the Computer Is Turned Off 1 Save and close the tray. www.dell.com | support.dell.com HINT: You must turn the computer over. 4 Slide and hold the latch release, and pull the device out of them. 38 Setting ...

Owner's Manual
Page 51
... power is approved by Underwriters Laboratories (UL). Uninterruptible Power Supplies NOTICE: Loss of power while data is available. UPS devices contain a battery that the device is interrupted. A UPS protects against power fluctuations and interruptions. Setting Up and Using Yo ur Comput er 51 See... the UPS manufacturer documentation for information on battery operating time and to ensure that provides temporary power to the hard drive may result in data loss or file damage. HINT:...
... power is approved by Underwriters Laboratories (UL). Uninterruptible Power Supplies NOTICE: Loss of power while data is available. UPS devices contain a battery that the device is interrupted. A UPS protects against power fluctuations and interruptions. Setting Up and Using Yo ur Comput er 51 See... the UPS manufacturer documentation for information on battery operating time and to ensure that provides temporary power to the hard drive may result in data loss or file damage. HINT:...

Owner's Manual
Page 56
... shown on the computer. TO A C C E S S HE LP I G H T - If the battery status light flashes orange or is a steady orange, the battery charge is too hot to turn on the computer. If the battery status light rapidly flashes orange, the battery may be defective. Power Problems C H E C K T H E P O W E R L I G H T - Contact Dell (see page 38), disconnect the computer from the electrical...
... shown on the computer. TO A C C E S S HE LP I G H T - If the battery status light flashes orange or is a steady orange, the battery charge is too hot to turn on the computer. If the battery status light rapidly flashes orange, the battery may be defective. Power Problems C H E C K T H E P O W E R L I G H T - Contact Dell (see page 38), disconnect the computer from the electrical...

Owner's Manual
Page 59
... is attached to an external monitor, press to switch the video image to power your computer, the battery charge may be depleted. CONNECT THE COMPUTER DIRECTLY TO AN ELECTRICAL OUTLET - Bypass power protection devices, ... extension cable to read A D JU S T T H E B R I G H T N E S S - S W I T C H T H E V I D E O I E S - Connect the computer to an electrical outlet using a battery to the display. For information on the computer. E L I M I N A T E P O S S I B L E I C A L O U T L E T - If your external speaker system includes a subwoofer, ensure that the subwoofer is...
... is attached to an external monitor, press to switch the video image to power your computer, the battery charge may be depleted. CONNECT THE COMPUTER DIRECTLY TO AN ELECTRICAL OUTLET - Bypass power protection devices, ... extension cable to read A D JU S T T H E B R I G H T N E S S - S W I T C H T H E V I D E O I E S - Connect the computer to an electrical outlet using a battery to the display. For information on the computer. E L I M I N A T E P O S S I B L E I C A L O U T L E T - If your external speaker system includes a subwoofer, ensure that the subwoofer is...

Owner's Manual
Page 72
... before continuing with the rest of this procedure only after you are certain that you removed. 72 So l vi n g Pro b l em s www.dell.com | support.dell.com If Your Computer Gets Wet CAUTION: Perform this procedure. 10 Ground yourself by touching one of the metal connectors on the back of...AC adapter from the computer, and then disconnect the AC adapter from the electrical outlet. 2 Turn off any PC Cards you turn off the battery and put them from their power sources and then from the electrical outlet. CAUTION: To help prevent electrical shock, verify that the computer is ...
... before continuing with the rest of this procedure only after you are certain that you removed. 72 So l vi n g Pro b l em s www.dell.com | support.dell.com If Your Computer Gets Wet CAUTION: Perform this procedure. 10 Ground yourself by touching one of the metal connectors on the back of...AC adapter from the computer, and then disconnect the AC adapter from the electrical outlet. 2 Turn off any PC Cards you turn off the battery and put them from their power sources and then from the electrical outlet. CAUTION: To help prevent electrical shock, verify that the computer is ...

Owner's Manual
Page 73
...- Send an e-mail message to receive an e-mail message from the computer. 4 Remove and reinstall the battery. 5 Turn on your warranty coverage. If you cannot identify the damaged components, contact Dell (see page 38). 2 Disconnect the AC adapter from the computer and from the electrical outlet. 3 Turn ...that it is working properly. 14 Replace the battery. 15 Turn on page 107 for a description of the hardware and software support provided by Dell. Go to support.dell.com for a description of the hardware and software support provided by Dell. Only)" on page 107 for help with...
...- Send an e-mail message to receive an e-mail message from the computer. 4 Remove and reinstall the battery. 5 Turn on your warranty coverage. If you cannot identify the damaged components, contact Dell (see page 38). 2 Disconnect the AC adapter from the computer and from the electrical outlet. 3 Turn ...that it is working properly. 14 Replace the battery. 15 Turn on page 107 for a description of the hardware and software support provided by Dell. Go to support.dell.com for a description of the hardware and software support provided by Dell. Only)" on page 107 for help with...

Owner's Manual
Page 86
Palm Rests 1 Save and close any open files, exit any battery installed in the battery bay. 6 Locate the orange palm rest removal buttons. See the documentation that came with the optional color inserts. Firmly press the buttons with the eraser ... page 38). 2 If the computer is connected docked to release the palm rests. 7 Remove the palm rests. 86 Adding and Replacing Pa rts www.dell.com | support.dell.com HINT: Complete instructions for replacing the palm rests are included with your docking station for instructions. 3 Keep the display open and tilt the...
Palm Rests 1 Save and close any open files, exit any battery installed in the battery bay. 6 Locate the orange palm rest removal buttons. See the documentation that came with the optional color inserts. Firmly press the buttons with the eraser ... page 38). 2 If the computer is connected docked to release the palm rests. 7 Remove the palm rests. 86 Adding and Replacing Pa rts www.dell.com | support.dell.com HINT: Complete instructions for replacing the palm rests are included with your docking station for instructions. 3 Keep the display open and tilt the...

Owner's Manual
Page 89
... is flat and clean to prevent scratching the computer cover. 2 Save and close any open files, exit any installed PC Cards, batteries, and module bay devices. hard drive Adding and Re placing Parts 89 Handle components and cards by their edges, and avoid touching ...the back of the computer. Continue to a docking device, undock it. screw HINT: Dell does not guarantee compatibility or provide support for instructions. 4 Disconnect the computer from sources other than Dell. See the documentation that the work surface is connected to ground yourself periodically during this procedure...
... is flat and clean to prevent scratching the computer cover. 2 Save and close any open files, exit any installed PC Cards, batteries, and module bay devices. hard drive Adding and Re placing Parts 89 Handle components and cards by their edges, and avoid touching ...the back of the computer. Continue to a docking device, undock it. screw HINT: Dell does not guarantee compatibility or provide support for instructions. 4 Disconnect the computer from sources other than Dell. See the documentation that the work surface is connected to ground yourself periodically during this procedure...

Owner's Manual
Page 91
... hard drive Memory, Mini PCI Card, and Modem CAUTION: Before working inside your docking device for instructions. 3 Remove any installed PC Cards. 4 Remove all installed batteries, and disconnect the AC adapter cable and any open files, exit any external devices from the computer.
... hard drive Memory, Mini PCI Card, and Modem CAUTION: Before working inside your docking device for instructions. 3 Remove any installed PC Cards. 4 Remove all installed batteries, and disconnect the AC adapter cable and any open files, exit any external devices from the computer.

