
Handling swollen Lithium-ion batteries
Page 1
.... ● Using a non-Dell or incompatible battery may impact the performance of the battery. ● Do not bend the battery. ● Do not use lithium-ion batteries. To discharge the battery, unplug the AC adapter from Dell. 1 When the system will no longer power on battery power. or its subsidiaries. Replace the battery only with a compatible battery purchased from the system...
.... ● Using a non-Dell or incompatible battery may impact the performance of the battery. ● Do not bend the battery. ● Do not use lithium-ion batteries. To discharge the battery, unplug the AC adapter from Dell. 1 When the system will no longer power on battery power. or its subsidiaries. Replace the battery only with a compatible battery purchased from the system...
Service Manual
Page 3
... cover...21 Prerequisites...21 Procedure...21 Procedure...22 9 Replacing the base cover...25 For computers shipped without optical drive...25 Procedure ...26 Post-requisites...27 10 Removing the battery...28 Lithium-ion battery precautions...28 Prerequisites...28 Procedure...28 11 Replacing the battery...30 Lithium-ion battery precautions...30 Procedure ...30 Post-requisites...31 12 Removing...
... cover...21 Prerequisites...21 Procedure...21 Procedure...22 9 Replacing the base cover...25 For computers shipped without optical drive...25 Procedure ...26 Post-requisites...27 10 Removing the battery...28 Lithium-ion battery precautions...28 Prerequisites...28 Procedure...28 11 Replacing the battery...30 Lithium-ion battery precautions...30 Procedure ...30 Post-requisites...31 12 Removing...
Service Manual
Page 4
... connector board 39 Procedure ...39 Post-requisites...39 18 Removing the coin-cell battery...40 Prerequisites...40 Procedure...40 For computers shipped without optical drive...40 19 Replacing the coin-cell battery...42 Procedure...42 For computers shipped without optical drive...42 Post-requisites...43 20... Removing the solid-state drive/Intel Optane memory module 44 Prerequisites...44 Procedure...44 21 Replacing the solid-state drive/Intel ...
... connector board 39 Procedure ...39 Post-requisites...39 18 Removing the coin-cell battery...40 Prerequisites...40 Procedure...40 For computers shipped without optical drive...40 19 Replacing the coin-cell battery...42 Procedure...42 For computers shipped without optical drive...42 Post-requisites...43 20... Removing the solid-state drive/Intel Optane memory module 44 Prerequisites...44 Procedure...44 21 Replacing the solid-state drive/Intel ...
Service Manual
Page 15
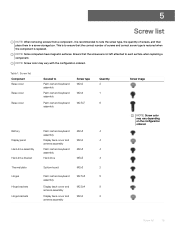
...to Palm rest and keyboard assembly Palm rest and keyboard assembly Palm rest and keyboard assembly Screw type M2x2 M2x4 M2.5x7 Quantity 2 1 6 Battery Palm rest and keyboard M2x3 4 assembly Display panel Display back-cover and M2x2 4 antenna assembly Hard-drive assembly Palm rest and keyboard M2x3 ... ordered. This is recommended to note the screw type, the quantity of screws and correct screw type is restored when the component is replaced. Table 1. 5 Screw list NOTE: When removing screws from a component, it is to ensure that the screws are not left attached to...
...to Palm rest and keyboard assembly Palm rest and keyboard assembly Palm rest and keyboard assembly Screw type M2x2 M2x4 M2.5x7 Quantity 2 1 6 Battery Palm rest and keyboard M2x3 4 assembly Display panel Display back-cover and M2x2 4 antenna assembly Hard-drive assembly Palm rest and keyboard M2x3 ... ordered. This is recommended to note the screw type, the quantity of screws and correct screw type is restored when the component is replaced. Table 1. 5 Screw list NOTE: When removing screws from a component, it is to ensure that the screws are not left attached to...
Service Manual
Page 25
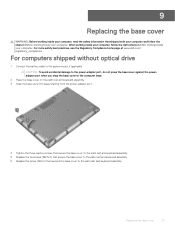
...Replacing the base cover WARNING: Before working inside your computer, read the safety information that secures the base cover to the system board, if applicable. After working inside your computer, follow the steps in After working inside your computer. For computers shipped without optical drive 1 Connect the battery... 5 Replace the six screws (M2.5x7) that secure the base cover to the palm rest and keyboard assembly. 6 Replace the screw... (M2x4) that shipped with your computer and follow the instructions in Before working inside your computer. Replacing the ...
...Replacing the base cover WARNING: Before working inside your computer, read the safety information that secures the base cover to the system board, if applicable. After working inside your computer, follow the steps in After working inside your computer. For computers shipped without optical drive 1 Connect the battery... 5 Replace the six screws (M2.5x7) that secure the base cover to the palm rest and keyboard assembly. 6 Replace the screw... (M2x4) that shipped with your computer and follow the instructions in Before working inside your computer. Replacing the ...
Service Manual
Page 26
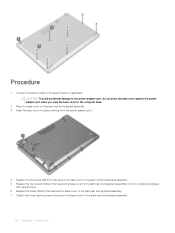
Procedure 1 Connect the battery cable to the palm rest and keyboard assembly. 26 Replacing the base cover CAUTION: To avoid accidental damage to the power-adapter port, do not press the base cover against the poweradapter port when you ... two screws (M2x2) that secure the base cover to the palm rest and keyboard assembly. (Only for computers shipped with optical drive) 6 Replace the screw (M2x4) that secures the base cover to the palm rest and keyboard assembly. 7 Tighten the three captive screws that secure the base cover ...
Procedure 1 Connect the battery cable to the palm rest and keyboard assembly. 26 Replacing the base cover CAUTION: To avoid accidental damage to the power-adapter port, do not press the base cover against the poweradapter port when you ... two screws (M2x2) that secure the base cover to the palm rest and keyboard assembly. (Only for computers shipped with optical drive) 6 Replace the screw (M2x4) that secures the base cover to the palm rest and keyboard assembly. 7 Tighten the three captive screws that secure the base cover ...
Service Manual
Page 28
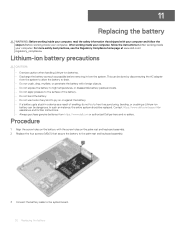
... inside your computer, follow the steps in After working inside your computer. Contact https://www.dell.com/support for assistance and further instructions. • Always purchase genuine batteries from the system. This can be dangerous. Procedure 1 Remove the four screws (M2x3) ...battery packs and cells. • Do not apply pressure to the surface of the battery. • Do not bend the battery. • Do not use tools of any kind to pry on or against the battery. • If a battery gets stuck in a device as puncturing, bending, or crushing a Lithium-ion battery can be replaced...
... inside your computer, follow the steps in After working inside your computer. Contact https://www.dell.com/support for assistance and further instructions. • Always purchase genuine batteries from the system. This can be dangerous. Procedure 1 Remove the four screws (M2x3) ...battery packs and cells. • Do not apply pressure to the surface of the battery. • Do not bend the battery. • Do not use tools of any kind to pry on or against the battery. • If a battery gets stuck in a device as puncturing, bending, or crushing a Lithium-ion battery can be replaced...
Service Manual
Page 30
... of swelling, do not try to the system board. 30 Replacing the battery This can be replaced. Procedure 1 Align the screw holes on the battery with the screw holes on the palm rest and keyboard assembly. 2 Replace the four screws (M2x3) that shipped with foreign objects. •... practices, see the Regulatory Compliance home page at www.dell.com/ regulatory_compliance. Contact https://www.dell.com/support for assistance and further instructions. • Always purchase genuine batteries from https://www.dell.com or authorized Dell partners and re-sellers. In such an instance, the...
... of swelling, do not try to the system board. 30 Replacing the battery This can be replaced. Procedure 1 Align the screw holes on the battery with the screw holes on the palm rest and keyboard assembly. 2 Replace the four screws (M2x3) that shipped with foreign objects. •... practices, see the Regulatory Compliance home page at www.dell.com/ regulatory_compliance. Contact https://www.dell.com/support for assistance and further instructions. • Always purchase genuine batteries from https://www.dell.com or authorized Dell partners and re-sellers. In such an instance, the...
Service Manual
Page 31
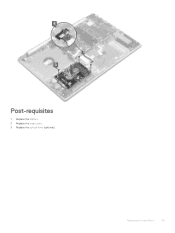
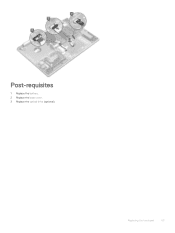
Replacing the battery 31 Post-requisites 1 Replace the base cover. 2 Replace the optical drive (optional).
Replacing the battery 31 Post-requisites 1 Replace the base cover. 2 Replace the optical drive (optional).
Service Manual
Page 42
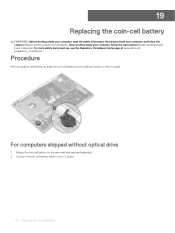
... on the palm rest and keyboard assembly. 2 Connect the coin-cell battery cable to the I /O board. For more safety best practices, see the Regulatory Compliance home page at www.dell.com/ regulatory_compliance. 19 Replacing the coin-cell battery WARNING: Before working inside your computer, read the safety information that shipped with your computer and...
... on the palm rest and keyboard assembly. 2 Connect the coin-cell battery cable to the I /O board. For more safety best practices, see the Regulatory Compliance home page at www.dell.com/ regulatory_compliance. 19 Replacing the coin-cell battery WARNING: Before working inside your computer, read the safety information that shipped with your computer and...
Service Manual
Page 43
Replacing the coin-cell battery 43 Post-requisites 1 Replace the base cover. 2 Replace the optical drive (optional).
Replacing the coin-cell battery 43 Post-requisites 1 Replace the base cover. 2 Replace the optical drive (optional).
Service Manual
Page 49
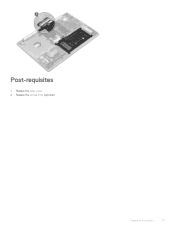
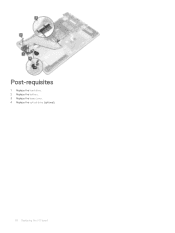
Replacing the hard drive 49 Post-requisites 1 Replace the battery. 2 Replace the base cover. 3 Replace the optical drive (optional).
Replacing the hard drive 49 Post-requisites 1 Replace the battery. 2 Replace the base cover. 3 Replace the optical drive (optional).
Service Manual
Page 53
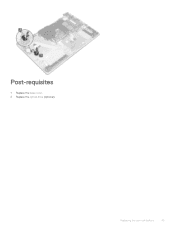
Post-requisites 1 Replace the battery. 2 Replace the base cover. 3 Replace the optical drive (optional). Replacing the touchpad 53
Post-requisites 1 Replace the battery. 2 Replace the base cover. 3 Replace the optical drive (optional). Replacing the touchpad 53
Service Manual
Page 67
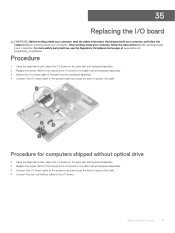
...more safety best practices, see the Regulatory Compliance home page at www.dell.com/ regulatory_compliance. Procedure for computers shipped without optical drive 1 Using the alignment posts, place the I/O board on the palm rest and keyboard assembly. 2 Replace the screw (M2x4) that secures the I/O board to the palm ...Connect the I/O-board cable to the system board and close the latch to secure the cable. 4 Connect the coin-cell battery cable to secure the cable. Replacing the I/O board 67 Procedure 1 Using the alignment posts, place the I/O board on the palm rest and keyboard assembly...
...more safety best practices, see the Regulatory Compliance home page at www.dell.com/ regulatory_compliance. Procedure for computers shipped without optical drive 1 Using the alignment posts, place the I/O board on the palm rest and keyboard assembly. 2 Replace the screw (M2x4) that secures the I/O board to the palm ...Connect the I/O-board cable to the system board and close the latch to secure the cable. 4 Connect the coin-cell battery cable to secure the cable. Replacing the I/O board 67 Procedure 1 Using the alignment posts, place the I/O board on the palm rest and keyboard assembly...
Service Manual
Page 68
Post-requisites 1 Replace the hard drive. 2 Replace the battery. 3 Replace the base cover. 4 Replace the optical drive (optional). 68 Replacing the I/O board
Post-requisites 1 Replace the hard drive. 2 Replace the battery. 3 Replace the base cover. 4 Replace the optical drive (optional). 68 Replacing the I/O board
Service Manual
Page 73
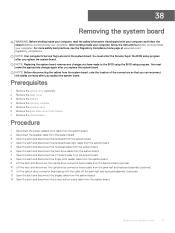
...and follow the instructions in Before working inside your computer. Prerequisites 1 Remove the optical drive (optional). 2 Remove the base cover. 3 Remove the battery. 4 Remove the memory modules. 5 Remove the wireless card. 6 Remove the solid-state drive/Intel Optane. 7 Remove the thermal plate. After..., read the safety information that you can reconnect the cables correctly after you replace the system board. For more safety best practices, see the Regulatory Compliance home page at www.dell.com/ regulatory_compliance. Removing the system board 73 NOTE: Your computer's Service Tag...
...and follow the instructions in Before working inside your computer. Prerequisites 1 Remove the optical drive (optional). 2 Remove the base cover. 3 Remove the battery. 4 Remove the memory modules. 5 Remove the wireless card. 6 Remove the solid-state drive/Intel Optane. 7 Remove the thermal plate. After..., read the safety information that you can reconnect the cables correctly after you replace the system board. For more safety best practices, see the Regulatory Compliance home page at www.dell.com/ regulatory_compliance. Removing the system board 73 NOTE: Your computer's Service Tag...
Service Manual
Page 78
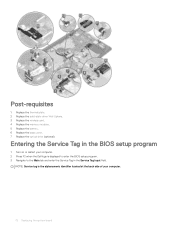
...Input field. NOTE: Service tag is the alphanumeric identifier located at the back side of your computer. 2 Press F2 when the Dell logo is displayed to enter the BIOS setup program. 3 Navigate to the Main tab and enter the Service Tag in the BIOS... setup program 1 Turn on or restart your computer. 78 Replacing the system board Post-requisites 1 Replace the thermal plate. 2 Replace the solid-state drive/Intel Optane. 3 Replace the wireless card. 4 Replace the memory modules. 5 Replace the battery. 6 Replace the base cover. 7 Replace the optical drive (optional).
...Input field. NOTE: Service tag is the alphanumeric identifier located at the back side of your computer. 2 Press F2 when the Dell logo is displayed to enter the BIOS setup program. 3 Navigate to the Main tab and enter the Service Tag in the BIOS... setup program 1 Turn on or restart your computer. 78 Replacing the system board Post-requisites 1 Replace the thermal plate. 2 Replace the solid-state drive/Intel Optane. 3 Replace the wireless card. 4 Replace the memory modules. 5 Replace the battery. 6 Replace the base cover. 7 Replace the optical drive (optional).
Service Manual
Page 81
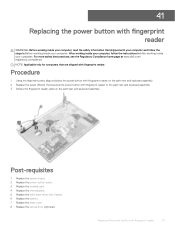
...follow the steps in After working inside your computer. Replacing the power button with fingerprint reader to the palm ... on the palm rest and keyboard assembly. 2 Replace the screw (M2x2) that secures the power button with fingerprint reader 81 41 Replacing the power button with fingerprint reader WARNING: Before...reader. Post-requisites 1 Replace the system board. 2 Replace the power-button board. 3 Replace the wireless card. 4 Replace the thermal plate. 5 Replace the solid-state drive/Intel Optane. 6 Replace the battery. 7 Replace the base cover. 8 Replace the optical drive (...
...follow the steps in After working inside your computer. Replacing the power button with fingerprint reader to the palm ... on the palm rest and keyboard assembly. 2 Replace the screw (M2x2) that secures the power button with fingerprint reader 81 41 Replacing the power button with fingerprint reader WARNING: Before...reader. Post-requisites 1 Replace the system board. 2 Replace the power-button board. 3 Replace the wireless card. 4 Replace the thermal plate. 5 Replace the solid-state drive/Intel Optane. 6 Replace the battery. 7 Replace the base cover. 8 Replace the optical drive (...
Service Manual
Page 85
10 Replace the wireless card. 11 Replace the solid-state drive/Intel Optane. 12 Replace the thermal plate. 13 Replace the optical-drive connector board (optional). 14 Replace the battery. 15 Replace the base cover. 16 Replace the optical drive (optional). Replacing the palm-rest and keyboard assembly 85
10 Replace the wireless card. 11 Replace the solid-state drive/Intel Optane. 12 Replace the thermal plate. 13 Replace the optical-drive connector board (optional). 14 Replace the battery. 15 Replace the base cover. 16 Replace the optical drive (optional). Replacing the palm-rest and keyboard assembly 85
Service Manual
Page 107
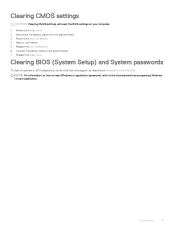
...computer. 1 Remove the base cover. 2 Disconnect the battery cable from the system board. 3 Remove the coin-cell battery. 4 Wait for one minute. 5 Replace the coin-cell battery. 6 Connect the battery cable to the system board. 7 Replace the base cover. Clearing BIOS (System Setup) and System... passwords To clear the system or BIOS passwords, contact Dell technical support as described at www.dell.com/contactdell...
...computer. 1 Remove the base cover. 2 Disconnect the battery cable from the system board. 3 Remove the coin-cell battery. 4 Wait for one minute. 5 Replace the coin-cell battery. 6 Connect the battery cable to the system board. 7 Replace the base cover. Clearing BIOS (System Setup) and System... passwords To clear the system or BIOS passwords, contact Dell technical support as described at www.dell.com/contactdell...


