
Handling swollen Lithium-ion batteries
Page 1
... impact the performance of the applicable warranty or service contract, including options for swelling of the battery cells Swollen battery may be returned to Dell in the electronics industry due to reassemble a damaged or swollen battery into a notebook PC. ● Swollen batteries should be replaced and disposed of fire or explosion. Handling swollen Lithium-ion...
... impact the performance of the applicable warranty or service contract, including options for swelling of the battery cells Swollen battery may be returned to Dell in the electronics industry due to reassemble a damaged or swollen battery into a notebook PC. ● Swollen batteries should be replaced and disposed of fire or explosion. Handling swollen Lithium-ion...

Handling swollen Lithium-ion batteries
Page 2
Lithium-ion batteries can swell for various reasons such as age, number of charge cycles, or exposure to minimize the possibility of occurrence of the laptop battery and to high heat. Frequently Asked Questions. 2 For more information on how to improve the performance and lifespan of the issue, see Dell Laptop Battery -
Lithium-ion batteries can swell for various reasons such as age, number of charge cycles, or exposure to minimize the possibility of occurrence of the laptop battery and to high heat. Frequently Asked Questions. 2 For more information on how to improve the performance and lifespan of the issue, see Dell Laptop Battery -
Setup and Specifications
Page 3
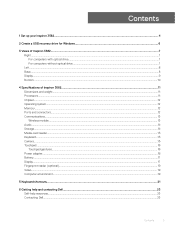
...Inspiron 3582...11 Dimensions and weight...11 Processors...11 Chipset...12 Operating system...12 Memory...12 Ports and connectors...12 Communications...13 Wireless module...13 Audio...14 Storage...14 Media-card reader...15 Keyboard...15 Camera...15 Touchpad...16 Touchpad gestures...16 Power adapter...16 Battery......17 Display...17 Fingerprint reader (optional)...19 Video...19 Computer environment...19 5 Keyboard shortcuts...21 6 Getting help and contacting Dell...23 Self-help resources...23 Contacting...
...Inspiron 3582...11 Dimensions and weight...11 Processors...11 Chipset...12 Operating system...12 Memory...12 Ports and connectors...12 Communications...13 Wireless module...13 Audio...14 Storage...14 Media-card reader...15 Keyboard...15 Camera...15 Touchpad...16 Touchpad gestures...16 Power adapter...16 Battery......17 Display...17 Fingerprint reader (optional)...19 Video...19 Computer environment...19 5 Keyboard shortcuts...21 6 Getting help and contacting Dell...23 Self-help resources...23 Contacting...
Setup and Specifications
Page 4
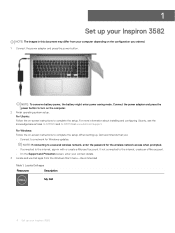
...to the internet, sign-in this document may differ from the Windows Start menu-Recommended Table 1. NOTE: To conserve battery power, the battery might enter power saving mode. For more information about installing and configuring Ubuntu, see the knowledge base articles SLN151664 and... instructions to the internet, create an offline account. • On the Support and Protection screen, enter your Inspiron 3582 Locate Dell apps Resources Description My Dell 4 Set up , Dell recommends that you ordered. 1 Connect the power adapter and press the power button. For Windows: Follow the ...
...to the internet, sign-in this document may differ from the Windows Start menu-Recommended Table 1. NOTE: To conserve battery power, the battery might enter power saving mode. For more information about installing and configuring Ubuntu, see the knowledge base articles SLN151664 and... instructions to the internet, create an offline account. • On the Support and Protection screen, enter your Inspiron 3582 Locate Dell apps Resources Description My Dell 4 Set up , Dell recommends that you ordered. 1 Connect the power adapter and press the power button. For Windows: Follow the ...
Setup and Specifications
Page 17
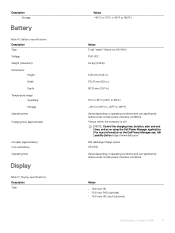
For more information on the Dell Power Manager see, Me and My Dell on https://www.dell.com/ 300 discharge/charge cycles CR-2032 Varies depending on operating conditions and can significantly reduce under certain power-intensive ...power-intensive conditions. Values • 15.6-inch HD • 15.6-inch FHD (optional) • 15.6-inch HD touch (optional) Specifications of Inspiron 3582 17 Battery specifications Description Type Voltage Weight (maximum) Dimensions: Height Width Depth Temperature range: Operating Storage Operating time Charging time (approximate) Life span (approximate)...
For more information on the Dell Power Manager see, Me and My Dell on https://www.dell.com/ 300 discharge/charge cycles CR-2032 Varies depending on operating conditions and can significantly reduce under certain power-intensive ...power-intensive conditions. Values • 15.6-inch HD • 15.6-inch FHD (optional) • 15.6-inch HD touch (optional) Specifications of Inspiron 3582 17 Battery specifications Description Type Voltage Weight (maximum) Dimensions: Height Width Depth Temperature range: Operating Storage Operating time Charging time (approximate) Life span (approximate)...
Setup and Specifications
Page 22
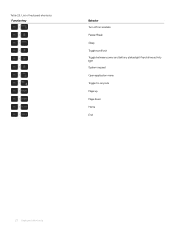
List of keyboard shortcuts Function key Behavior Turn off/on wireless Pause/Break Sleep Toggle scroll lock Toggle between power and battery-status light/hard-drive activity light System request Open application menu Toggle Fn-key lock Page up Page down Home End 22 Keyboard shortcuts Table 23.
List of keyboard shortcuts Function key Behavior Turn off/on wireless Pause/Break Sleep Toggle scroll lock Toggle between power and battery-status light/hard-drive activity light System request Open application menu Toggle Fn-key lock Page up Page down Home End 22 Keyboard shortcuts Table 23.
Service Manual
Page 3
......22 9 Replacing the base cover...25 For computers shipped without optical drive...25 Procedure ...26 Post-requisites...27 10 Removing the battery...28 Lithium-ion battery precautions...28 Prerequisites...28 Procedure...28 11 Replacing the battery...30 Lithium-ion battery precautions...30 Procedure ...30 Post-requisites...31 12 Removing the memory modules...32 Contents 3
......22 9 Replacing the base cover...25 For computers shipped without optical drive...25 Procedure ...26 Post-requisites...27 10 Removing the battery...28 Lithium-ion battery precautions...28 Prerequisites...28 Procedure...28 11 Replacing the battery...30 Lithium-ion battery precautions...30 Procedure ...30 Post-requisites...31 12 Removing the memory modules...32 Contents 3
Service Manual
Page 4
... the optical-drive connector board 39 Procedure ...39 Post-requisites...39 18 Removing the coin-cell battery...40 Prerequisites...40 Procedure...40 For computers shipped without optical drive...40 19 Replacing the coin-cell battery...42 Procedure...42 For computers shipped without optical drive...42 Post-requisites...43 20 Removing the solid...
... the optical-drive connector board 39 Procedure ...39 Post-requisites...39 18 Removing the coin-cell battery...40 Prerequisites...40 Procedure...40 For computers shipped without optical drive...40 19 Replacing the coin-cell battery...42 Procedure...42 For computers shipped without optical drive...42 Post-requisites...43 20 Removing the solid...
Service Manual
Page 15
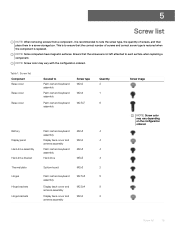
... is recommended to Palm rest and keyboard assembly Palm rest and keyboard assembly Palm rest and keyboard assembly Screw type M2x2 M2x4 M2.5x7 Quantity 2 1 6 Battery Palm rest and keyboard M2x3 4 assembly Display panel Display back-cover and M2x2 4 antenna assembly Hard-drive assembly Palm rest and keyboard M2x3 4 assembly Hard...
... is recommended to Palm rest and keyboard assembly Palm rest and keyboard assembly Palm rest and keyboard assembly Screw type M2x2 M2x4 M2.5x7 Quantity 2 1 6 Battery Palm rest and keyboard M2x3 4 assembly Display panel Display back-cover and M2x2 4 antenna assembly Hard-drive assembly Palm rest and keyboard M2x3 4 assembly Hard...
Service Manual
Page 22
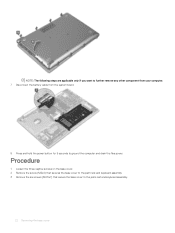
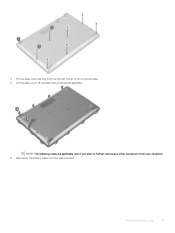
NOTE: The following steps are applicable only if you want to further remove any other component from your computer. 7 Disconnect the battery cable from the system board. 8 Press and hold the power button for 5 seconds to the palm rest and keyboard assembly. 22 Removing the base cover Procedure 1 Loosen the three captive screws on the base cover. 2 Remove the screw (M2x4) that secures the base cover to the palm rest and keyboard assembly. 3 Remove the six screws (M2.5x7) that secure the base cover to ground the computer and drain the flea power.
NOTE: The following steps are applicable only if you want to further remove any other component from your computer. 7 Disconnect the battery cable from the system board. 8 Press and hold the power button for 5 seconds to the palm rest and keyboard assembly. 22 Removing the base cover Procedure 1 Loosen the three captive screws on the base cover. 2 Remove the screw (M2x4) that secures the base cover to the palm rest and keyboard assembly. 3 Remove the six screws (M2.5x7) that secure the base cover to ground the computer and drain the flea power.
Service Manual
Page 23
NOTE: The following steps are applicable only if you want to further remove any other component from your computer. 6 Disconnect the battery cable from the top-left corner of the computer base. 5 Lift the base cover off the palm rest and keyboard assembly. Removing the base cover 23 4 Pry the base cover starting from the system board.
NOTE: The following steps are applicable only if you want to further remove any other component from your computer. 6 Disconnect the battery cable from the top-left corner of the computer base. 5 Lift the base cover off the palm rest and keyboard assembly. Removing the base cover 23 4 Pry the base cover starting from the system board.
Service Manual
Page 25
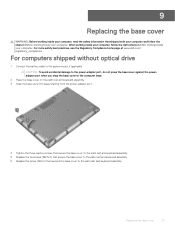
...the safety information that secures the base cover to the palm rest and keyboard assembly. For computers shipped without optical drive 1 Connect the battery cable to the palm rest and keyboard assembly. 6 Replace the screw (M2x4) that shipped with your computer and follow the instructions in ..., follow the steps in After working inside your computer. For more safety best practices, see the Regulatory Compliance home page at www.dell.com/ regulatory_compliance. CAUTION: To avoid accidental damage to the power-adapter port, do not press the base cover against the poweradapter port...
...the safety information that secures the base cover to the palm rest and keyboard assembly. For computers shipped without optical drive 1 Connect the battery cable to the palm rest and keyboard assembly. 6 Replace the screw (M2x4) that shipped with your computer and follow the instructions in ..., follow the steps in After working inside your computer. For more safety best practices, see the Regulatory Compliance home page at www.dell.com/ regulatory_compliance. CAUTION: To avoid accidental damage to the power-adapter port, do not press the base cover against the poweradapter port...
Service Manual
Page 26
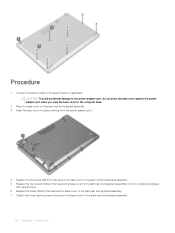
Procedure 1 Connect the battery cable to the palm rest and keyboard assembly. 26 Replacing the base cover CAUTION: To avoid accidental damage to the power-adapter port, do not ...
Procedure 1 Connect the battery cable to the palm rest and keyboard assembly. 26 Replacing the base cover CAUTION: To avoid accidental damage to the power-adapter port, do not ...
Service Manual
Page 28
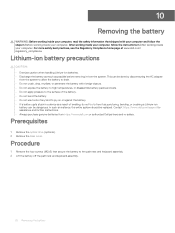
...see the Regulatory Compliance home page at www.dell.com/ regulatory_compliance. This can be replaced. Procedure 1 Remove the four screws (M2x3) that shipped with foreign objects. • Do not expose the battery to high temperatures, or disassemble battery packs and cells. • Do not apply...the base cover. 10 Removing the battery WARNING: Before working inside your computer, read the safety information that secure the battery to free it from the system. In such an instance, the entire system should be dangerous. Contact https://www.dell.com/support for assistance and further...
...see the Regulatory Compliance home page at www.dell.com/ regulatory_compliance. This can be replaced. Procedure 1 Remove the four screws (M2x3) that shipped with foreign objects. • Do not expose the battery to high temperatures, or disassemble battery packs and cells. • Do not apply...the base cover. 10 Removing the battery WARNING: Before working inside your computer, read the safety information that secure the battery to free it from the system. In such an instance, the entire system should be dangerous. Contact https://www.dell.com/support for assistance and further...
Service Manual
Page 29
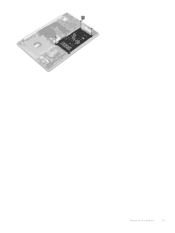
Removing the battery 29
Removing the battery 29
Service Manual
Page 30
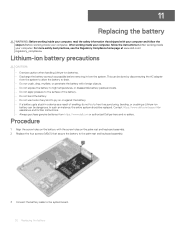
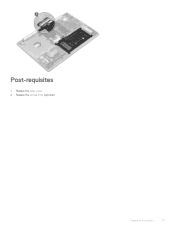
...instance, the entire system should be done by disconnecting the AC adapter from https://www.dell.com or authorized Dell partners and re-sellers. Procedure 1 Align the screw holes on the battery with the screw holes on the palm rest and keyboard assembly. 2 Replace the four ... drop, mutilate, or penetrate the battery with your computer. Contact https://www.dell.com/support for assistance and further instructions. • Always purchase genuine batteries from the system to allow the battery to pry on or against the battery. • If a battery gets stuck in After working inside your...
...instance, the entire system should be done by disconnecting the AC adapter from https://www.dell.com or authorized Dell partners and re-sellers. Procedure 1 Align the screw holes on the battery with the screw holes on the palm rest and keyboard assembly. 2 Replace the four ... drop, mutilate, or penetrate the battery with your computer. Contact https://www.dell.com/support for assistance and further instructions. • Always purchase genuine batteries from the system to allow the battery to pry on or against the battery. • If a battery gets stuck in After working inside your...
Service Manual
Page 31
Post-requisites 1 Replace the base cover. 2 Replace the optical drive (optional). Replacing the battery 31
Post-requisites 1 Replace the base cover. 2 Replace the optical drive (optional). Replacing the battery 31
Service Manual
Page 40
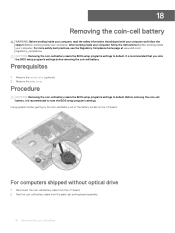
... Compliance home page at www.dell.com/ regulatory_compliance. Prerequisites 1 Remove the optical drive (optional). 2 Remove the base cover. CAUTION: Removing the coin-cell battery resets the BIOS setup program's settings to default. Before removing the coin-cell battery, it is recommended that shipped.... After working inside your computer, follow the steps in After working inside your computer. Procedure CAUTION: Removing the coin-cell battery resets the BIOS setup program's settings to default. It is recommended to note the BIOS setup program's settings. For computers ...
... Compliance home page at www.dell.com/ regulatory_compliance. Prerequisites 1 Remove the optical drive (optional). 2 Remove the base cover. CAUTION: Removing the coin-cell battery resets the BIOS setup program's settings to default. Before removing the coin-cell battery, it is recommended that shipped.... After working inside your computer, follow the steps in After working inside your computer. Procedure CAUTION: Removing the coin-cell battery resets the BIOS setup program's settings to default. It is recommended to note the BIOS setup program's settings. For computers ...
Service Manual
Page 41
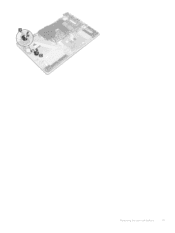
Removing the coin-cell battery 41
Removing the coin-cell battery 41
Service Manual
Page 42
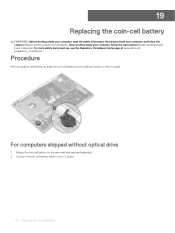
...Replacing the coin-cell battery WARNING: Before working inside your computer, read the safety information that shipped with your computer and follow the instructions in Before working inside your computer. For more safety best practices, see the Regulatory Compliance home page at www.dell.com/ regulatory_compliance. For ...computers shipped without optical drive 1 Adhere the coin-cell battery on the I /O board. 42 Replacing the coin-cell...
...Replacing the coin-cell battery WARNING: Before working inside your computer, read the safety information that shipped with your computer and follow the instructions in Before working inside your computer. For more safety best practices, see the Regulatory Compliance home page at www.dell.com/ regulatory_compliance. For ...computers shipped without optical drive 1 Adhere the coin-cell battery on the I /O board. 42 Replacing the coin-cell...

