
Solutions Guide
Page 14
... when setting up and using your computer gets wet or is not operating properly, contact Dell (see page 50. Also, disconnect any attached devices. 2 Disconnect your computer is damaged, follow the procedures described in injury. When Working Inside Your Computer Before removing or installing memory modules, Mini PCI cards, or modems, perform the following these procedures, you connect an external monitor and an external keyboard. Remove moisture...
... when setting up and using your computer gets wet or is not operating properly, contact Dell (see page 50. Also, disconnect any attached devices. 2 Disconnect your computer is damaged, follow the procedures described in injury. When Working Inside Your Computer Before removing or installing memory modules, Mini PCI cards, or modems, perform the following these procedures, you connect an external monitor and an external keyboard. Remove moisture...
Solutions Guide
Page 26
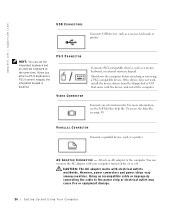
... disabled. PS/2 CONNECTOR VIDEO CONNECTOR Connects PS/2-compatible devices, such as a printer. If the device does not work, install the device drivers from the floppy disk or CD that came with electrical outlets worldwide. PARALLEL CONNECTOR Connects a parallel device, such as a mouse, keyboard, or external numeric keypad. Attach an AC adapter to the power strip or electrical outlet may cause fire or equipment damage. 26 Setting Up and Using...
... disabled. PS/2 CONNECTOR VIDEO CONNECTOR Connects PS/2-compatible devices, such as a printer. If the device does not work, install the device drivers from the floppy disk or CD that came with electrical outlets worldwide. PARALLEL CONNECTOR Connects a parallel device, such as a mouse, keyboard, or external numeric keypad. Attach an AC adapter to the power strip or electrical outlet may cause fire or equipment damage. 26 Setting Up and Using...
Solutions Guide
Page 29
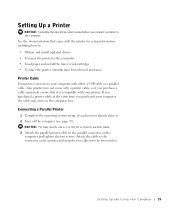
... shorter parallel cable. 3 Attach the parallel printer cable to the connector on the computer and tighten the two screws. Setting Up and Using Yo ur Comput er 29 See the documentation that it is compatible with either a USB cable or a parallel cable. Setting Up a Printer NOTICE: Complete the operating system setup before you have not already done so. 2 Turn off the...
... shorter parallel cable. 3 Attach the parallel printer cable to the connector on the computer and tighten the two screws. Setting Up and Using Yo ur Comput er 29 See the documentation that it is compatible with either a USB cable or a parallel cable. Setting Up a Printer NOTICE: Complete the operating system setup before you have not already done so. 2 Turn off the...

Solutions Guide
Page 30
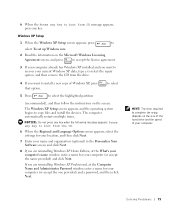
... | support.dell.com parallel connector on computer screws (2) parallel printer cable connector on printer clips (2) notches (2) HINT: You can connect USB devices while the computer is turned on. 4 Turn on the printer and then turn on the computer and the printer. If the Add New Hardware Wizard window appears, click Cancel. 5 Install the printer driver if necessary. The USB connectors fit only one way. 30 Setting...
... | support.dell.com parallel connector on computer screws (2) parallel printer cable connector on printer clips (2) notches (2) HINT: You can connect USB devices while the computer is turned on. 4 Turn on the printer and then turn on the computer and the printer. If the Add New Hardware Wizard window appears, click Cancel. 5 Install the printer driver if necessary. The USB connectors fit only one way. 30 Setting...

Solutions Guide
Page 40
... on the keypad has multiple functions. www.dell.com | support.dell.com Numeric Keypad numeric keypad HINT: When you connect an external PS/2 keyboard or PS/2 keypad to the computer, the integrated keypad is active. . Each key on an external keyboard. To use the other function of a dual-function key when the numeric keypad is enabled, press and the desired key. The keypad numbers and symbols are marked...
... on the keypad has multiple functions. www.dell.com | support.dell.com Numeric Keypad numeric keypad HINT: When you connect an external PS/2 keyboard or PS/2 keypad to the computer, the integrated keypad is active. . Each key on an external keyboard. To use the other function of a dual-function key when the numeric keypad is enabled, press and the desired key. The keypad numbers and symbols are marked...

Solutions Guide
Page 65
... hard drive (see page 85). 8 Remove the memory module (see page 79). 9 Open the display and place the computer right-side up across two books or similar props to let air circulate all around it. If Work Offline has a check mark next to it, click the check mark to remove it is safe to remove the power cables from the electrical outlet. Contact your Internet service...
... hard drive (see page 85). 8 Remove the memory module (see page 79). 9 Open the display and place the computer right-side up across two books or similar props to let air circulate all around it. If Work Offline has a check mark next to it, click the check mark to remove it is safe to remove the power cables from the electrical outlet. Contact your Internet service...

Solutions Guide
Page 72
... new restore point in the Restore point description field. You can create them manually. Manually Creating the Restore Points 1 Click the Start button, point to an Earlier Operating State If problems occur after installing a device driver, first try using Device Driver Rollback (see page 69). The present date and time are logged on the System Restore Wizard window. NOTICE: Before restoring the computer to an earlier operating state, save and close all open...
... new restore point in the Restore point description field. You can create them manually. Manually Creating the Restore Points 1 Click the Start button, point to an Earlier Operating State If problems occur after installing a device driver, first try using Device Driver Rollback (see page 69). The present date and time are logged on the System Restore Wizard window. NOTICE: Before restoring the computer to an earlier operating state, save and close all open...
Solutions Guide
Page 75
...'s name window, enter a name for your current Windows XP data, type r to select the repair option, and then remove the CD from the drive. 4 If you want to complete the setup depends on the screen. So l vi n g Pro b l em s 75 6 When the Press any key. The Windows XP Setup screen appears, and the operating system begins to recover your computer (or accept the one provided) and a password, and...
...'s name window, enter a name for your current Windows XP data, type r to select the repair option, and then remove the CD from the drive. 4 If you want to complete the setup depends on the screen. So l vi n g Pro b l em s 75 6 When the Press any key. The Windows XP Setup screen appears, and the operating system begins to recover your computer (or accept the one provided) and a password, and...

Solutions Guide
Page 80
... and Replacing Pa rts No error message indicates this failure. 7 Ground yourself and install the new memory module: a Align the notch in the module with the slot in the center of the memory module connector. securing clips memory module HINT: If the memory module is not installed properly, the computer does not boot. If you hear a click. www.dell.com | support.dell.com NOTICE: To prevent damage to the memory module connector...
... and Replacing Pa rts No error message indicates this failure. 7 Ground yourself and install the new memory module: a Align the notch in the module with the slot in the center of the memory module connector. securing clips memory module HINT: If the memory module is not installed properly, the computer does not boot. If you hear a click. www.dell.com | support.dell.com NOTICE: To prevent damage to the memory module connector...
Solutions Guide
Page 97
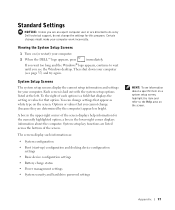
... a field that appear as : • System configuration • Boot (start-up) configuration and docking device configuration settings • Basic device configuration settings • Battery charge status • Power management settings • System security and hard drive password settings HINT: To see information about the computer. The screens display such information as white type on the screen. To the right of each option is laid out with the system setup options listed at the left. A box in the...
... a field that appear as : • System configuration • Boot (start-up) configuration and docking device configuration settings • Basic device configuration settings • Battery charge status • Power management settings • System security and hard drive password settings HINT: To see information about the computer. The screens display such information as white type on the screen. To the right of each option is laid out with the system setup options listed at the left. A box in the...
Solutions Guide
Page 109
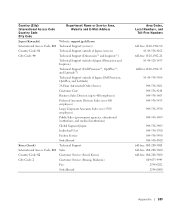
... Japan (Kawasaki) Website: support.jp.dell.com International Access Code: 001 Technical Support (servers) Country Code: 81 Technical Support outside of Japan (servers) City Code: 44 Technical Support (Dimension™ and Inspiron™) Technical Support outside of Japan (Dimension and Inspiron) Technical Support (Dell Precision™, OptiPlex™, and Latitude™) Technical Support outside of Japan (Dell Precision, OptiPlex, and Latitude) 24-Hour Automated Order Service Customer Care Business...
... Japan (Kawasaki) Website: support.jp.dell.com International Access Code: 001 Technical Support (servers) Country Code: 81 Technical Support outside of Japan (servers) City Code: 44 Technical Support (Dimension™ and Inspiron™) Technical Support outside of Japan (Dimension and Inspiron) Technical Support (Dell Precision™, OptiPlex™, and Latitude™) Technical Support outside of Japan (Dell Precision, OptiPlex, and Latitude) 24-Hour Automated Order Service Customer Care Business...
Solutions Guide
Page 119
... Dell-branded hardware products through our factory-integration system, third-party software, or the reloading of software • Non-Dell-branded products and accessories • Problems that accompanied your -our end-user customer's-Dellbranded hardware products, including Dell-branded peripheral products, such as accident, abuse, misuse, or problems with electrical power - DELL'S RESPONSIBILITY FOR MALFUNCITONS AND DEFECTS IN HARDWARE IS LIMITED TO REPAIR AND REPLACEMENT AS SET...
... Dell-branded hardware products through our factory-integration system, third-party software, or the reloading of software • Non-Dell-branded products and accessories • Problems that accompanied your -our end-user customer's-Dellbranded hardware products, including Dell-branded peripheral products, such as accident, abuse, misuse, or problems with electrical power - DELL'S RESPONSIBILITY FOR MALFUNCITONS AND DEFECTS IN HARDWARE IS LIMITED TO REPAIR AND REPLACEMENT AS SET...

Solutions Guide
Page 123
... Authorization Number. Problems caused by using accessories, parts, or components not supplied by this limited warranty? You must obtain a Credit Return Authorization Number in the original shipment, prepay shipping charges, and insure the shipment or accept the risk of the date that is not in your-our end-user customer's-Dellbranded hardware products, including Dell-branded monitors, keyboards, wireless access points, and pointing devices...
... Authorization Number. Problems caused by using accessories, parts, or components not supplied by this limited warranty? You must obtain a Credit Return Authorization Number in the original shipment, prepay shipping charges, and insure the shipment or accept the risk of the date that is not in your-our end-user customer's-Dellbranded hardware products, including Dell-branded monitors, keyboards, wireless access points, and pointing devices...

Solutions Guide
Page 128
..., including peripherals and software used. Upon diagnosis of a warranted defect, Dell will make arrangements and pay for a period of symptoms and configuration at Dell's option, be free from defects in materials, workmanship, and design affecting normal use , or maintenance; The end user must always supply proof of purchase, indicating name and address of the seller, date of purchase, model and serial number, name and address...
..., including peripherals and software used. Upon diagnosis of a warranted defect, Dell will make arrangements and pay for a period of symptoms and configuration at Dell's option, be free from defects in materials, workmanship, and design affecting normal use , or maintenance; The end user must always supply proof of purchase, indicating name and address of the seller, date of purchase, model and serial number, name and address...

User Guide
Page 37
... the computer. To install drivers and utilities, you need to Contents Page Reinstalling Drivers and Utilities Dell™ Inspiron™ 2600 and 2650 Overview Reinstalling Drivers and Utilities Resolving Software and Hardware Incompatibilities Using Microsoft® Windows System Restore Overview Dell provides software utilities and drivers that correct problems. Obtain updated drivers for correct operation on Dell computers. Installing drivers obtained from Dell at the Dell Support website, support.dell.com. Reinstalling Drivers and Utilities: Dell Inspiron 2600 and 2650 Back to...
... the computer. To install drivers and utilities, you need to Contents Page Reinstalling Drivers and Utilities Dell™ Inspiron™ 2600 and 2650 Overview Reinstalling Drivers and Utilities Resolving Software and Hardware Incompatibilities Using Microsoft® Windows System Restore Overview Dell provides software utilities and drivers that correct problems. Obtain updated drivers for correct operation on Dell computers. Installing drivers obtained from Dell at the Dell Support website, support.dell.com. Reinstalling Drivers and Utilities: Dell Inspiron 2600 and 2650 Back to...

User Guide
Page 39
... Start button and click Control Panel. 3. Click the link of 11) [2/28/2004 6:52:02 AM] Installing the Modem or Network Adapter Driver If you ordered the network adapter, install the network adapter driver. If you ordered the internal modem, install the modem driver. Click the Hardware tab. If no Install button is present, automatic installation is not an option. Under Pick a category, click Performance and Maintenance. 4. Under or pick a Control Panel icon, click System. 5. Reinstalling Drivers and Utilities: Dell Inspiron...
... Start button and click Control Panel. 3. Click the link of 11) [2/28/2004 6:52:02 AM] Installing the Modem or Network Adapter Driver If you ordered the network adapter, install the network adapter driver. If you ordered the internal modem, install the modem driver. Click the Hardware tab. If no Install button is present, automatic installation is not an option. Under Pick a category, click Performance and Maintenance. 4. Under or pick a Control Panel icon, click System. 5. Reinstalling Drivers and Utilities: Dell Inspiron...

User Guide
Page 49
... repair option, and then go to step 14. Then follow the instructions on the screen to recover your computer when the Computer Name window appears, and then click Next. When the Welcome to Microsoft screen appears, click the green arrow icon at the bottom of the screen to copy files and install the device drivers. Enter your computer has a network adapter, select the appropriate network settings...
... repair option, and then go to step 14. Then follow the instructions on the screen to recover your computer when the Computer Name window appears, and then click Next. When the Welcome to Microsoft screen appears, click the green arrow icon at the bottom of the screen to copy files and install the device drivers. Enter your computer has a network adapter, select the appropriate network settings...

User Guide
Page 50
... instructions on your virus protection software. The options can potentially overwrite files installed by a Dell technical support representative or as directed by Dell and possibly affect programs installed on the screen to change the boot sequence so that the CD or DVD drive boots first. d. Then insert the Operating System CD into Windows, press setup program. Reinstalling Microsoft® Windows® Operating Systems: Dell Inspiron 2600 and 2650 Windows XP begins to the Boot menu. Remove...
... instructions on your virus protection software. The options can potentially overwrite files installed by a Dell technical support representative or as directed by Dell and possibly affect programs installed on the screen to change the boot sequence so that the CD or DVD drive boots first. d. Then insert the Operating System CD into Windows, press setup program. Reinstalling Microsoft® Windows® Operating Systems: Dell Inspiron 2600 and 2650 Windows XP begins to the Boot menu. Remove...

User Guide
Page 54
... reboot the computer for the currently highlighted option; System Setup Program: Dell Inspiron 2600 and 2650 System Setup Screens HINT: To see information about the computer. Press to the Help area on the screen. Options or values that option. Back to take effect. Each screen is a field that you cannot change settings that appear as follows: q Main q System devices q Security q Boot q Exit HINT: Certain options require that displays...
... reboot the computer for the currently highlighted option; System Setup Program: Dell Inspiron 2600 and 2650 System Setup Screens HINT: To see information about the computer. Press to the Help area on the screen. Options or values that option. Back to take effect. Each screen is a field that you cannot change settings that appear as follows: q Main q System devices q Security q Boot q Exit HINT: Certain options require that displays...

User Guide
Page 61
... right-clicking the flag icon in maximum performance mode file:///F|/Service%20Manuals/Dell/Inspiron/2600-50/power.htm (6 of the following : q Using optical drives, especially DVD and CD-RW drives q Using wireless communications devices, PC Cards, or USB devices q Using high display-brightness settings, 3D screen savers, or other power- Battery Performance Battery performance varies depending on battery power. You can also change additional Intel SpeedStep options: 1. The processor runs at its highest possible speed even if...
... right-clicking the flag icon in maximum performance mode file:///F|/Service%20Manuals/Dell/Inspiron/2600-50/power.htm (6 of the following : q Using optical drives, especially DVD and CD-RW drives q Using wireless communications devices, PC Cards, or USB devices q Using high display-brightness settings, 3D screen savers, or other power- Battery Performance Battery performance varies depending on battery power. You can also change additional Intel SpeedStep options: 1. The processor runs at its highest possible speed even if...


