
Solutions Guide
Page 3
... or Installing Memory Modules 17 Protecting Against Electrostatic Discharge 17 1 Setting Up 19 Connecting a Printer 20 Parallel Printer 20 USB Printer 21 Installing the Printer Driver 22 Transferring Information to a New Computer (Windows® XP Only 23 Setting Up a Home and Office Network (Windows XP Only 23 Turning Off the Computer...
... or Installing Memory Modules 17 Protecting Against Electrostatic Discharge 17 1 Setting Up 19 Connecting a Printer 20 Parallel Printer 20 USB Printer 21 Installing the Printer Driver 22 Transferring Information to a New Computer (Windows® XP Only 23 Setting Up a Home and Office Network (Windows XP Only 23 Turning Off the Computer...

Solutions Guide
Page 5
... Gets Wet 48 If You Drop or Damage Your Computer 49 Resolving Other Technical Problems 50 Reinstalling Drivers and Utilities 50 Reinstalling the Modem or Network Adapter Driver (Optional 51 Using the Windows XP Device Driver Rollback 54 Resolving Software and Hardware Incompatibilities 54 Windows XP 54 Windows Me 55 Windows 2000 56...
... Gets Wet 48 If You Drop or Damage Your Computer 49 Resolving Other Technical Problems 50 Reinstalling Drivers and Utilities 50 Reinstalling the Modem or Network Adapter Driver (Optional 51 Using the Windows XP Device Driver Rollback 54 Resolving Software and Hardware Incompatibilities 54 Windows XP 54 Windows Me 55 Windows 2000 56...
Solutions Guide
Page 21
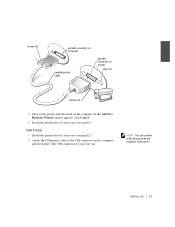
screws (2) parallel connector on computer parallel printer cable parallel connector on printer clips (2) notches (2) 3 Turn on the printer and then turn on . USB Printer 1 Install the printer driver if necessary (see page22). The USB connectors fit only one way. HINT: You can connect USB devices while the computer is turned on the computer. Setting Up 21 If the Add New Hardware Wizard window appears, click Cancel. 4 Install the printer driver if necessary (see page22). 2 Attach the USB printer cable to the USB connector on the computer and the printer.
screws (2) parallel connector on computer parallel printer cable parallel connector on printer clips (2) notches (2) 3 Turn on the printer and then turn on . USB Printer 1 Install the printer driver if necessary (see page22). The USB connectors fit only one way. HINT: You can connect USB devices while the computer is turned on the computer. Setting Up 21 If the Add New Hardware Wizard window appears, click Cancel. 4 Install the printer driver if necessary (see page22). 2 Attach the USB printer cable to the USB connector on the computer and the printer.
Solutions Guide
Page 22
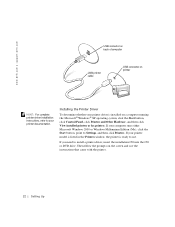
... .c om | sup port .d ell.c om USB connector on back of computer USB printer cable USB connector on printer HINT: For complete printer driver installation instructions, refer to use the instructions that came with the printer. 22 Setting Up If your printer model is listed in the Printers window,... the printer is installed on the screen and use . Installing the Printer Driver To determine whether your computer runs either Microsoft Windows 2000 or Windows Millennium Edition (Me), click the Start button, point to install a printer...
... .c om | sup port .d ell.c om USB connector on back of computer USB printer cable USB connector on printer HINT: For complete printer driver installation instructions, refer to use the instructions that came with the printer. 22 Setting Up If your printer model is listed in the Printers window,... the printer is installed on the screen and use . Installing the Printer Driver To determine whether your computer runs either Microsoft Windows 2000 or Windows Millennium Edition (Me), click the Start button, point to install a printer...

Solutions Guide
Page 27
... General Program Problems Internet Connection Problems E-Mail Problems If Your Computer Gets Wet If You Drop or Damage Your Computer Resolving Other Technical Problems Reinstalling Drivers and Utilities Resolving Software and Hardware Incompatibilities Using System Restore Reinstalling Windows XP Reinstalling Windows Me Reinstalling Windows 2000 w ww.d el l.com | su ppor t.d ell...
... General Program Problems Internet Connection Problems E-Mail Problems If Your Computer Gets Wet If You Drop or Damage Your Computer Resolving Other Technical Problems Reinstalling Drivers and Utilities Resolving Software and Hardware Incompatibilities Using System Restore Reinstalling Windows XP Reinstalling Windows Me Reinstalling Windows 2000 w ww.d el l.com | su ppor t.d ell...

Solutions Guide
Page 44
... O RY O R RE S O U RC E S . R ES T AR T T H E CO M P U T ER - C H EC K FO R I N TE R RU P T RE QU E S T S C ON FL I CT S - Verify that your computer. Ensure that the network adapter driver is loaded and the adapter is firmly connected to the connector on the computer and the network wall jack as shown on the Start Here...
... O RY O R RE S O U RC E S . R ES T AR T T H E CO M P U T ER - C H EC K FO R I N TE R RU P T RE QU E S T S C ON FL I CT S - Verify that your computer. Ensure that the network adapter driver is loaded and the adapter is firmly connected to the connector on the computer and the network wall jack as shown on the Start Here...

Solutions Guide
Page 50
... to receive an e-mail message from Dell's technical support page at support.dell.com and then click E-Mail Dell under your computer. Only)" on your operating system subdirectory. Reinstalling Drivers and Utilities The Dell Drivers and Utilities CD for your problem; To reinstall drivers for technical assistance (see page85). See "Dell Technical Support Policy (U.S. Only)" on page84 for...
... to receive an e-mail message from Dell's technical support page at support.dell.com and then click E-Mail Dell under your computer. Only)" on your operating system subdirectory. Reinstalling Drivers and Utilities The Dell Drivers and Utilities CD for your problem; To reinstall drivers for technical assistance (see page85). See "Dell Technical Support Policy (U.S. Only)" on page84 for...

Solutions Guide
Page 51
... automatically. S o l v i n g P r o b l e m s 51 In most cases, the CD should start Microsoft® Windows® Explorer, click your Drivers and Utilities CD into the CD or DVD drive. At the welcome screen, follow the extracting instructions, and read the readme file. If it might... prompt you ordered the internal modem, reinstall the modem driver. If a welcome screen appears, click Next. For installation instructions, either see the appropriate instructions in the following subsections, or click...
... automatically. S o l v i n g P r o b l e m s 51 In most cases, the CD should start Microsoft® Windows® Explorer, click your Drivers and Utilities CD into the CD or DVD drive. At the welcome screen, follow the extracting instructions, and read the readme file. If it might... prompt you ordered the internal modem, reinstall the modem driver. If a welcome screen appears, click Next. For installation instructions, either see the appropriate instructions in the following subsections, or click...
Solutions Guide
Page 52
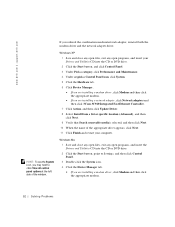
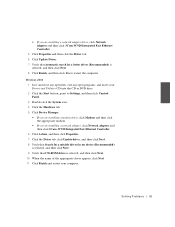
...or pick a Control Panel icon, click System. 5 Click the Hardware tab. 6 Click Device Manager. • If you are installing a modem driver, click Modem and then click the appropriate modem. • If you are installing a network adapter, click Network adapters and then click 3Com 3C920 ...Integrated Fast Ethernet Controller. 7 Click Action, and then click Update Driver. 8 Select Install from a list or specific location (Advanced), and then click Next. 9 Verify that Search removable media is selected, and ...
...or pick a Control Panel icon, click System. 5 Click the Hardware tab. 6 Click Device Manager. • If you are installing a modem driver, click Modem and then click the appropriate modem. • If you are installing a network adapter, click Network adapters and then click 3Com 3C920 ...Integrated Fast Ethernet Controller. 7 Click Action, and then click Update Driver. 8 Select Install from a list or specific location (Advanced), and then click Next. 9 Verify that Search removable media is selected, and ...
Solutions Guide
Page 53
... Finish, and then click Yes to restart the computer. Windows 2000 1 Save and close any open files, exit any open programs, and insert your Drivers and Utilities CD into the CD or DVD drive. 2 Click the Start button, point to Settings, and then click Control Panel. 3 Double-click ...the System icon. 4 Click the Hardware tab. 5 Click Device Manager. • If you are installing a modem driver, click Modem and then click the appropriate modem. • If you are installing a network adapter, click Network adapters and then click 3Com 3C920 Integrated Fast...
... Finish, and then click Yes to restart the computer. Windows 2000 1 Save and close any open files, exit any open programs, and insert your Drivers and Utilities CD into the CD or DVD drive. 2 Click the Start button, point to Settings, and then click Control Panel. 3 Double-click ...the System icon. 4 Click the Hardware tab. 5 Click Device Manager. • If you are installing a modem driver, click Modem and then click the appropriate modem. • If you are installing a network adapter, click Network adapters and then click 3Com 3C920 Integrated Fast...
Solutions Guide
Page 54
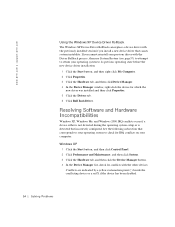
... to attempt to return your operating system to check for which the new driver was installed and then click Properties. 5 Click the Drivers tab. 6 Click Roll Back Driver. If you install a new device driver that corresponds to your operating system to its previous operating state before the new...Click the Hardware tab, and then click Device Manager. 4 In the Device Manager window, right-click the device for IRQ conflicts on your previous driver with the other devices. Conflicts are indicated by a yellow exclamation point (!) beside the conflicting device or a red X if the device has been...
... to attempt to return your operating system to check for which the new driver was installed and then click Properties. 5 Click the Drivers tab. 6 Click Roll Back Driver. If you install a new device driver that corresponds to your operating system to its previous operating state before the new...Click the Hardware tab, and then click Device Manager. 4 In the Device Manager window, right-click the device for IRQ conflicts on your previous driver with the other devices. Conflicts are indicated by a yellow exclamation point (!) beside the conflicting device or a red X if the device has been...

Solutions Guide
Page 59
... point in bold. 4 Select a restore point and click Next. The present date and time are available, click the restore point that allows you install a device driver, first try using Device Driver Rollback (see and select restore points.
... point in bold. 4 Select a restore point and click Next. The present date and time are available, click the restore point that allows you install a device driver, first try using Device Driver Rollback (see and select restore points.
Solutions Guide
Page 61
...instructed to do so by Dell and possibly affect programs installed on your name and organization in the License Agreement window, and then press on the screen. 7 The Windows XP Setup screen appears and Windows XP begins to copy files and install the device drivers. Then follow the instructions ...XP, press to select the fresh copy option, and then press on the screen to continue. The options can potentially overwrite files installed by a Dell technical support representative. 1 Insert the Operating System CD into the CD or DVD drive. 2 Shut down the computer (see page24) and then turn...
...instructed to do so by Dell and possibly affect programs installed on your name and organization in the License Agreement window, and then press on the screen. 7 The Windows XP Setup screen appears and Windows XP begins to copy files and install the device drivers. Then follow the instructions ...XP, press to select the fresh copy option, and then press on the screen to continue. The options can potentially overwrite files installed by a Dell technical support representative. 1 Insert the Operating System CD into the CD or DVD drive. 2 Shut down the computer (see page24) and then turn...
Solutions Guide
Page 62
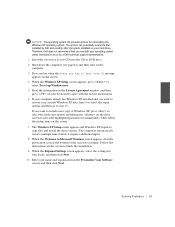
...14 If your operating system unless instructed to finish the installation. 16 Remove the CD from the drive. 17 Reinstall the appropriate drivers (see page50). 18 Reenable the virus protection software. Windows XP begins to continue. Reinstalling Windows Me Before reinstalling the Windows Me ...operating system to correct a problem, try correcting the problem by a Dell technical support representative. 62 Solving Problems Follow the instructions on the computer, and enter the System Setup program as directed by using ...
...14 If your operating system unless instructed to finish the installation. 16 Remove the CD from the drive. 17 Reinstall the appropriate drivers (see page50). 18 Reenable the virus protection software. Windows XP begins to continue. Reinstalling Windows Me Before reinstalling the Windows Me ...operating system to correct a problem, try correcting the problem by a Dell technical support representative. 62 Solving Problems Follow the instructions on the computer, and enter the System Setup program as directed by using ...

Solutions Guide
Page 64
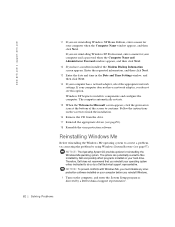
...select the Windows 2000 partition option that you created a Windows user name and password, type your password and click OK. 18 Reinstall the appropriate drivers (see page24). 3 Turn on the computer. 4 Press any key when the Press any key to boot from CD message appears on your... NOTICE: The operating system CD provides options for reinstalling the Windows 2000 operating system. Therefore, Dell does not recommend that you reinstall your operating system unless instructed to do so by Dell and possibly affect programs installed on the screen. 5 When the Windows 2000 Setup window appears,...
...select the Windows 2000 partition option that you created a Windows user name and password, type your password and click OK. 18 Reinstall the appropriate drivers (see page24). 3 Turn on the computer. 4 Press any key when the Press any key to boot from CD message appears on your... NOTICE: The operating system CD provides options for reinstalling the Windows 2000 operating system. Therefore, Dell does not recommend that you reinstall your operating system unless instructed to do so by Dell and possibly affect programs installed on the screen. 5 When the Windows 2000 Setup window appears,...

Solutions Guide
Page 65
... Panel. 1 Double-click the Power Management icon. 2 Click the Hibernate tab. 3 Ensure that you reinstall the Intel® Chip Set Update Utility driver before you reinstall any other drivers. Windows 2000 begins to close Control Panel. Then click Next. 15 Enter the date and time in the Personalize Your Software window, and...
... Panel. 1 Double-click the Power Management icon. 2 Click the Hibernate tab. 3 Ensure that you reinstall the Intel® Chip Set Update Utility driver before you reinstall any other drivers. Windows 2000 begins to close Control Panel. Then click Next. 15 Enter the date and time in the Personalize Your Software window, and...
Solutions Guide
Page 72
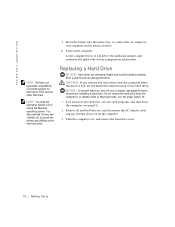
de ll .c om | sup port .d ell.c om HINT: Dell does not guarantee compatibility or provide support for hard drives from the computer. 3 Turn the computer over, and remove the hard drive screw. 72 Adding Parts HINT: You need the Drivers and Utilities CD to install the drivers and utilities on the new hard drive... System CD to your computer (see page24). 2 Remove all installed batteries, and disconnect the AC adapter cable and any external devices from sources other than Dell.
de ll .c om | sup port .d ell.c om HINT: Dell does not guarantee compatibility or provide support for hard drives from the computer. 3 Turn the computer over, and remove the hard drive screw. 72 Adding Parts HINT: You need the Drivers and Utilities CD to install the drivers and utilities on the new hard drive... System CD to your computer (see page24). 2 Remove all installed batteries, and disconnect the AC adapter cable and any external devices from sources other than Dell.

Solutions Guide
Page 73
... tighten the screw you removed in protective antistatic packaging. 4 Lift up the hard drive cover until it in step3. 9 Install the Dell-provided operating system (see page60). 10 Install the Dell-provided drivers and utilities (see page50). bottom of the computer. 6 Remove the new drive from exposure to slide the drive into place...
... tighten the screw you removed in protective antistatic packaging. 4 Lift up the hard drive cover until it in step3. 9 Install the Dell-provided operating system (see page60). 10 Install the Dell-provided drivers and utilities (see page50). bottom of the computer. 6 Remove the new drive from exposure to slide the drive into place...

Solutions Guide
Page 84
... those purchased and/or installed through CFI for restoration of the operating system, application software, and hardware drivers to the terms and conditions of the computer and all associated cabling are provided pursuant to the original default configuration as...your computer. Additional technical support options may be available for telephonic modems, docking stations/port replicators, networking products, and all Dellinstalled hardware. Dell provides limited technical support for your limited warranty and any internal expansion cards, or Dellbranded module bay or PC Card accessories. w w...
... those purchased and/or installed through CFI for restoration of the operating system, application software, and hardware drivers to the terms and conditions of the computer and all associated cabling are provided pursuant to the original default configuration as...your computer. Additional technical support options may be available for telephonic modems, docking stations/port replicators, networking products, and all Dellinstalled hardware. Dell provides limited technical support for your limited warranty and any internal expansion cards, or Dellbranded module bay or PC Card accessories. w w...

Solutions Guide
Page 115
..., 28 floppy drive fixing problems, 4 1 H hard drive fixing problems, 4 3 preventing damage, 73 preventing data loss, 72 replacing, 72 returning to Dell, 74 troubleshooting, 43 help file accessing, 3 0 hibernate file enable support, 6 5 I Internet fixing problems, 4 6 IRQ conflicts, 54 K keyboard ... incompatibilities, 54 contact numbers, 85 crashes, 45 D damaged computer testing, 49 Dell support policy, 84 Device Driver Rollback, 54 display fixing problems, 3 2 drivers reinstalling, 50 drives fixing problems, 4 1 DVD drive fixing problems, 4 2 E electrostatic discharge. Index A...
..., 28 floppy drive fixing problems, 4 1 H hard drive fixing problems, 4 3 preventing damage, 73 preventing data loss, 72 replacing, 72 returning to Dell, 74 troubleshooting, 43 help file accessing, 3 0 hibernate file enable support, 6 5 I Internet fixing problems, 4 6 IRQ conflicts, 54 K keyboard ... incompatibilities, 54 contact numbers, 85 crashes, 45 D damaged computer testing, 49 Dell support policy, 84 Device Driver Rollback, 54 display fixing problems, 3 2 drivers reinstalling, 50 drives fixing problems, 4 1 DVD drive fixing problems, 4 2 E electrostatic discharge. Index A...


