
Owner's Manual
Page 5
... the Processor 85 Replacing the Processor 87 23 Power-Adapter Port 89 Removing the Power-Adapter Port 89 Replacing the Power-Adapter Port 91 24 Speakers 93 Removing the Speakers 93 Replacing the Speakers 95 25 Subwoofer 97 Removing the Subwoofer 97 Replacing the Subwoofer 99 26 Flashing the BIOS 101 Contents | 5
... the Processor 85 Replacing the Processor 87 23 Power-Adapter Port 89 Removing the Power-Adapter Port 89 Replacing the Power-Adapter Port 91 24 Speakers 93 Removing the Speakers 93 Replacing the Speakers 95 25 Subwoofer 97 Removing the Subwoofer 97 Replacing the Subwoofer 99 26 Flashing the BIOS 101 Contents | 5
Owner's Manual
Page 77
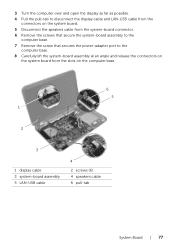
... far as possible. 4 Pull the pull-tab to disconnect the display cable and LAN-USB cable from the connectors on the system board. 5 Disconnect the speakers cable from the system-board connector. 6 Remove the screws that secure the system-board assembly to the computer base. 7 Remove the screw that secures the... angle and release the connectors on the system board from the slots on the computer base. 6 5 1 2 3 1 display cable 3 system-board assembly 5 LAN-USB cable 4 2 screws (6) 4 speakers cable 6 pull-tab System Board | 77
... far as possible. 4 Pull the pull-tab to disconnect the display cable and LAN-USB cable from the connectors on the system board. 5 Disconnect the speakers cable from the system-board connector. 6 Remove the screws that secure the system-board assembly to the computer base. 7 Remove the screw that secures the... angle and release the connectors on the system board from the slots on the computer base. 6 5 1 2 3 1 display cable 3 system-board assembly 5 LAN-USB cable 4 2 screws (6) 4 speakers cable 6 pull-tab System Board | 77
Owner's Manual
Page 79
... with the screw hole on the computer base. 8 Replace the screw that secures the power-adapter port to the computer base. 9 Connect the display cable, speakers cable, and LAN-USB cable to the connectors on the system board. 10 Close the display and turn the computer over. 11 Connect the subwoofer...
... with the screw hole on the computer base. 8 Replace the screw that secures the power-adapter port to the computer base. 9 Connect the display cable, speakers cable, and LAN-USB cable to the connectors on the system board. 10 Close the display and turn the computer over. 11 Connect the subwoofer...
Owner's Manual
Page 93
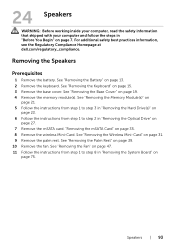
... the safety information that shipped with your computer and follow the steps in "Before You Begin" on page 19. 4 Remove the memory module(s). Speakers | 93 See "Removing the Base Cover" on page 7. "Removing the mSATA Card" on page 13. 2 Remove the keyboard. See "Removing...Optical Drive" on page 27. 7 Remove the mSATA card. For additional safety best practices information, see the Regulatory Compliance Homepage at dell.com/regulatory_compliance. Removing the Speakers Prerequisites 1 Remove the battery. See "Removing the Palm Rest" on page 31. 9 Remove the palm rest. See "Removing the...
... the safety information that shipped with your computer and follow the steps in "Before You Begin" on page 19. 4 Remove the memory module(s). Speakers | 93 See "Removing the Base Cover" on page 7. "Removing the mSATA Card" on page 13. 2 Remove the keyboard. See "Removing...Optical Drive" on page 27. 7 Remove the mSATA card. For additional safety best practices information, see the Regulatory Compliance Homepage at dell.com/regulatory_compliance. Removing the Speakers Prerequisites 1 Remove the battery. See "Removing the Palm Rest" on page 31. 9 Remove the palm rest. See "Removing the...

Owner's Manual
Page 94
Procedure 1 Make a note of the speakers cable routing and remove it from the routing guides on the computer base. 2 Lift the speakers along with its cable away from the computer base. 1 speakers (2) 2 1 2 speakers cable routing 94 | Speakers
Procedure 1 Make a note of the speakers cable routing and remove it from the routing guides on the computer base. 2 Lift the speakers along with its cable away from the computer base. 1 speakers (2) 2 1 2 speakers cable routing 94 | Speakers
Owner's Manual
Page 95
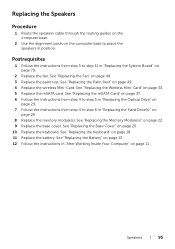
... Mini-Card. See "Replacing the Palm Rest" on page 22. 9 Replace the base cover. Speakers | 95 See "Replacing the Base Cover" on page 11. Replacing the Speakers Procedure 1 Route the speakers cable through the routing guides on the computer base. 2 Use the alignment posts on the computer base...(s). See "Replacing the Battery" on page 13. 12 Follow the instructions in position. Postrequisites 1 Follow the instructions from step 4 to place the speakers in "After Working Inside Your Computer" on page 20. 10 Replace the keyboard. See "Replacing the Wireless Mini-Card" on page 79. 2...
... Mini-Card. See "Replacing the Palm Rest" on page 22. 9 Replace the base cover. Speakers | 95 See "Replacing the Base Cover" on page 11. Replacing the Speakers Procedure 1 Route the speakers cable through the routing guides on the computer base. 2 Use the alignment posts on the computer base...(s). See "Replacing the Battery" on page 13. 12 Follow the instructions in position. Postrequisites 1 Follow the instructions from step 4 to place the speakers in "After Working Inside Your Computer" on page 20. 10 Replace the keyboard. See "Replacing the Wireless Mini-Card" on page 79. 2...

7720 Me and My Dell
Page 5
Speakers 32 2.1 Audio 32 5.1 Audio 32 7.1 Audio 32 Webcam 33 ExpressCards 33 Network 35 Modem 35 Network‑Interface Controller (NIC) 35 Wireless Local‑Area ... Using LAN 37 Connecting to the Internet Using WLAN 37 Connecting to the Internet Using WWAN 38 Setting up Audio 39 Configuring 5.1/7.1 Audio 39 Connecting 5.1 Speakers 40 Connecting 7.1 Speakers 41 Setting Up Your Printer 42 Setting Up Your Webcam 43 Integrated Webcam 43 External Webcam 43 Setting up Bluetooth 43 Contents 5
Speakers 32 2.1 Audio 32 5.1 Audio 32 7.1 Audio 32 Webcam 33 ExpressCards 33 Network 35 Modem 35 Network‑Interface Controller (NIC) 35 Wireless Local‑Area ... Using LAN 37 Connecting to the Internet Using WLAN 37 Connecting to the Internet Using WWAN 38 Setting up Audio 39 Configuring 5.1/7.1 Audio 39 Connecting 5.1 Speakers 40 Connecting 7.1 Speakers 41 Setting Up Your Printer 42 Setting Up Your Webcam 43 Integrated Webcam 43 External Webcam 43 Setting up Bluetooth 43 Contents 5

7720 Me and My Dell
Page 32
... of channels and the digit after the decimal indicates the sub-woofer. A 7.1 audio system uses two additional speakers (rear left and rear right) in combination with two speakers (left surround, and right surround) and one subwoofer. 5.1 Audio 5.1 refers to indicate errors or failures....to a system with the 5.1 audio system. 32 Speakers Speakers Laptops and tablets have a built-in speaker, however, they are generally categorized by the number of audio channels they support; 2, 2.1, 5.1, 7.1, and so on. Speakers are used only to produce beeps to the number of audio channels...
... of channels and the digit after the decimal indicates the sub-woofer. A 7.1 audio system uses two additional speakers (rear left and rear right) in combination with two speakers (left surround, and right surround) and one subwoofer. 5.1 Audio 5.1 refers to indicate errors or failures....to a system with the 5.1 audio system. 32 Speakers Speakers Laptops and tablets have a built-in speaker, however, they are generally categorized by the number of audio channels they support; 2, 2.1, 5.1, 7.1, and so on. Speakers are used only to produce beeps to the number of audio channels...

7720 Me and My Dell
Page 39
... and tablets have built-in the documents that shipped with a discrete sound card, connect the speakers to the connectors on the card. Follow the instructions on your speakers. Dell computers and tablets also support a 3.5 mm audio port to allow you to provide multi-channel audio... output. In the results that support 2‑channel audio. Select a speaker configuration under Audio channels: and click Test. Setting...
... and tablets have built-in the documents that shipped with a discrete sound card, connect the speakers to the connectors on the card. Follow the instructions on your speakers. Dell computers and tablets also support a 3.5 mm audio port to allow you to provide multi-channel audio... output. In the results that support 2‑channel audio. Select a speaker configuration under Audio channels: and click Test. Setting...

7720 Me and My Dell
Page 40
Connecting 5.1 Speakers 1 Rear audio connector on the 5 computer 2 Center/LFE surround out on 6 the computer 3 Front audio connector on 7 the computer 4 5.1 channel audio cable Center/LFE surround out on the speaker Front audio connector on the speaker Rear audio connector on the speaker 40 Setting Up Your Computer
Connecting 5.1 Speakers 1 Rear audio connector on the 5 computer 2 Center/LFE surround out on 6 the computer 3 Front audio connector on 7 the computer 4 5.1 channel audio cable Center/LFE surround out on the speaker Front audio connector on the speaker Rear audio connector on the speaker 40 Setting Up Your Computer

7720 Me and My Dell
Page 41
Connecting 7.1 Speakers 1 Rear audio connector on 6 Center/LFE surround out on the computer the speaker 2 Center/LFE surround out 7 Front audio connector on the on the computer speaker 3 Side audio connector on 8 Rear audio connector on the the computer speaker 4 Front audio connector on 9 Side audio connector on the the computer speaker 5 7.1 channel audio cable Setting Up Your Computer 41
Connecting 7.1 Speakers 1 Rear audio connector on 6 Center/LFE surround out on the computer the speaker 2 Center/LFE surround out 7 Front audio connector on the on the computer speaker 3 Side audio connector on 8 Rear audio connector on the the computer speaker 4 Front audio connector on 9 Side audio connector on the the computer speaker 5 7.1 channel audio cable Setting Up Your Computer 41

7720 Me and My Dell
Page 59
.... Connect external microphone for voice or sound input. Line-out port - Connect multi‑channel capable speakers. Connect a single subwoofer. The LFE channel drives a subwoofer to connect speakers, headphones, microphones, sound systems, amplifiers, or TVs audio output. NOTE: The Low Frequency Effects ...not using subwoofers can shunt the LFE information to the main speakers in the surround sound setup. Center/LFE surround out - Connect headphones or speakers that shipped with your computer or Specifications at dell.com/support. Audio 59 For information on the ...
.... Connect external microphone for voice or sound input. Line-out port - Connect multi‑channel capable speakers. Connect a single subwoofer. The LFE channel drives a subwoofer to connect speakers, headphones, microphones, sound systems, amplifiers, or TVs audio output. NOTE: The Low Frequency Effects ...not using subwoofers can shunt the LFE information to the main speakers in the surround sound setup. Center/LFE surround out - Connect headphones or speakers that shipped with your computer or Specifications at dell.com/support. Audio 59 For information on the ...

7720 Me and My Dell
Page 60
... drives, cameras, phones, and so on most laptops and desktops. Most USB device connect to a computer or a tablet. Side-surround sound port - Connect left/right speakers. For more information, see the documentation for your computer. RCA S/PDIF port - USB also supports Plug-and-Play and hot swapping. Allows you to connect...
... drives, cameras, phones, and so on most laptops and desktops. Most USB device connect to a computer or a tablet. Side-surround sound port - Connect left/right speakers. For more information, see the documentation for your computer. RCA S/PDIF port - USB also supports Plug-and-Play and hot swapping. Allows you to connect...

7720 Me and My Dell
Page 65
... S/PDIF connections: • Optical - Micro HDMI Micro High Definition Multimedia Interface (HDMI) provides digital connection between your computer and portable devices such as sound cards, speakers, home theater systems, TVs, and so on most smart phones.
... S/PDIF connections: • Optical - Micro HDMI Micro High Definition Multimedia Interface (HDMI) provides digital connection between your computer and portable devices such as sound cards, speakers, home theater systems, TVs, and so on most smart phones.


