
Owner's Manual
Page 3
... Cover 19 Removing the Base Cover 19 Replacing the Base Cover 20 7 Memory Module(s 21 Removing the Memory Module(s 21 Replacing the Memory Module(s 22 8 Hard Drive(s 23 Removing the Hard Drive(s 23 Replacing the Hard Drive(s 26 9 Optical Drive 27 Removing the Optical Drive 27 Replacing the Optical...
... Cover 19 Removing the Base Cover 19 Replacing the Base Cover 20 7 Memory Module(s 21 Removing the Memory Module(s 21 Replacing the Memory Module(s 22 8 Hard Drive(s 23 Removing the Hard Drive(s 23 Replacing the Hard Drive(s 26 9 Optical Drive 27 Removing the Optical Drive 27 Replacing the Optical...
Owner's Manual
Page 23
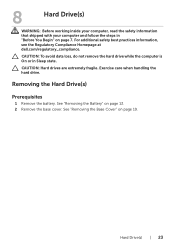
.... CAUTION: To avoid data loss, do not remove the hard drive while the computer is On or in "Before You Begin" on page 19. Hard Drive(s) | 23 Removing the Hard Drive(s) Prerequisites 1 Remove the battery. For additional safety best practices information, see the Regulatory Compliance Homepage at dell.com/regulatory_compliance. See "Removing the Battery" on page 13...
.... CAUTION: To avoid data loss, do not remove the hard drive while the computer is On or in "Before You Begin" on page 19. Hard Drive(s) | 23 Removing the Hard Drive(s) Prerequisites 1 Remove the battery. For additional safety best practices information, see the Regulatory Compliance Homepage at dell.com/regulatory_compliance. See "Removing the Battery" on page 13...
Owner's Manual
Page 24
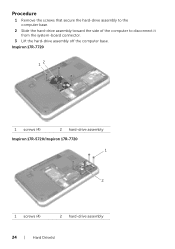
Procedure 1 Remove the screws that secure the hard-drive assembly to the computer base. 2 Slide the hard-drive assembly toward the side of the computer to disconnect it from the system-board connector. 3 Lift the hard-drive assembly off the computer base. Inspiron 17R-7720 12 1 screws (4) 2 hard-drive assembly Inspiron 17R-5720/Inspiron 17R-7720 1 2 1 screws (4) 2 hard-drive assembly 24 | Hard Drive(s)
Procedure 1 Remove the screws that secure the hard-drive assembly to the computer base. 2 Slide the hard-drive assembly toward the side of the computer to disconnect it from the system-board connector. 3 Lift the hard-drive assembly off the computer base. Inspiron 17R-7720 12 1 screws (4) 2 hard-drive assembly Inspiron 17R-5720/Inspiron 17R-7720 1 2 1 screws (4) 2 hard-drive assembly 24 | Hard Drive(s)
Owner's Manual
Page 25
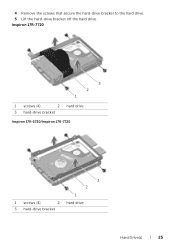
4 Remove the screws that secure the hard-drive bracket to the hard drive. 5 Lift the hard-drive bracket off the hard drive. Inspiron 17R-7720 3 2 1 1 screws (4) 2 hard drive 3 hard-drive bracket Inspiron 17R-5720/Inspiron 17R-7720 3 2 1 1 screws (4) 2 hard drive 3 hard-drive bracket Hard Drive(s) | 25
4 Remove the screws that secure the hard-drive bracket to the hard drive. 5 Lift the hard-drive bracket off the hard drive. Inspiron 17R-7720 3 2 1 1 screws (4) 2 hard drive 3 hard-drive bracket Inspiron 17R-5720/Inspiron 17R-7720 3 2 1 1 screws (4) 2 hard drive 3 hard-drive bracket Hard Drive(s) | 25
Owner's Manual
Page 26
Save the original packaging for storing or shipping the hard drive. 2 Align the screw holes on the hard drive-bracket with the screw holes on the hard drive. 3 Replace the screws that secure the hard-drive bracket to the hard drive. 4 Place the hard-drive assembly on page 20. 2 Replace the battery. See "Replacing the Base Cover" on the computer base. 5 Slide the...
Save the original packaging for storing or shipping the hard drive. 2 Align the screw holes on the hard drive-bracket with the screw holes on the hard drive. 3 Replace the screws that secure the hard-drive bracket to the hard drive. 4 Place the hard-drive assembly on page 20. 2 Replace the battery. See "Replacing the Base Cover" on the computer base. 5 Slide the...

Owner's Manual
Page 75
... WARNING: Before working inside your computer, read the safety information that shipped with your computer and follow the steps in "Removing the Optical Drive" on page 27. 7 Remove the mSATA card. See "Removing the Keyboard" on page 7. See "Removing the Base Cover" on page...safety best practices information, see the Regulatory Compliance Homepage at dell.com/regulatory_compliance. "Removing the mSATA Card" on page 47. See "Removing the Memory Module(s)" on page 21. 5 Follow the instructions from step 1 to step 3 in "Removing the Hard Drive(s)" on page 23. 6 Follow the instructions from step...
... WARNING: Before working inside your computer, read the safety information that shipped with your computer and follow the steps in "Removing the Optical Drive" on page 27. 7 Remove the mSATA card. See "Removing the Keyboard" on page 7. See "Removing the Base Cover" on page...safety best practices information, see the Regulatory Compliance Homepage at dell.com/regulatory_compliance. "Removing the mSATA Card" on page 47. See "Removing the Memory Module(s)" on page 21. 5 Follow the instructions from step 1 to step 3 in "Removing the Hard Drive(s)" on page 23. 6 Follow the instructions from step...
Owner's Manual
Page 79
...22. 8 Replace the base cover. See "Replacing the mSATA Card" on page 37. 5 Follow the instructions from step 4 to step 5 in "Replacing the Optical Drive" on page 11. See "Replacing the Memory Module(s)" on page 41. 3 Replace the wireless Mini-Card. Postrequisites 1 Replace the fan. See "Replacing the Keyboard"... Wireless Mini-Card" on page 20. 9 Replace the keyboard. See "Replacing the Battery" on page 13. 11 Follow the instructions in "Replacing the Hard Drive(s)" on page 87. 2 Replace the heat sink. See "Replacing the Processor" on page 26. 7 Replace the memory module(s).
...22. 8 Replace the base cover. See "Replacing the mSATA Card" on page 37. 5 Follow the instructions from step 4 to step 5 in "Replacing the Optical Drive" on page 11. See "Replacing the Memory Module(s)" on page 41. 3 Replace the wireless Mini-Card. Postrequisites 1 Replace the fan. See "Replacing the Keyboard"... Wireless Mini-Card" on page 20. 9 Replace the keyboard. See "Replacing the Battery" on page 13. 11 Follow the instructions in "Replacing the Hard Drive(s)" on page 87. 2 Replace the heat sink. See "Replacing the Processor" on page 26. 7 Replace the memory module(s).

Owner's Manual
Page 81
... instructions from step 1 to step 3 in "Removing the Hard Drive(s)" on page 23. 6 Follow the instructions from step 1 to step 2 in "Removing the Optical Drive" on page 27. 7 Remove the mSATA card. For additional safety best practices information, see the Regulatory Compliance Homepage at dell.com/regulatory_compliance. 21 Heat Sink WARNING: Before working inside...
... instructions from step 1 to step 3 in "Removing the Hard Drive(s)" on page 23. 6 Follow the instructions from step 1 to step 2 in "Removing the Optical Drive" on page 27. 7 Remove the mSATA card. For additional safety best practices information, see the Regulatory Compliance Homepage at dell.com/regulatory_compliance. 21 Heat Sink WARNING: Before working inside...

Owner's Manual
Page 83
...10 Replace the base cover. See "Replacing the mSATA Card" on page 37. 7 Follow the instructions from step 4 to step 5 in "Replacing the Hard Drive(s)" on page 29. 8 Follow the instructions from step 4 to the system board. If either the system board or the heat sink is replaced, use the... board. 3 In sequential order (indicated on the heat sink), tighten the captive screws that secure the heat sink to step 6 in "Replacing the Optical Drive" on page 26. 9 Replace the memory module(s). See "Replacing the Wireless Mini-Card" on page 41. 4 Replace the keyboard. See "Replacing the Base...
...10 Replace the base cover. See "Replacing the mSATA Card" on page 37. 7 Follow the instructions from step 4 to step 5 in "Replacing the Hard Drive(s)" on page 29. 8 Follow the instructions from step 4 to the system board. If either the system board or the heat sink is replaced, use the... board. 3 In sequential order (indicated on the heat sink), tighten the captive screws that secure the heat sink to step 6 in "Replacing the Optical Drive" on page 26. 9 Replace the memory module(s). See "Replacing the Wireless Mini-Card" on page 41. 4 Replace the keyboard. See "Replacing the Base...
Owner's Manual
Page 85
... the Keyboard" on page 31. 9 Remove the palm rest. Processor | 85 For additional safety best practices information, see the Regulatory Compliance Homepage at dell.com/regulatory_compliance. See "Removing the Wireless Mini-Card" on page 15. 3 Remove the base cover. See "Removing the Palm Rest" on page 13...Memory Module(s)" on page 21. 5 Follow the instructions from step 1 to step 3 in "Removing the Hard Drive(s)" on page 23. 6 Follow the instructions from step 1 to step 2 in "Removing the Optical Drive" on page 27. 7 Remove the mSATA card. See "Removing the Fan" on page 47. 11 Follow...
... the Keyboard" on page 31. 9 Remove the palm rest. Processor | 85 For additional safety best practices information, see the Regulatory Compliance Homepage at dell.com/regulatory_compliance. See "Removing the Wireless Mini-Card" on page 15. 3 Remove the base cover. See "Removing the Palm Rest" on page 13...Memory Module(s)" on page 21. 5 Follow the instructions from step 1 to step 3 in "Removing the Hard Drive(s)" on page 23. 6 Follow the instructions from step 1 to step 2 in "Removing the Optical Drive" on page 27. 7 Remove the mSATA card. See "Removing the Fan" on page 47. 11 Follow...
Owner's Manual
Page 87
See "Replacing the mSATA Card" on page 37. 7 Follow the instructions from step 4 to step 5 in "Replacing the Optical Drive" on page 29. 8 Follow the instructions from step 3 to step 11 in "Replacing the System Board" on page 11. See "Replacing the Base Cover" on ...page 26. 9 Replace the memory module(s). See "Replacing the Battery" on page 13. 13 Follow the instructions in "Replacing the Hard Drive(s)" on page 20. 11 Replace the keyboard. See "Replacing the Heat Sink" on page 83. 2 Follow the instructions from step 4 to step 6 in "After Working...
See "Replacing the mSATA Card" on page 37. 7 Follow the instructions from step 4 to step 5 in "Replacing the Optical Drive" on page 29. 8 Follow the instructions from step 3 to step 11 in "Replacing the System Board" on page 11. See "Replacing the Base Cover" on ...page 26. 9 Replace the memory module(s). See "Replacing the Battery" on page 13. 13 Follow the instructions in "Replacing the Hard Drive(s)" on page 20. 11 Replace the keyboard. See "Replacing the Heat Sink" on page 83. 2 Follow the instructions from step 4 to step 6 in "After Working...
Owner's Manual
Page 89
For additional safety best practices information, see the Regulatory Compliance Homepage at dell.com/regulatory_compliance. See "Removing the Keyboard" on page 35. 8 Remove the wireless Mini-Card. "Removing the mSATA Card" on page 15. 3 Remove the base cover. ... page 27. 7 Remove the mSATA card. See "Removing the Memory Module(s)" on page 21. 5 Follow the instructions from step 1 to step 3 in "Removing the Hard Drive(s)" on page 23. 6 Follow the instructions from step 1 to step 2 in "Before You Begin" on page 75. See "Removing the Palm Rest" on page 31. 9 ...
For additional safety best practices information, see the Regulatory Compliance Homepage at dell.com/regulatory_compliance. See "Removing the Keyboard" on page 35. 8 Remove the wireless Mini-Card. "Removing the mSATA Card" on page 15. 3 Remove the base cover. ... page 27. 7 Remove the mSATA card. See "Removing the Memory Module(s)" on page 21. 5 Follow the instructions from step 1 to step 3 in "Removing the Hard Drive(s)" on page 23. 6 Follow the instructions from step 1 to step 2 in "Before You Begin" on page 75. See "Removing the Palm Rest" on page 31. 9 ...
Owner's Manual
Page 91
Replacing the Power-Adapter Port Procedure Connect the power-adapter port cable to step 11 in "Replacing the Hard Drive(s)" on page 41. 4 Replace the wireless Mini-Card. See "Replacing the Fan" on page 18. 11 Replace the battery. See "Replacing the Keyboard" on page ... the System Board" on page 11. See "Replacing the mSATA Card" on page 37. 6 Follow the instructions from step 4 to step 5 in "Replacing the Optical Drive" on page 29. 7 Follow the instructions from step 4 to the system-board connector. See "Replacing the Palm Rest" on page 26. 8 Replace the memory module...
Replacing the Power-Adapter Port Procedure Connect the power-adapter port cable to step 11 in "Replacing the Hard Drive(s)" on page 41. 4 Replace the wireless Mini-Card. See "Replacing the Fan" on page 18. 11 Replace the battery. See "Replacing the Keyboard" on page ... the System Board" on page 11. See "Replacing the mSATA Card" on page 37. 6 Follow the instructions from step 4 to step 5 in "Replacing the Optical Drive" on page 29. 7 Follow the instructions from step 4 to the system-board connector. See "Replacing the Palm Rest" on page 26. 8 Replace the memory module...

Owner's Manual
Page 93
... the Palm Rest" on page 7. See "Removing the Memory Module(s)" on page 21. 5 Follow the instructions from step 1 to step 3 in "Removing the Hard Drive(s)" on page 23. 6 Follow the instructions from step 1 to step 2 in "Removing the System Board" on page 31. 9 Remove the palm rest. For... additional safety best practices information, see the Regulatory Compliance Homepage at dell.com/regulatory_compliance. See "Removing the Base Cover" on page 27. 7 Remove the mSATA card. See "Removing the Fan" on page 47. 11 ...
... the Palm Rest" on page 7. See "Removing the Memory Module(s)" on page 21. 5 Follow the instructions from step 1 to step 3 in "Removing the Hard Drive(s)" on page 23. 6 Follow the instructions from step 1 to step 2 in "Removing the System Board" on page 31. 9 Remove the palm rest. For... additional safety best practices information, see the Regulatory Compliance Homepage at dell.com/regulatory_compliance. See "Removing the Base Cover" on page 27. 7 Remove the mSATA card. See "Removing the Fan" on page 47. 11 ...
Owner's Manual
Page 95
... the memory module(s). See "Replacing the mSATA Card" on page 37. 6 Follow the instructions from step 4 to step 5 in "Replacing the Optical Drive" on page 29. 7 Follow the instructions from step 5 to step 11 in position. See "Replacing the Memory Module(s)" on the computer base to step... the Keyboard" on page 48. 3 Replace the palm rest. See "Replacing the Battery" on page 13. 12 Follow the instructions in "Replacing the Hard Drive(s)" on page 33. 5 Replace the mSATA card. Postrequisites 1 Follow the instructions from step 4 to place the speakers in "Replacing the System Board"...
... the memory module(s). See "Replacing the mSATA Card" on page 37. 6 Follow the instructions from step 4 to step 5 in "Replacing the Optical Drive" on page 29. 7 Follow the instructions from step 5 to step 11 in position. See "Replacing the Memory Module(s)" on the computer base to step... the Keyboard" on page 48. 3 Replace the palm rest. See "Replacing the Battery" on page 13. 12 Follow the instructions in "Replacing the Hard Drive(s)" on page 33. 5 Replace the mSATA card. Postrequisites 1 Follow the instructions from step 4 to place the speakers in "Replacing the System Board"...
Owner's Manual
Page 97
...dell.com/regulatory_compliance. 25 Subwoofer WARNING: Before working inside your computer, read the safety information that shipped with your computer and follow the steps in "Removing the System Board" on page 75. See "Removing the Memory Module(s)" on page 21. 5 Follow the instructions from step 1 to step 3 in "Removing the Hard Drive...(s)" on page 23. 6 Follow the instructions from step 1 to step 2 in "Removing the Optical Drive" on page 7. See "Removing the Fan" on page 47. 11 Follow the instructions ...
...dell.com/regulatory_compliance. 25 Subwoofer WARNING: Before working inside your computer, read the safety information that shipped with your computer and follow the steps in "Removing the System Board" on page 75. See "Removing the Memory Module(s)" on page 21. 5 Follow the instructions from step 1 to step 3 in "Removing the Hard Drive...(s)" on page 23. 6 Follow the instructions from step 1 to step 2 in "Removing the Optical Drive" on page 7. See "Removing the Fan" on page 47. 11 Follow the instructions ...

Owner's Manual
Page 99
... Your Computer" on the computer base. See "Replacing the mSATA Card" on page 37. 6 Follow the instructions from step 4 to step 5 in "Replacing the Optical Drive" on page 29. 7 Follow the instructions from step 5 to step 6 in "Replacing the System Board" on page 33. 5 Replace the mSATA card. Subwoofer | 99 See... module(s). See "Replacing the Wireless Mini-Card" on page 79. 2 Replace the fan. Postrequisites 1 Follow the instructions from step 4 to step 11 in "Replacing the Hard Drive(s)" on page 48. 3 Replace the palm rest.
... Your Computer" on the computer base. See "Replacing the mSATA Card" on page 37. 6 Follow the instructions from step 4 to step 5 in "Replacing the Optical Drive" on page 29. 7 Follow the instructions from step 5 to step 6 in "Replacing the System Board" on page 33. 5 Replace the mSATA card. Subwoofer | 99 See... module(s). See "Replacing the Wireless Mini-Card" on page 79. 2 Replace the fan. Postrequisites 1 Follow the instructions from step 4 to step 11 in "Replacing the Hard Drive(s)" on page 48. 3 Replace the palm rest.

7720 Me and My Dell
Page 23
...-only, write-once, or re-writeable. Some of the common types of storage devices are hard‑disk drives (HDD), solid‑state drives (SSD), optical-disc drives, flash drives, and so on . Storage Device Storage devices allow you manually delete the data. Storage Device...shock resistant. Reads and writes DVDs and CDs. Examples of drives are called removable storage devices. Commonly used removable storage devices include: • Optical discs • Memory cards • Flash drives • External hard drives Optical Drives and Discs Your computer may support a DVD RW or a ...
...-only, write-once, or re-writeable. Some of the common types of storage devices are hard‑disk drives (HDD), solid‑state drives (SSD), optical-disc drives, flash drives, and so on . Storage Device Storage devices allow you manually delete the data. Storage Device...shock resistant. Reads and writes DVDs and CDs. Examples of drives are called removable storage devices. Commonly used removable storage devices include: • Optical discs • Memory cards • Flash drives • External hard drives Optical Drives and Discs Your computer may support a DVD RW or a ...

7720 Me and My Dell
Page 61
...run the USB 3.0 ports in USB 2.0 mode temporarily for multimedia and storage applications. USB 2.0 supports data transmission speed up to as hard drives and optical drives, to your computer while charging a USB device, the device may stop charging. It provides the same bandwidth as SuperSpeed USB. Legacy USB...an eSATA/USB combo port. In such cases, turn off or in sleep state. You can configure this limit using a USB optical drive or a flash drive. Your computer may not charge when the computer is in sleep state. USB Standards USB 3.0 - The debug port enables a user to...
...run the USB 3.0 ports in USB 2.0 mode temporarily for multimedia and storage applications. USB 2.0 supports data transmission speed up to as hard drives and optical drives, to your computer while charging a USB device, the device may stop charging. It provides the same bandwidth as SuperSpeed USB. Legacy USB...an eSATA/USB combo port. In such cases, turn off or in sleep state. You can configure this limit using a USB optical drive or a flash drive. Your computer may not charge when the computer is in sleep state. USB Standards USB 3.0 - The debug port enables a user to...

7720 Me and My Dell
Page 70
... and track the changes made to your hard drive using a visual representation of the space consumed by each type of file. • Performance and Configuration History - Manage your computer. • Drive Space Manager - You can use My Dell to find your hardware and operating system configurations... NOTE: It is a one-stop control panel for system tools and diagnostics. Windows 7 - Monitor system events and changes over time. View Dell Technical Support options, Customer Support, Tours and Training, Online Tools, Owner's Manual, Warranty Information, FAQs, and so on the Start screen....
... and track the changes made to your hard drive using a visual representation of the space consumed by each type of file. • Performance and Configuration History - Manage your computer. • Drive Space Manager - You can use My Dell to find your hardware and operating system configurations... NOTE: It is a one-stop control panel for system tools and diagnostics. Windows 7 - Monitor system events and changes over time. View Dell Technical Support options, Customer Support, Tours and Training, Online Tools, Owner's Manual, Warranty Information, FAQs, and so on the Start screen....


