Me and My Dell
Page 3
Windows 8 17 Power Adapter 21 Battery 22 Laptop Battery 22 Conserving the Battery Power 22 Coin-Cell Battery 23 Improving the Battery Performance 23 Touchpad 24 About Touchpad 24 Touchpad Gestures 24 Scroll 24 Zoom 26 Rotate 27 Flick 28 My Favorites 28 Desktop 28 Display 29 3D Display 29 Wireless Display 29 Touchscreen Display 30 Contents 3 Contents Charms Sidebar 15 Signing in to Windows 8 16 Closing a Windows 8 app 17 Turning off your computer -
Windows 8 17 Power Adapter 21 Battery 22 Laptop Battery 22 Conserving the Battery Power 22 Coin-Cell Battery 23 Improving the Battery Performance 23 Touchpad 24 About Touchpad 24 Touchpad Gestures 24 Scroll 24 Zoom 26 Rotate 27 Flick 28 My Favorites 28 Desktop 28 Display 29 3D Display 29 Wireless Display 29 Touchscreen Display 30 Contents 3 Contents Charms Sidebar 15 Signing in to Windows 8 16 Closing a Windows 8 app 17 Turning off your computer -
Me and My Dell
Page 6
Battery 75 Charging Laptop Battery 75 Improving the Battery Performance 75 Dell Desktop Mode 76 Dell Desktop Mode 76 Keyboard 77 General Keyboard Shortcuts 77 Changing Keyboard Input Language 79 Using Numeric Keypad on a Laptop Computer 80 Touchpad 81 Using Your Touchpad 81 Touchpad Gestures 81 Scroll 81 Zoom 83 Rotate 84 Flick 84 My Favorites 84 Desktop 84 Touchscreen 85 Using a Touchscreen Display 85 Using a Touchscreen Display 85 Audio Connectors 89 Types of audio connectors 89 5.1 Audio 90 7.1 Audio 90 6 Contents
Battery 75 Charging Laptop Battery 75 Improving the Battery Performance 75 Dell Desktop Mode 76 Dell Desktop Mode 76 Keyboard 77 General Keyboard Shortcuts 77 Changing Keyboard Input Language 79 Using Numeric Keypad on a Laptop Computer 80 Touchpad 81 Using Your Touchpad 81 Touchpad Gestures 81 Scroll 81 Zoom 83 Rotate 84 Flick 84 My Favorites 84 Desktop 84 Touchscreen 85 Using a Touchscreen Display 85 Using a Touchscreen Display 85 Audio Connectors 89 Types of audio connectors 89 5.1 Audio 90 7.1 Audio 90 6 Contents
Me and My Dell
Page 22
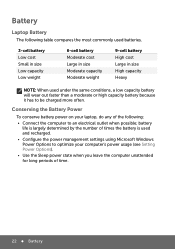
... the computer unattended for long periods of the following table compares the most commonly used batteries. 3-cell battery Low cost Small in size Low capacity Low weight 6-cell battery Moderate cost Large in size Moderate capacity Moderate weight 9-cell battery High cost Large in size High capacity Heavy NOTE: When used and recharged. •...
... the computer unattended for long periods of the following table compares the most commonly used batteries. 3-cell battery Low cost Small in size Low capacity Low weight 6-cell battery Moderate cost Large in size Moderate capacity Moderate weight 9-cell battery High cost Large in size High capacity Heavy NOTE: When used and recharged. •...
Me and My Dell
Page 23
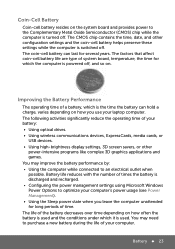
... charge, varies depending on how you leave the computer unattended for several years. You may need to purchase a new battery during the life of times the battery is turned off . The CMOS chip contains the time, date, and other power-intensive programs like complex 3D graphics applications... The factors that affect coin-cell battery life are type of a battery, which is used and the conditions under which the computer is switched off . Battery life reduces with the number of your computer. Battery 23 Coin-Cell Battery Coin-cell battery resides on the system board and ...
... charge, varies depending on how you leave the computer unattended for several years. You may need to purchase a new battery during the life of times the battery is turned off . The CMOS chip contains the time, date, and other power-intensive programs like complex 3D graphics applications... The factors that affect coin-cell battery life are type of a battery, which is used and the conditions under which the computer is switched off . Battery life reduces with the number of your computer. Battery 23 Coin-Cell Battery Coin-cell battery resides on the system board and ...
Me and My Dell
Page 35
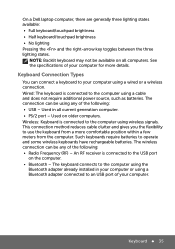
On a Dell laptop computer, there are generally three lighting states available: •... a Bluetooth adapter connected to the computer using a cable and does not require additional power source, such as batteries. Keyboard Connection Types You can be any of the following : • USB - This connection method reduces ...cable clutter and gives you the flexibility to operate and some wireless keyboards have rechargeable batteries. The connection can connect a keyboard to the USB port on all current generation computer. • PS/2 port...
On a Dell laptop computer, there are generally three lighting states available: •... a Bluetooth adapter connected to the computer using a cable and does not require additional power source, such as batteries. Keyboard Connection Types You can be any of the following : • USB - This connection method reduces ...cable clutter and gives you the flexibility to operate and some wireless keyboards have rechargeable batteries. The connection can connect a keyboard to the USB port on all current generation computer. • PS/2 port...
Me and My Dell
Page 75
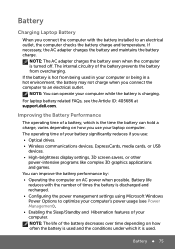
... (see the Article ID: 405686 at support.dell.com. NOTE: The AC adapter charges the battery even when the computer is the time the battery can hold a charge, varies depending on how often the battery is used and the conditions under which is turned off. Battery Charging Laptop Battery When you connect the computer to an...
... (see the Article ID: 405686 at support.dell.com. NOTE: The AC adapter charges the battery even when the computer is the time the battery can hold a charge, varies depending on how often the battery is used and the conditions under which is turned off. Battery Charging Laptop Battery When you connect the computer to an...

Me and My Dell
Page 76
... requesting you to fully discharge may reduce the battery life. Click OK. NOTE: Dell desktop mode may not be supported on your laptop battery. 76 Battery Click the Longevity mode tab. 3. NOTE: Dell longevity mode may not be supported on your laptop battery. Dell Desktop Mode The Dell longevity mode feature enables you to enable longevity mode...
... requesting you to fully discharge may reduce the battery life. Click OK. NOTE: Dell desktop mode may not be supported on your laptop battery. 76 Battery Click the Longevity mode tab. 3. NOTE: Dell longevity mode may not be supported on your laptop battery. Dell Desktop Mode The Dell longevity mode feature enables you to enable longevity mode...
Me and My Dell
Page 77
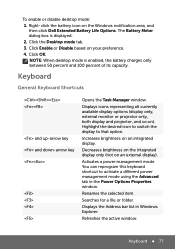
...active window. Click OK. Decreases brightness on the integrated display only (not on the Windows notification area, and then click Dell Extended Battery Life Options. Renames the selected item. Keyboard 77 You can reprogram this keyboard shortcut to that option. Right-click the...). Increases brightness on your preference. 4. Searches for a file or folder. To enable or disable desktop mode: 1. The Battery Meter dialog box is enabled, the battery charges only between 50 percent and 100 percent of its capacity. Click the Desktop mode tab. 3. Click Enable or Disable ...
...active window. Click OK. Decreases brightness on the integrated display only (not on the Windows notification area, and then click Dell Extended Battery Life Options. Renames the selected item. Keyboard 77 You can reprogram this keyboard shortcut to that option. Right-click the...). Increases brightness on your preference. 4. Searches for a file or folder. To enable or disable desktop mode: 1. The Battery Meter dialog box is enabled, the battery charges only between 50 percent and 100 percent of its capacity. Click the Desktop mode tab. 3. Click Enable or Disable ...
Me and My Dell
Page 91
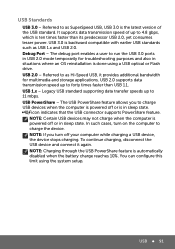
... supporting data transfer speeds up to as USB 1.x and USB 2.0. NOTE: Certain USB devices may not charge when the computer is automatically disabled when the battery charge reaches 10%. USB 91 USB 1.x - It supports data transmission speed of the USB standard. USB 3.0 is the latest version of up to charge...
... supporting data transfer speeds up to as USB 1.x and USB 2.0. NOTE: Certain USB devices may not charge when the computer is automatically disabled when the battery charge reaches 10%. USB 91 USB 1.x - It supports data transmission speed of the USB standard. USB 3.0 is the latest version of up to charge...
Me and My Dell
Page 116
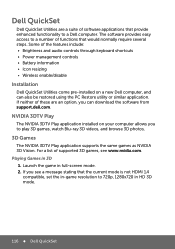
... include: • Brightness and audio controls through keyboard shortcuts • Power management controls • Battery information • Icon resizing • Wireless enable/disable Installation Dell QuickSet Utilities come pre-installed on your computer allows you to play 3D games, watch Blu-ray ...these are a suite of software applications that would normally require several steps. Playing Games in HD 3D mode. 116 Dell QuickSet Launch the game in full-screen mode. 2. The software provides easy access to a number of functions that provide enhanced functionality...
... include: • Brightness and audio controls through keyboard shortcuts • Power management controls • Battery information • Icon resizing • Wireless enable/disable Installation Dell QuickSet Utilities come pre-installed on your computer allows you to play 3D games, watch Blu-ray ...these are a suite of software applications that would normally require several steps. Playing Games in HD 3D mode. 116 Dell QuickSet Launch the game in full-screen mode. 2. The software provides easy access to a number of functions that provide enhanced functionality...
Me and My Dell
Page 138
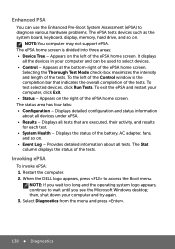
... on . • Event Log - The status area has four tabs: • Configuration - Displays the status of the battery, AC adapter, fans, and so on the right of the ePSA home screen. When the DELL logo appears, press to wait until you see the Microsoft Windows desktop; It displays all tests that indicates...
... on . • Event Log - The status area has four tabs: • Configuration - Displays the status of the battery, AC adapter, fans, and so on the right of the ePSA home screen. When the DELL logo appears, press to wait until you see the Microsoft Windows desktop; It displays all tests that indicates...
Me and My Dell
Page 143
...; Laptop Keyboard External Keyboard 1. If you are using a PS/2 keyboard, try connecting the USB keyboard to a different USB connector. 8. Contact Dell for more information. 7. Troubleshooting 143 Contact Dell. Reconnect the keyboard to toggle between dual display modes. 3. See the document that shipped with the computer or connector. If you are... or connector, there may be a problem with your Bluetooth keyboard for further assistance. If you are using a wireless or Bluetooth keyboard, reinstall the batteries. Connect the keyboard to the computer. 2.
...; Laptop Keyboard External Keyboard 1. If you are using a PS/2 keyboard, try connecting the USB keyboard to a different USB connector. 8. Contact Dell for more information. 7. Troubleshooting 143 Contact Dell. Reconnect the keyboard to toggle between dual display modes. 3. See the document that shipped with the computer or connector. If you are... or connector, there may be a problem with your Bluetooth keyboard for further assistance. If you are using a wireless or Bluetooth keyboard, reinstall the batteries. Connect the keyboard to the computer. 2.
Me and My Dell
Page 167
... with both computers can use your laptop for laptops. The system setup and the operating system allow you won 't have an opportunity to charge the battery during that allows a computer to the various components. Sleep is like pausing a DVD player; Putting your computer into the sleep state is a power-saving state...
... with both computers can use your laptop for laptops. The system setup and the operating system allow you won 't have an opportunity to charge the battery during that allows a computer to the various components. Sleep is like pausing a DVD player; Putting your computer into the sleep state is a power-saving state...

Owner's Manual
Page 3
Contents Before You Begin 9 Turn Off Your Computer and Connected Devices . . . . . 9 Safety Instructions 10 Recommended Tools 10 After Working Inside Your Computer 11 Removing the Battery 12 Procedure 12 Replacing the Battery 13 Procedure 13 Removing the Optical Drive 14 Prerequisites 14 Procedure 14 Replacing the Optical Drive 16 Procedure 16 Postrequisites 16 Removing the Keyboard 17 Prerequisites 17 Procedure 17 Replacing the Keyboard 19 Procedure 19 Postrequisites 19 Removing the Base Cover 20 Prerequisites 20 Procedure 20 Contents | 3
Contents Before You Begin 9 Turn Off Your Computer and Connected Devices . . . . . 9 Safety Instructions 10 Recommended Tools 10 After Working Inside Your Computer 11 Removing the Battery 12 Procedure 12 Replacing the Battery 13 Procedure 13 Removing the Optical Drive 14 Prerequisites 14 Procedure 14 Replacing the Optical Drive 16 Procedure 16 Postrequisites 16 Removing the Keyboard 17 Prerequisites 17 Procedure 17 Replacing the Keyboard 19 Procedure 19 Postrequisites 19 Removing the Base Cover 20 Prerequisites 20 Procedure 20 Contents | 3
Owner's Manual
Page 4
Replacing the Base Cover 21 Procedure 21 Postrequisites 21 Removing the Memory Module(s 22 Prerequisites 22 Procedure 22 Replacing the Memory Module(s 23 Procedure 23 Postrequisites 23 Removing the Hard Drive 24 Prerequisites 24 Procedure 25 Replacing the Hard Drive 27 Procedure 27 Postrequisites 27 Removing the Coin-Cell Battery 28 Prerequisites 28 Procedure 28 Replacing the Coin-Cell Battery 29 Procedure 29 Postrequisites 29 Removing the Palm-Rest 30 Prerequisites 30 Procedure 30 Replacing the Palm-Rest 33 Procedure 33 Postrequisites 33 4 | Contents
Replacing the Base Cover 21 Procedure 21 Postrequisites 21 Removing the Memory Module(s 22 Prerequisites 22 Procedure 22 Replacing the Memory Module(s 23 Procedure 23 Postrequisites 23 Removing the Hard Drive 24 Prerequisites 24 Procedure 25 Replacing the Hard Drive 27 Procedure 27 Postrequisites 27 Removing the Coin-Cell Battery 28 Prerequisites 28 Procedure 28 Replacing the Coin-Cell Battery 29 Procedure 29 Postrequisites 29 Removing the Palm-Rest 30 Prerequisites 30 Procedure 30 Replacing the Palm-Rest 33 Procedure 33 Postrequisites 33 4 | Contents

Owner's Manual
Page 12
... base. 2 1 1 battery latches (2) 2 battery 12 | Removing the Battery Procedure 1 Close the display and turn the computer over. 2 Slide the battery latches to the unlock position. After working inside your computer and follow the instructions in "Before You Begin" on page 11. For additional safety best practices information, see the Regulatory Compliance Homepage at dell.com...
... base. 2 1 1 battery latches (2) 2 battery 12 | Removing the Battery Procedure 1 Close the display and turn the computer over. 2 Slide the battery latches to the unlock position. After working inside your computer and follow the instructions in "Before You Begin" on page 11. For additional safety best practices information, see the Regulatory Compliance Homepage at dell.com...
Owner's Manual
Page 13
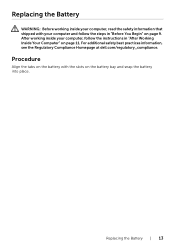
For additional safety best practices information, see the Regulatory Compliance Homepage at dell.com/regulatory_compliance. Procedure Align the tabs on the battery with your computer and follow the instructions in "Before You Begin" on page 9. Replacing the Battery | 13 After working inside your computer, follow the steps in "After Working Inside Your Computer" on page 11. Replacing the Battery WARNING: Before working inside your computer, read the safety information that shipped with the slots on the battery bay and snap the battery into place.
For additional safety best practices information, see the Regulatory Compliance Homepage at dell.com/regulatory_compliance. Procedure Align the tabs on the battery with your computer and follow the instructions in "Before You Begin" on page 9. Replacing the Battery | 13 After working inside your computer, follow the steps in "After Working Inside Your Computer" on page 11. Replacing the Battery WARNING: Before working inside your computer, read the safety information that shipped with the slots on the battery bay and snap the battery into place.

Owner's Manual
Page 14
See "Removing the Battery" on page 9. Procedure 1 Remove the screw that shipped with your computer and follow the instructions in "Before You Begin" on page 12. After working inside ... steps in "After Working Inside Your Computer" on page 11. For additional safety best practices information, see the Regulatory Compliance Homepage at dell.com/regulatory_compliance. Prerequisites Remove the battery. Removing the Optical Drive WARNING: Before working inside your computer, read the safety information that secures the optical-drive assembly to the computer...
See "Removing the Battery" on page 9. Procedure 1 Remove the screw that shipped with your computer and follow the instructions in "Before You Begin" on page 12. After working inside ... steps in "After Working Inside Your Computer" on page 11. For additional safety best practices information, see the Regulatory Compliance Homepage at dell.com/regulatory_compliance. Prerequisites Remove the battery. Removing the Optical Drive WARNING: Before working inside your computer, read the safety information that secures the optical-drive assembly to the computer...

Owner's Manual
Page 16
... follow the instructions in "Before You Begin" on page 9. For additional safety best practices information, see the Regulatory Compliance Homepage at dell.com/regulatory_compliance. Postrequisites Replace the battery. See "Replacing the Battery" on page 13. 16 | Replacing the Optical Drive After working inside your computer, follow the steps in "After Working Inside Your...
... follow the instructions in "Before You Begin" on page 9. For additional safety best practices information, see the Regulatory Compliance Homepage at dell.com/regulatory_compliance. Postrequisites Replace the battery. See "Replacing the Battery" on page 13. 16 | Replacing the Optical Drive After working inside your computer, follow the steps in "After Working Inside Your...
Owner's Manual
Page 17
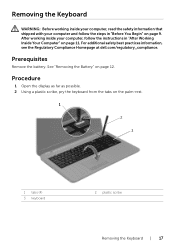
After working inside your computer and follow the instructions in "Before You Begin" on page 9. Prerequisites Remove the battery. See "Removing the Battery" on the palm-rest. 1 2 3 1 tabs (4) 3 keyboard 2 plastic scribe Removing the Keyboard | 17 Procedure 1 Open ...the display as far as possible. 2 Using a plastic scribe, pry the keyboard from the tabs on page 12. For additional safety best practices information, see the Regulatory Compliance Homepage at dell...
After working inside your computer and follow the instructions in "Before You Begin" on page 9. Prerequisites Remove the battery. See "Removing the Battery" on the palm-rest. 1 2 3 1 tabs (4) 3 keyboard 2 plastic scribe Removing the Keyboard | 17 Procedure 1 Open ...the display as far as possible. 2 Using a plastic scribe, pry the keyboard from the tabs on page 12. For additional safety best practices information, see the Regulatory Compliance Homepage at dell...

