Me and My Dell
Page 3
Windows 8 17 Power Adapter 21 Battery 22 Laptop Battery 22 Conserving the Battery Power 22 Coin-Cell Battery 23 Improving the Battery Performance 23 Touchpad 24 About Touchpad 24 Touchpad Gestures 24 Scroll 24 Zoom 26 Rotate 27 Flick 28 My Favorites 28 Desktop 28 Display 29 3D Display 29 Wireless Display 29 Touchscreen Display 30 Contents 3 Contents Charms Sidebar 15 Signing in to Windows 8 16 Closing a Windows 8 app 17 Turning off your computer -
Windows 8 17 Power Adapter 21 Battery 22 Laptop Battery 22 Conserving the Battery Power 22 Coin-Cell Battery 23 Improving the Battery Performance 23 Touchpad 24 About Touchpad 24 Touchpad Gestures 24 Scroll 24 Zoom 26 Rotate 27 Flick 28 My Favorites 28 Desktop 28 Display 29 3D Display 29 Wireless Display 29 Touchscreen Display 30 Contents 3 Contents Charms Sidebar 15 Signing in to Windows 8 16 Closing a Windows 8 app 17 Turning off your computer -
Me and My Dell
Page 6
Battery 75 Charging Laptop Battery 75 Improving the Battery Performance 75 Dell Desktop Mode 76 Dell Desktop Mode 76 Keyboard 77 General Keyboard Shortcuts 77 Changing Keyboard Input Language 79 Using Numeric Keypad on a Laptop Computer 80 Touchpad 81 Using Your Touchpad 81 Touchpad Gestures 81 Scroll 81 Zoom 83 Rotate 84 Flick 84 My Favorites 84 Desktop 84 Touchscreen 85 Using a Touchscreen Display 85 Using a Touchscreen Display 85 Audio Connectors 89 Types of audio connectors 89 5.1 Audio 90 7.1 Audio 90 6 Contents
Battery 75 Charging Laptop Battery 75 Improving the Battery Performance 75 Dell Desktop Mode 76 Dell Desktop Mode 76 Keyboard 77 General Keyboard Shortcuts 77 Changing Keyboard Input Language 79 Using Numeric Keypad on a Laptop Computer 80 Touchpad 81 Using Your Touchpad 81 Touchpad Gestures 81 Scroll 81 Zoom 83 Rotate 84 Flick 84 My Favorites 84 Desktop 84 Touchscreen 85 Using a Touchscreen Display 85 Using a Touchscreen Display 85 Audio Connectors 89 Types of audio connectors 89 5.1 Audio 90 7.1 Audio 90 6 Contents
Me and My Dell
Page 22
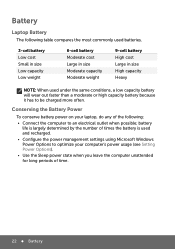
...do any of the following: • Connect the computer to be charged more often. battery life is largely determined by the number of time. 22 Battery Conserving the Battery Power To conserve battery power on your computer's power usage (see Setting Power Options). • Use the... Sleep power state when you leave the computer unattended for long periods of times the battery is used under the same conditions...
...do any of the following: • Connect the computer to be charged more often. battery life is largely determined by the number of time. 22 Battery Conserving the Battery Power To conserve battery power on your computer's power usage (see Setting Power Options). • Use the... Sleep power state when you leave the computer unattended for long periods of times the battery is used under the same conditions...
Me and My Dell
Page 23
... the computer while connected to optimize your computer's power usage (see Power Management). • Using the Sleep power state when you use your battery: • Using optical drives. • Using wireless communications devices, ExpressCards, media cards, or USB devices. • Using high-brightness display... settings, 3D screen savers, or other configuration settings and the coin-cell battery helps preserve these settings while the computer is turned off . You may need to the Complementary Metal Oxide Semiconductor (CMOS) chip ...
... the computer while connected to optimize your computer's power usage (see Power Management). • Using the Sleep power state when you use your battery: • Using optical drives. • Using wireless communications devices, ExpressCards, media cards, or USB devices. • Using high-brightness display... settings, 3D screen savers, or other configuration settings and the coin-cell battery helps preserve these settings while the computer is turned off . You may need to the Complementary Metal Oxide Semiconductor (CMOS) chip ...
Me and My Dell
Page 35
...The connection can connect a keyboard to the computer using the Bluetooth adapter already installed in all computers. Used in your computer. On a Dell laptop computer, there are generally three lighting states available: • Full keyboard/touchpad brightness • Half keyboard/touchpad brightness • No... Backlit keyboard may not be using a Bluetooth adapter connected to the computer using wireless signals. Such keyboards require batteries to the USB port on older computers. Wireless: Keyboard is connected to operate and some wireless keyboards have rechargeable...
...The connection can connect a keyboard to the computer using the Bluetooth adapter already installed in all computers. Used in your computer. On a Dell laptop computer, there are generally three lighting states available: • Full keyboard/touchpad brightness • Half keyboard/touchpad brightness • No... Backlit keyboard may not be using a Bluetooth adapter connected to the computer using wireless signals. Such keyboards require batteries to the USB port on older computers. Wireless: Keyboard is connected to operate and some wireless keyboards have rechargeable...
Me and My Dell
Page 75
... your computer's power usage (see the Article ID: 405686 at support.dell.com. If necessary, the AC adapter charges the battery and maintains the battery charge. Improving the Battery Performance The operating time of your laptop computer. NOTE: The AC adapter charges the battery even when the computer is used in your computer or being...
... your computer's power usage (see the Article ID: 405686 at support.dell.com. If necessary, the AC adapter charges the battery and maintains the battery charge. Improving the Battery Performance The operating time of your laptop computer. NOTE: The AC adapter charges the battery even when the computer is used in your computer or being...

Me and My Dell
Page 76
... charge and discharge cycles. NOTE: When longevity mode is displayed. 2. NOTE: Dell desktop mode may reduce the battery life. The desktop mode feature protects the battery health by moderating the extent to which your battery charges, and prevents your laptop battery. Dell Desktop Mode The Dell longevity mode feature enables you to enable Desktop Mode. Click Enable...
... charge and discharge cycles. NOTE: When longevity mode is displayed. 2. NOTE: Dell desktop mode may reduce the battery life. The desktop mode feature protects the battery health by moderating the extent to which your battery charges, and prevents your laptop battery. Dell Desktop Mode The Dell longevity mode feature enables you to enable Desktop Mode. Click Enable...
Me and My Dell
Page 77
... dialog box is enabled, the battery charges only between 50 percent and 100 percent of its capacity. Click Enable or Disable based on ). Displays icons representing all currently available display options (... mode is displayed. 2. Decreases brightness on the integrated display only (not on the Windows notification area, and then click Dell Extended Battery Life Options. Searches for a file or folder. Right-click the battery icon on an external display). Displays the Address bar list in the Power Options Properties window. To enable or disable...
... dialog box is enabled, the battery charges only between 50 percent and 100 percent of its capacity. Click Enable or Disable based on ). Displays icons representing all currently available display options (... mode is displayed. 2. Decreases brightness on the integrated display only (not on the Windows notification area, and then click Dell Extended Battery Life Options. Searches for a file or folder. Right-click the battery icon on an external display). Displays the Address bar list in the Power Options Properties window. To enable or disable...
Me and My Dell
Page 91
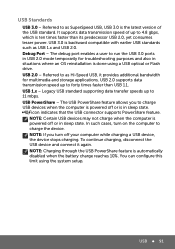
..., which is ten times faster than USB 1.1. USB 91 The debug port enables a user to as SuperSpeed USB, USB 3.0 is automatically disabled when the battery charge reaches 10%. USB 1.x - To continue charging, disconnect the USB device and connect it provides additional bandwidth for troubleshooting purposes and also in USB 2.0 mode...
..., which is ten times faster than USB 1.1. USB 91 The debug port enables a user to as SuperSpeed USB, USB 3.0 is automatically disabled when the battery charge reaches 10%. USB 1.x - To continue charging, disconnect the USB device and connect it provides additional bandwidth for troubleshooting purposes and also in USB 2.0 mode...
Me and My Dell
Page 116
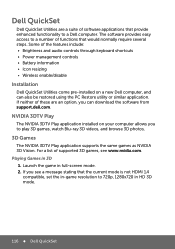
... and audio controls through keyboard shortcuts • Power management controls • Battery information • Icon resizing • Wireless enable/disable Installation Dell QuickSet Utilities come pre-installed on your computer allows you to a Dell computer. Playing Games in full-screen mode. 2. NVIDIA 3DTV Play The NVIDIA... Vision. If you see www.nvidia.com. The software provides easy access to 720p, 1280x720 in HD 3D mode. 116 Dell QuickSet For a list of functions that the current mode is not HDMI 1.4 compatible, set the in-game resolution to a number of...
... and audio controls through keyboard shortcuts • Power management controls • Battery information • Icon resizing • Wireless enable/disable Installation Dell QuickSet Utilities come pre-installed on your computer allows you to a Dell computer. Playing Games in full-screen mode. 2. NVIDIA 3DTV Play The NVIDIA... Vision. If you see www.nvidia.com. The software provides easy access to 720p, 1280x720 in HD 3D mode. 116 Dell QuickSet For a list of functions that the current mode is not HDMI 1.4 compatible, set the in-game resolution to a number of...
Me and My Dell
Page 138
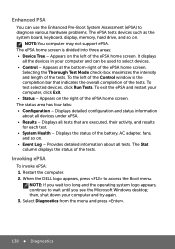
... To exit the ePSA and restart your computer and can use the Enhanced Pre-Boot System Assessment (ePSA) to access the Boot menu. When the DELL logo appears, press to diagnose various hardware problems. The ePSA tests devices such as the system board, keyboard, display, memory, hard drive, and...devices. • Control - NOTE:You computer may not support ePSA. Displays the status of the tests. The Stat column displays the status of the battery, AC adapter, fans, and so on the right of the tests. Restart the computer. 2. Selecting the Thorough Test Mode check-box maximizes the ...
... To exit the ePSA and restart your computer and can use the Enhanced Pre-Boot System Assessment (ePSA) to access the Boot menu. When the DELL logo appears, press to diagnose various hardware problems. The ePSA tests devices such as the system board, keyboard, display, memory, hard drive, and...devices. • Control - NOTE:You computer may not support ePSA. Displays the status of the tests. The Stat column displays the status of the battery, AC adapter, fans, and so on the right of the tests. Restart the computer. 2. Selecting the Thorough Test Mode check-box maximizes the ...
Me and My Dell
Page 143
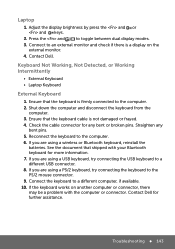
...If the keyboard works on the external monitor. 4. Check the cable connector for more information. 7. Reconnect the keyboard to toggle between dual display modes. 3. Contact Dell. If you are using a USB keyboard, try connecting the keyboard to the PS/2 mouse connector. 9. Press the and to the computer. 6. Keyboard Not ...and or and keys. 2. Ensure that shipped with the computer or connector. If you are using a wireless or Bluetooth keyboard, reinstall the batteries. Contact Dell for further assistance. Laptop 1. Straighten any bent or broken pins.
...If the keyboard works on the external monitor. 4. Check the cable connector for more information. 7. Reconnect the keyboard to toggle between dual display modes. 3. Contact Dell. If you are using a USB keyboard, try connecting the keyboard to the PS/2 mouse connector. 9. Press the and to the computer. 6. Keyboard Not ...and or and keys. 2. Ensure that shipped with the computer or connector. If you are using a wireless or Bluetooth keyboard, reinstall the batteries. Contact Dell for further assistance. Laptop 1. Straighten any bent or broken pins.
Me and My Dell
Page 167
.... Putting your computer into the sleep state is a power-saving state designed primarily for an extended period and won't have an opportunity to charge the battery during that allows a computer to quickly resume full-power operation (typically within several seconds) when you to configure when the power supply to the various...
.... Putting your computer into the sleep state is a power-saving state designed primarily for an extended period and won't have an opportunity to charge the battery during that allows a computer to quickly resume full-power operation (typically within several seconds) when you to configure when the power supply to the various...

Owner's Manual
Page 3
Contents Before You Begin 9 Turn Off Your Computer and Connected Devices . . . . . 9 Safety Instructions 10 Recommended Tools 10 After Working Inside Your Computer 11 Removing the Battery 12 Procedure 12 Replacing the Battery 13 Procedure 13 Removing the Optical Drive 14 Prerequisites 14 Procedure 14 Replacing the Optical Drive 16 Procedure 16 Postrequisites 16 Removing the Keyboard 17 Prerequisites 17 Procedure 17 Replacing the Keyboard 19 Procedure 19 Postrequisites 19 Removing the Base Cover 20 Prerequisites 20 Procedure 20 Contents | 3
Contents Before You Begin 9 Turn Off Your Computer and Connected Devices . . . . . 9 Safety Instructions 10 Recommended Tools 10 After Working Inside Your Computer 11 Removing the Battery 12 Procedure 12 Replacing the Battery 13 Procedure 13 Removing the Optical Drive 14 Prerequisites 14 Procedure 14 Replacing the Optical Drive 16 Procedure 16 Postrequisites 16 Removing the Keyboard 17 Prerequisites 17 Procedure 17 Replacing the Keyboard 19 Procedure 19 Postrequisites 19 Removing the Base Cover 20 Prerequisites 20 Procedure 20 Contents | 3
Owner's Manual
Page 4
Replacing the Base Cover 21 Procedure 21 Postrequisites 21 Removing the Memory Module(s 22 Prerequisites 22 Procedure 22 Replacing the Memory Module(s 23 Procedure 23 Postrequisites 23 Removing the Hard Drive 24 Prerequisites 24 Procedure 25 Replacing the Hard Drive 27 Procedure 27 Postrequisites 27 Removing the Coin-Cell Battery 28 Prerequisites 28 Procedure 28 Replacing the Coin-Cell Battery 29 Procedure 29 Postrequisites 29 Removing the Palm-Rest 30 Prerequisites 30 Procedure 30 Replacing the Palm-Rest 33 Procedure 33 Postrequisites 33 4 | Contents
Replacing the Base Cover 21 Procedure 21 Postrequisites 21 Removing the Memory Module(s 22 Prerequisites 22 Procedure 22 Replacing the Memory Module(s 23 Procedure 23 Postrequisites 23 Removing the Hard Drive 24 Prerequisites 24 Procedure 25 Replacing the Hard Drive 27 Procedure 27 Postrequisites 27 Removing the Coin-Cell Battery 28 Prerequisites 28 Procedure 28 Replacing the Coin-Cell Battery 29 Procedure 29 Postrequisites 29 Removing the Palm-Rest 30 Prerequisites 30 Procedure 30 Replacing the Palm-Rest 33 Procedure 33 Postrequisites 33 4 | Contents

Owner's Manual
Page 12
..., see the Regulatory Compliance Homepage at dell.com/regulatory_compliance. You hear a click when the battery is unlocked. 3 Lift and remove the battery off the computer base. 2 1 1 battery latches (2) 2 battery 12 | Removing the Battery Procedure 1 Close the display and turn the computer over. 2 Slide the battery latches to the unlock position. Removing the Battery WARNING: Before working inside your...
..., see the Regulatory Compliance Homepage at dell.com/regulatory_compliance. You hear a click when the battery is unlocked. 3 Lift and remove the battery off the computer base. 2 1 1 battery latches (2) 2 battery 12 | Removing the Battery Procedure 1 Close the display and turn the computer over. 2 Slide the battery latches to the unlock position. Removing the Battery WARNING: Before working inside your...
Owner's Manual
Page 13
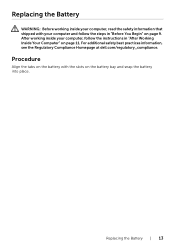
Procedure Align the tabs on the battery with your computer and follow the instructions in "Before You Begin" on the battery bay and snap the battery into place. Replacing the Battery | 13 For additional safety best practices information, see the Regulatory Compliance Homepage at dell.com/regulatory_compliance. Replacing the Battery WARNING: Before working inside your computer, read the safety information that shipped with the slots on page 9. After working inside your computer, follow the steps in "After Working Inside Your Computer" on page 11.
Procedure Align the tabs on the battery with your computer and follow the instructions in "Before You Begin" on the battery bay and snap the battery into place. Replacing the Battery | 13 For additional safety best practices information, see the Regulatory Compliance Homepage at dell.com/regulatory_compliance. Replacing the Battery WARNING: Before working inside your computer, read the safety information that shipped with the slots on page 9. After working inside your computer, follow the steps in "After Working Inside Your Computer" on page 11.

Owner's Manual
Page 14
... instructions in "Before You Begin" on page 12. For additional safety best practices information, see the Regulatory Compliance Homepage at dell.com/regulatory_compliance. See "Removing the Battery" on page 9. Prerequisites Remove the battery. After working inside your fingertips, slide the optical-drive assembly out of the optical-drive bay. 2 1 1 optical-drive assembly 2 screw...
... instructions in "Before You Begin" on page 12. For additional safety best practices information, see the Regulatory Compliance Homepage at dell.com/regulatory_compliance. See "Removing the Battery" on page 9. Prerequisites Remove the battery. After working inside your fingertips, slide the optical-drive assembly out of the optical-drive bay. 2 1 1 optical-drive assembly 2 screw...

Owner's Manual
Page 16
... follow the instructions in "Before You Begin" on page 9. For additional safety best practices information, see the Regulatory Compliance Homepage at dell.com/regulatory_compliance. Postrequisites Replace the battery. See "Replacing the Battery" on page 11. After working inside your computer, follow the steps in "After Working Inside Your Computer" on page 13. 16...
... follow the instructions in "Before You Begin" on page 9. For additional safety best practices information, see the Regulatory Compliance Homepage at dell.com/regulatory_compliance. Postrequisites Replace the battery. See "Replacing the Battery" on page 11. After working inside your computer, follow the steps in "After Working Inside Your Computer" on page 13. 16...
Owner's Manual
Page 17
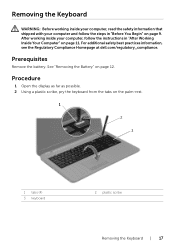
After working inside your computer and follow the instructions in "Before You Begin" on page 9. See "Removing the Battery" on the palm-rest. 1 2 3 1 tabs (4) 3 keyboard 2 plastic scribe Removing the Keyboard | 17 Removing the Keyboard WARNING: Before working ...in "After Working Inside Your Computer" on page 11. For additional safety best practices information, see the Regulatory Compliance Homepage at dell.com/regulatory_compliance. Prerequisites Remove the battery. Procedure 1 Open the display as far as possible. 2 Using a plastic scribe, pry the keyboard from the tabs on ...
After working inside your computer and follow the instructions in "Before You Begin" on page 9. See "Removing the Battery" on the palm-rest. 1 2 3 1 tabs (4) 3 keyboard 2 plastic scribe Removing the Keyboard | 17 Removing the Keyboard WARNING: Before working ...in "After Working Inside Your Computer" on page 11. For additional safety best practices information, see the Regulatory Compliance Homepage at dell.com/regulatory_compliance. Prerequisites Remove the battery. Procedure 1 Open the display as far as possible. 2 Using a plastic scribe, pry the keyboard from the tabs on ...

