
View
Page 100
...a When the DELL™ logo appears, press immediately. Starting the Dell Diagnostics From Your Hard Drive The Dell Diagnostics is located on a hidden diagnostic utility partition on your system board, keyboard, hard drive, and display. • During the assessment, answer any key to start the Dell Diagnostics from the...wait too long and the operating system logo appears, continue to be powered down the error code(s) and contact Dell. b Press and hold the key while powering the computer on your hard drive. 100 Troubleshooting to retest the component that is connected to an ...
...a When the DELL™ logo appears, press immediately. Starting the Dell Diagnostics From Your Hard Drive The Dell Diagnostics is located on a hidden diagnostic utility partition on your system board, keyboard, hard drive, and display. • During the assessment, answer any key to start the Dell Diagnostics from the...wait too long and the operating system logo appears, continue to be powered down the error code(s) and contact Dell. b Press and hold the key while powering the computer on your hard drive. 100 Troubleshooting to retest the component that is connected to an ...
View
Page 113
...the software documentation. The computer cannot find the hard drive. Reinstall the memory modules and, if necessary, replace them (see "Contacting Dell" on the system board may be faulty or improperly seated. The operating system may be malfunctioning. A memory module may be faulty or improperly seated. N...still appears, see "Memory" on page 147). Troubleshooting 113 Restart the computer, and avoid touching the keyboard or keys during the boot routine. K E Y B O A R D S T U C K KEY F A I N T E R R U P T - For external keyboards or keypads, check the cable ...
...the software documentation. The computer cannot find the hard drive. Reinstall the memory modules and, if necessary, replace them (see "Contacting Dell" on the system board may be faulty or improperly seated. The operating system may be malfunctioning. A memory module may be faulty or improperly seated. N...still appears, see "Memory" on page 147). Troubleshooting 113 Restart the computer, and avoid touching the keyboard or keys during the boot routine. K E Y B O A R D S T U C K KEY F A I N T E R R U P T - For external keyboards or keypads, check the cable ...

View
Page 157
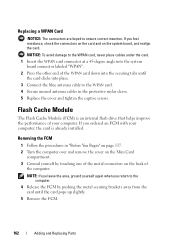
If you feel resistance, check the connectors on the card and on the system board, and realign the card. NOTICE: To avoid damage to ensure correct insertion. Adding and Replacing Parts 157 2 1 1 metal securing tabs (2) 2 WLAN card Replacing a WLAN Card NOTICE: The connectors are keyed to the WLAN card, never place cables under the card. 1 Insert the WLAN card connector at a 45-degree angle into the system board connector labeled "WLAN". 2 Press the other end of the WLAN card down into the securing tabs until the card clicks into place.
If you feel resistance, check the connectors on the card and on the system board, and realign the card. NOTICE: To avoid damage to ensure correct insertion. Adding and Replacing Parts 157 2 1 1 metal securing tabs (2) 2 WLAN card Replacing a WLAN Card NOTICE: The connectors are keyed to the WLAN card, never place cables under the card. 1 Insert the WLAN card connector at a 45-degree angle into the system board connector labeled "WLAN". 2 Press the other end of the WLAN card down into the securing tabs until the card clicks into place.

View
Page 160
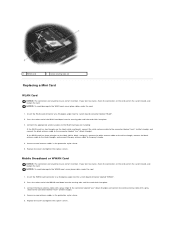
If you feel resistance, check the connectors on the card and on the system board, and realign the card. NOTICE: To avoid damage to ensure correct insertion. 2 1 1 metal securing tabs (2) 2 WWAN card Replacing a WWAN Card NOTICE: The connectors are keyed to the WWAN card, never place cables under the card. 1 Insert the WWAN card connector at a 45-degree angle into the system board connector labeled "WWAN". 2 Press the other end of the WWAN card down into the securing tabs until the card clicks into place. 160 Adding and Replacing Parts
If you feel resistance, check the connectors on the card and on the system board, and realign the card. NOTICE: To avoid damage to ensure correct insertion. 2 1 1 metal securing tabs (2) 2 WWAN card Replacing a WWAN Card NOTICE: The connectors are keyed to the WWAN card, never place cables under the card. 1 Insert the WWAN card connector at a 45-degree angle into the system board connector labeled "WWAN". 2 Press the other end of the WWAN card down into the securing tabs until the card clicks into place. 160 Adding and Replacing Parts
View
Page 162
Replacing a WPAN Card NOTICE: The connectors are keyed to the WPAN card. 4 Secure unused antenna cables in "Before You Begin" on page .... If you return to the computer. 4 Release the FCM by touching one of the metal connectors on the system board, and realign the card. NOTE: If you leave the area, ground yourself again when you ordered an FCM with your... card, never place cables under the card. 1 Insert the WPAN card connector at a 45-degree angle into the system board connector labeled "WPAN". 2 Press the other end of the WPAN card down into the securing tabs until the card pops ...
Replacing a WPAN Card NOTICE: The connectors are keyed to the WPAN card. 4 Secure unused antenna cables in "Before You Begin" on page .... If you return to the computer. 4 Release the FCM by touching one of the metal connectors on the system board, and realign the card. NOTE: If you leave the area, ground yourself again when you ordered an FCM with your... card, never place cables under the card. 1 Insert the WPAN card connector at a 45-degree angle into the system board connector labeled "WPAN". 2 Press the other end of the WPAN card down into the securing tabs until the card pops ...

View
Page 202
... in . An electronic pathway assigned to a building or a few nearby buildings. The ISP typically provides you cannot operate both devices simultaneously. key combination - kHz - liquid crystal display - I /O - Each device connection must be connected to another LAN over any distance through telephone ...lines and radio waves to press multiple keys at the same time. input/output - ISP - Keyboards and printers are physically located on the computer's system board. IrDA - Although two devices can share the same IRQ assignment, you...
... in . An electronic pathway assigned to a building or a few nearby buildings. The ISP typically provides you cannot operate both devices simultaneously. key combination - kHz - liquid crystal display - I /O - Each device connection must be connected to another LAN over any distance through telephone ...lines and radio waves to press multiple keys at the same time. input/output - ISP - Keyboards and printers are physically located on the computer's system board. IrDA - Although two devices can share the same IRQ assignment, you...
Service Manual
Page 52
... never place cables under the card. 1. Insert the WLAN card connector at a 45-degree angle into the system board connector labeled "WLAN". 2. If you are keyed to ensure correct insertion. Secure unused antenna cables in the protective mylar sleeve. 5. Press the other end of the... 1. Secure unused antenna cables in the protective mylar sleeve. 5. Insert the WWAN card connector at a 45-degree angle into the system board connector labeled "WWAN". 2. Replace the cover and tighten the captive screws. Replace the cover and tighten the captive screws. NOTICE: To ...
... never place cables under the card. 1. Insert the WLAN card connector at a 45-degree angle into the system board connector labeled "WLAN". 2. If you are keyed to ensure correct insertion. Secure unused antenna cables in the protective mylar sleeve. 5. Press the other end of the... 1. Secure unused antenna cables in the protective mylar sleeve. 5. Insert the WWAN card connector at a 45-degree angle into the system board connector labeled "WWAN". 2. Replace the cover and tighten the captive screws. Replace the cover and tighten the captive screws. NOTICE: To ...
Service Manual
Page 53
WPAN Card NOTICE: The connectors are keyed to the WPAN card. 4. Secure unused antenna cables in the protective mylar sleeve. 5. If you feel resistance, check the connectors on the card and on the system board, and realign the card. Connect the blue antenna cable to ensure correct insertion. Back to the WPAN card... a 45-degree angle into place. 3. Press the other end of the WPAN card down into the securing tabs until the card clicks into the system board connector labeled "WPAN". 2. NOTICE: To avoid damage to Contents Page
WPAN Card NOTICE: The connectors are keyed to the WPAN card. 4. Secure unused antenna cables in the protective mylar sleeve. 5. If you feel resistance, check the connectors on the card and on the system board, and realign the card. Connect the blue antenna cable to ensure correct insertion. Back to the WPAN card... a 45-degree angle into place. 3. Press the other end of the WPAN card down into the securing tabs until the card clicks into the system board connector labeled "WPAN". 2. NOTICE: To avoid damage to Contents Page
Service Manual
Page 55
Replace the internal card with the screw holes on the system board. 4. Replace the hinge cover (see Replacing the Bluetooth Card). 7. Replace the optical...rest (see Replacing the Keyboard). 9. Replace the keyboard (see Replacing the Palm Rest). 6. Back to the system board and the base of the computer. 3. Align the screw holes on the modem with Bluetooth wireless technology, if ...Replacing the Hinge Cover). 10. Press the modem into the connector on the system board and the base of the computer. 5. Replace the hard drive (see Replacing a Hard Drive). 11. NOTICE: ...
Replace the internal card with the screw holes on the system board. 4. Replace the hinge cover (see Replacing the Bluetooth Card). 7. Replace the optical...rest (see Replacing the Keyboard). 9. Replace the keyboard (see Replacing the Palm Rest). 6. Back to the system board and the base of the computer. 3. Align the screw holes on the modem with Bluetooth wireless technology, if ...Replacing the Hinge Cover). 10. Press the modem into the connector on the system board and the base of the computer. 5. Replace the hard drive (see Replacing a Hard Drive). 11. NOTICE: ...


