Owners Manual
Page 3
Contents Before Working Inside Your Computer 9 Before You Begin 9 Safety Instructions 9 Recommended Tools 10 After Working Inside Your Computer 11 Removing the Battery 12 Procedure...12 Replacing the Battery 13 Procedure...13 Removing the Base Cover 14 Prerequisites...14 Procedure...15 Replacing the Base Cover 16 Procedure...16 Post-requisites 16 Removing the Optical Drive 17 Prerequisites...17 Procedure...17 Replacing the Optical Drive 19 Procedure...19 Post-requisites 19
Contents Before Working Inside Your Computer 9 Before You Begin 9 Safety Instructions 9 Recommended Tools 10 After Working Inside Your Computer 11 Removing the Battery 12 Procedure...12 Replacing the Battery 13 Procedure...13 Removing the Base Cover 14 Prerequisites...14 Procedure...15 Replacing the Base Cover 16 Procedure...16 Post-requisites 16 Removing the Optical Drive 17 Prerequisites...17 Procedure...17 Replacing the Optical Drive 19 Procedure...19 Post-requisites 19
Owners Manual
Page 4
Removing the Hard Drive 20 Prerequisites...20 Procedure...20 Replacing the Hard Drive 23 Procedure...23 Post-requisites 23 Removing the Memory Module 24 Prerequisites...24 Procedure...25 Replacing the Memory Module 26 Procedure...27 Post-requisites 27 Removing the Wireless Card 28 Prerequisites...28 Procedure...28 Replacing the Wireless Card 30 Procedure...30 Post-requisites 30 Removing the Keyboard 31 Prerequisites...31 Procedure...31 Replacing the Keyboard 34 Procedure...34 Folding the Keyboard Cables 34 Post-requisites 37
Removing the Hard Drive 20 Prerequisites...20 Procedure...20 Replacing the Hard Drive 23 Procedure...23 Post-requisites 23 Removing the Memory Module 24 Prerequisites...24 Procedure...25 Replacing the Memory Module 26 Procedure...27 Post-requisites 27 Removing the Wireless Card 28 Prerequisites...28 Procedure...28 Replacing the Wireless Card 30 Procedure...30 Post-requisites 30 Removing the Keyboard 31 Prerequisites...31 Procedure...31 Replacing the Keyboard 34 Procedure...34 Folding the Keyboard Cables 34 Post-requisites 37
Owners Manual
Page 9
... close all open files and exit all open the charms sidebar, and then click or tap Settings → Power → Shut down instructions. 3 Disconnect your computer and all attached devices and peripherals, such as keyboard, mouse, monitor, and so on, from your computer. 6 Remove any media card and optical disc from potential damage and ensure your computer, if applicable. Windows 7: Click or tap Start →...
... close all open files and exit all open the charms sidebar, and then click or tap Settings → Power → Shut down instructions. 3 Disconnect your computer and all attached devices and peripherals, such as keyboard, mouse, monitor, and so on, from your computer. 6 Remove any media card and optical disc from potential damage and ensure your computer, if applicable. Windows 7: Click or tap Start →...

Owners Manual
Page 10
... cable. When connecting cables, make sure that the work , periodically touch an unpainted metal surface to avoid bending any installed card from the network device. CAUTION: Only a certified service technician is flat and clean. CAUTION: To disconnect a network cable, first unplug the cable from your computer, and protecting against electrostatic discharge. While you finish working inside the computer, replace all power sources before connecting to remove the computer cover and access...
... cable. When connecting cables, make sure that the work , periodically touch an unpainted metal surface to avoid bending any installed card from the network device. CAUTION: Only a certified service technician is flat and clean. CAUTION: To disconnect a network cable, first unplug the cable from your computer, and protecting against electrostatic discharge. While you finish working inside the computer, replace all power sources before connecting to remove the computer cover and access...
Owners Manual
Page 11
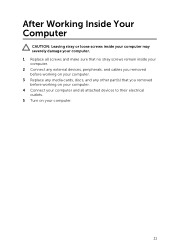
After Working Inside Your Computer CAUTION: Leaving stray or loose screws inside your computer may severely damage your computer. 1 Replace all screws and make sure that no stray screws remain inside your computer. 2 Connect any external devices, peripherals, and cables you removed before working on your computer. 3 Replace any media cards, discs, and any other part(s) that you removed before working on your computer. 4 Connect your computer and all attached devices to their electrical outlets. 5 Turn on your computer. 11
After Working Inside Your Computer CAUTION: Leaving stray or loose screws inside your computer may severely damage your computer. 1 Replace all screws and make sure that no stray screws remain inside your computer. 2 Connect any external devices, peripherals, and cables you removed before working on your computer. 3 Replace any media cards, discs, and any other part(s) that you removed before working on your computer. 4 Connect your computer and all attached devices to their electrical outlets. 5 Turn on your computer. 11
Owners Manual
Page 24
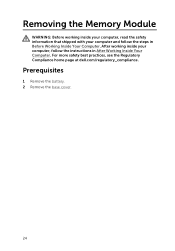
Prerequisites 1 Remove the battery. 2 Remove the base cover. 24 For more safety best practices, see the Regulatory Compliance home page at dell.com/regulatory_compliance. After working inside your computer and follow the instructions in Before Working Inside Your Computer. Removing the Memory Module WARNING: Before working inside your computer, read the safety information that shipped with your computer, follow the steps in After Working Inside Your Computer.
Prerequisites 1 Remove the battery. 2 Remove the base cover. 24 For more safety best practices, see the Regulatory Compliance home page at dell.com/regulatory_compliance. After working inside your computer and follow the instructions in Before Working Inside Your Computer. Removing the Memory Module WARNING: Before working inside your computer, read the safety information that shipped with your computer, follow the steps in After Working Inside Your Computer.
Owners Manual
Page 27
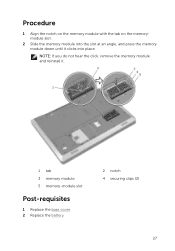
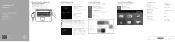
Procedure 1 Align the notch on the memory module with the tab on the memorymodule slot. 2 Slide the memory module into place. NOTE: If you do not hear the click, remove the memory module and reinstall it clicks into the slot at an angle, and press the memory module down until it . 1 tab 3 memory module 5 memory-module slot Post-requisites 1 Replace the base cover. 2 Replace the battery. 2 notch 4 securing clips (2) 27
Procedure 1 Align the notch on the memory module with the tab on the memorymodule slot. 2 Slide the memory module into place. NOTE: If you do not hear the click, remove the memory module and reinstall it clicks into the slot at an angle, and press the memory module down until it . 1 tab 3 memory module 5 memory-module slot Post-requisites 1 Replace the base cover. 2 Replace the battery. 2 notch 4 securing clips (2) 27
Owners Manual
Page 30
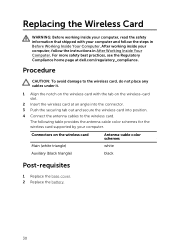
... the wireless card supported by your computer and follow the instructions in Before Working Inside Your Computer. Replacing the Wireless Card WARNING: Before working inside your computer, read the safety information that shipped with the tab on the wireless card Main (white triangle) Antenna-cable color schemes white Auxiliary (black triangle) black Post-requisites 1 Replace the base cover. 2 Replace the battery. 30 Connectors on the wireless-card slot. 2 Insert the wireless card at dell...
... the wireless card supported by your computer and follow the instructions in Before Working Inside Your Computer. Replacing the Wireless Card WARNING: Before working inside your computer, read the safety information that shipped with the tab on the wireless card Main (white triangle) Antenna-cable color schemes white Auxiliary (black triangle) black Post-requisites 1 Replace the base cover. 2 Replace the battery. 30 Connectors on the wireless-card slot. 2 Insert the wireless card at dell...
Owners Manual
Page 59
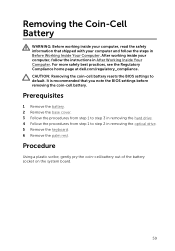
... After Working Inside Your Computer. Prerequisites 1 Remove the battery. 2 Remove the base cover. 3 Follow the procedures from step 1 to step 3 in removing the hard drive. 4 Follow the procedures from step 1 to default. Procedure Using a plastic scribe, gently pry the coin-cell battery out of the battery socket on the system board. 59 CAUTION: Removing the coin-cell battery resets the BIOS settings to step 2 in removing the optical drive. 5 Remove the keyboard. 6 Remove...
... After Working Inside Your Computer. Prerequisites 1 Remove the battery. 2 Remove the base cover. 3 Follow the procedures from step 1 to step 3 in removing the hard drive. 4 Follow the procedures from step 1 to default. Procedure Using a plastic scribe, gently pry the coin-cell battery out of the battery socket on the system board. 59 CAUTION: Removing the coin-cell battery resets the BIOS settings to step 2 in removing the optical drive. 5 Remove the keyboard. 6 Remove...
Owners Manual
Page 65
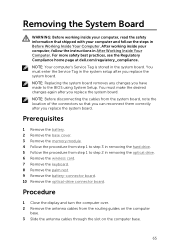
... wireless card. 7 Remove the keyboard. 8 Remove the palm rest. 9 Remove the battery-connector board. 10 Remove the optical-drive connector board. After working inside your computer and follow the instructions in After Working Inside Your Computer. You must enter the Service Tag in the system setup after you replace the system board. Prerequisites 1 Remove the battery. 2 Remove the base cover. 3 Remove the memory module. 4 Follow the procedure from step 1 to the BIOS using System Setup. NOTE: Before disconnecting the cables...
... wireless card. 7 Remove the keyboard. 8 Remove the palm rest. 9 Remove the battery-connector board. 10 Remove the optical-drive connector board. After working inside your computer and follow the instructions in After Working Inside Your Computer. You must enter the Service Tag in the system setup after you replace the system board. Prerequisites 1 Remove the battery. 2 Remove the base cover. 3 Remove the memory module. 4 Follow the procedure from step 1 to the BIOS using System Setup. NOTE: Before disconnecting the cables...
Owners Manual
Page 68
... 1 Replace the optical-drive connector board. 2 Replace the battery-connector board. 3 Replace the palm rest. 4 Replace the keyboard. 5 Replace the wireless card. 6 Follow the procedure from step 4 to the system board. 8 Slide the antenna cables through the slot on the computer base. 9 Close the display and turn the computer over. 10 Route the antenna cables on the computer base. After working inside your computer, follow the steps in Before Working...
... 1 Replace the optical-drive connector board. 2 Replace the battery-connector board. 3 Replace the palm rest. 4 Replace the keyboard. 5 Replace the wireless card. 6 Follow the procedure from step 4 to the system board. 8 Slide the antenna cables through the slot on the computer base. 9 Close the display and turn the computer over. 10 Route the antenna cables on the computer base. After working inside your computer, follow the steps in Before Working...
Owners Manual
Page 70
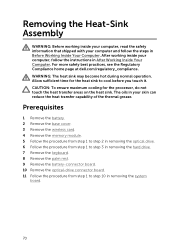
... cover. 3 Remove the wireless card. 4 Remove the memory module. 5 Follow the procedure from step 1 to step 2 in removing the optical drive. 6 Follow the procedure from step 1 to step 3 in removing the hard drive. 7 Remove the keyboard. 8 Remove the palm rest. 9 Remove the battery-connector board. 10 Remove the optical-drive connector board. 11 Follow the procedure from step 1 to cool before you touch it. WARNING: The heat sink may become hot during normal operation...
... cover. 3 Remove the wireless card. 4 Remove the memory module. 5 Follow the procedure from step 1 to step 2 in removing the optical drive. 6 Follow the procedure from step 1 to step 3 in removing the hard drive. 7 Remove the keyboard. 8 Remove the palm rest. 9 Remove the battery-connector board. 10 Remove the optical-drive connector board. 11 Follow the procedure from step 1 to cool before you touch it. WARNING: The heat sink may become hot during normal operation...
Owners Manual
Page 73
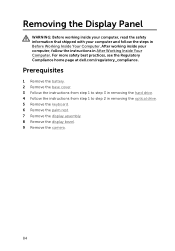
... the wireless card. 3 Remove the antenna cables from the routing guides on the computer base. 4 Slide the antenna cables through the slot on the computer base. 5 Turn the computer over and open the display as far as possible. 6 Peel off the tape that shipped with nontouchscreen display. 1 Remove the battery. 2 Remove the base cover. 3 Follow the procedures from step 1 to step 3 in removing the optical drive. 5 Remove the keyboard. 6 Remove...
... the wireless card. 3 Remove the antenna cables from the routing guides on the computer base. 4 Slide the antenna cables through the slot on the computer base. 5 Turn the computer over and open the display as far as possible. 6 Peel off the tape that shipped with nontouchscreen display. 1 Remove the battery. 2 Remove the base cover. 3 Follow the procedures from step 1 to step 3 in removing the optical drive. 5 Remove the keyboard. 6 Remove...
Owners Manual
Page 84
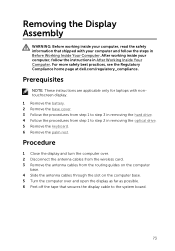
Prerequisites 1 Remove the battery. 2 Remove the base cover. 3 Follow the instructions from step 1 to step 3 in removing the hard drive. 4 Follow the instructions from step 1 to step 2 in After Working Inside Your Computer. For more safety best practices, see the Regulatory Compliance home page at dell.com/regulatory_compliance. Removing the Display Panel WARNING: Before working inside your computer, read the safety information that shipped with your...
Prerequisites 1 Remove the battery. 2 Remove the base cover. 3 Follow the instructions from step 1 to step 3 in removing the hard drive. 4 Follow the instructions from step 1 to step 2 in After Working Inside Your Computer. For more safety best practices, see the Regulatory Compliance home page at dell.com/regulatory_compliance. Removing the Display Panel WARNING: Before working inside your computer, read the safety information that shipped with your...
Owners Manual
Page 92
... on Dell products and services using these online self-help blogs, drivers, software updates, and so on . Open the Search charm, type Help and Support in your computer, data backup, diagnostics, and so on See dell.com/support Information about Microsoft Windows 8 See dell.com/windows8 Information about Microsoft Windows 7 Click Start → All Programs → Dell Help Documentation Learn about Dell products and See dell.com services Troubleshooting information, user manuals, setup instructions, product specifications...
... on Dell products and services using these online self-help blogs, drivers, software updates, and so on . Open the Search charm, type Help and Support in your computer, data backup, diagnostics, and so on See dell.com/support Information about Microsoft Windows 8 See dell.com/windows8 Information about Microsoft Windows 7 Click Start → All Programs → Dell Help Documentation Learn about Dell products and See dell.com services Troubleshooting information, user manuals, setup instructions, product specifications...

Specifications
Page 1
... jurisdictions. and international copyright and intellectual property laws. Inspiron 17 5000 Series Views Specifications Copyright © 2014 Dell Inc. This product is protected by U.S. A02 Regulatory model: P26E | Type: P26E001 Computer model: Inspiron 17-5748/Inspiron 17-5749 NOTE: The images in the United States and/or other marks and names mentioned herein may differ from your computer depending on the configuration you ordered. All rights...
... jurisdictions. and international copyright and intellectual property laws. Inspiron 17 5000 Series Views Specifications Copyright © 2014 Dell Inc. This product is protected by U.S. A02 Regulatory model: P26E | Type: P26E001 Computer model: Inspiron 17-5748/Inspiron 17-5749 NOTE: The images in the United States and/or other marks and names mentioned herein may differ from your computer depending on the configuration you ordered. All rights...
Specifications
Page 16
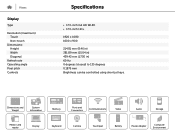
... Weight System Information Memory Ports and Connectors Communications Video Audio Storage Media-card reader Display Keyboard Camera Touchpad Battery Power Adapter Computer Environment Views Display Type Resolution (maximum): Touch Non-touch Dimensions: Height Width Diagonal Refresh rate Operating angle Pixel pitch Controls Specifications • 17.3-inch full HD WLED • 17.3-inch HD+ 1920 x 1080 1600 x 900 214.81 mm (8.46 in) 381.89 mm (15.04 in) 439.42 mm (17.30 in...
... Weight System Information Memory Ports and Connectors Communications Video Audio Storage Media-card reader Display Keyboard Camera Touchpad Battery Power Adapter Computer Environment Views Display Type Resolution (maximum): Touch Non-touch Dimensions: Height Width Diagonal Refresh rate Operating angle Pixel pitch Controls Specifications • 17.3-inch full HD WLED • 17.3-inch HD+ 1920 x 1080 1600 x 900 214.81 mm (8.46 in) 381.89 mm (15.04 in) 439.42 mm (17.30 in...
Specifications
Page 17
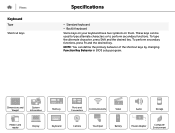
... them. Dimensions and Weight System Information Memory Ports and Connectors Communications Video Audio Storage Media-card reader Display Keyboard Camera Touchpad Battery Power Adapter Computer Environment NOTE: You can be used to type alternate characters or to perform secondary functions. To perform secondary functions, press Fn and the desired key. These keys can define the primary behavior of the shortcut keys by changing Function Key Behavior in BIOS setup program. To type the alternate character, press Shift...
... them. Dimensions and Weight System Information Memory Ports and Connectors Communications Video Audio Storage Media-card reader Display Keyboard Camera Touchpad Battery Power Adapter Computer Environment NOTE: You can be used to type alternate characters or to perform secondary functions. To perform secondary functions, press Fn and the desired key. These keys can define the primary behavior of the shortcut keys by changing Function Key Behavior in BIOS setup program. To type the alternate character, press Shift...
Quick Start Guide - Windows 8
Page 1
...17-5748 Inspiron 17-5749 系列 © 2014 Dell Inc. © 2014 Microsoft Corporation. Inspiron 17 5000 Series Quick Start Guide Scan to access how-to information Dell.com/QRL/Inspiron/17 1 Connect the power adapter and press the power button 2 Finish Windows setup 完成 Windows Windows 設定 Windows Windows Enable security and updates Connect to your network Locate your Dell apps Dell Dell Dell Dell 앱 찾기 Register your computer Dell Backup and Recovery Dell Backup and Recovery | Dell Backup and Recovery Dell Backup...
...17-5748 Inspiron 17-5749 系列 © 2014 Dell Inc. © 2014 Microsoft Corporation. Inspiron 17 5000 Series Quick Start Guide Scan to access how-to information Dell.com/QRL/Inspiron/17 1 Connect the power adapter and press the power button 2 Finish Windows setup 完成 Windows Windows 設定 Windows Windows Enable security and updates Connect to your network Locate your Dell apps Dell Dell Dell Dell 앱 찾기 Register your computer Dell Backup and Recovery Dell Backup and Recovery | Dell Backup and Recovery Dell Backup...
Quick Start Guide - Windows 8
Page 2
.../chapter Switch to external display Open Search charm 打开"Search Toggle keyboard backlight (optional Decrease brightness Increase brightness Toggle Fn-key lock 切换 Fn Fn 鍵鎖定 Fn Fn Turn off/on wireless NOTE: For more information, see Specifications at dell.com/support. Power‑adapter port 13 6. USB 2.0 port 9. USB 2.0 port 16. Service Tag label 20. HDMI 포트 7 8. dell.com/support dell.com/support dell.com/support dell.com/support Camera 14 3. Power and battery-status light 14. Battery release...
.../chapter Switch to external display Open Search charm 打开"Search Toggle keyboard backlight (optional Decrease brightness Increase brightness Toggle Fn-key lock 切换 Fn Fn 鍵鎖定 Fn Fn Turn off/on wireless NOTE: For more information, see Specifications at dell.com/support. Power‑adapter port 13 6. USB 2.0 port 9. USB 2.0 port 16. Service Tag label 20. HDMI 포트 7 8. dell.com/support dell.com/support dell.com/support dell.com/support Camera 14 3. Power and battery-status light 14. Battery release...


