Owners Manual
Page 3
Contents 1 Before You Begin 9 Recommended Tools 9 Turning Off Your Computer 9 Before Working Inside Your Computer 10 2 Battery 13 Removing the Battery 13 Replacing the Battery 14 3 Keyboard 15 Removing the Keyboard 15 Replacing the Keyboard 17 4 Memory Module(s 19 Removing the Memory Module(s 19 Replacing the Memory Module(s 20 5 Optical Drive 23 Removing the Optical Drive 23 Contents 3
Contents 1 Before You Begin 9 Recommended Tools 9 Turning Off Your Computer 9 Before Working Inside Your Computer 10 2 Battery 13 Removing the Battery 13 Replacing the Battery 14 3 Keyboard 15 Removing the Keyboard 15 Replacing the Keyboard 17 4 Memory Module(s 19 Removing the Memory Module(s 19 Replacing the Memory Module(s 20 5 Optical Drive 23 Removing the Optical Drive 23 Contents 3
Owners Manual
Page 19
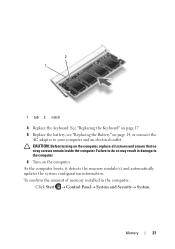
... computer. You can be accessed from Dell are covered under your computer memory by periodically touching an unpainted metal surface (such as a connector on page 15. Memory 19 CAUTION: To avoid electrostatic discharge, ground yourself by using a wrist grounding strap or by installing memory modules on each end of memory supported by your computer). Your computer...
... computer. You can be accessed from Dell are covered under your computer memory by periodically touching an unpainted metal surface (such as a connector on page 15. Memory 19 CAUTION: To avoid electrostatic discharge, ground yourself by using a wrist grounding strap or by installing memory modules on each end of memory supported by your computer). Your computer...
Owners Manual
Page 20
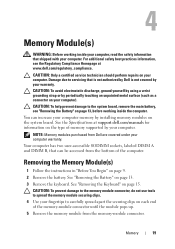
... may not boot. 20 Memory 1 3 2 1 memory-module connector 2 securing clips (2) 3 memory module Replacing the Memory Module(s) CAUTION: If you need to install memory modules in two connectors, install a memory module in the memory-module connector. 3 Slide the memory module firmly into place. If you install a memory module in the connector labeled...in "Before You Begin" on page 9. 2 Align the notch in the memory module with the tab in the connector labeled "DIMM A" before you do not hear the click, remove the memory module and reinstall it clicks into the slot at a 45-degree angle, ...
... may not boot. 20 Memory 1 3 2 1 memory-module connector 2 securing clips (2) 3 memory module Replacing the Memory Module(s) CAUTION: If you need to install memory modules in two connectors, install a memory module in the memory-module connector. 3 Slide the memory module firmly into place. If you install a memory module in the connector labeled...in "Before You Begin" on page 9. 2 Align the notch in the memory module with the tab in the connector labeled "DIMM A" before you do not hear the click, remove the memory module and reinstall it clicks into the slot at a 45-degree angle, ...
Owners Manual
Page 21
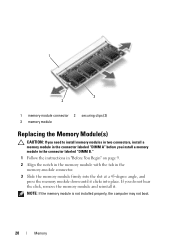
... connect the AC adapter to the computer. 6 Turn on the computer. To confirm the amount of memory installed in damage to your computer and an electrical outlet. Memory 21 As the computer boots, it detects the memory module(s) and automatically updates the system configuration information. 2 1 1 tab 2 notch 4 Replace the keyboard. See "Replacing the...
... connect the AC adapter to the computer. 6 Turn on the computer. To confirm the amount of memory installed in damage to your computer and an electrical outlet. Memory 21 As the computer boots, it detects the memory module(s) and automatically updates the system configuration information. 2 1 1 tab 2 notch 4 Replace the keyboard. See "Replacing the...
Owners Manual
Page 67
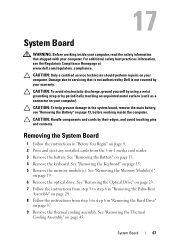
...a connector on your computer. 17 System Board WARNING: Before working inside your computer, read the safety information that is not authorized by Dell is not covered by your computer. CAUTION: Only a certified service technician should perform repairs on page 9. 2 Press and eject any ...Follow the instructions from step 3 to step 6 in -1 media card reader. 3 Remove the battery. See "Removing the Battery" on page 15. 5 Remove the memory module(s). See "Removing the Keyboard" on page 13. 4 Remove the keyboard. CAUTION: Handle components and cards by their edges, and avoid ...
...a connector on your computer. 17 System Board WARNING: Before working inside your computer, read the safety information that is not authorized by Dell is not covered by your computer. CAUTION: Only a certified service technician should perform repairs on page 9. 2 Press and eject any ...Follow the instructions from step 3 to step 6 in -1 media card reader. 3 Remove the battery. See "Removing the Battery" on page 15. 5 Remove the memory module(s). See "Removing the Keyboard" on page 13. 4 Remove the keyboard. CAUTION: Handle components and cards by their edges, and avoid ...
Owners Manual
Page 70
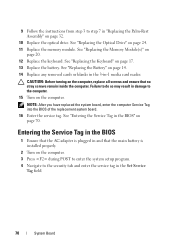
See "Replacing the Battery" on the computer. Failure to do so may result in damage to the computer. 15 Turn on page 14. 14 Replace any removed cards or blanks in the 3-in-1 media card reader. See "Replacing the Keyboard" on the computer. 3 Press ... ensure that the AC adapter is plugged in the Set Service Tag field. 70 System Board CAUTION: Before turning on page 24. 11 Replace the memory module. See "Entering the Service Tag in "Replacing the Palm-Rest Assembly" on page 32. 10 Replace the optical drive. See "Replacing the...
See "Replacing the Battery" on the computer. Failure to do so may result in damage to the computer. 15 Turn on page 14. 14 Replace any removed cards or blanks in the 3-in-1 media card reader. See "Replacing the Keyboard" on the computer. 3 Press ... ensure that the AC adapter is plugged in the Set Service Tag field. 70 System Board CAUTION: Before turning on page 24. 11 Replace the memory module. See "Entering the Service Tag in "Replacing the Palm-Rest Assembly" on page 32. 10 Replace the optical drive. See "Replacing the...


