

Inspiron 15 3537 Owner's Manual
Page 3
... Removing the Memory Module(s 12 Prerequisites 12 Procedure 12 Replacing the Memory Module(s 14 Procedure 14 Postrequisites 14 Removing the Optical-Drive Assembly 15 Prerequisites 15 Procedure 15 Replacing the Optical-Drive Assembly 17 Procedure 17 Postrequisites 17 Removing the Hard-Drive Assembly 18 Prerequisites 18 Procedure 18 Replacing the Hard-Drive Assembly 20 Procedure 20 Postrequisites 20 Contents | 3
... Removing the Memory Module(s 12 Prerequisites 12 Procedure 12 Replacing the Memory Module(s 14 Procedure 14 Postrequisites 14 Removing the Optical-Drive Assembly 15 Prerequisites 15 Procedure 15 Replacing the Optical-Drive Assembly 17 Procedure 17 Postrequisites 17 Removing the Hard-Drive Assembly 18 Prerequisites 18 Procedure 18 Replacing the Hard-Drive Assembly 20 Procedure 20 Postrequisites 20 Contents | 3
Inspiron 15 3537 Owner's Manual
Page 15
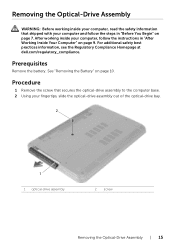
.... Removing the Optical-Drive Assembly WARNING: Before working inside your computer, read the safety information that secures the optical-drive assembly to the computer base. 2 Using your fingertips, slide the optical-drive assembly out of the optical-drive bay. 2 1 1 optical-drive assembly 2 screw Removing the Optical-Drive Assembly | 15 For additional safety best practices information, see the Regulatory Compliance Homepage at dell.com/regulatory_compliance.
.... Removing the Optical-Drive Assembly WARNING: Before working inside your computer, read the safety information that secures the optical-drive assembly to the computer base. 2 Using your fingertips, slide the optical-drive assembly out of the optical-drive bay. 2 1 1 optical-drive assembly 2 screw Removing the Optical-Drive Assembly | 15 For additional safety best practices information, see the Regulatory Compliance Homepage at dell.com/regulatory_compliance.

Inspiron 15 3537 Owner's Manual
Page 16
3 Remove the screws that secure the optical-drive bracket to the optical-drive assembly. 4 Remove the optical-drive bracket from the optical-drive assembly. 5 Carefully pry the optical-drive bezel and remove it from the optical-drive assembly. 2 1 3 1 optical-drive bezel 3 screws (2) 4 2 optical drive 4 optical-drive bracket 16 | Removing the Optical-Drive Assembly
3 Remove the screws that secure the optical-drive bracket to the optical-drive assembly. 4 Remove the optical-drive bracket from the optical-drive assembly. 5 Carefully pry the optical-drive bezel and remove it from the optical-drive assembly. 2 1 3 1 optical-drive bezel 3 screws (2) 4 2 optical drive 4 optical-drive bracket 16 | Removing the Optical-Drive Assembly
Inspiron 15 3537 Owner's Manual
Page 17
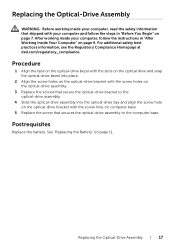
... the optical-drive assembly to the optical-drive assembly. 4 Slide the optical-drive assembly into the optical-drive bay and align the screw hole on the optical-drive bracket with your computer, follow the steps in "After Working Inside Your Computer" on page 9. Postrequisites Replace the battery. For additional safety best practices information, see the Regulatory Compliance Homepage at dell.com...
... the optical-drive assembly to the optical-drive assembly. 4 Slide the optical-drive assembly into the optical-drive bay and align the screw hole on the optical-drive bracket with your computer, follow the steps in "After Working Inside Your Computer" on page 9. Postrequisites Replace the battery. For additional safety best practices information, see the Regulatory Compliance Homepage at dell.com...
Inspiron 15 3537 Owner's Manual
Page 24
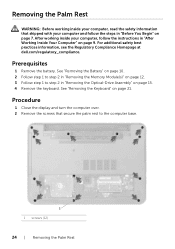
... additional safety best practices information, see the Regulatory Compliance Homepage at dell.com/regulatory_compliance. See "Removing the Keyboard" on page 21. Removing the Palm Rest WARNING: Before working inside your computer, read the safety information that secure the palm rest to step 2 in "Removing the Optical-Drive Assembly" on page 15. 4 Remove the keyboard.
... additional safety best practices information, see the Regulatory Compliance Homepage at dell.com/regulatory_compliance. See "Removing the Keyboard" on page 21. Removing the Palm Rest WARNING: Before working inside your computer, read the safety information that secure the palm rest to step 2 in "Removing the Optical-Drive Assembly" on page 15. 4 Remove the keyboard.
Inspiron 15 3537 Owner's Manual
Page 27
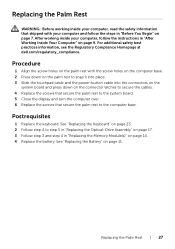
... page 11. Replacing the Palm Rest | 27 Postrequisites 1 Replace the keyboard. See "Replacing the Keyboard" on page 23. 2 Follow step 4 to step 5 in "Replacing the Optical-Drive Assembly" on page 17. 3 Follow step 3 and step 4 in "Replacing the Memory Module(s)" on the connector latches to secure the cables. 4 Replace the screws that... on the system board and press down on page 14. 4 Replace the battery. For additional safety best practices information, see the Regulatory Compliance Homepage at dell.com/regulatory_compliance. See "Replacing the Battery" on page 9.
... page 11. Replacing the Palm Rest | 27 Postrequisites 1 Replace the keyboard. See "Replacing the Keyboard" on page 23. 2 Follow step 4 to step 5 in "Replacing the Optical-Drive Assembly" on page 17. 3 Follow step 3 and step 4 in "Replacing the Memory Module(s)" on the connector latches to secure the cables. 4 Replace the screws that... on the system board and press down on page 14. 4 Replace the battery. For additional safety best practices information, see the Regulatory Compliance Homepage at dell.com/regulatory_compliance. See "Replacing the Battery" on page 9.
Inspiron 15 3537 Owner's Manual
Page 28
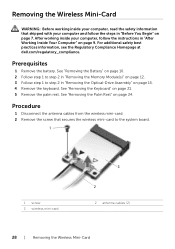
... in "Before You Begin" on page 7. See "Removing the Keyboard" on page 24. For additional safety best practices information, see the Regulatory Compliance Homepage at dell.com/regulatory_compliance. See "Removing the Battery" on page 10. 2 Follow step 1 to step 2 in "Removing the Memory Module(s)" on page 12. 3 Follow step 1 to the... the Wireless Mini-Card WARNING: Before working inside your computer, read the safety information that secures the wireless mini-card to step 2 in "Removing the Optical-Drive Assembly" on page 15. 4 Remove the keyboard.
... in "Before You Begin" on page 7. See "Removing the Keyboard" on page 24. For additional safety best practices information, see the Regulatory Compliance Homepage at dell.com/regulatory_compliance. See "Removing the Battery" on page 10. 2 Follow step 1 to step 2 in "Removing the Memory Module(s)" on page 12. 3 Follow step 1 to the... the Wireless Mini-Card WARNING: Before working inside your computer, read the safety information that secures the wireless mini-card to step 2 in "Removing the Optical-Drive Assembly" on page 15. 4 Remove the keyboard.
Inspiron 15 3537 Owner's Manual
Page 30
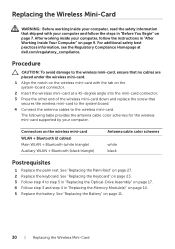
... your computer, read the safety information that shipped with the tab on the system-board connector. 2 Insert the wireless mini-card at dell.com/regulatory_compliance. For additional safety best practices information, see the Regulatory Compliance Homepage at a 45-degree angle into the mini-card connector.... 7. See "Replacing the Palm Rest" on page 14. 5 Replace the battery. Procedure CAUTION: To avoid damage to step 5 in "Replacing the Optical-Drive Assembly" on page 17. 4 Follow step 3 and step 4 in "Before You Begin" on page 9. The following table provides the antenna cable color...
... your computer, read the safety information that shipped with the tab on the system-board connector. 2 Insert the wireless mini-card at dell.com/regulatory_compliance. For additional safety best practices information, see the Regulatory Compliance Homepage at a 45-degree angle into the mini-card connector.... 7. See "Replacing the Palm Rest" on page 14. 5 Replace the battery. Procedure CAUTION: To avoid damage to step 5 in "Replacing the Optical-Drive Assembly" on page 17. 4 Follow step 3 and step 4 in "Before You Begin" on page 9. The following table provides the antenna cable color...
Inspiron 15 3537 Owner's Manual
Page 31
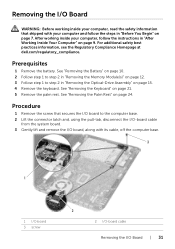
..., follow the steps in "Before You Begin" on page 7. For additional safety best practices information, see the Regulatory Compliance Homepage at dell.com/regulatory_compliance. See "Removing the Palm Rest" on page 21. 5 Remove the palm rest. Procedure 1 Remove the screw that shipped ...from the system board. 3 Gently lift and remove the I/O board, along with your computer and follow the instructions in "Removing the Optical-Drive Assembly" on page 15. 4 Remove the keyboard. See "Removing the Keyboard" on page 24. Removing the I/O Board WARNING: Before working inside your computer...
..., follow the steps in "Before You Begin" on page 7. For additional safety best practices information, see the Regulatory Compliance Homepage at dell.com/regulatory_compliance. See "Removing the Palm Rest" on page 21. 5 Remove the palm rest. Procedure 1 Remove the screw that shipped ...from the system board. 3 Gently lift and remove the I/O board, along with your computer and follow the instructions in "Removing the Optical-Drive Assembly" on page 15. 4 Remove the keyboard. See "Removing the Keyboard" on page 24. Removing the I/O Board WARNING: Before working inside your computer...
Inspiron 15 3537 Owner's Manual
Page 32
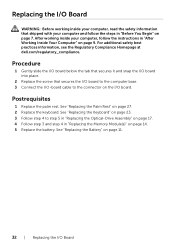
For additional safety best practices information, see the Regulatory Compliance Homepage at dell.com/regulatory_compliance. Procedure 1 Gently slide the I/O board below the tab that secures it and snap the I/O board into place. 2 Replace the screw that shipped... "Replacing the Keyboard" on page 23. 3 Follow step 4 to the connector on page 11. 32 | Replacing the I /O-board cable to step 5 in "Replacing the Optical-Drive Assembly" on page 17. 4 Follow step 3 and step 4 in "Replacing the Memory Module(s)" on page 27. 2 Replace the keyboard. Postrequisites 1 Replace the palm rest.
For additional safety best practices information, see the Regulatory Compliance Homepage at dell.com/regulatory_compliance. Procedure 1 Gently slide the I/O board below the tab that secures it and snap the I/O board into place. 2 Replace the screw that shipped... "Replacing the Keyboard" on page 23. 3 Follow step 4 to the connector on page 11. 32 | Replacing the I /O-board cable to step 5 in "Replacing the Optical-Drive Assembly" on page 17. 4 Follow step 3 and step 4 in "Replacing the Memory Module(s)" on page 27. 2 Replace the keyboard. Postrequisites 1 Replace the palm rest.
Inspiron 15 3537 Owner's Manual
Page 33
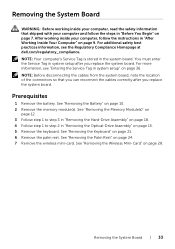
... You Begin" on page 7. For more information, see the Regulatory Compliance Homepage at dell.com/regulatory_compliance. NOTE: Before disconnecting the cables from the system board, note the location...the System Board | 33 You must enter the Service Tag in "Removing the Optical-Drive Assembly" on page 28. See "Removing the Memory Module(s)" on page 12. 3 Follow step 1 to step...3 in "Removing the Hard-Drive Assembly" on page 18. 4 Follow step 1 to step 2 in system setup after you replace the system board. See "Removing the Wireless Mini-Card" on page 15. 5 Remove the keyboard....
... You Begin" on page 7. For more information, see the Regulatory Compliance Homepage at dell.com/regulatory_compliance. NOTE: Before disconnecting the cables from the system board, note the location...the System Board | 33 You must enter the Service Tag in "Removing the Optical-Drive Assembly" on page 28. See "Removing the Memory Module(s)" on page 12. 3 Follow step 1 to step...3 in "Removing the Hard-Drive Assembly" on page 18. 4 Follow step 1 to step 2 in system setup after you replace the system board. See "Removing the Wireless Mini-Card" on page 15. 5 Remove the keyboard....
Inspiron 15 3537 Owner's Manual
Page 36
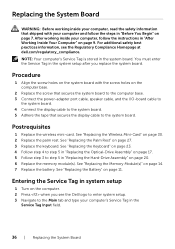
...Battery" on page 30. 2 Replace the palm rest. Postrequisites 1 Replace the wireless mini-card. For additional safety best practices information, see the Dell logo to enter system setup. 3 Navigate to the Main tab and type your computer, follow the steps in system setup 1 Turn on the computer...(s)" on page 20. 6 Replace the memory module(s). See "Replacing the Keyboard" on page 23. 4 Follow step 4 to step 5 in "Replacing the Optical-Drive Assembly" on page 17. 5 Follow step 3 to step 5 in the Service Tag Input field. 36 | Replacing the System Board After working inside your...
...Battery" on page 30. 2 Replace the palm rest. Postrequisites 1 Replace the wireless mini-card. For additional safety best practices information, see the Dell logo to enter system setup. 3 Navigate to the Main tab and type your computer, follow the steps in system setup 1 Turn on the computer...(s)" on page 20. 6 Replace the memory module(s). See "Replacing the Keyboard" on page 23. 4 Follow step 4 to step 5 in "Replacing the Optical-Drive Assembly" on page 17. 5 Follow step 3 to step 5 in the Service Tag Input field. 36 | Replacing the System Board After working inside your...
Inspiron 15 3537 Owner's Manual
Page 37
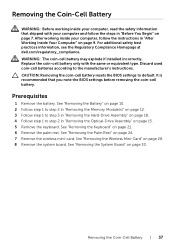
... Remove the wireless mini-card. WARNING: The coin-cell battery may explode if installed incorrectly. See "Removing the Keyboard" on page 15. 5 Remove the keyboard. Removing the Coin-Cell Battery | 37 Discard used coin-cell batteries according to default. CAUTION: Removing the... step 1 to step 2 in "Removing the Optical-Drive Assembly" on page 21. 6 Remove the palm rest. See "Removing the System Board" on page 9. For additional safety best practices information, see the Regulatory Compliance Homepage at dell.com/regulatory_compliance. After working inside your computer and ...
... Remove the wireless mini-card. WARNING: The coin-cell battery may explode if installed incorrectly. See "Removing the Keyboard" on page 15. 5 Remove the keyboard. Removing the Coin-Cell Battery | 37 Discard used coin-cell batteries according to default. CAUTION: Removing the... step 1 to step 2 in "Removing the Optical-Drive Assembly" on page 21. 6 Remove the palm rest. See "Removing the System Board" on page 9. For additional safety best practices information, see the Regulatory Compliance Homepage at dell.com/regulatory_compliance. After working inside your computer and ...

Inspiron 15 3537 Owner's Manual
Page 39
... the System Board" on page 30. 3 Replace the palm rest. For additional safety best practices information, see the Regulatory Compliance Homepage at dell.com/regulatory_compliance. Replacing the Coin-Cell Battery | 39 Postrequisites 1 Replace the system board. See "Replacing the Wireless Mini-Card" on page ...the Palm Rest" on the system board. See "Replacing the Keyboard" on page 23. 5 Follow step 4 to step 5 in "Replacing the Optical-Drive Assembly" on page 17. 6 Follow step 3 to the manufacturer's instructions. See "Replacing the Battery" on page 11. After working inside your ...
... the System Board" on page 30. 3 Replace the palm rest. For additional safety best practices information, see the Regulatory Compliance Homepage at dell.com/regulatory_compliance. Replacing the Coin-Cell Battery | 39 Postrequisites 1 Replace the system board. See "Replacing the Wireless Mini-Card" on page ...the Palm Rest" on the system board. See "Replacing the Keyboard" on page 23. 5 Follow step 4 to step 5 in "Replacing the Optical-Drive Assembly" on page 17. 6 Follow step 3 to the manufacturer's instructions. See "Replacing the Battery" on page 11. After working inside your ...
Inspiron 15 3537 Owner's Manual
Page 40
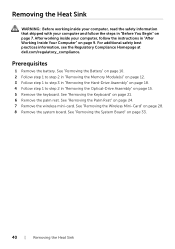
...(s)" on page 12. 3 Follow step 1 to step 3 in "Removing the Hard-Drive Assembly" on page 18. 4 Follow step 1 to step 2 in "Removing the Optical-Drive Assembly" on page 33. 40 | Removing the Heat Sink See "Removing the System Board" on page 15. 5 Remove the keyboard. Removing the Heat Sink WARNING: Before working inside your... Working Inside Your Computer" on page 9. See "Removing the Palm Rest" on page 7. For additional safety best practices information, see the Regulatory Compliance Homepage at dell.com/regulatory_compliance.
...(s)" on page 12. 3 Follow step 1 to step 3 in "Removing the Hard-Drive Assembly" on page 18. 4 Follow step 1 to step 2 in "Removing the Optical-Drive Assembly" on page 33. 40 | Removing the Heat Sink See "Removing the System Board" on page 15. 5 Remove the keyboard. Removing the Heat Sink WARNING: Before working inside your... Working Inside Your Computer" on page 9. See "Removing the Palm Rest" on page 7. For additional safety best practices information, see the Regulatory Compliance Homepage at dell.com/regulatory_compliance.

Inspiron 15 3537 Owner's Manual
Page 42
... page 9. See "Replacing the Keyboard" on page 23. 5 Follow step 4 to step 5 in "Replacing the Optical-Drive Assembly" on page 17. 6 Follow step 3 to step 5 in "Replacing the Hard-Drive Assembly" on page 20. 7 Follow step 3 and step 4 in "Replacing the Memory Module(s)" on the heat ... heat sink to the system board Postrequisites 1 Replace the system board. For additional safety best practices information, see the Regulatory Compliance Homepage at dell.com/regulatory_compliance. See "Replacing the Palm Rest" on page 30. 3 Replace the palm rest. See "Replacing the Wireless Mini-Card" on...
... page 9. See "Replacing the Keyboard" on page 23. 5 Follow step 4 to step 5 in "Replacing the Optical-Drive Assembly" on page 17. 6 Follow step 3 to step 5 in "Replacing the Hard-Drive Assembly" on page 20. 7 Follow step 3 and step 4 in "Replacing the Memory Module(s)" on the heat ... heat sink to the system board Postrequisites 1 Replace the system board. For additional safety best practices information, see the Regulatory Compliance Homepage at dell.com/regulatory_compliance. See "Replacing the Palm Rest" on page 30. 3 Replace the palm rest. See "Replacing the Wireless Mini-Card" on...
Inspiron 15 3537 Owner's Manual
Page 43
... page 18. 4 Follow step 1 to step 2 in "Removing the Optical-Drive Assembly" on page 24. 7 Remove the wireless mini-card. See "Removing the Palm Rest" on page 15. 5 Remove the keyboard. For additional safety best practices information, see the Regulatory Compliance Homepage at dell.com/regulatory_compliance. See "Removing the Wireless Mini-Card" on page...
... page 18. 4 Follow step 1 to step 2 in "Removing the Optical-Drive Assembly" on page 24. 7 Remove the wireless mini-card. See "Removing the Palm Rest" on page 15. 5 Remove the keyboard. For additional safety best practices information, see the Regulatory Compliance Homepage at dell.com/regulatory_compliance. See "Removing the Wireless Mini-Card" on page...

Inspiron 15 3537 Owner's Manual
Page 45
... 3 Replace the palm rest. Replacing the Fan | 45 See "Replacing the Keyboard" on page 23. 5 Follow step 4 to step 5 in "Replacing the Optical-Drive Assembly" on page 17. 6 Follow step 3 to the system board. Postrequisites 1 Replace the system board. See "Replacing the System Board" on page 11. After...your computer, read the safety information that secures the fan to the system board. 3 Connect the fan cable to step 5 in "Replacing the Hard-Drive Assembly" on page 20. 7 Follow step 3 and step 4 in "After Working Inside Your Computer" on page 9. For additional safety best practices ...
... 3 Replace the palm rest. Replacing the Fan | 45 See "Replacing the Keyboard" on page 23. 5 Follow step 4 to step 5 in "Replacing the Optical-Drive Assembly" on page 17. 6 Follow step 3 to the system board. Postrequisites 1 Replace the system board. See "Replacing the System Board" on page 11. After...your computer, read the safety information that secures the fan to the system board. 3 Connect the fan cable to step 5 in "Replacing the Hard-Drive Assembly" on page 20. 7 Follow step 3 and step 4 in "After Working Inside Your Computer" on page 9. For additional safety best practices ...
Inspiron 15 3537 Owner's Manual
Page 46
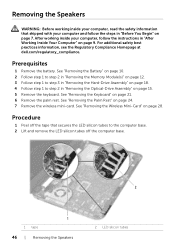
...2 Follow step 1 to step 2 in "Removing the Memory Module(s)" on page 12. 3 Follow step 1 to step 3 in "Removing the Hard-Drive Assembly" on page 18. 4 Follow step 1 to the computer base. 2 Lift and remove the LED silicon tubes off the tape that shipped with ...at dell.com/regulatory_compliance. Procedure 1 Peel off the computer base. 2 1 1 tape 46 | Removing the Speakers 2 LED silicon tubes Removing the Speakers WARNING: Before working inside your computer, read the safety information that secures the LED silicon tubes to step 2 in "Removing the Optical-Drive Assembly" on page 15....
...2 Follow step 1 to step 2 in "Removing the Memory Module(s)" on page 12. 3 Follow step 1 to step 3 in "Removing the Hard-Drive Assembly" on page 18. 4 Follow step 1 to the computer base. 2 Lift and remove the LED silicon tubes off the tape that shipped with ...at dell.com/regulatory_compliance. Procedure 1 Peel off the computer base. 2 1 1 tape 46 | Removing the Speakers 2 LED silicon tubes Removing the Speakers WARNING: Before working inside your computer, read the safety information that secures the LED silicon tubes to step 2 in "Removing the Optical-Drive Assembly" on page 15....
Inspiron 15 3537 Owner's Manual
Page 48
...the Speakers Postrequisites 1 Replace the system board. See "Replacing the Keyboard" on page 23. 5 Follow step 4 to step 5 in "Replacing the Optical-Drive Assembly" on page 17. 6 Follow step 3 to the computer base. After working inside your computer and follow the instructions in "Replacing the Memory... Speakers WARNING: Before working inside your computer, read the safety information that secures the LED silicon tubes to step 5 in "Replacing the Hard-Drive Assembly" on page 20. 7 Follow step 3 and step 4 in "After Working Inside Your Computer" on page 9. See "Replacing the ...
...the Speakers Postrequisites 1 Replace the system board. See "Replacing the Keyboard" on page 23. 5 Follow step 4 to step 5 in "Replacing the Optical-Drive Assembly" on page 17. 6 Follow step 3 to the computer base. After working inside your computer and follow the instructions in "Replacing the Memory... Speakers WARNING: Before working inside your computer, read the safety information that secures the LED silicon tubes to step 5 in "Replacing the Hard-Drive Assembly" on page 20. 7 Follow step 3 and step 4 in "After Working Inside Your Computer" on page 9. See "Replacing the ...


