Me and My Dell
Page 4
Touchscreen Gestures 30 Zoom 30 Dwell 31 Flick 31 Scroll 31 Rotate 32 Keyboard 33 Backlit Keyboard 34 Keyboard Connection Types 35 Locating the Service Tag and Express-Service Code 36 Locating the Label on Your Computer 36 Using Dell's Online System Profiler 36 Storage 36 About Storage Devices 36 Internal Storage Devices 37 Hard Drives 37 Solid-State Drives 37 Removable Storage Devices 37 Optical Discs 38 Memory Cards 38 Memory Module 39 System Board 40 Processor 42 Computer Fan 43 Heat Sink 43 Thermal Grease 44 4 Contents
Touchscreen Gestures 30 Zoom 30 Dwell 31 Flick 31 Scroll 31 Rotate 32 Keyboard 33 Backlit Keyboard 34 Keyboard Connection Types 35 Locating the Service Tag and Express-Service Code 36 Locating the Label on Your Computer 36 Using Dell's Online System Profiler 36 Storage 36 About Storage Devices 36 Internal Storage Devices 37 Hard Drives 37 Solid-State Drives 37 Removable Storage Devices 37 Optical Discs 38 Memory Cards 38 Memory Module 39 System Board 40 Processor 42 Computer Fan 43 Heat Sink 43 Thermal Grease 44 4 Contents
Me and My Dell
Page 37
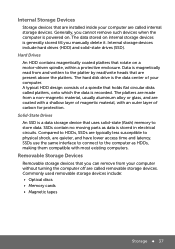
... physical shock, are present above the platters. Hard Drives An HDD contains magnetically coated platters that rotate on . Data is magnetically read /write heads that are quieter, and have lower access time and latency. The hard disk drive is a data storage device that uses solid-...disks called internal storage devices. Internal storage devices include hard drives (HDD) and solid-state drives (SSD). A typical HDD design consists of your computer. SSDs use the same interface to connect to store data. Generally, you can remove from a non-magnetic material, usually aluminum alloy or...
... physical shock, are present above the platters. Hard Drives An HDD contains magnetically coated platters that rotate on . Data is magnetically read /write heads that are quieter, and have lower access time and latency. The hard disk drive is a data storage device that uses solid-...disks called internal storage devices. Internal storage devices include hard drives (HDD) and solid-state drives (SSD). A typical HDD design consists of your computer. SSDs use the same interface to connect to store data. Generally, you can remove from a non-magnetic material, usually aluminum alloy or...
Me and My Dell
Page 94
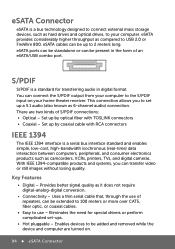
Provides better signal quality as hard drives and optical drives, to your computer. Eliminates the need for transferring audio in the form of S/PDIF connections: • Optical - Enables devices to be extended to 100 meters ... storage devices, such as it does not require digital‑analog-digital conversion. • Connectivity - eSATA ports can be standalone or can be added and removed while the device and computer are two kinds of an eSATA/USB combo port. Set up to 2 meters long. eSATA cables can be present in...
Provides better signal quality as hard drives and optical drives, to your computer. Eliminates the need for transferring audio in the form of S/PDIF connections: • Optical - Enables devices to be extended to 100 meters ... storage devices, such as it does not require digital‑analog-digital conversion. • Connectivity - eSATA ports can be standalone or can be added and removed while the device and computer are two kinds of an eSATA/USB combo port. Set up to 2 meters long. eSATA cables can be present in...
Me and My Dell
Page 114
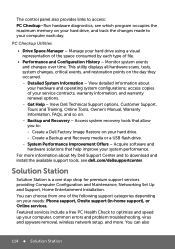
... available support tools, see which program occupies the maximum memory on your hard drive, and track the changes made to your hard drive. -- Create a Dell Factory Image Restore on your computer each type of your computer, common errors and problem troubleshooting, virus and spyware removal, wireless network setup, and more information about your system performance. The...
... available support tools, see which program occupies the maximum memory on your hard drive, and track the changes made to your hard drive. -- Create a Dell Factory Image Restore on your computer each type of your computer, common errors and problem troubleshooting, virus and spyware removal, wireless network setup, and more information about your system performance. The...
Me and My Dell
Page 123
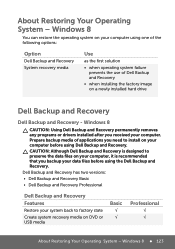
...Operating System - Windows 8 CAUTION: Using Dell Backup and Recovery permanently removes any programs or drivers installed after you received your computer using one of the following options: Option Dell Backup and Recovery System recovery media Use ...Dell Backup and Recovery. About Restoring Your Operating System - Windows 8 123 CAUTION: Although Dell Backup and Recovery is designed to preserve the data files on your computer, it is recommended that you need to factory state Create system recovery media on a newly installed hard drive Dell Backup and Recovery Dell...
...Operating System - Windows 8 CAUTION: Using Dell Backup and Recovery permanently removes any programs or drivers installed after you received your computer using one of the following options: Option Dell Backup and Recovery System recovery media Use ...Dell Backup and Recovery. About Restoring Your Operating System - Windows 8 123 CAUTION: Although Dell Backup and Recovery is designed to preserve the data files on your computer, it is recommended that you need to factory state Create system recovery media on a newly installed hard drive Dell Backup and Recovery Dell...
Me and My Dell
Page 132
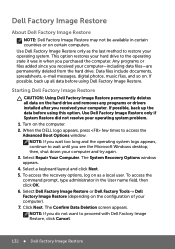
... method to restore your computer-including data files-are permanently deleted from the hard drive. Dell Factory Image Restore About Dell Factory Image Restore NOTE: Dell Factory Image Restore may not be available in when you purchased the computer. Turn on the hard drive and removes any programs or drivers installed after you received your operating system. Starting...
... method to restore your computer-including data files-are permanently deleted from the hard drive. Dell Factory Image Restore About Dell Factory Image Restore NOTE: Dell Factory Image Restore may not be available in when you purchased the computer. Turn on the hard drive and removes any programs or drivers installed after you received your operating system. Starting...
Me and My Dell
Page 147
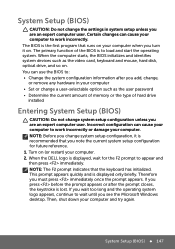
...You can cause your computer • Set or change a user-selectable option such as the video card, keyboard and mouse, hard disk, optical drive, and so on . When the DELL logo is displayed only briefly. System Setup (BIOS) 147 Turn on (or restart) your computer when you wait too... long and the operating system logo appears, continue to load and start the operating system. If you press before the prompt appears or after you add, change, or remove...
...You can cause your computer • Set or change a user-selectable option such as the video card, keyboard and mouse, hard disk, optical drive, and so on . When the DELL logo is displayed only briefly. System Setup (BIOS) 147 Turn on (or restart) your computer when you wait too... long and the operating system logo appears, continue to load and start the operating system. If you press before the prompt appears or after you add, change, or remove...

Owner's Manual
Page 4
5 Optical Drive 23 Removing the Optical Drive 23 Replacing the Optical Drive 24 6 Wireless Mini-Card 25 Removing the Mini-Card 25 Replacing the Mini-Card 27 7 Palm-Rest Assembly 29 Removing the Palm-Rest Assembly 29 Replacing the Palm-Rest Assembly 32 8 Power Button Board 35 Removing the Power Button Board 35 Replacing the Power Button Board 36 9 Hard Drive 37 Removing the Hard Drive 37 Replacing the Hard Drive 39 4 Contents
5 Optical Drive 23 Removing the Optical Drive 23 Replacing the Optical Drive 24 6 Wireless Mini-Card 25 Removing the Mini-Card 25 Replacing the Mini-Card 27 7 Palm-Rest Assembly 29 Removing the Palm-Rest Assembly 29 Replacing the Palm-Rest Assembly 32 8 Power Button Board 35 Removing the Power Button Board 35 Replacing the Power Button Board 36 9 Hard Drive 37 Removing the Hard Drive 37 Replacing the Hard Drive 39 4 Contents
Owner's Manual
Page 37
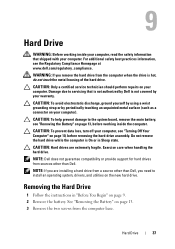
... strap or by Dell is hot, do not touch the metal housing of the hard drive. CAUTION: Hard drives are installing a hard drive from the computer when the drive is not covered by your warranty. Damage due to install an operating system, drivers, and utilities on page 13, before removing the hard-drive assembly. Hard Drive 37 Do not remove the hard drive while the computer...
... strap or by Dell is hot, do not touch the metal housing of the hard drive. CAUTION: Hard drives are installing a hard drive from the computer when the drive is not covered by your warranty. Damage due to install an operating system, drivers, and utilities on page 13, before removing the hard-drive assembly. Hard Drive 37 Do not remove the hard drive while the computer...

Owner's Manual
Page 38
4 Follow the instructions from step 3 to step 8 in "Removing the Palm-Rest Assembly" on page 29. 5 Slide the hard drive to the right to disconnect it from the connector on the system board. 6 Lift the hard drive out of the computer base. 38 Hard Drive
4 Follow the instructions from step 3 to step 8 in "Removing the Palm-Rest Assembly" on page 29. 5 Slide the hard drive to the right to disconnect it from the connector on the system board. 6 Lift the hard drive out of the computer base. 38 Hard Drive
Owner's Manual
Page 39
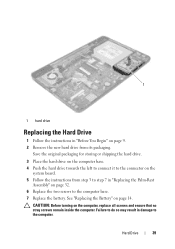
... original packaging for storing or shipping the hard drive. 3 Place the hard drive on the computer base. 4 Push the hard drive towards the left to connect it to the computer base. 7 Replace the battery. See "Replacing the Battery" on page 9. 2 Remove the new hard drive from step 3 to the computer. 1 1 hard drive Replacing the Hard Drive 1 Follow the instructions in "Before You Begin...
... original packaging for storing or shipping the hard drive. 3 Place the hard drive on the computer base. 4 Push the hard drive towards the left to connect it to the computer base. 7 Replace the battery. See "Replacing the Battery" on page 9. 2 Remove the new hard drive from step 3 to the computer. 1 1 hard drive Replacing the Hard Drive 1 Follow the instructions in "Before You Begin...
Owner's Manual
Page 43
...using a wrist grounding strap or by your computer. Removing the USB Board 1 Follow the procedures in "Removing the Palm-Rest Assembly" on page 29. 4 Remove the hard drive. CAUTION: Only a certified service technician should perform repairs on page 9. 2 Remove the battery. USB Board 43 For additional safety ...read the safety information that shipped with your warranty. See "Removing the Hard Drive" on page 37. 5 Lift the connector latch that secures the USB-board cable to servicing that is not authorized by Dell is not covered by periodically touching an unpainted metal surface. ...
...using a wrist grounding strap or by your computer. Removing the USB Board 1 Follow the procedures in "Removing the Palm-Rest Assembly" on page 29. 4 Remove the hard drive. CAUTION: Only a certified service technician should perform repairs on page 9. 2 Remove the battery. USB Board 43 For additional safety ...read the safety information that shipped with your warranty. See "Removing the Hard Drive" on page 37. 5 Lift the connector latch that secures the USB-board cable to servicing that is not authorized by Dell is not covered by periodically touching an unpainted metal surface. ...
Owner's Manual
Page 67
... page 15. 5 Remove the memory module(s). See "Removing the Keyboard" on your computer). See "Removing the Optical Drive" on page 23. 7 Follow the instructions from the 3-in-1 media card reader. 3 Remove the battery. See "Removing the Thermal Cooling Assembly" on page 13. 4 Remove the keyboard. See "Removing the ...WARNING: Before working inside your computer, read the safety information that is not authorized by Dell is not covered by your warranty. Damage due to step 6 in "Removing the Hard Drive" on page 9. 2 Press and eject any installed cards from step 3 to step ...
... page 15. 5 Remove the memory module(s). See "Removing the Keyboard" on your computer). See "Removing the Optical Drive" on page 23. 7 Follow the instructions from the 3-in-1 media card reader. 3 Remove the battery. See "Removing the Thermal Cooling Assembly" on page 13. 4 Remove the keyboard. See "Removing the ...WARNING: Before working inside your computer, read the safety information that is not authorized by Dell is not covered by your warranty. Damage due to step 6 in "Removing the Hard Drive" on page 9. 2 Press and eject any installed cards from step 3 to step ...


