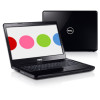
Service Manual
Page 1
... Module Cover Memory Module(s) Keyboard Wireless Mini-Card Palm Rest Power Button Board Display Camera Internal Card With Bluetooth® Wireless Technology System Board Coin-Cell Battery Thermal Cooling Assembly Processor Module I/O Board Speakers Battery Latch Assembly Flashing the BIOS Notes, Cautions, and Warnings NOTE: A NOTE indicates important information that helps you how to avoid the problem. CAUTION: A CAUTION indicates either potential damage to either trademarks or registered trademarks of your computer. Microsoft, Windows, Windows Vista, and the Windows Vista start...
... Module Cover Memory Module(s) Keyboard Wireless Mini-Card Palm Rest Power Button Board Display Camera Internal Card With Bluetooth® Wireless Technology System Board Coin-Cell Battery Thermal Cooling Assembly Processor Module I/O Board Speakers Battery Latch Assembly Flashing the BIOS Notes, Cautions, and Warnings NOTE: A NOTE indicates important information that helps you how to avoid the problem. CAUTION: A CAUTION indicates either potential damage to either trademarks or registered trademarks of your computer. Microsoft, Windows, Windows Vista, and the Windows Vista start...

Service Manual
Page 2
Back to Contents Page Module Cover Dell™ Inspiron™ N4020/N4030 Service Manual Removing the Module Cover Replacing the Module Cover WARNING: Before working inside the computer. Using the notch on the computer base, lift and slide the module cover tabs out of the slots on the computer base and gently snap the module cover into place. 3. CAUTION: Before turning on the computer, replace all screws and ensure that no stray screws...
Back to Contents Page Module Cover Dell™ Inspiron™ N4020/N4030 Service Manual Removing the Module Cover Replacing the Module Cover WARNING: Before working inside the computer. Using the notch on the computer base, lift and slide the module cover tabs out of the slots on the computer base and gently snap the module cover into place. 3. CAUTION: Before turning on the computer, replace all screws and ensure that no stray screws...
Service Manual
Page 5
... help to Contents Page Before You Begin Dell™ Inspiron™ N4020/N4030 Service Manual Recommended Tools Turning Off Your Computer Before Working Inside Your Computer This manual provides procedures for removing and installing components in Turning Off Your Computer and Before Working Inside Your Computer. Click the Start button and then click Shut Down. 3. CAUTION: When you connect a cable, ensure that is not authorized by...
... help to Contents Page Before You Begin Dell™ Inspiron™ N4020/N4030 Service Manual Recommended Tools Turning Off Your Computer Before Working Inside Your Computer This manual provides procedures for removing and installing components in Turning Off Your Computer and Before Working Inside Your Computer. Click the Start button and then click Shut Down. 3. CAUTION: When you connect a cable, ensure that is not authorized by...
Service Manual
Page 8
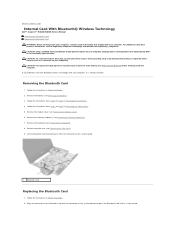
... and press the Bluetooth card until it is already installed. Removing the Bluetooth Card 1. Follow the instructions from step 3 to step 5 in Removing the Hard Drive. 4. Back to disconnect it from the connector on the system board. 1 Bluetooth card Replacing the Bluetooth Card 1. Remove the memory module(s) (see Removing the Module Cover). 6. Lift the Bluetooth card to Contents Page Internal Card With Bluetooth® Wireless Technology Dell™ Inspiron™ N4020/N4030 Service Manual Removing the Bluetooth Card Replacing the Bluetooth Card WARNING: Before working inside your...
... and press the Bluetooth card until it is already installed. Removing the Bluetooth Card 1. Follow the instructions from step 3 to step 5 in Removing the Hard Drive. 4. Back to disconnect it from the connector on the system board. 1 Bluetooth card Replacing the Bluetooth Card 1. Remove the memory module(s) (see Removing the Module Cover). 6. Lift the Bluetooth card to Contents Page Internal Card With Bluetooth® Wireless Technology Dell™ Inspiron™ N4020/N4030 Service Manual Removing the Bluetooth Card Replacing the Bluetooth Card WARNING: Before working inside your...
Service Manual
Page 10
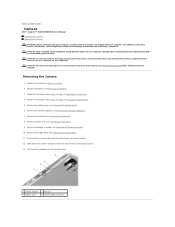
... on your computer). CAUTION: Only a certified service technician should perform repairs on the camera module. 12. Follow the instructions from step 3 to step 5 in Removing the Optical Drive. 5. Remove the battery (see Removing the Keyboard). 8. Remove the keyboard (see Removing the Battery). 3. Remove the display assembly (see Removing the Memory Module(s)). 7. Back to Contents Page Camera Dell™ Inspiron™ N4020/N4030 Service Manual Removing the Camera Replacing the Camera WARNING: Before working inside your computer, read the safety information that...
... on your computer). CAUTION: Only a certified service technician should perform repairs on the camera module. 12. Follow the instructions from step 3 to step 5 in Removing the Optical Drive. 5. Remove the battery (see Removing the Keyboard). 8. Remove the keyboard (see Removing the Battery). 3. Remove the display assembly (see Removing the Memory Module(s)). 7. Back to Contents Page Camera Dell™ Inspiron™ N4020/N4030 Service Manual Removing the Camera Replacing the Camera WARNING: Before working inside your computer, read the safety information that...
Service Manual
Page 17
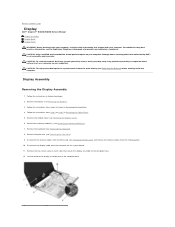
.... Follow the instructions in Removing the Hard Drive. 4. Lift and remove the display assembly out of the computer base. CAUTION: Only a certified service technician should perform repairs on your computer. Remove the battery (see Removing the Memory Module(s)). 7. Remove the memory module(s) (see Removing the Battery). 3. For additional safety best practices information, see Removing the Keyboard). 8. Back to Contents Page Display Dell™ Inspiron™ N4020/N4030 Service Manual Display Assembly Display Bezel Display Panel WARNING: Before working inside your...
.... Follow the instructions in Removing the Hard Drive. 4. Lift and remove the display assembly out of the computer base. CAUTION: Only a certified service technician should perform repairs on your computer. Remove the battery (see Removing the Memory Module(s)). 7. Remove the memory module(s) (see Removing the Battery). 3. For additional safety best practices information, see Removing the Keyboard). 8. Back to Contents Page Display Dell™ Inspiron™ N4020/N4030 Service Manual Display Assembly Display Bezel Display Panel WARNING: Before working inside your...
Service Manual
Page 22
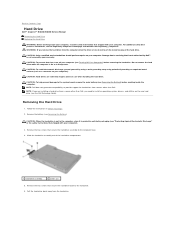
... the hard drive is not covered by periodically touching an unpainted metal surface (such as a connector on the new hard drive (see Turning Off Your Computer) before working inside the computer. Pull the hard-drive bezel away from a source other than Dell, you are extremely fragile. Follow the instructions in Sleep state. Back to Contents Page Hard Drive Dell™ Inspiron™ N4020/N4030 Service Manual Removing the Hard Drive Replacing the Hard Drive WARNING: Before working inside...
... the hard drive is not covered by periodically touching an unpainted metal surface (such as a connector on the new hard drive (see Turning Off Your Computer) before working inside the computer. Pull the hard-drive bezel away from a source other than Dell, you are extremely fragile. Follow the instructions in Sleep state. Back to Contents Page Hard Drive Dell™ Inspiron™ N4020/N4030 Service Manual Removing the Hard Drive Replacing the Hard Drive WARNING: Before working inside...
Service Manual
Page 23
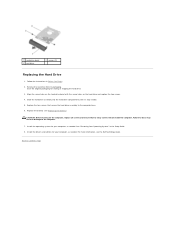
Remove the new drive from its packaging. Replace the two screws that no stray screws remain inside the computer. Install the drivers and utilities for your computer, as needed . For more information, see Replacing the Battery). Follow the instructions in the Setup Guide. 8. CAUTION: Before turning on the hard drive and replace the two screws. 4. See "Restoring Your Operating System" in Before You Begin. 2. Slide the hard-drive assembly into the hard-drive compartment...
Remove the new drive from its packaging. Replace the two screws that no stray screws remain inside the computer. Install the drivers and utilities for your computer, as needed . For more information, see Replacing the Battery). Follow the instructions in the Setup Guide. 8. CAUTION: Before turning on the hard drive and replace the two screws. 4. See "Restoring Your Operating System" in Before You Begin. 2. Slide the hard-drive assembly into the hard-drive compartment...
Service Manual
Page 26
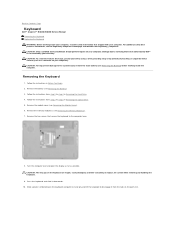
... Keyboard Dell™ Inspiron™ N4020/N4030 Service Manual Removing the Keyboard Replacing the Keyboard WARNING: Before working inside your computer, read the safety information that shipped with your computer. Turn the computer over and open the display as far as a connector on your computer). Slide a plastic scribe between the keyboard and palm rest and pry and lift the keyboard to the system board, remove the main battery (see Removing...
... Keyboard Dell™ Inspiron™ N4020/N4030 Service Manual Removing the Keyboard Replacing the Keyboard WARNING: Before working inside your computer, read the safety information that shipped with your computer. Turn the computer over and open the display as far as a connector on your computer). Slide a plastic scribe between the keyboard and palm rest and pry and lift the keyboard to the system board, remove the main battery (see Removing...
Service Manual
Page 29
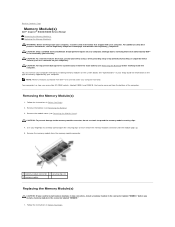
... best practices information, see Removing the Module Cover). Follow the instructions in Before You Begin. 2. Back to Contents Page Memory Module(s) Dell™ Inspiron™ N4020/N4030 Service Manual Removing the Memory Module(s) Replacing the Memory Module(s) WARNING: Before working inside your computer, read the safety information that shipped with your computer. Remove the battery (see Removing the Battery) before you need to install memory modules in two connectors, install a memory module in your Setup Guide for information on your computer...
... best practices information, see Removing the Module Cover). Follow the instructions in Before You Begin. 2. Back to Contents Page Memory Module(s) Dell™ Inspiron™ N4020/N4030 Service Manual Removing the Memory Module(s) Replacing the Memory Module(s) WARNING: Before working inside your computer, read the safety information that shipped with your computer. Remove the battery (see Removing the Battery) before you need to install memory modules in two connectors, install a memory module in your Setup Guide for information on your computer...

Service Manual
Page 30
...: Before turning on the computer. To confirm the amount of memory installed in the memory- module connector. 3. Replace the battery (see Replacing the Module Cover). 5. 2. Align the notch in the memory module with the tab in the computer: Windows® Vista: Click Start Windows® 7: ® Help and Support® Dell System Information. If you do so may not boot. 1 tab 2 notch 4. Replace the module cover (see Replacing the Battery), or connect the AC adapter to...
...: Before turning on the computer. To confirm the amount of memory installed in the memory- module connector. 3. Replace the battery (see Replacing the Module Cover). 5. 2. Align the notch in the memory module with the tab in the computer: Windows® Vista: Click Start Windows® 7: ® Help and Support® Dell System Information. If you do so may not boot. 1 tab 2 notch 4. Replace the module cover (see Replacing the Battery), or connect the AC adapter to...
Service Manual
Page 31
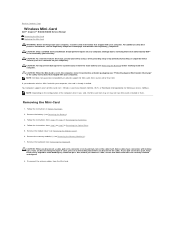
... connectors apart, keep them . Disconnect the antenna cables from step 3 to Contents Page Wireless Mini-Card Dell™ Inspiron™ N4020/N4030 Service Manual Removing the Mini-Card Replacing the Mini-Card WARNING: Before working inside your computer. Your computer supports one half Mini-Card slot - Wireless Local Area Network (WLAN), Wi-Fi, or Worldwide Interoperability for Mini-Cards from step 3 to the system board, remove the main battery (see Removing the Module Cover). 6. Removing the Mini-Card...
... connectors apart, keep them . Disconnect the antenna cables from step 3 to Contents Page Wireless Mini-Card Dell™ Inspiron™ N4020/N4030 Service Manual Removing the Mini-Card Replacing the Mini-Card WARNING: Before working inside your computer. Your computer supports one half Mini-Card slot - Wireless Local Area Network (WLAN), Wi-Fi, or Worldwide Interoperability for Mini-Cards from step 3 to the system board, remove the main battery (see Removing the Module Cover). 6. Removing the Mini-Card...
Service Manual
Page 36
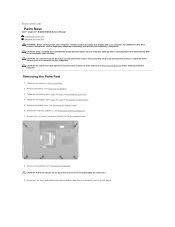
... as a connector on your warranty. Remove the keyboard (see Removing the Memory Module(s)). 7. Remove the memory module(s) (see Removing the Keyboard). Follow the instructions from step 3 to step 5 in Before You Begin. 2. Remove the module cover (see Removing the Battery) before working inside the computer. Back to Contents Page Palm Rest Dell™ Inspiron™ N4020/N4030 Service Manual Removing the Palm Rest Replacing the Palm Rest WARNING: Before working inside your computer, read the...
... as a connector on your warranty. Remove the keyboard (see Removing the Memory Module(s)). 7. Remove the memory module(s) (see Removing the Keyboard). Follow the instructions from step 3 to step 5 in Before You Begin. 2. Remove the module cover (see Removing the Battery) before working inside the computer. Back to Contents Page Palm Rest Dell™ Inspiron™ N4020/N4030 Service Manual Removing the Palm Rest Replacing the Palm Rest WARNING: Before working inside your computer, read the...
Service Manual
Page 39
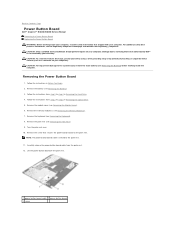
.... 1 power button board cable 2 power button board 3 screw Remove the keyboard (see the Regulatory Compliance Homepage at www.dell.com/regulatory_compliance. For additional safety best practices information, see Removing the Keyboard). 8. Follow the instructions in Removing the Hard Drive. 4. Turn the palm rest over. 10. NOTE: The power button board cable is not covered by periodically touching an unpainted metal surface (such as a connector on your computer). Remove the memory module(s) (see Removing the Battery). 3. Follow the instructions from...
.... 1 power button board cable 2 power button board 3 screw Remove the keyboard (see the Regulatory Compliance Homepage at www.dell.com/regulatory_compliance. For additional safety best practices information, see Removing the Keyboard). 8. Follow the instructions in Removing the Hard Drive. 4. Turn the palm rest over. 10. NOTE: The power button board cable is not covered by periodically touching an unpainted metal surface (such as a connector on your computer). Remove the memory module(s) (see Removing the Battery). 3. Follow the instructions from...

Service Manual
Page 45
... battery (see Replacing the Module Cover). 15. Follow the instructions in the BIOS 1. Failure to the computer. 19. Enter the service tag (see Entering the Service Tag in damage to do so may result in the BIOS). Ensure that the main battery is plugged in -1 media card reader. Remove the processor module (see Removing the Thermal Cooling Assembly). 17. Connect the display cable and the speakers cable to step 4 in Replacing the Optical Drive...
... battery (see Replacing the Module Cover). 15. Follow the instructions in the BIOS 1. Failure to the computer. 19. Enter the service tag (see Entering the Service Tag in damage to do so may result in the BIOS). Ensure that the main battery is plugged in -1 media card reader. Remove the processor module (see Removing the Thermal Cooling Assembly). 17. Connect the display cable and the speakers cable to step 4 in Replacing the Optical Drive...
Setup Guide
Page 5
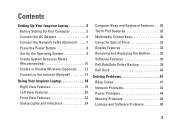
... Network Cable (Optional 7 Press the Power Button 8 Set Up the Operating System 9 Create System Recovery Media (Recommended 10 Enable or Disable Wireless (Optional 12 Connect to the Internet (Optional 14 Using Your Inspiron Laptop 18 Right View Features 18 Left View Features 20 Front View Features 22 Status Lights and Indicators 24 Computer Base and Keyboard Features 26 Touch Pad Gestures 28 Multimedia Control Keys 30 Using the Optical Drive 32 Display Features 34 Removing and Replacing the Battery 36 Software Features 38 Dell DataSafe Online Backup...
... Network Cable (Optional 7 Press the Power Button 8 Set Up the Operating System 9 Create System Recovery Media (Recommended 10 Enable or Disable Wireless (Optional 12 Connect to the Internet (Optional 14 Using Your Inspiron Laptop 18 Right View Features 18 Left View Features 20 Front View Features 22 Status Lights and Indicators 24 Computer Base and Keyboard Features 26 Touch Pad Gestures 28 Multimedia Control Keys 30 Using the Optical Drive 32 Display Features 34 Removing and Replacing the Battery 36 Software Features 38 Dell DataSafe Online Backup...

Setup Guide
Page 43
See the Service Manual at support.dell.com/manuals. Beep Codes Your computer might emit a series of beeps during start-up if there are errors or problems. This series of beeps, called a beep code, identifies a problem. NOTE: To replace parts, see the Service Manual at support.dell.com/manuals for your problem using the following guidelines, see "Contacting Dell" on page 72. WARNING: Only trained service personnel should remove the computer cover. BIOS ROM checksum failure Two No RAM detected...
See the Service Manual at support.dell.com/manuals. Beep Codes Your computer might emit a series of beeps during start-up if there are errors or problems. This series of beeps, called a beep code, identifies a problem. NOTE: To replace parts, see the Service Manual at support.dell.com/manuals for your problem using the following guidelines, see "Contacting Dell" on page 72. WARNING: Only trained service personnel should remove the computer cover. BIOS ROM checksum failure Two No RAM detected...
Setup Guide
Page 46
... the memory module(s) into the connector(s) (see the Service Manual at support.dell.com/manuals). • If the problem persists, contact Dell (see "Contacting Dell" on your computer - Some possible causes of interference are not using to the same electrical outlet. Solving Problems • If the display is creating interference by interrupting or blocking other signals. An unwanted signal is not responding, press the power button...
... the memory module(s) into the connector(s) (see the Service Manual at support.dell.com/manuals). • If the problem persists, contact Dell (see "Contacting Dell" on your computer - Some possible causes of interference are not using to the same electrical outlet. Solving Problems • If the display is creating interference by interrupting or blocking other signals. An unwanted signal is not responding, press the power button...
Setup Guide
Page 53
.... 3. Type hardware troubleshooter in the system setup program and is recommended that you print these procedures before you begin. In the search results, select the option that you want to enter the System Setup (BIOS) utility. Ensure that the device that best describes the problem and follow the remaining troubleshooting steps. Start the Dell Diagnostics from your hard drive or from the Drivers and Utilities disc. 51 NOTE: Dell Diagnostics works...
.... 3. Type hardware troubleshooter in the system setup program and is recommended that you print these procedures before you begin. In the search results, select the option that you want to enter the System Setup (BIOS) utility. Ensure that the device that best describes the problem and follow the remaining troubleshooting steps. Start the Dell Diagnostics from your hard drive or from the Drivers and Utilities disc. 51 NOTE: Dell Diagnostics works...
Setup Guide
Page 78
... Model Dell™ Inspiron™ N4020/N4030 Memory Memory module connector Memory module capacities Memory type Minimum memory two user-accessible SODIMM connectors 1 GB, 2 GB, and 4 GB 1333 MHz SODIMM DDR3 1 GB Memory Maximum memory 4 GB Possible memory 2 GB, 3 GB, 4 GB, and configurations 6 GB NOTE: For instructions on upgrading the memory, see the Service Manual at support.dell.com/manuals. 76 For more information regarding the configuration of your computer, click Start → Help and Support and select the option...
... Model Dell™ Inspiron™ N4020/N4030 Memory Memory module connector Memory module capacities Memory type Minimum memory two user-accessible SODIMM connectors 1 GB, 2 GB, and 4 GB 1333 MHz SODIMM DDR3 1 GB Memory Maximum memory 4 GB Possible memory 2 GB, 3 GB, 4 GB, and configurations 6 GB NOTE: For instructions on upgrading the memory, see the Service Manual at support.dell.com/manuals. 76 For more information regarding the configuration of your computer, click Start → Help and Support and select the option...


