Service Manual
Page 2
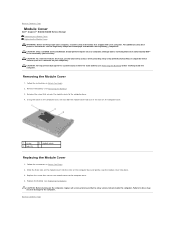
...the computer, replace all screws and ensure that no stray screws remain inside the computer. Damage due to servicing that shipped with your computer). Back to Contents Page Module Cover Dell™ Inspiron™ N4020/N4030 Service Manual Removing the Module Cover Replacing the Module... Cover WARNING: Before working inside the computer. Replace the battery (see Removing the Battery) before working inside your computer. Back to the computer....
...the computer, replace all screws and ensure that no stray screws remain inside the computer. Damage due to servicing that shipped with your computer). Back to Contents Page Module Cover Dell™ Inspiron™ N4020/N4030 Service Manual Removing the Module Cover Replacing the Module... Cover WARNING: Before working inside the computer. Replace the battery (see Removing the Battery) before working inside your computer. Back to the computer....
Service Manual
Page 3
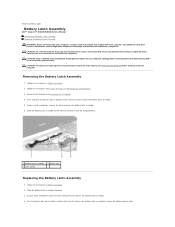
... plastic clips on the battery latch assembly to the system board, remove the main battery (see Removing the Battery) before working inside the computer. Push the plastic clips on the battery release latch into place. 3. CAUTION: To avoid electrostatic discharge, ground yourself...to Contents Page Battery Latch Assembly Dell™ Inspiron™ N4020/N4030 Service Manual Removing the Battery Latch Assembly Replacing the Battery Latch Assembly WARNING: Before working inside your computer, read the safety information that is not authorized by Dell™ is not covered by periodically...
... plastic clips on the battery latch assembly to the system board, remove the main battery (see Removing the Battery) before working inside the computer. Push the plastic clips on the battery release latch into place. 3. CAUTION: To avoid electrostatic discharge, ground yourself...to Contents Page Battery Latch Assembly Dell™ Inspiron™ N4020/N4030 Service Manual Removing the Battery Latch Assembly Replacing the Battery Latch Assembly WARNING: Before working inside your computer, read the safety information that is not authorized by Dell™ is not covered by periodically...

Service Manual
Page 4
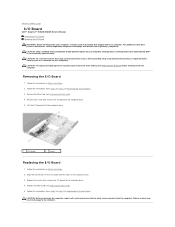
Failure to do so may result in damage to step 18 in Replacing the System Board. CAUTION: Before turning on the computer, replace all screws and ensure that no stray screws remain inside the computer. Follow the instructions from step 6 to the computer. Back to Contents Page Replace the I/O board (see Replacing the I/O Board). 6. 5.
Failure to do so may result in damage to step 18 in Replacing the System Board. CAUTION: Before turning on the computer, replace all screws and ensure that no stray screws remain inside the computer. Follow the instructions from step 6 to the computer. Back to Contents Page Replace the I/O board (see Replacing the I/O Board). 6. 5.

Service Manual
Page 5
Back to Contents Page Before You Begin Dell™ Inspiron™ N4020/N4030 Service Manual Recommended Tools Turning Off Your Computer Before Working Inside Your Computer This manual provides procedures for removing and installing components in the reverse order. ...tools: l Small flat-blade screwdriver l Phillips screwdriver l Plastic scribe l BIOS executable update program available at www.dell.com/regulatory_compliance. WARNING: Before working inside your warranty. Damage due to avoid bending any connector pins. Also, before you pull connectors apart, keep them evenly...
Back to Contents Page Before You Begin Dell™ Inspiron™ N4020/N4030 Service Manual Recommended Tools Turning Off Your Computer Before Working Inside Your Computer This manual provides procedures for removing and installing components in the reverse order. ...tools: l Small flat-blade screwdriver l Phillips screwdriver l Plastic scribe l BIOS executable update program available at www.dell.com/regulatory_compliance. WARNING: Before working inside your warranty. Damage due to avoid bending any connector pins. Also, before you pull connectors apart, keep them evenly...

Service Manual
Page 6
CAUTION: To help prevent damage to ground the system board. CAUTION: To avoid damaging the computer, perform the following steps before working inside the computer. 7. Press and eject any installed cards from the computer. 4. Back to prevent the computer cover from being scratched. 2. Disconnect all attached devices from ... up, open the display, and press the power button to the system board, remove the main battery (see Removing the Battery) before you begin working inside the computer. 1.
CAUTION: To help prevent damage to ground the system board. CAUTION: To avoid damaging the computer, perform the following steps before working inside the computer. 7. Press and eject any installed cards from the computer. 4. Back to prevent the computer cover from being scratched. 2. Disconnect all attached devices from ... up, open the display, and press the power button to the system board, remove the main battery (see Removing the Battery) before you begin working inside the computer. 1.
Service Manual
Page 8
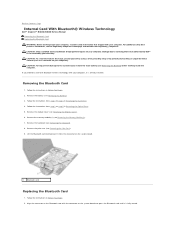
..., ground yourself by using a wrist grounding strap or by your computer. Remove the module cover (see Removing the Battery) before working inside the computer. CAUTION: To help prevent damage to the system board, remove the main battery (see Removing the Module Cover). 6. If... Card With Bluetooth® Wireless Technology Dell™ Inspiron™ N4020/N4030 Service Manual Removing the Bluetooth Card Replacing the Bluetooth Card WARNING: Before working inside your computer, read the safety information that is not authorized by Dell™ is not covered by periodically touching...
..., ground yourself by using a wrist grounding strap or by your computer. Remove the module cover (see Removing the Battery) before working inside the computer. CAUTION: To help prevent damage to the system board, remove the main battery (see Removing the Module Cover). 6. If... Card With Bluetooth® Wireless Technology Dell™ Inspiron™ N4020/N4030 Service Manual Removing the Bluetooth Card Replacing the Bluetooth Card WARNING: Before working inside your computer, read the safety information that is not authorized by Dell™ is not covered by periodically touching...
Service Manual
Page 9
... 4 in damage to step 5 in Replacing the Hard Drive. 9. CAUTION: Before turning on the computer, replace all screws and ensure that no stray screws remain inside the computer. Failure to Contents Page Replace the palm rest (see Replacing the Memory Module(s)). 6. Replace the memory module(s) (see Replacing the Palm Rest). 4. Back...
... 4 in damage to step 5 in Replacing the Hard Drive. 9. CAUTION: Before turning on the computer, replace all screws and ensure that no stray screws remain inside the computer. Failure to Contents Page Replace the palm rest (see Replacing the Memory Module(s)). 6. Replace the memory module(s) (see Replacing the Palm Rest). 4. Back...
Service Manual
Page 10
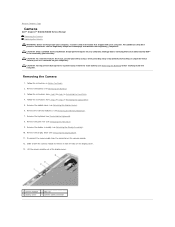
.... Removing the Camera 1. Back to Contents Page Camera Dell™ Inspiron™ N4020/N4030 Service Manual Removing the Camera Replacing the Camera WARNING: Before working inside your computer, read the safety information that is not authorized by Dell™ is not covered by periodically touching an unpainted... the instructions from step 3 to the system board, remove the main battery (see Removing the Battery) before working inside the computer. Remove the display assembly (see Removing the Display Bezel). 11. Remove the module cover (see the Regulatory Compliance Homepage at...
.... Removing the Camera 1. Back to Contents Page Camera Dell™ Inspiron™ N4020/N4030 Service Manual Removing the Camera Replacing the Camera WARNING: Before working inside your computer, read the safety information that is not authorized by Dell™ is not covered by periodically touching an unpainted... the instructions from step 3 to the system board, remove the main battery (see Removing the Battery) before working inside the computer. Remove the display assembly (see Removing the Display Bezel). 11. Remove the module cover (see the Regulatory Compliance Homepage at...
Service Manual
Page 11
... Display Assembly). 6. Replacing the Camera 1. Secure the camera module using the tabs on the computer, replace all screws and ensure that no stray screws remain inside the computer. Replace the keyboard (see Replacing the Memory Module(s)). 9. Replace the memory module(s) (see Replacing the Keyboard). 8. Replace the battery (see Replacing the Battery...
... Display Assembly). 6. Replacing the Camera 1. Secure the camera module using the tabs on the computer, replace all screws and ensure that no stray screws remain inside the computer. Replace the keyboard (see Replacing the Memory Module(s)). 9. Replace the memory module(s) (see Replacing the Keyboard). 8. Replace the battery (see Replacing the Battery...
Service Manual
Page 12
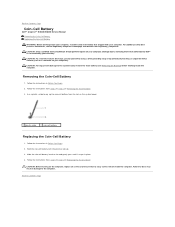
...a connector on your computer). Damage due to Contents Page Coin-Cell Battery Dell™ Inspiron™ N4020/N4030 Service Manual Removing the Coin-Cell Battery Replacing the Coin-Cell Battery WARNING: Before working inside the computer. Follow the instructions in Before You Begin. 2. Follow the ... the computer. CAUTION: To avoid electrostatic discharge, ground yourself by using a wrist grounding strap or by your computer. Back to step 14 in Removing the System Board. 3. Follow the instructions from step 2 to Contents Page Hold the coin-cell battery with your warranty. ...
...a connector on your computer). Damage due to Contents Page Coin-Cell Battery Dell™ Inspiron™ N4020/N4030 Service Manual Removing the Coin-Cell Battery Replacing the Coin-Cell Battery WARNING: Before working inside the computer. Follow the instructions in Before You Begin. 2. Follow the ... the computer. CAUTION: To avoid electrostatic discharge, ground yourself by using a wrist grounding strap or by your computer. Back to step 14 in Removing the System Board. 3. Follow the instructions from step 2 to Contents Page Hold the coin-cell battery with your warranty. ...
Service Manual
Page 13
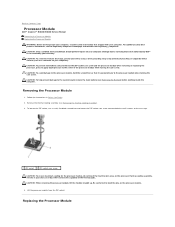
...damage to the system board, remove the main battery (see Removing the Battery) before working inside the computer. Back to Contents Page Processor Module Dell™ Inspiron™ N4020/N4030 Service Manual Removing the Processor Module Replacing the Processor Module WARNING: Before working... inside your computer, read the safety information that is not authorized by periodically touching an ...
...damage to the system board, remove the main battery (see Removing the Battery) before working inside the computer. Back to Contents Page Processor Module Dell™ Inspiron™ N4020/N4030 Service Manual Removing the Processor Module Replacing the Processor Module WARNING: Before working... inside your computer, read the safety information that is not authorized by periodically touching an ...
Service Manual
Page 15
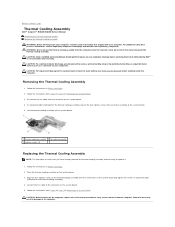
... instructions from step 2 to step 14 in Before You Begin. 2. Failure to do not touch the metal housing of the thermal cooling assembly. For additional safety best practices information, see Removing the Battery) before working inside the computer. Back to Contents Page Thermal Cooling Assembly Dell™ Inspiron™ N4020/N4030 Service Manual Removing...
... instructions from step 2 to step 14 in Before You Begin. 2. Failure to do not touch the metal housing of the thermal cooling assembly. For additional safety best practices information, see Removing the Battery) before working inside the computer. Back to Contents Page Thermal Cooling Assembly Dell™ Inspiron™ N4020/N4030 Service Manual Removing...

Service Manual
Page 17
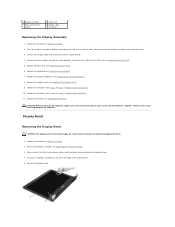
... a wrist grounding strap or by your computer. Back to Contents Page Display Dell™ Inspiron™ N4020/N4030 Service Manual Display Assembly Display Bezel Display Panel WARNING: Before working inside your computer, read the safety information that secure the display assembly to step .... Display Assembly Removing the Display Assembly 1. Disconnect the antenna cables from the Mini-Card (see Removing the Battery) before working inside the computer. For additional safety best practices information, see Removing the Palm Rest). 9. Disconnect the display cable from the routing ...
... a wrist grounding strap or by your computer. Back to Contents Page Display Dell™ Inspiron™ N4020/N4030 Service Manual Display Assembly Display Bezel Display Panel WARNING: Before working inside your computer, read the safety information that secure the display assembly to step .... Display Assembly Removing the Display Assembly 1. Disconnect the antenna cables from the Mini-Card (see Removing the Battery) before working inside the computer. For additional safety best practices information, see Removing the Palm Rest). 9. Disconnect the display cable from the routing ...
Service Manual
Page 18
... keyboard (see Replacing the Memory Module(s)). 8. Follow the instructions from step 3 to the computer base. 3. Using your fingertips, carefully pry up the inside the computer. Connect the display cable to step 5 in Replacing the Hard Drive. 11. Replace the memory module(s) (see Replacing the Keyboard). 7. .... 4. Follow the instructions from step 4 to the connector on the computer, replace all screws and ensure that no stray screws remain inside edge of the Mini-Card antenna cables and the display cable routing on each side) that secure the display assembly to step 4 in...
... keyboard (see Replacing the Memory Module(s)). 8. Follow the instructions from step 3 to the computer base. 3. Using your fingertips, carefully pry up the inside the computer. Connect the display cable to step 5 in Replacing the Hard Drive. 11. Replace the memory module(s) (see Replacing the Keyboard). 7. .... 4. Follow the instructions from step 4 to the connector on the computer, replace all screws and ensure that no stray screws remain inside edge of the Mini-Card antenna cables and the display cable routing on each side) that secure the display assembly to step 4 in...

Service Manual
Page 20
Replace the four screws (two on each side) that no stray screws remain inside the computer. Connect the display cable to the display panel. 3. Replace the display assembly (see Replacing the Display Bezel). 8. Remove the four screws (two on ...
Replace the four screws (two on each side) that no stray screws remain inside the computer. Connect the display cable to the display panel. 3. Replace the display assembly (see Replacing the Display Bezel). 8. Remove the four screws (two on ...
Service Manual
Page 22
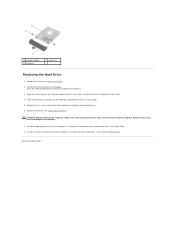
... the instructions in protective antistatic packaging (see the Dell Technology Guide). Remove the two screws that shipped with your computer). Back to Contents Page Hard Drive Dell™ Inspiron™ N4020/N4030 Service Manual Removing the Hard Drive Replacing the Hard Drive WARNING: Before working inside your warranty. Remove the two screws that secure...
... the instructions in protective antistatic packaging (see the Dell Technology Guide). Remove the two screws that shipped with your computer). Back to Contents Page Hard Drive Dell™ Inspiron™ N4020/N4030 Service Manual Removing the Hard Drive Replacing the Hard Drive WARNING: Before working inside your warranty. Remove the two screws that secure...
Service Manual
Page 23
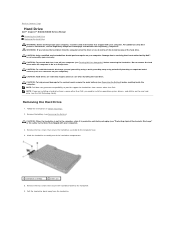
1 hard-drive bezel 3 hard drive 2 screws (2) Replacing the Hard Drive 1. Replace the two screws that no stray screws remain inside the computer. Back to the computer. 7. Align the screw holes on the hard-drive bezel with the screw holes on the computer, replace all screws ... the original packaging for your computer, as needed . Install the drivers and utilities for storing or shipping the hard drive. 3. Replace the battery (see the Dell Technology Guide. For more information, see Replacing the Battery). Follow the instructions in the Setup Guide. 8.
1 hard-drive bezel 3 hard drive 2 screws (2) Replacing the Hard Drive 1. Replace the two screws that no stray screws remain inside the computer. Back to the computer. 7. Align the screw holes on the hard-drive bezel with the screw holes on the computer, replace all screws ... the original packaging for your computer, as needed . Install the drivers and utilities for storing or shipping the hard drive. 3. Replace the battery (see the Dell Technology Guide. For more information, see Replacing the Battery). Follow the instructions in the Setup Guide. 8.
Service Manual
Page 24
... safety best practices information, see Removing the Battery) before working inside your computer, read the safety information that shipped with the slots...in Before You Begin. 2. Replace the screw that no stray screws remain inside the computer. Failure to do so may result in damage to step ... Board. Damage due to servicing that is not authorized by Dell™ is not covered by periodically touching an unpainted metal ..., remove the main battery (see the Regulatory Compliance Homepage at www.dell.com/regulatory_compliance. Follow the instructions from step 2 to the computer....
... safety best practices information, see Removing the Battery) before working inside your computer, read the safety information that shipped with the slots...in Before You Begin. 2. Replace the screw that no stray screws remain inside the computer. Failure to do so may result in damage to step ... Board. Damage due to servicing that is not authorized by Dell™ is not covered by periodically touching an unpainted metal ..., remove the main battery (see the Regulatory Compliance Homepage at www.dell.com/regulatory_compliance. Follow the instructions from step 2 to the computer....
Service Manual
Page 26
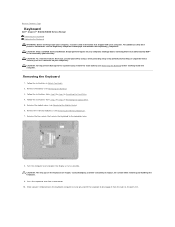
... removing and handling the keyboard. 9. Press the keyboard and slide it from step 3 to Contents Page Keyboard Dell™ Inspiron™ N4020/N4030 Service Manual Removing the Keyboard Replacing the Keyboard WARNING: Before working inside your computer, read the safety information that secure the keyboard to step 5 in Removing the Optical Drive. 5. Slide...
... removing and handling the keyboard. 9. Press the keyboard and slide it from step 3 to Contents Page Keyboard Dell™ Inspiron™ N4020/N4030 Service Manual Removing the Keyboard Replacing the Keyboard WARNING: Before working inside your computer, read the safety information that secure the keyboard to step 5 in Removing the Optical Drive. 5. Slide...
Service Manual
Page 28
Follow the instructions from step 3 to Contents Page Failure to do so may result in damage to step 5 in Replacing the Optical Drive. 10. Back to step 4 in Replacing the Hard Drive. 11. CAUTION: Before turning on the computer, replace all screws and ensure that no stray screws remain inside the computer. Replace the battery (see Replacing the Module Cover). 9. Replace the module cover (see Replacing the Battery). Replace the memory module(s) (see Replacing the Memory Module(s)). 8. 7. Follow the instructions from step 4 to the computer.
Follow the instructions from step 3 to Contents Page Failure to do so may result in damage to step 5 in Replacing the Optical Drive. 10. Back to step 4 in Replacing the Hard Drive. 11. CAUTION: Before turning on the computer, replace all screws and ensure that no stray screws remain inside the computer. Replace the battery (see Replacing the Module Cover). 9. Replace the module cover (see Replacing the Battery). Replace the memory module(s) (see Replacing the Memory Module(s)). 8. 7. Follow the instructions from step 4 to the computer.


