Owner's Manual
Page 4
... 29 Touch Pad 30 Customizing the Touch Pad 30 5 Using a Battery Battery Performance 31 Checking the Battery Charge 32 Dell™ QuickSet Battery Meter 32 Microsoft® Windows® Power Meter 32 Low-Battery Warning 32 Conserving Battery Power 32 Power Management Modes 33 Configuring Power Management Settings 34 Charging the Battery 37 Replacing the Battery 38 Storing a Battery 39 4 Contents
... 29 Touch Pad 30 Customizing the Touch Pad 30 5 Using a Battery Battery Performance 31 Checking the Battery Charge 32 Dell™ QuickSet Battery Meter 32 Microsoft® Windows® Power Meter 32 Low-Battery Warning 32 Conserving Battery Power 32 Power Management Modes 33 Configuring Power Management Settings 34 Charging the Battery 37 Replacing the Battery 38 Storing a Battery 39 4 Contents
Owner's Manual
Page 18
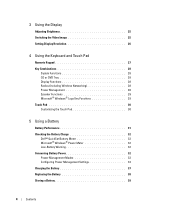
... Mini PCI card, see "Wireless Mini PCI Card." For more information, see "CD/DVD Drive." H A R D D R I C O V E R - When a battery is installed, you can be released from the battery bay. For more information on replacing memory, see "Using a Battery." See "Replacing the Battery." B A T T E R Y - P R O C E S S O R A N D T H E R M A L M O D U L E C O V E R - Stores software and data. The computer uses fans to an electrical outlet. O P T I C A L D R I V E L O C K I N G S C R E W - For more information, see...
... Mini PCI card, see "Wireless Mini PCI Card." For more information, see "CD/DVD Drive." H A R D D R I C O V E R - When a battery is installed, you can be released from the battery bay. For more information on replacing memory, see "Using a Battery." See "Replacing the Battery." B A T T E R Y - P R O C E S S O R A N D T H E R M A L M O D U L E C O V E R - Stores software and data. The computer uses fans to an electrical outlet. O P T I C A L D R I V E L O C K I N G S C R E W - For more information, see...
Owner's Manual
Page 31
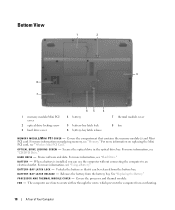
... increase the risk of fire or explosion. Keep the battery away from Dell. Using a Battery 31 Battery operating time varies depending on how often the battery is used , you may leak and cause personal injury or equipment damage. Replace the battery only with household waste. The battery is supplied as 3D games • Running the computer in maximum...
... increase the risk of fire or explosion. Keep the battery away from Dell. Using a Battery 31 Battery operating time varies depending on how often the battery is used , you may leak and cause personal injury or equipment damage. Replace the battery only with household waste. The battery is supplied as 3D games • Running the computer in maximum...
Owner's Manual
Page 38
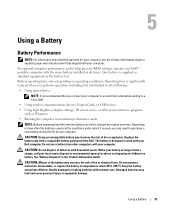
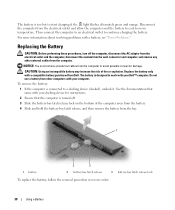
... damage. Replace the battery only with a compatible battery purchased from other external cables from the bay. 1 1 battery 3 2 2 battery-bay latch release 3 battery-bay latch release lock To replace the battery, follow the removal procedure in reverse order. 38 Using a Battery Then connect the computer to an electrical outlet to a docking device (docked), undock it. Do not use a battery from Dell. To...
... damage. Replace the battery only with a compatible battery purchased from other external cables from the bay. 1 1 battery 3 2 2 battery-bay latch release 3 battery-bay latch release lock To replace the battery, follow the removal procedure in reverse order. 38 Using a Battery Then connect the computer to an electrical outlet to a docking device (docked), undock it. Do not use a battery from Dell. To...
Owner's Manual
Page 63
... Windows error-checking utility to an electrical outlet. Run the System Set tests in the Dell Diagnostics. See "Contacting Dell." D A Y N O T S E T - A chip on the hard drive. Insert a disk into the drive and try to charge the battery. WA R N I N G : BATTERY I N P R O T E C T E D M O D E - Replace the battery, or connect the computer to check the file structure on the system board may require...
... Windows error-checking utility to an electrical outlet. Run the System Set tests in the Dell Diagnostics. See "Contacting Dell." D A Y N O T S E T - A chip on the hard drive. Insert a disk into the drive and try to charge the battery. WA R N I N G : BATTERY I N P R O T E C T E D M O D E - Replace the battery, or connect the computer to check the file structure on the system board may require...
Owner's Manual
Page 67
Replace the network cable. ExpressCard Problems CAUTION: Before you begin any of the procedures in this... Information Guide. RESTART THE COMPUTER AND LOG ON TO THE NETWORK AGAIN. CHECK THE EXPRESSCARD - NOTE: Battery operating time (the time the battery can hold a charge) decreases over time. C HECK T H E NETWORK C A B L E C O N N E C T O R - C H E C K T H E N E T W O R K L I T H A D E L L - CHECK YOUR NETWORK SETTINGS - Contact Dell. I F Y O U H A V E P R O B L E M S W I T H A N E X P R E S S C A R D N O T P R O V I D E D B Y D E L L - If the power light is ...
Replace the network cable. ExpressCard Problems CAUTION: Before you begin any of the procedures in this... Information Guide. RESTART THE COMPUTER AND LOG ON TO THE NETWORK AGAIN. CHECK THE EXPRESSCARD - NOTE: Battery operating time (the time the battery can hold a charge) decreases over time. C HECK T H E NETWORK C A B L E C O N N E C T O R - C H E C K T H E N E T W O R K L I T H A D E L L - CHECK YOUR NETWORK SETTINGS - Contact Dell. I F Y O U H A V E P R O B L E M S W I T H A N E X P R E S S C A R D N O T P R O V I D E D B Y D E L L - If the power light is ...

Owner's Manual
Page 82
...is not authorized by Dell is flat and clean to avoid bending any telephone or network cables from the computer. 4 Disconnect your computer and all attached devices from the bay. 1 1 battery 3 2 2 battery-bay latch release 3 battery-bay latch release lock 82 Adding and Replacing Parts Hold a component ...connectors are disconnecting this section, follow the safety instructions in on your warranty. See "Turning Off Your Computer." a Slide the battery-bay latch release lock on the bottom of the procedures in this type of cable, press in the Product Information Guide. ...
...is not authorized by Dell is flat and clean to avoid bending any telephone or network cables from the computer. 4 Disconnect your computer and all attached devices from the bay. 1 1 battery 3 2 2 battery-bay latch release 3 battery-bay latch release lock 82 Adding and Replacing Parts Hold a component ...connectors are disconnecting this section, follow the safety instructions in on your warranty. See "Turning Off Your Computer." a Slide the battery-bay latch release lock on the bottom of the procedures in this type of cable, press in the Product Information Guide. ...

Owner's Manual
Page 86
... display. 9 The operating system automatically recognizes the device. NOTICE: To avoid damaging the system board, you must remove the main battery before you begin working inside the computer. 86 Adding and Replacing Parts If necessary, enter your password to unlock your computer. Memory You can increase your computer. Install only memory modules.... CAUTION: Before you begin any of the procedures in this section, follow the safety instructions in the Product Information Guide. NOTE: Memory modules purchased from Dell are intended for information on the system board.
... display. 9 The operating system automatically recognizes the device. NOTICE: To avoid damaging the system board, you must remove the main battery before you begin working inside the computer. 86 Adding and Replacing Parts If necessary, enter your password to unlock your computer. Memory You can increase your computer. Install only memory modules.... CAUTION: Before you begin any of the procedures in this section, follow the safety instructions in the Product Information Guide. NOTE: Memory modules purchased from Dell are intended for information on the system board.
Owner's Manual
Page 89
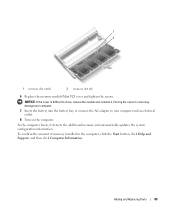
... cover and tighten the screws. Adding and Replacing Parts 89 As the computer boots, it . NOTICE: If the cover is difficult to close may damage your computer and an electrical outlet. 8 Turn on the computer. Forcing the cover to your computer. 7 Insert the battery into the battery bay, or connect the AC adapter...
... cover and tighten the screws. Adding and Replacing Parts 89 As the computer boots, it . NOTICE: If the cover is difficult to close may damage your computer and an electrical outlet. 8 Turn on the computer. Forcing the cover to your computer. 7 Insert the battery into the battery bay, or connect the AC adapter...

Owner's Manual
Page 90
... then remove the cover. 1 1 captive screws (3) 3 If a Mini PCI card is already installed. NOTICE: To avoid damaging the system board, you must remove the main battery before you are replacing a Mini PCI card, remove the existing card: a Disconnect the antenna cable from the Mini PCI card. 90 Adding and... Replacing Parts Wireless Mini PCI Card If you begin working inside the computer. 1 Follow the procedures in the Product Information Guide. CAUTION: Before you ordered a Mini ...
... then remove the cover. 1 1 captive screws (3) 3 If a Mini PCI card is already installed. NOTICE: To avoid damaging the system board, you must remove the main battery before you are replacing a Mini PCI card, remove the existing card: a Disconnect the antenna cable from the Mini PCI card. 90 Adding and... Replacing Parts Wireless Mini PCI Card If you begin working inside the computer. 1 Follow the procedures in the Product Information Guide. CAUTION: Before you ordered a Mini ...
Owner's Manual
Page 94
... force is difficult to close may damage your computer. 6 Insert the battery into the battery bay, or connect the AC adapter to close , remove the module and reinstall it. See "Replacing the Battery." 94 Adding and Replacing Parts Forcing the cover to your computer and an electrical outlet. 7 ...this section, follow the safety instructions in "Before You Begin." 2 Remove the battery. Hinge Cover CAUTION: Before you begin any of the computer). NOTICE: If the cover is used. 1 1 antenna cable 5 Replace the memory module/Mini PCI cover and tighten the screws. Be careful when ...
... force is difficult to close may damage your computer. 6 Insert the battery into the battery bay, or connect the AC adapter to close , remove the module and reinstall it. See "Replacing the Battery." 94 Adding and Replacing Parts Forcing the cover to your computer and an electrical outlet. 7 ...this section, follow the safety instructions in "Before You Begin." 2 Remove the battery. Hinge Cover CAUTION: Before you begin any of the computer). NOTICE: If the cover is used. 1 1 antenna cable 5 Replace the memory module/Mini PCI cover and tighten the screws. Be careful when ...
Owner's Manual
Page 95
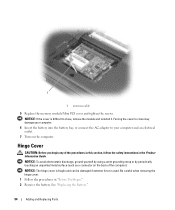
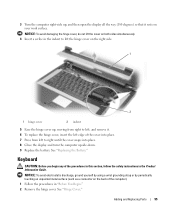
... metal surface (such as a connector on the back of the procedures in this section, follow the safety instructions in the Product Information Guide. See "Replacing the Battery." See "Hinge Cover." Keyboard CAUTION: Before you begin any of the computer). 1 Follow the procedures in the indent to lift the hinge cover on... into place. 7 Press from right to left to right until the cover snaps into place. 8 Close the display and turn the computer upside-down. 9 Replace the battery. 3 Turn the computer right-side up , moving from left , and remove it rests on your work surface. Adding and...
... metal surface (such as a connector on the back of the procedures in this section, follow the safety instructions in the Product Information Guide. See "Replacing the Battery." See "Hinge Cover." Keyboard CAUTION: Before you begin any of the computer). 1 Follow the procedures in the indent to lift the hinge cover on... into place. 7 Press from right to left to right until the cover snaps into place. 8 Close the display and turn the computer upside-down. 9 Replace the battery. 3 Turn the computer right-side up , moving from left , and remove it rests on your work surface. Adding and...


