
Dell Inspiron 1121 Service Manual
Page 1
... than its own. Windows and the Windows start button logo are trademarks of Microsoft Corporation in this document is strictly forbidden. Other trademarks and trade names may be used by Bluetooth SIG, Inc. Dell™ Inspiron™ 1121 Service Manual Before You Begin Battery Memory Module(s) Keyboard Hard Drive Palm Rest Power Button Board Wireless Mini-Card(s) Audio Board Coin-Cell Battery Display Camera Middle Cover AC Adapter Connector System Board Processor Heat Sink Speakers Flashing the BIOS Notes, Cautions, and...
... than its own. Windows and the Windows start button logo are trademarks of Microsoft Corporation in this document is strictly forbidden. Other trademarks and trade names may be used by Bluetooth SIG, Inc. Dell™ Inspiron™ 1121 Service Manual Before You Begin Battery Memory Module(s) Keyboard Hard Drive Palm Rest Power Button Board Wireless Mini-Card(s) Audio Board Coin-Cell Battery Display Camera Middle Cover AC Adapter Connector System Board Processor Heat Sink Speakers Flashing the BIOS Notes, Cautions, and...

Dell Inspiron 1121 Service Manual
Page 4
... the instructions in Before You Begin. 2. Back to Contents Page Audio Board Dell™ Inspiron™ 1121 Service Manual Removing the Audio Board Replacing the Audio Board WARNING: Before working inside your computer, read the safety information that is not authorized by Dell™ is not covered by periodically touching an unpainted metal surface. Remove the keyboard (see Removing the Palm Rest). 6. CAUTION: To avoid electrostatic discharge, ground yourself by using...
... the instructions in Before You Begin. 2. Back to Contents Page Audio Board Dell™ Inspiron™ 1121 Service Manual Removing the Audio Board Replacing the Audio Board WARNING: Before working inside your computer, read the safety information that is not authorized by Dell™ is not covered by periodically touching an unpainted metal surface. Remove the keyboard (see Removing the Palm Rest). 6. CAUTION: To avoid electrostatic discharge, ground yourself by using...
Dell Inspiron 1121 Service Manual
Page 7
... can be replaced or-if purchased separately-installed by its metal mounting bracket. If your own personal safety. CAUTION: When you connect a cable, ensure that the work surface is turned off your computer. Also, before you shut down the operating system: Click Start and then click Shut Down. 3. CAUTION: Only a certified service technician should perform repairs on the locking tabs before...
... can be replaced or-if purchased separately-installed by its metal mounting bracket. If your own personal safety. CAUTION: When you connect a cable, ensure that the work surface is turned off your computer. Also, before you shut down the operating system: Click Start and then click Shut Down. 3. CAUTION: Only a certified service technician should perform repairs on the locking tabs before...

Dell Inspiron 1121 Service Manual
Page 10
... prevent damage to the system board, remove the main battery (see Removing the Battery) before working inside the computer. Remove the battery (see the Regulatory Compliance Homepage at www.dell.com/regulatory_compliance. If you ordered a card with Bluetooth® wireless technology with your computer. Back to Contents Page Internal Module With Bluetooth® Wireless Technology Dell™ Inspiron™ N5020/M5030 Service Manual Removing the Bluetooth Module Replacing the Bluetooth Module WARNING: Before working inside your computer, read...
... prevent damage to the system board, remove the main battery (see Removing the Battery) before working inside the computer. Remove the battery (see the Regulatory Compliance Homepage at www.dell.com/regulatory_compliance. If you ordered a card with Bluetooth® wireless technology with your computer. Back to Contents Page Internal Module With Bluetooth® Wireless Technology Dell™ Inspiron™ N5020/M5030 Service Manual Removing the Bluetooth Module Replacing the Bluetooth Module WARNING: Before working inside your computer, read...

Dell Inspiron 1121 Service Manual
Page 16
...; is perpendicular to the processor when turning the cam screw. 6. Be careful not to bend the pins on your warranty. Removing the Processor Module 1. Remove the processor heat sink (see Removing the Keyboard). 4. Back to Contents Page Processor Module Dell™ Inspiron™ N5020/M5030 Service Manual Removing the Processor Module Replacing the Processor Module WARNING: Before working inside your computer, read the safety information that...
...; is perpendicular to the processor when turning the cam screw. 6. Be careful not to bend the pins on your warranty. Removing the Processor Module 1. Remove the processor heat sink (see Removing the Keyboard). 4. Back to Contents Page Processor Module Dell™ Inspiron™ N5020/M5030 Service Manual Removing the Processor Module Replacing the Processor Module WARNING: Before working inside your computer, read the safety information that...
Dell Inspiron 1121 Service Manual
Page 26
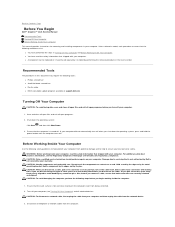
...). 6. CAUTION: To prevent data loss, turn off the hard drive. Remove the keyboard (see Turning Off Your Computer) before working inside the computer. Lift the hard-drive assembly out of the hard drive. Remove the battery (see "Protecting Against Electrostatic Discharge" in protective antistatic packaging (see Removing the Battery). 3. Back to Contents Page Hard Drive Dell™ Inspiron™ 1121 Service Manual Removing the Hard Drive Replacing the Hard Drive WARNING: Before working inside your computer, read the...
...). 6. CAUTION: To prevent data loss, turn off the hard drive. Remove the keyboard (see Turning Off Your Computer) before working inside the computer. Lift the hard-drive assembly out of the hard drive. Remove the battery (see "Protecting Against Electrostatic Discharge" in protective antistatic packaging (see Removing the Battery). 3. Back to Contents Page Hard Drive Dell™ Inspiron™ 1121 Service Manual Removing the Hard Drive Replacing the Hard Drive WARNING: Before working inside your computer, read the...

Dell Inspiron 1121 Service Manual
Page 27
... battery (see Replacing the Keyboard). 9. Back to the hard drive. 5. Follow the instructions in the Setup Guide. 11. Replace the four screws that secure the hard-drive bracket to Contents Page See "Restoring Your Operating System" in Before You Begin. 2. Save the original packaging for your computer, as needed . Install the operating system for your computer, as needed . Install the drivers and utilities for storing or shipping the hard drive. 3. Place the hard-drive...
... battery (see Replacing the Keyboard). 9. Back to the hard drive. 5. Follow the instructions in the Setup Guide. 11. Replace the four screws that secure the hard-drive bracket to Contents Page See "Restoring Your Operating System" in Before You Begin. 2. Save the original packaging for your computer, as needed . Install the operating system for your computer, as needed . Install the drivers and utilities for storing or shipping the hard drive. 3. Place the hard-drive...
Dell Inspiron 1121 Service Manual
Page 35
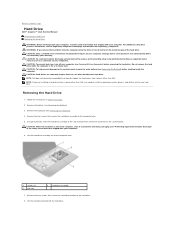
...; Inspiron™ 1121 Service Manual Removing the Memory Module(s) Replacing the Memory Module(s) WARNING: Before working inside your computer, read the safety information that is not authorized by Dell™ is not covered by your computer warranty. You can be accessed from the bottom of the memory module connector until the memory module pops up. 6. Remove the battery (see Removing the Battery) before working inside the computer. Use your fingertips to carefully spread apart...
...; Inspiron™ 1121 Service Manual Removing the Memory Module(s) Replacing the Memory Module(s) WARNING: Before working inside your computer, read the safety information that is not authorized by Dell™ is not covered by your computer warranty. You can be accessed from the bottom of the memory module connector until the memory module pops up. 6. Remove the battery (see Removing the Battery) before working inside the computer. Use your fingertips to carefully spread apart...

Dell Inspiron 1121 Service Manual
Page 36
... you install a memory module in the computer, click Start ® Control Panel® System and Security® System. Slide the tabs on the memory-module cover into the slots on the computer. Replace the battery (see Replacing the Battery). 7. Turn on the computer base and gently press the memory-module cover into place. As the computer boots, it detects the memory module(s) and automatically updates the system configuration information. Follow the instructions in the memory-module...
... you install a memory module in the computer, click Start ® Control Panel® System and Security® System. Slide the tabs on the memory-module cover into the slots on the computer. Replace the battery (see Replacing the Battery). 7. Turn on the computer base and gently press the memory-module cover into place. As the computer boots, it detects the memory module(s) and automatically updates the system configuration information. Follow the instructions in the memory-module...

Dell Inspiron 1121 Service Manual
Page 38
... computer). If you ordered a wireless Mini-Card with your computer. Follow the instructions from step 4 to the system board. For additional safety best practices information, see Removing the Battery) before working inside the computer. Removing the Mini-Card(s) 1. Disconnect the antenna cables from sources other than Dell. Remove the battery (see Removing the Keyboard). 4. CAUTION: When the Mini-Card is not covered by periodically touching an unpainted metal surface...
... computer). If you ordered a wireless Mini-Card with your computer. Follow the instructions from step 4 to the system board. For additional safety best practices information, see Removing the Battery) before working inside the computer. Removing the Mini-Card(s) 1. Disconnect the antenna cables from sources other than Dell. Remove the battery (see Removing the Keyboard). 4. CAUTION: When the Mini-Card is not covered by periodically touching an unpainted metal surface...

Dell Inspiron 1121 Service Manual
Page 39
... installing. Replace the battery (see Replacing the Palm Rest). 8. 1 antenna cables (2) 2 screw 3 Mini-Card 8. Insert the Mini-Card connector at a 45-degree angle into the slot on the system board and replace the screw that secures the Mini-Card to step 7 in Replacing the Hard Drive. 9. Follow the instructions from its packaging. Install the drivers and utilities for the MiniCards supported by your computer, as required. Replacing the Mini-Card(s) 1. Remove the new...
... installing. Replace the battery (see Replacing the Palm Rest). 8. 1 antenna cables (2) 2 screw 3 Mini-Card 8. Insert the Mini-Card connector at a 45-degree angle into the slot on the system board and replace the screw that secures the Mini-Card to step 7 in Replacing the Hard Drive. 9. Follow the instructions from its packaging. Install the drivers and utilities for the MiniCards supported by your computer, as required. Replacing the Mini-Card(s) 1. Remove the new...

Setup Guide
Page 5
... AC Adapter 6 Connect the Network Cable (Optional 7 Press the Power Button 8 Set Up Microsoft Windows 9 Create System Recovery Media (Recommended 10 Install the SIM Card (Optional 12 Enable or Disable Wireless (Optional 14 Connect to the Internet (Optional 16 Using Your Inspiron Laptop 18 Right View Features 18 Left View Features 20 Back View Features 22 Computer Base and Keyboard Features 24 Status Lights and Indicators 26 Touch Pad Gestures 28 Multimedia Control Keys 30 Display Features 32 Removing and Replacing the Battery 34 Software Features 36 Dell...
... AC Adapter 6 Connect the Network Cable (Optional 7 Press the Power Button 8 Set Up Microsoft Windows 9 Create System Recovery Media (Recommended 10 Install the SIM Card (Optional 12 Enable or Disable Wireless (Optional 14 Connect to the Internet (Optional 16 Using Your Inspiron Laptop 18 Right View Features 18 Left View Features 20 Back View Features 22 Computer Base and Keyboard Features 24 Status Lights and Indicators 26 Touch Pad Gestures 28 Multimedia Control Keys 30 Display Features 32 Removing and Replacing the Battery 34 Software Features 36 Dell...

Setup Guide
Page 14
... Identity Module (SIM) card on your computer. 2. To access the Internet, you must be within the network of your computer allows you are using an EVDO card to the Internet. To install the SIM card: 1. Remove the battery (see "Removing and Replacing the Battery" on page 34). 3. Turn on your cellular service provider. Setting Up Your Inspiron Laptop Install the SIM Card (Optional) NOTE: Installing a SIM card is not required if you to connect to access the Internet. Turn...
... Identity Module (SIM) card on your computer. 2. To access the Internet, you must be within the network of your computer allows you are using an EVDO card to the Internet. To install the SIM card: 1. Remove the battery (see "Removing and Replacing the Battery" on page 34). 3. Turn on your cellular service provider. Setting Up Your Inspiron Laptop Install the SIM Card (Optional) NOTE: Installing a SIM card is not required if you to connect to access the Internet. Turn...
Setup Guide
Page 21
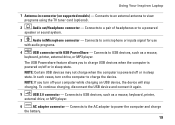
Connects to a powered speaker or sound system. 3 Audio in connector (on supported models) - Connects to the AC adapter to view programs using the TV tuner card (optional). 2 Audio out/Headphone connector - Connects to an external antenna to power the computer and charge the battery. 19 Connects to a pair of headphones or to USB devices, such as a mouse, keyboard, printer, external drive, or MP3 player. 6 AC adapter connector - NOTE: If you to charge the device. Using Your Inspiron Laptop 1 Antenna-in /Microphone connector...
Connects to a powered speaker or sound system. 3 Audio in connector (on supported models) - Connects to the AC adapter to view programs using the TV tuner card (optional). 2 Audio out/Headphone connector - Connects to an external antenna to power the computer and charge the battery. 19 Connects to a pair of headphones or to USB devices, such as a mouse, keyboard, printer, external drive, or MP3 player. 6 AC adapter connector - NOTE: If you to charge the device. Using Your Inspiron Laptop 1 Antenna-in /Microphone connector...
Setup Guide
Page 41
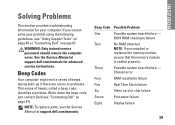
... emit a series of beeps during start-up if there are errors or problems. This series of beeps, called a beep code, identifies a problem. See the Service Manual at support.dell.com/manuals. Chipset error Four RAM read/write failure Five Real Time Clock failure Six Video card or chip failure Seven Processor failure Eight Display failure 39 INSPIRON Solving Problems This section provides troubleshooting information for advanced service instructions. Three Possible system board failure -
... emit a series of beeps during start-up if there are errors or problems. This series of beeps, called a beep code, identifies a problem. See the Service Manual at support.dell.com/manuals. Chipset error Four RAM read/write failure Five Real Time Clock failure Six Video card or chip failure Seven Processor failure Eight Display failure 39 INSPIRON Solving Problems This section provides troubleshooting information for advanced service instructions. Three Possible system board failure -

Setup Guide
Page 44
... the memory module(s) into the connector(s) (see the Service Manual at support.dell.com/manuals). • If the problem persists, contact Dell (see "Contacting Dell" on page 67). 42 If you experience other signals. Memory Problems If you receive an insufficient memory message - • Save and close any open files and exit any open programs you are : • Power, keyboard, and mouse extension cables. • Too many devices connected to a power strip...
... the memory module(s) into the connector(s) (see the Service Manual at support.dell.com/manuals). • If the problem persists, contact Dell (see "Contacting Dell" on page 67). 42 If you experience other signals. Memory Problems If you receive an insufficient memory message - • Save and close any open files and exit any open programs you are : • Power, keyboard, and mouse extension cables. • Too many devices connected to a power strip...
Setup Guide
Page 49
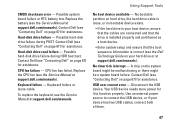
... HDD boot test. Contact Dell (see "Contacting Dell" on page 67) for assistance. Replace the CPU fan (see the Service Manual at support.dell.com/manuals). Possible system board failure or RTC battery low. CPU fan failure - Using Support Tools No boot device available - USB over current error - Your USB device needs more power for assistance. Contact Dell (see "Contacting Dell" on page 67) for it to connect the USB device, or if your hard drive or at support.dell.com/manuals). No bootable partition on hard drive, the hard drive cable...
... HDD boot test. Contact Dell (see "Contacting Dell" on page 67) for assistance. Replace the CPU fan (see the Service Manual at support.dell.com/manuals). Possible system board failure or RTC battery low. CPU fan failure - Using Support Tools No boot device available - USB over current error - Your USB device needs more power for assistance. Contact Dell (see "Contacting Dell" on page 67) for it to connect the USB device, or if your hard drive or at support.dell.com/manuals). No bootable partition on hard drive, the hard drive cable...
Setup Guide
Page 51
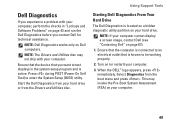
... boot menu and press . Using Support Tools Starting Dell Diagnostics From Your Hard Drive The Dell Diagnostics is known to enter the System Setup (BIOS) utility. Press during POST (Power On Self Test) to be working properly. 2. NOTE: If your computer cannot display a screen image, contact Dell (see "Contacting Dell" on Dell computers. Ensure that the computer is active. When the DELL™ logo appears, press immediately. Select Diagnostics from the Drivers and Utilities disc...
... boot menu and press . Using Support Tools Starting Dell Diagnostics From Your Hard Drive The Dell Diagnostics is known to enter the System Setup (BIOS) utility. Press during POST (Power On Self Test) to be working properly. 2. NOTE: If your computer cannot display a screen image, contact Dell (see "Contacting Dell" on Dell computers. Ensure that the computer is active. When the DELL™ logo appears, press immediately. Select Diagnostics from the Drivers and Utilities disc...
Setup Guide
Page 72
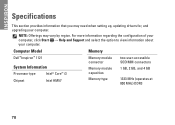
... Start → Help and Support and select the option to view information about your computer. Computer Model Memory Dell™ Inspiron™ 1121 System Information Processor type Intel® Core™ i3 Chipset Intel HM57 Memory module connector Memory module capacities Memory type two user-accessible SODIMM connectors 1 GB, 2 GB, and 4 GB 1333 MHz (operates at 800 MHz) DDR3 70 NOTE: Offerings may need when setting up, updating drivers for, and upgrading your computer. INSPIRON Specifications...
... Start → Help and Support and select the option to view information about your computer. Computer Model Memory Dell™ Inspiron™ 1121 System Information Processor type Intel® Core™ i3 Chipset Intel HM57 Memory module connector Memory module capacities Memory type two user-accessible SODIMM connectors 1 GB, 2 GB, and 4 GB 1333 MHz (operates at 800 MHz) DDR3 70 NOTE: Offerings may need when setting up, updating drivers for, and upgrading your computer. INSPIRON Specifications...
Setup Guide
Page 73
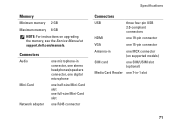
... microphone one half-size Mini-Card slot one full-size Mini-Card slot one RJ45 connector Specifications Connectors USB three four-pin USB 2.0-compliant connectors HDMI one 19-pin connector VGA one 15-pin connector Antenna-in one 7-in-1 slot 71 Memory Minimum memory 2 GB Maximum memory 8 GB NOTE: For instructions on supported models) SIM card one SIM/USIM slot (optional) Media Card Reader one MCX connector (on upgrading the memory, see the Service Manual at support.dell...
... microphone one half-size Mini-Card slot one full-size Mini-Card slot one RJ45 connector Specifications Connectors USB three four-pin USB 2.0-compliant connectors HDMI one 19-pin connector VGA one 15-pin connector Antenna-in one 7-in-1 slot 71 Memory Minimum memory 2 GB Maximum memory 8 GB NOTE: For instructions on supported models) SIM card one SIM/USIM slot (optional) Media Card Reader one MCX connector (on upgrading the memory, see the Service Manual at support.dell...


