
Service Manual
Page 1
.... and is strictly forbidden. Information in this document is a registered trademark owned by Dell under license. Dell™ Inspiron™ 1121 Service Manual Before You Begin Battery Memory Module(s) Keyboard Hard Drive Palm Rest Power Button Board Wireless Mini-Card(s) Audio Board Coin-Cell Battery Display Camera Middle Cover AC Adapter Connector System Board Processor...
.... and is strictly forbidden. Information in this document is a registered trademark owned by Dell under license. Dell™ Inspiron™ 1121 Service Manual Before You Begin Battery Memory Module(s) Keyboard Hard Drive Palm Rest Power Button Board Wireless Mini-Card(s) Audio Board Coin-Cell Battery Display Camera Middle Cover AC Adapter Connector System Board Processor...

Service Manual
Page 4
...on the computer base. CAUTION: To avoid electrostatic discharge, ground yourself by using a wrist grounding strap or by your warranty. Disconnect the Mini-Card antenna cables from step 4 to step 6 in Removing the Hard Drive. 5. CAUTION: To help prevent damage to the system ... 4. CAUTION: Only a certified service technician should perform repairs on the audio board. 8. Back to Contents Page Audio Board Dell™ Inspiron™ 1121 Service Manual Removing the Audio Board Replacing the Audio Board WARNING: Before working inside your computer, read the safety information that ...
...on the computer base. CAUTION: To avoid electrostatic discharge, ground yourself by using a wrist grounding strap or by your warranty. Disconnect the Mini-Card antenna cables from step 4 to step 6 in Removing the Hard Drive. 5. CAUTION: To help prevent damage to the system ... 4. CAUTION: Only a certified service technician should perform repairs on the audio board. 8. Back to Contents Page Audio Board Dell™ Inspiron™ 1121 Service Manual Removing the Audio Board Replacing the Audio Board WARNING: Before working inside your computer, read the safety information that ...
Service Manual
Page 5
CAUTION: Before turning on the audio board. 5. 3. Replace the palm rest (see Replacing the Battery). Back to the Mini-Card(s). 6. Connect the Mini-Card antenna cables to Contents Page Failure to do so may result in Replacing the Hard Drive. 8. Replace the battery (see Replacing the Palm Rest). 7. ...
CAUTION: Before turning on the audio board. 5. 3. Replace the palm rest (see Replacing the Battery). Back to the Mini-Card(s). 6. Connect the Mini-Card antenna cables to Contents Page Failure to do so may result in Replacing the Hard Drive. 8. Replace the battery (see Replacing the Palm Rest). 7. ...

Service Manual
Page 20
...surface (such as a connector on your computer). Remove the battery (see the Regulatory Compliance Homepage at www.dell.com/regulatory_compliance. Follow the instructions from the Mini-Card(s). 7. Follow the instructions in Removing the Hard Drive. 5. Remove the palm rest (see Removing the ...Remove the keyboard (see Removing the Palm Rest). 6. Disconnect the Mini-Card antenna cables from step 4 to step 6 in Before You Begin. 2. Back to Contents Page Display Dell™ Inspiron™ 1121 Service Manual Display Assembly Display Bezel Display Panel Display-Panel Brackets WARNING...
...surface (such as a connector on your computer). Remove the battery (see the Regulatory Compliance Homepage at www.dell.com/regulatory_compliance. Follow the instructions from the Mini-Card(s). 7. Follow the instructions in Removing the Hard Drive. 5. Remove the palm rest (see Removing the ...Remove the keyboard (see Removing the Palm Rest). 6. Disconnect the Mini-Card antenna cables from step 4 to step 6 in Before You Begin. 2. Back to Contents Page Display Dell™ Inspiron™ 1121 Service Manual Display Assembly Display Bezel Display Panel Display-Panel Brackets WARNING...
Service Manual
Page 21
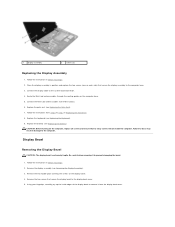
...inside edges of the display bezel to remove it to prevent damaging the bezel. 1. Follow the instructions in Before You Begin. 2. Connect the Mini-Card antenna cables to the system board connector. 4. CAUTION: Before turning on each side) that secure the display assembly to step 7 in ...the keyboard (see Removing the Display Assembly). 3. Remove the display assembly (see Replacing the Keyboard). 9. Connect the display cable to the Mini-Card(s). 6. Follow the instructions from the display back cover. Using your fingertips, carefully pry up the inside the computer.
...inside edges of the display bezel to remove it to prevent damaging the bezel. 1. Follow the instructions in Before You Begin. 2. Connect the Mini-Card antenna cables to the system board connector. 4. CAUTION: Before turning on each side) that secure the display assembly to step 7 in ...the keyboard (see Removing the Display Assembly). 3. Remove the display assembly (see Replacing the Keyboard). 9. Connect the display cable to the Mini-Card(s). 6. Follow the instructions from the display back cover. Using your fingertips, carefully pry up the inside the computer.

Service Manual
Page 38
... touching an unpainted metal surface (such as a connector on your computer). Remove the battery (see Removing the Keyboard). 4. Back to Contents Page Wireless Mini-Card(s) Dell™ Inspiron™ 1121 Service Manual Removing the Mini-Card(s) Replacing the Mini-Card(s) WARNING: Before working inside your computer, read the safety information that shipped with your warranty. NOTE...
... touching an unpainted metal surface (such as a connector on your computer). Remove the battery (see Removing the Keyboard). 4. Back to Contents Page Wireless Mini-Card(s) Dell™ Inspiron™ 1121 Service Manual Removing the Mini-Card(s) Replacing the Mini-Card(s) WARNING: Before working inside your computer, read the safety information that shipped with your warranty. NOTE...

Service Manual
Page 39
... 11. CAUTION: To avoid damage to ensure correct insertion. Follow the instructions from its packaging. 1 antenna cables (2) 2 screw 3 Mini-Card 8. Replacing the Mini-Card(s) 1. Replace the battery (see Replacing the Keyboard). 10. Install the drivers and utilities for the MiniCards supported by your computer... CAUTION: Use firm and even pressure to the Mini-Card you are keyed to the Mini-Card, never place cables under the card. 3. Insert the Mini-Card connector at a 45-degree angle into the slot on the Mini-Card WWAN (2 antenna cables) Antenna Cable Color Scheme...
... 11. CAUTION: To avoid damage to ensure correct insertion. Follow the instructions from its packaging. 1 antenna cables (2) 2 screw 3 Mini-Card 8. Replacing the Mini-Card(s) 1. Replace the battery (see Replacing the Keyboard). 10. Install the drivers and utilities for the MiniCards supported by your computer... CAUTION: Use firm and even pressure to the Mini-Card you are keyed to the Mini-Card, never place cables under the card. 3. Insert the Mini-Card connector at a 45-degree angle into the slot on the Mini-Card WWAN (2 antenna cables) Antenna Cable Color Scheme...

Service Manual
Page 40
NOTE: If you are installing a wireless Mini-Card from a source other than Dell, you must install the appropriate drivers and utilities. Back to Contents Page
NOTE: If you are installing a wireless Mini-Card from a source other than Dell, you must install the appropriate drivers and utilities. Back to Contents Page

Service Manual
Page 51
... 7. Remove the palm rest (see Removing the Keyboard). 5. Remove the Mini-Card(s) (see the Regulatory Compliance Homepage at www.dell.com/regulatory_compliance. Remove the screw that is not authorized by Dell™ is not covered by periodically touching an unpainted metal surface (such as...the audio board. 1 system board connector 3 audio board connector 2 audio cable 11. Back to Contents Page System Board Dell™ Inspiron™ 1121 Service Manual Removing the System Board Replacing the System Board WARNING: Before working inside your computer, read the safety information that...
... 7. Remove the palm rest (see Removing the Keyboard). 5. Remove the Mini-Card(s) (see the Regulatory Compliance Homepage at www.dell.com/regulatory_compliance. Remove the screw that is not authorized by Dell™ is not covered by periodically touching an unpainted metal surface (such as...the audio board. 1 system board connector 3 audio board connector 2 audio cable 11. Back to Contents Page System Board Dell™ Inspiron™ 1121 Service Manual Removing the System Board Replacing the System Board WARNING: Before working inside your computer, read the safety information that...

Service Manual
Page 52
... Replacing the Coin-Cell Battery). 7. Replace the coin-cell battery (see Replacing the Processor Heat Sink). 3. Replace the middle cover (see Replacing the Mini-Card(s)). 11. Replace the Mini-Card(s) (see Replacing the Middle Cover). 9. Align the connectors on the system board with the slots on the computer base, and use the...
... Replacing the Coin-Cell Battery). 7. Replace the coin-cell battery (see Replacing the Processor Heat Sink). 3. Replace the middle cover (see Replacing the Mini-Card(s)). 11. Replace the Mini-Card(s) (see Replacing the Middle Cover). 9. Align the connectors on the system board with the slots on the computer base, and use the...

Setup Guide
Page 73
... Network adapter one microphone-in connector, one stereo headphones/speakers connector, one digital microphone one half-size Mini-Card slot one full-size Mini-Card slot one RJ45 connector Specifications Connectors USB three four-pin USB 2.0-compliant connectors HDMI one 19-pin connector VGA one 15-pin connector Antenna-... supported models) SIM card one SIM/USIM slot (optional) Media Card Reader one MCX connector (on upgrading the memory, see the Service Manual at support.dell.com/manuals.
... Network adapter one microphone-in connector, one stereo headphones/speakers connector, one digital microphone one half-size Mini-Card slot one full-size Mini-Card slot one RJ45 connector Specifications Connectors USB three four-pin USB 2.0-compliant connectors HDMI one 19-pin connector VGA one 15-pin connector Antenna-... supported models) SIM card one SIM/USIM slot (optional) Media Card Reader one MCX connector (on upgrading the memory, see the Service Manual at support.dell.com/manuals.


