

Owner's Manual
Page 37
3 Using the pull tab, disconnect the display cable from the system board. 4 Lift the latches and disconnect the status-light cable, keyboard cable, touchpad cable, and I/O board cable from the system board. 5 Disconnect the power-adapter port cable from the system board. 3 1 2 4 7 1 display cable 3 power-adapter port cable 5 keyboard cable 7 I/O board cable 5 6 2 pull-tab 4 status-lights cable 6 touchpad cable Removing the System Board | 37
3 Using the pull tab, disconnect the display cable from the system board. 4 Lift the latches and disconnect the status-light cable, keyboard cable, touchpad cable, and I/O board cable from the system board. 5 Disconnect the power-adapter port cable from the system board. 3 1 2 4 7 1 display cable 3 power-adapter port cable 5 keyboard cable 7 I/O board cable 5 6 2 pull-tab 4 status-lights cable 6 touchpad cable Removing the System Board | 37

Owner's Manual
Page 39
For more safety best practices, see the Regulatory Compliance home page at dell.com/regulatory_compliance. See "Replacing the Memory Module(s)" on page 11. See "Replacing the Base Cover" on page 16. 6 Replace the battery. Entering the Service Tag in the BIOS 1 Turn on page 9. ...32. 2 Replace the fan. Procedure CAUTION: Make sure that secure the system board to the palm-rest assembly. 3 Slide the status-light cable, keyboard cable, touchpad cable, and I/O board cable in the respective connectors, and press down on the latches to secure the cables. 4 Connect the display...
For more safety best practices, see the Regulatory Compliance home page at dell.com/regulatory_compliance. See "Replacing the Memory Module(s)" on page 11. See "Replacing the Base Cover" on page 16. 6 Replace the battery. Entering the Service Tag in the BIOS 1 Turn on page 9. ...32. 2 Replace the fan. Procedure CAUTION: Make sure that secure the system board to the palm-rest assembly. 3 Slide the status-light cable, keyboard cable, touchpad cable, and I/O board cable in the respective connectors, and press down on the latches to secure the cables. 4 Connect the display...

Owner's Manual
Page 44
Procedure 1 Lift the latches and disconnect the touchpad cable, keyboard cable, and status-lights cable from the system board. 2 Using the pull tabs, disconnect the display cable from the system board. 2 1 1 display cable 3 keyboard cable 3 4 2 status-light cable 4 touchpad cable 44 | Removing the Palm Rest
Procedure 1 Lift the latches and disconnect the touchpad cable, keyboard cable, and status-lights cable from the system board. 2 Using the pull tabs, disconnect the display cable from the system board. 2 1 1 display cable 3 keyboard cable 3 4 2 status-light cable 4 touchpad cable 44 | Removing the Palm Rest

Owner's Manual
Page 48
...steps in "After Working Inside Your Computer" on page 9. See "Replacing the Speakers" on page 11. 48 | Replacing the Palm Rest See "Replacing the Base Cover" on page 24. 5 ...secure the system board to the palm-rest assembly. 5 Connect the display cable, touchpad cable, keyboard cable, and status-lights cable to the system board. Procedure 1 Place the palm-rest assembly ...30. 4 Replace the speakers. For more safety best practices, see the Regulatory Compliance home page at dell.com/regulatory_compliance. See "Replacing the Hard Drive" on page 13. 7 Replace the base cover. See "Replacing...
...steps in "After Working Inside Your Computer" on page 9. See "Replacing the Speakers" on page 11. 48 | Replacing the Palm Rest See "Replacing the Base Cover" on page 24. 5 ...secure the system board to the palm-rest assembly. 5 Connect the display cable, touchpad cable, keyboard cable, and status-lights cable to the system board. Procedure 1 Place the palm-rest assembly ...30. 4 Replace the speakers. For more safety best practices, see the Regulatory Compliance home page at dell.com/regulatory_compliance. See "Replacing the Hard Drive" on page 13. 7 Replace the base cover. See "Replacing...
Specifications
Page 4
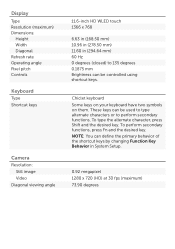
...: Height Width Diagonal Refresh rate Operating angle Pixel pitch Controls Keyboard Type Shortcut keys Camera Resolution: Still image Video Diagonal viewing angle 11.6-inch HD WLED touch 1366 x 768 6.63 in (168.50 mm) 10.96 in (278.50 mm) 11.60 in System Setup. 0.92 megapixel 1280 x 720 (...shortcut keys by changing Function Key Behavior in (294.64 mm) 60 Hz 0 degrees (closed) to perform secondary functions. Chiclet keyboard Some keys on your keyboard have two symbols on them. To perform secondary functions, press Fn and the desired key. These keys can be controlled using shortcut...
...: Height Width Diagonal Refresh rate Operating angle Pixel pitch Controls Keyboard Type Shortcut keys Camera Resolution: Still image Video Diagonal viewing angle 11.6-inch HD WLED touch 1366 x 768 6.63 in (168.50 mm) 10.96 in (278.50 mm) 11.60 in System Setup. 0.92 megapixel 1280 x 720 (...shortcut keys by changing Function Key Behavior in (294.64 mm) 60 Hz 0 degrees (closed) to perform secondary functions. Chiclet keyboard Some keys on your keyboard have two symbols on them. To perform secondary functions, press Fn and the desired key. These keys can be controlled using shortcut...


