
Quick Reference Guide
Page 3
...Tower Computers . . 13 Desktop and Mini-Tower Computers 13 Inside Your Computer 14 Small Form-factor Computer 14 Small Desktop Computer 14 Desktop Computer 15 Small Mini-Tower Computer 15 Mini-Tower Computer 16 Setting Up Your Computer 16 Solving Problems 19 Dell Diagnostics 19 System Lights ...21 Diagnostic Lights 23 Beep Codes 26 Running the Dell™ IDE Hard Drive ...
...Tower Computers . . 13 Desktop and Mini-Tower Computers 13 Inside Your Computer 14 Small Form-factor Computer 14 Small Desktop Computer 14 Desktop Computer 15 Small Mini-Tower Computer 15 Mini-Tower Computer 16 Setting Up Your Computer 16 Solving Problems 19 Dell Diagnostics 19 System Lights ...21 Diagnostic Lights 23 Beep Codes 26 Running the Dell™ IDE Hard Drive ...

Quick Reference Guide
Page 5
Desktop System Software (DSS) Located on your CD to provide last-minute updates about technical changes to direct your call when contacting technical support. Product Information Guide • How to remove and replace parts • Technical specifications • How to configure system settings • How to troubleshoot and solve problems Dell™ OptiPlex...technical-reference material for my computer • My computer documentation • My device documentation • Desktop System Software (DSS) • Operating system updates and patches • Terms and Conditions •...
Desktop System Software (DSS) Located on your CD to provide last-minute updates about technical changes to direct your call when contacting technical support. Product Information Guide • How to remove and replace parts • Technical specifications • How to configure system settings • How to troubleshoot and solve problems Dell™ OptiPlex...technical-reference material for my computer • My computer documentation • My device documentation • Desktop System Software (DSS) • Operating system updates and patches • Terms and Conditions •...

Quick Reference Guide
Page 6
... to view the appropriate support site. After you ordered. • Regulatory model information and chassis type • DHP - Desktop chassis • DHM - www.dell.com | support.dell.com What Are You Looking For? See your OptiPlex User's Guide for components, such as a modem) Windows Help and Support Center 1 Click the Start button and click...
... to view the appropriate support site. After you ordered. • Regulatory model information and chassis type • DHP - Desktop chassis • DHM - www.dell.com | support.dell.com What Are You Looking For? See your OptiPlex User's Guide for components, such as a modem) Windows Help and Support Center 1 Click the Start button and click...
Quick Reference Guide
Page 9
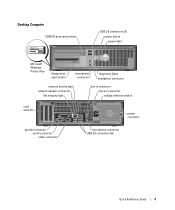
Desktop Computer CD/DVD-drive eject button USB 2.0 connectors (2) power button power light Microsoft Windows Product Key floppy-drive eject button microphone connector diagnostic lights headphone connector network activity light network adapter connector link integrity light line-in connector line-out connector voltage selection switch card slots (3) power connector parallel connector serial connector video connector microphone connector USB 2.0 connectors (6) Quick Reference Guide 9
Desktop Computer CD/DVD-drive eject button USB 2.0 connectors (2) power button power light Microsoft Windows Product Key floppy-drive eject button microphone connector diagnostic lights headphone connector network activity light network adapter connector link integrity light line-in connector line-out connector voltage selection switch card slots (3) power connector parallel connector serial connector video connector microphone connector USB 2.0 connectors (6) Quick Reference Guide 9
Quick Reference Guide
Page 13
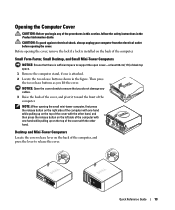
Small Form-Factor, Small Desktop, and Small Mini-Tower Computers NOTICE: Ensure that you do not damage any of the procedures in this section, follow the safety instructions in the ... release buttons as you lift the cover. CAUTION: To guard against electrical shock, always unplug your computer from the electrical outlet before opening the cover. Desktop and Mini-Tower Computers Locate the cover release lever on the back of the computer, and press the lever to support the open cover-at...
Small Form-Factor, Small Desktop, and Small Mini-Tower Computers NOTICE: Ensure that you do not damage any of the procedures in this section, follow the safety instructions in the ... release buttons as you lift the cover. CAUTION: To guard against electrical shock, always unplug your computer from the electrical outlet before opening the cover. Desktop and Mini-Tower Computers Locate the cover release lever on the back of the computer, and press the lever to support the open cover-at...

Quick Reference Guide
Page 14
power supply card cage www.dell.com | support.dell.com Inside Your Computer Small Form-factor Computer floppy drive hard drive heat sink and blower assembly padlock ring PCI-E x16 connector Small Desktop Computer CD/DVD drive floppy drive system board heat sink and blower assembly PCI-E x16 connector PCI-E x1 connector 14 Quick Reference Guide CD/DVD drive internal speaker chassis intrusion switch SATA connector system board power supply hard drive internal speaker chassis intrusion switch SATA connector(s) (2) NOTE: Your computer may not have the SATA1 connector.
power supply card cage www.dell.com | support.dell.com Inside Your Computer Small Form-factor Computer floppy drive hard drive heat sink and blower assembly padlock ring PCI-E x16 connector Small Desktop Computer CD/DVD drive floppy drive system board heat sink and blower assembly PCI-E x16 connector PCI-E x1 connector 14 Quick Reference Guide CD/DVD drive internal speaker chassis intrusion switch SATA connector system board power supply hard drive internal speaker chassis intrusion switch SATA connector(s) (2) NOTE: Your computer may not have the SATA1 connector.
Quick Reference Guide
Page 15
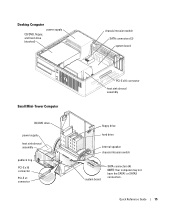
Desktop Computer power supply CD/DVD, floppy, and hard drive (stacked) chassis intrusion switch SATA connectors (2) system board Small Mini-Tower Computer CD/DVD drive power supply heat sink shroud assembly padlock ring PCI-E x16 connector PCI-E x1 connector PCI-E x16 connector heat sink shroud assembly floppy drive hard drive internal speaker chassis intrusion switch system board SATA connectors (4) NOTE: Your computer may not have the SATA1 or SATA3 connectors. Quick Reference Guide 15
Desktop Computer power supply CD/DVD, floppy, and hard drive (stacked) chassis intrusion switch SATA connectors (2) system board Small Mini-Tower Computer CD/DVD drive power supply heat sink shroud assembly padlock ring PCI-E x16 connector PCI-E x1 connector PCI-E x16 connector heat sink shroud assembly floppy drive hard drive internal speaker chassis intrusion switch system board SATA connectors (4) NOTE: Your computer may not have the SATA1 or SATA3 connectors. Quick Reference Guide 15
Quick Reference Guide
Page 19
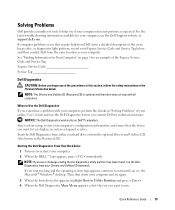
... CAUTION: Before you see the Microsoft® Windows® desktop. NOTICE: The Dell Diagnostics works only on page 5 for your Drivers and Utilities CD (optional). Starting the Dell Diagnostics From Your Hard Drive 1 Turn on (or restart) your hard drive or from the optional Drivers ..., and ensure that no diagnostics utility partition has been found, run . Quick Reference Guide 19 record your computer. and then contact Dell from Dell, write a detailed description of the procedures in this section, follow the safety instructions in "Solving Problems" of the Express Service Code...
... CAUTION: Before you see the Microsoft® Windows® desktop. NOTICE: The Dell Diagnostics works only on page 5 for your Drivers and Utilities CD (optional). Starting the Dell Diagnostics From Your Hard Drive 1 Turn on (or restart) your hard drive or from the optional Drivers ..., and ensure that no diagnostics utility partition has been found, run . Quick Reference Guide 19 record your computer. and then contact Dell from Dell, write a detailed description of the procedures in this section, follow the safety instructions in "Solving Problems" of the Express Service Code...
Quick Reference Guide
Page 20
...most common symptoms encountered and allows you to 20 minutes and requires no interaction on your computer and try again. Dell Diagnostics Main Menu 1 After the Dell Diagnostics loads and the Main Menu screen appears, click the button for the option you are listed, select the ...version appropriate for one time only. Write down and restart the computer. If you see the Windows desktop. www.dell.com | support.dell.com Starting the Dell Diagnostics From the Drivers and Utilities CD NOTE: The Drivers and Utilities CD (ResourceCD) is encountered during a test, a...
...most common symptoms encountered and allows you to 20 minutes and requires no interaction on your computer and try again. Dell Diagnostics Main Menu 1 After the Dell Diagnostics loads and the Main Menu screen appears, click the button for the option you are listed, select the ...version appropriate for one time only. Write down and restart the computer. If you see the Windows desktop. www.dell.com | support.dell.com Starting the Dell Diagnostics From the Drivers and Utilities CD NOTE: The Drivers and Utilities CD (ResourceCD) is encountered during a test, a...
Quick Reference Guide
Page 23
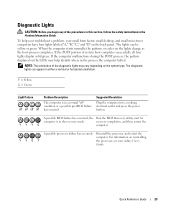
... off off off off " condition or a possible pre-BIOS failure has occurred. For information on reinstalling YYGY the processor, see your small form factor, small desktop, and small mini-tower computers have four lights labeled "A," "B," "C," and "D" on the lights change as the boot process completes. To help identify where in either...
... off off off off " condition or a possible pre-BIOS failure has occurred. For information on reinstalling YYGY the processor, see your small form factor, small desktop, and small mini-tower computers have four lights labeled "A," "B," "C," and "D" on the lights change as the boot process completes. To help identify where in either...
Quick Reference Guide
Page 31
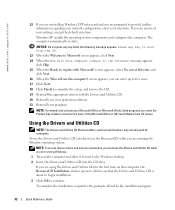
... until you want to recover your current Windows XP data, type r to select the repair option, and remove the CD. 4 If you see the Windows desktop, and then shut down the computer and try again. 5 Press the arrow keys to select CD-ROM, and press . 6 When the Press any key...message appears, press any open files and exit any key. Click Exit if Install Windows XP message appears. 3 Restart the computer. 4 Press immediately after the DELL™ logo appears. Booting From the Operating System CD 1 Save and close any open programs. 2 Insert the Operating System CD. NOTICE: Do not press...
... until you want to recover your current Windows XP data, type r to select the repair option, and remove the CD. 4 If you see the Windows desktop, and then shut down the computer and try again. 5 Press the arrow keys to select CD-ROM, and press . 6 When the Press any key...message appears, press any open files and exit any key. Click Exit if Install Windows XP message appears. 3 Restart the computer. 4 Press immediately after the DELL™ logo appears. Booting From the Operating System CD 1 Save and close any open programs. 2 Insert the Operating System CD. NOTICE: Do not press...
Quick Reference Guide
Page 32
www.dell.com | support.dell.com 12 If you are reinstalling Windows XP Professional and you are prompted to provide further information regarding your network configuration, enter your settings, accept ... the Windows operating system: NOTE: To access device drivers and user documentation, you must use this computer, the ResourceCD Installation window opens to the Windows desktop. 2 Insert the Drivers and Utilities CD into the CD drive. NOTICE: Do not press any key when the following message appears: Press any key to...
www.dell.com | support.dell.com 12 If you are reinstalling Windows XP Professional and you are prompted to provide further information regarding your network configuration, enter your settings, accept ... the Windows operating system: NOTE: To access device drivers and user documentation, you must use this computer, the ResourceCD Installation window opens to the Windows desktop. 2 Insert the Drivers and Utilities CD into the CD drive. NOTICE: Do not press any key when the following message appears: Press any key to...


