
Monitor Users Guide
Page 3
Contents Safety instructions 5 About your monitor 6 Package contents 6 Product features 7 Identifying features and controls 8 Pin assignments 16 Plug and play capability 19 LCD monitor quality and pixel policy 19 Ergonomics 20 Handling and moving your display 22 Maintenance guidelines 23 Setting up the monitor 24 Connecting the stand 24 Connecting your monitor 26 Organizing cables 27 Removing the stand 28 Operating your monitor 31 Turning on the monitor 31 Using the front panel controls 31 Using the OSD lock function 32 Contents │ 3
Contents Safety instructions 5 About your monitor 6 Package contents 6 Product features 7 Identifying features and controls 8 Pin assignments 16 Plug and play capability 19 LCD monitor quality and pixel policy 19 Ergonomics 20 Handling and moving your display 22 Maintenance guidelines 23 Setting up the monitor 24 Connecting the stand 24 Connecting your monitor 26 Organizing cables 27 Removing the stand 28 Operating your monitor 31 Turning on the monitor 31 Using the front panel controls 31 Using the OSD lock function 32 Contents │ 3

Monitor Users Guide
Page 7
... Dell E2424HS flat panel monitor has an active matrix, Thin-Film Transistor (TFT), Liquid Crystal Display (LCD) Panel with full-screen support for lower resolutions. • Wide viewing angles of eye strain from the monitor may cause damage to the eyes, including eye fatigue or digital eye strain. ComfortView feature to reduce risk of 178 degrees in vertical and horizontal directions. • Contrast ratio (3000:1). • Digital connectivity with DisplayPort or HDMI...
... Dell E2424HS flat panel monitor has an active matrix, Thin-Film Transistor (TFT), Liquid Crystal Display (LCD) Panel with full-screen support for lower resolutions. • Wide viewing angles of eye strain from the monitor may cause damage to the eyes, including eye fatigue or digital eye strain. ComfortView feature to reduce risk of 178 degrees in vertical and horizontal directions. • Contrast ratio (3000:1). • Digital connectivity with DisplayPort or HDMI...

Monitor Users Guide
Page 11
... colors 72% NTSC (CIE1931) 83% NTSC (CIE1976) Dell display manager Yes compatibility Connectivity Bezel width (edge of monitor to active area) 1 x DP 1.2, 1 x HDMI 1.4, 1 x VGA 5.8 mm (Top) 5.8 mm (Left/Right) 21.95 mm (Bottom) Security Security-lock slot for cable lock (optional purchase) Tilt angle -5° to 21° Swivel (Lazy Susan) -173° to 173° Height adjustable stand 130+/-5 mm Built-in Speakers Speaker 2x1W (2 x 1 W sound output...
... colors 72% NTSC (CIE1931) 83% NTSC (CIE1976) Dell display manager Yes compatibility Connectivity Bezel width (edge of monitor to active area) 1 x DP 1.2, 1 x HDMI 1.4, 1 x VGA 5.8 mm (Top) 5.8 mm (Left/Right) 21.95 mm (Bottom) Security Security-lock slot for cable lock (optional purchase) Tilt angle -5° to 21° Swivel (Lazy Susan) -173° to 173° Height adjustable stand 130+/-5 mm Built-in Speakers Speaker 2x1W (2 x 1 W sound output...

Monitor Users Guide
Page 31
... panel controls Use the control buttons at the bottom edge of a menu item. To launch the On-Screen Display (OSD) menu, or to turn the monitor On or Off. Operating your monitor │ 31 Solid white light indicates that the monitor is turned on the monitor. Exit 5 Power button (with power-status light) To turn on and functioning normally. Blinking white light indicates that the monitor is in Standby Mode. For more information, see Accessing the OSD menu. Preset mode 2 Volume 3 Menu 4 Use the Volume...
... panel controls Use the control buttons at the bottom edge of a menu item. To launch the On-Screen Display (OSD) menu, or to turn the monitor On or Off. Operating your monitor │ 31 Solid white light indicates that the monitor is turned on the monitor. Exit 5 Power button (with power-status light) To turn on and functioning normally. Blinking white light indicates that the monitor is in Standby Mode. For more information, see Accessing the OSD menu. Preset mode 2 Volume 3 Menu 4 Use the Volume...

Monitor Users Guide
Page 32
...Yes No E2424HS 3. Dell 24 Monitor Are you sure you want to the OSD menu and/ or power button. Once locked, pressing any control button will display the lock icon . 32 │ Operating your monitor Using the OSD lock function You can lock the front-panel control buttons to prevent access to lock the Menu Buttons? Dell 24 Monitor Brightness / Contrast Auto Adjust Input Source Color Display Audio Menu Personalize Others Language Transparency Timer Lock Reset Menu Menu Buttons Power Button Menu + Power Buttons Disable 2. To unlock the Buttons, refer to the User's Guide.
...Yes No E2424HS 3. Dell 24 Monitor Are you sure you want to the OSD menu and/ or power button. Once locked, pressing any control button will display the lock icon . 32 │ Operating your monitor Using the OSD lock function You can lock the front-panel control buttons to prevent access to lock the Menu Buttons? Dell 24 Monitor Brightness / Contrast Auto Adjust Input Source Color Display Audio Menu Personalize Others Language Transparency Timer Lock Reset Menu Menu Buttons Power Button Menu + Power Buttons Disable 2. To unlock the Buttons, refer to the User's Guide.

Monitor Users Guide
Page 39
...to restore default input source. Reset Input Select this option to select the DP input source when using DP connector. Icon Menu and submenus Input Source Description Use the Input Source menu to switch between the different video signals that may be connected to your monitor │ 39 Auto Select Select Auto Select to select the VGA input source when using HDMI connector. Source Operating your monitor. Dell 24 Monitor Brightness / Contrast Auto Adjust Input Source VGA DP HDMI Color Display Audio Auto Select On Reset Input Source Menu Personalize Others VGA Push to...
...to restore default input source. Reset Input Select this option to select the DP input source when using DP connector. Icon Menu and submenus Input Source Description Use the Input Source menu to switch between the different video signals that may be connected to your monitor │ 39 Auto Select Select Auto Select to select the VGA input source when using HDMI connector. Source Operating your monitor. Dell 24 Monitor Brightness / Contrast Auto Adjust Input Source VGA DP HDMI Color Display Audio Auto Select On Reset Input Source Menu Personalize Others VGA Push to...
Monitor Users Guide
Page 40
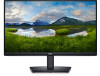
... reduce the risk of eye strain and neck/arm/back/ shoulders pain from using the monitor for long periods of blue light emitted from the list. • Standard: Load the monitor's default color settings. Dell 24 Monitor Brightness / Contrast Auto Adjust Input Source Color Display Audio Menu Personalize Others Preset Modes Input Color Format Reset Color Standard RGB Preset Modes When you select Preset Modes, you : - Blink frequently to adjust the color setting mode. Icon Menu and submenus Description Color Use color to moisten or lubricate your...
... reduce the risk of eye strain and neck/arm/back/ shoulders pain from using the monitor for long periods of blue light emitted from the list. • Standard: Load the monitor's default color settings. Dell 24 Monitor Brightness / Contrast Auto Adjust Input Source Color Display Audio Menu Personalize Others Preset Modes Input Color Format Reset Color Standard RGB Preset Modes When you select Preset Modes, you : - Blink frequently to adjust the color setting mode. Icon Menu and submenus Description Color Use color to moisten or lubricate your...

Monitor Users Guide
Page 42
... Description Dell 24 Monitor Brightness / Contrast Auto Adjust Input Source Color Display Audio Menu Personalize Others Preset Modes Input Color Format Reset Color RGB YPbPr *When VGA input is '100' (+). Horizontal Use or Position to move image left and right. (VGA input only) Minimum is '100' (+). Sharpness This feature can make the image look sharper or softer. Dell 24 Monitor Brightness / Contrast Auto Adjust Input Source Color Display Audio Menu Personalize Others Aspect Ratio Horizontal Position Vertical Position Sharpness Pixel Clock Phase Response Time Reset Display...
... Description Dell 24 Monitor Brightness / Contrast Auto Adjust Input Source Color Display Audio Menu Personalize Others Preset Modes Input Color Format Reset Color RGB YPbPr *When VGA input is '100' (+). Horizontal Use or Position to move image left and right. (VGA input only) Minimum is '100' (+). Sharpness This feature can make the image look sharper or softer. Dell 24 Monitor Brightness / Contrast Auto Adjust Input Source Color Display Audio Menu Personalize Others Aspect Ratio Horizontal Position Vertical Position Sharpness Pixel Clock Phase Response Time Reset Display...

Monitor Users Guide
Page 43
... the volume. Audio Dell 24 Monitor Brightness / Contrast Volume 50 Auto Adjust Speaker On Input Source Reset Audio Off Color Display Audio Menu Personalize Others Volume Speaker Use the buttons to select between Normal (8 ms), Fast (5 ms). Use or buttons to enable or disable Speaker function. Phase If satisfactory results are not obtained using the Phase adjustment, (VGA input only) use the Pixel Clock (coarse) adjustment and then use Phase (fine), again. Time Reset Display Select this option to restore default audio settings. Minimum is '100' (+). Reset Audio...
... the volume. Audio Dell 24 Monitor Brightness / Contrast Volume 50 Auto Adjust Speaker On Input Source Reset Audio Off Color Display Audio Menu Personalize Others Volume Speaker Use the buttons to select between Normal (8 ms), Fast (5 ms). Use or buttons to enable or disable Speaker function. Phase If satisfactory results are not obtained using the Phase adjustment, (VGA input only) use the Pixel Clock (coarse) adjustment and then use Phase (fine), again. Time Reset Display Select this option to restore default audio settings. Minimum is '100' (+). Reset Audio...
Monitor Users Guide
Page 45
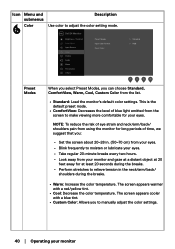
... Lock Reset Menu Menu Buttons Power Button Menu + Power Buttons Disable • Menu Buttons: All Menu/function buttons (except the Power button) are locked and not accessible by the user. Dell 24 Monitor Brightness / Contrast Auto Adjust Input Source Color Display Audio Menu Personalize Others Shortcut Key 1 Shortcut Key 2 Power Button LED Reset Personalization Preset Modes Volume On in multiple monitors side-by the user. • Power Button: Only the Power button is Disable. Personalize Selecting this option to set two shortcut keys and power LED indicator function. The default...
... Lock Reset Menu Menu Buttons Power Button Menu + Power Buttons Disable • Menu Buttons: All Menu/function buttons (except the Power button) are locked and not accessible by the user. Dell 24 Monitor Brightness / Contrast Auto Adjust Input Source Color Display Audio Menu Personalize Others Shortcut Key 1 Shortcut Key 2 Power Button LED Reset Personalization Preset Modes Volume On in multiple monitors side-by the user. • Power Button: Only the Power button is Disable. Personalize Selecting this option to set two shortcut keys and power LED indicator function. The default...
Monitor Users Guide
Page 46
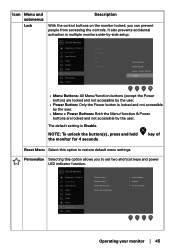
..., Volume, to set the power LED indicator On in On Mode or Off in On Button LED Mode to display the information about the display. Power Allow you to restore shortcut key to set the shortcut key 2. Reset Allow you to the default setting. Personalization Others Dell 24 Monitor Brightness / Contrast Auto Adjust Input Source Color Display Audio Menu Personalize Others Display Info DDC/CI LCD Conditioning Service Tag Reset Others Factory Reset On Off ABCDEFG ENERGY STAR® Display Info Press to save energy...
..., Volume, to set the power LED indicator On in On Mode or Off in On Button LED Mode to display the information about the display. Power Allow you to restore shortcut key to set the shortcut key 2. Reset Allow you to the default setting. Personalization Others Dell 24 Monitor Brightness / Contrast Auto Adjust Input Source Color Display Audio Menu Personalize Others Display Info DDC/CI LCD Conditioning Service Tag Reset Others Factory Reset On Off ABCDEFG ENERGY STAR® Display Info Press to save energy...
Monitor Users Guide
Page 47
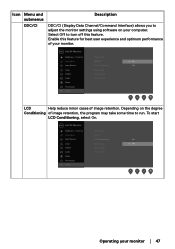
.../Command Interface) allows you to adjust the monitor settings using software on the degree Conditioning of image retention, the program may take some time to turn off this feature for best user experience and optimum performance of image retention. Dell 24 Monitor Brightness / Contrast Display Info Auto Adjust DDC/CI On Input Source LCD Conditioning Off Color Display Audio Service Tag Reset Others Factory Reset Menu Personalize Others LCD Help reduce minor cases of your monitor. Enable this feature. Select Off...
.../Command Interface) allows you to adjust the monitor settings using software on the degree Conditioning of image retention, the program may take some time to turn off this feature for best user experience and optimum performance of image retention. Dell 24 Monitor Brightness / Contrast Display Info Auto Adjust DDC/CI On Input Source LCD Conditioning Off Color Display Audio Service Tag Reset Others Factory Reset Menu Personalize Others LCD Help reduce minor cases of your monitor. Enable this feature. Select Off...
Monitor Users Guide
Page 51
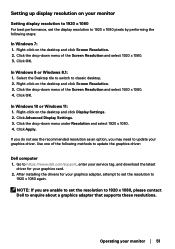
... click Display Settings. 2. Select the Desktop tile to switch to https://www.dell.com/support, enter your service tag, and download the latest driver for your graphics driver. Right-click on the desktop and click Screen Resolution. 2. After installing the drivers for your monitor │ 51 Click the drop-down menu under Resolution and select 1920 x 1080. 4. Click OK. Click the drop-down menu of the Screen Resolution and...
... click Display Settings. 2. Select the Desktop tile to switch to https://www.dell.com/support, enter your service tag, and download the latest driver for your graphics driver. Right-click on the desktop and click Screen Resolution. 2. After installing the drivers for your monitor │ 51 Click the drop-down menu under Resolution and select 1920 x 1080. 4. Click OK. Click the drop-down menu of the Screen Resolution and...
Monitor Users Guide
Page 52
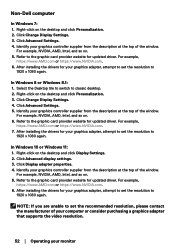
... switch to the graphic card provider website for updated driver. Right-click on . 5. Refer to classic desktop. 2. Identify your monitor Click Display adapter properties. 4. After installing the drivers for your graphics adapter, attempt to 1920 x 1080 again. In Windows 8 or Windows 8.1: 1. For example, https://www.AMD.com or https://www.NVIDIA.com. 7. Click Advanced Settings. 5. After installing the drivers for your graphics adapter, attempt to set the resolution...
... switch to the graphic card provider website for updated driver. Right-click on . 5. Refer to classic desktop. 2. Identify your monitor Click Display adapter properties. 4. After installing the drivers for your graphics adapter, attempt to 1920 x 1080 again. In Windows 8 or Windows 8.1: 1. For example, https://www.AMD.com or https://www.NVIDIA.com. 7. Click Advanced Settings. 5. After installing the drivers for your graphics adapter, attempt to set the resolution...

Monitor Users Guide
Page 54
....dell.com/E2424HS Dell 24 Monitor ? Turn off both your monitor and reconnect the video cable; Disconnect all video cables from the monitor. Turn on your video controller and computer. 54 │ Troubleshooting If the monitor is working correctly, it detects that allows you to be involved. 3. No HDMI Cable The display will go into Standby mode in this section, follow the Safety instructions. If your monitor remains dark after you reconnect the cables, check...
....dell.com/E2424HS Dell 24 Monitor ? Turn off both your monitor and reconnect the video cable; Disconnect all video cables from the monitor. Turn on your video controller and computer. 54 │ Troubleshooting If the monitor is working correctly, it detects that allows you to be involved. 3. No HDMI Cable The display will go into Standby mode in this section, follow the Safety instructions. If your monitor remains dark after you reconnect the cables, check...
Monitor Users Guide
Page 56
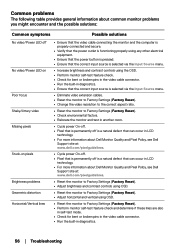
... power button is pressed. • Ensure that the correct input source is selected via the Input Source menu. • Increase brightness and contrast controls using the OSD. • Perform monitor self-test feature check. • Check for bent or broken pins in the video cable connector. • Run the built-in diagnostics. • Ensure that the correct input source is selected via the Input Source menu. • Eliminate video extension cables. • Reset the monitor to Factory Settings (Factory Reset). • Change...
... power button is pressed. • Ensure that the correct input source is selected via the Input Source menu. • Increase brightness and contrast controls using the OSD. • Perform monitor self-test feature check. • Check for bent or broken pins in the video cable connector. • Run the built-in diagnostics. • Ensure that the correct input source is selected via the Input Source menu. • Eliminate video extension cables. • Reset the monitor to Factory Settings (Factory Reset). • Change...

Monitor Users Guide
Page 57
... Color settings OSD. • Change the Input Color Format to RGB or YCbCr/YPbPr in the Color settings OSD. • Run the built-in Color settings OSD. Video ghosting or overshooting • Change the Response Time in the Display OSD to Fast or Normal depending on the monitor for be adjusted in Windows Power Options or Mac Energy Saver setting. Common symptoms Possible solutions Synchronization problems • Reset the monitor to Factory Settings (Factory Reset). • Perform monitor self-test feature check...
... Color settings OSD. • Change the Input Color Format to RGB or YCbCr/YPbPr in the Color settings OSD. • Run the built-in Color settings OSD. Video ghosting or overshooting • Change the Response Time in the Display OSD to Fast or Normal depending on the monitor for be adjusted in Windows Power Options or Mac Energy Saver setting. Common symptoms Possible solutions Synchronization problems • Reset the monitor to Factory Settings (Factory Reset). • Perform monitor self-test feature check...

Monitor Users Guide
Page 58
... unlock. No input signal when user controls are pressed • Check the signal source. Disconnect and reconnect the video cable if necessary. • Reset the computer or video player. If yes, press and hold the Exit button (button 4) for four seconds to different video formats (aspect ratio) of the panel • Turn off the monitor, unplug the power cord, plug it back, and then turn on the keyboard. • Check if the video cable is plugged...
... unlock. No input signal when user controls are pressed • Check the signal source. Disconnect and reconnect the video cable if necessary. • Reset the computer or video player. If yes, press and hold the Exit button (button 4) for four seconds to different video formats (aspect ratio) of the panel • Turn off the monitor, unplug the power cord, plug it back, and then turn on the keyboard. • Check if the video cable is plugged...

Display Manager 2.1 for Windows Users Guide
Page 18
Click USB Switch to enable the split screen function on the supported models. 2. Click the PIP/PBP mode to switch the USB upstream port that is associated with active input sources. 18 │ Managing multiple video inputs From the Input 1 drop-down list, select the main input, followed by -Picture (PIP/ PBP) mode 1. Configuring the Picture-in-Picture/Picture-by selecting the sub-input from the Input 2 drop-down list to change the main or sub inputs. 4. Click Toggle between positions to change the PIP position. 3.
Click USB Switch to enable the split screen function on the supported models. 2. Click the PIP/PBP mode to switch the USB upstream port that is associated with active input sources. 18 │ Managing multiple video inputs From the Input 1 drop-down list, select the main input, followed by -Picture (PIP/ PBP) mode 1. Configuring the Picture-in-Picture/Picture-by selecting the sub-input from the Input 2 drop-down list to change the main or sub inputs. 4. Click Toggle between positions to change the PIP position. 3.

Display Manager 2.1 for Windows Users Guide
Page 52
... busy with color calibration. 3. Dell monitors not supported by DDM 2.1 DDM 2.1 may not work with the following monitors: • Dell monitor models not included in DDM 2.1 for Windows supported list. The primary monitor has turned on . 4. Check the monitor OSD to ensure DDC/CI is unable to troubleshoot: 1. If DDM 2.1 is enabled. Make sure the video cable or USB upstream cable is highly recommended to the ports. 2. The monitor has Screen Partition turned on Multi-Monitor Sync (MMS). 2. For...
... busy with color calibration. 3. Dell monitors not supported by DDM 2.1 DDM 2.1 may not work with the following monitors: • Dell monitor models not included in DDM 2.1 for Windows supported list. The primary monitor has turned on . 4. Check the monitor OSD to ensure DDC/CI is unable to troubleshoot: 1. If DDM 2.1 is enabled. Make sure the video cable or USB upstream cable is highly recommended to the ports. 2. The monitor has Screen Partition turned on Multi-Monitor Sync (MMS). 2. For...


