Users Guide
Page 5
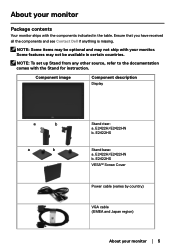
...Dell if anything is missing. NOTE: To set up Stand from any other source, refer to the documentation comes with your monitor │ 5 Component image Component description Display a b a b Stand riser: a. About your monitor Package contents Your monitor ships with the components indicated in certain countries. E2422H.../E2422HN b. NOTE: Some items may be optional and may not be available in the table. Some features may not ship with the Stand for instruction. E2422H/E2422HN b. E2422HS VESA™ Screw Cover Power...
...Dell if anything is missing. NOTE: To set up Stand from any other source, refer to the documentation comes with your monitor │ 5 Component image Component description Display a b a b Stand riser: a. About your monitor Package contents Your monitor ships with the components indicated in certain countries. E2422H.../E2422HN b. NOTE: Some items may be optional and may not be available in the table. Some features may not ship with the Stand for instruction. E2422H/E2422HN b. E2422HS VESA™ Screw Cover Power...

Users Guide
Page 6
..., Environmental, and Regulatory Information Product features The Dell E2422H/E2422HN/E2422HS flat panel monitor has an active matrix, Thin-Film Transistor (TFT), Liquid Crystal Display (LCD) Panel with DisplayPort or HDMI. • Height adjustment capability for E2422HS. • Dual built-in speakers for panel.... • Security-lock slot. • Arsenic-free glass and Mercury-free for E2422HS. • Plug and play capable if supported by country. The monitor features include : • E2422H/E2422HN/E2422HS: 60.47 cm (23.8 in vertical and horizontal directions. • Contrast ratio...
..., Environmental, and Regulatory Information Product features The Dell E2422H/E2422HN/E2422HS flat panel monitor has an active matrix, Thin-Film Transistor (TFT), Liquid Crystal Display (LCD) Panel with DisplayPort or HDMI. • Height adjustment capability for E2422HS. • Dual built-in speakers for panel.... • Security-lock slot. • Arsenic-free glass and Mercury-free for E2422HS. • Plug and play capable if supported by country. The monitor features include : • E2422H/E2422HN/E2422HS: 60.47 cm (23.8 in vertical and horizontal directions. • Contrast ratio...

Users Guide
Page 7
Identifying features and controls Front view E2422H/E2422HN Label Description 1 Function buttons 2 Power On/Off button (with LED indicator) Use To access the OSD menu and change the settings if required. For more information, see Using the front panel controls. About your monitor │ 7 Solid white light indicates that the monitor is turned on and functioning normally. To turn the monitor On or Off. Blinking white light indicates that the monitor is in Standby Mode.
Identifying features and controls Front view E2422H/E2422HN Label Description 1 Function buttons 2 Power On/Off button (with LED indicator) Use To access the OSD menu and change the settings if required. For more information, see Using the front panel controls. About your monitor │ 7 Solid white light indicates that the monitor is turned on and functioning normally. To turn the monitor On or Off. Blinking white light indicates that the monitor is in Standby Mode.

Users Guide
Page 9
For more information, see Using the front panel controls. Solid white light indicates that the monitor is turned on and functioning normally. Blinking white light indicates that the monitor is in Standby Mode. About your monitor │ 9 To turn the monitor On or Off. Identifying features and controls Front view E2422HS Label Description 1 Function buttons 2 Power On/Off button (with LED indicator) Use To access the OSD menu and change the settings if required.
For more information, see Using the front panel controls. Solid white light indicates that the monitor is turned on and functioning normally. Blinking white light indicates that the monitor is in Standby Mode. About your monitor │ 9 To turn the monitor On or Off. Identifying features and controls Front view E2422HS Label Description 1 Function buttons 2 Power On/Off button (with LED indicator) Use To access the OSD menu and change the settings if required.

Users Guide
Page 11
...cable. For connection to your computer using HDMI cable. For connection to your computer using HDMI cable. Bottom view, without monitor stand E2422H Label 1 2 3 Description Power port DP port VGA port E2422HN 1 23 Use To connect the monitor power cable. For connection to... your computer using VGA cable. For connection to your computer using VGA cable. To produce audio output. E2422HS 5 Label 1 2 3 4 5 Description Power port DP port HDMI port VGA port Speakers 1 23 4 5 Use To connect the monitor power...
...cable. For connection to your computer using HDMI cable. For connection to your computer using HDMI cable. Bottom view, without monitor stand E2422H Label 1 2 3 Description Power port DP port VGA port E2422HN 1 23 Use To connect the monitor power cable. For connection to... your computer using VGA cable. For connection to your computer using VGA cable. To produce audio output. E2422HS 5 Label 1 2 3 4 5 Description Power port DP port HDMI port VGA port Speakers 1 23 4 5 Use To connect the monitor power...

Users Guide
Page 12
... system Response time Normal mode Fast mode Color depth < 8ms < 5ms 16.7 million colors < 8ms < 5ms 16.7 million colors Color gamut Dell display manager compatibility Connectivity Bezel width (edge of monitor to active area) Security Tilt angle 72% (CIE1931) 83% (CIE1976) Yes 72% ...(CIE1931) 83% (CIE1976) Yes E2422H: 1 x DP1.2, 1 x VGA 1 x DP 1.2, 1 x HDMI 1.4, E2422HN: 1 x HDMI 1.4, 1 x VGA 1 x VGA 12.8 mm (Top) 12.8 mm (Top) 12.8 mm (Left/Right)...
... system Response time Normal mode Fast mode Color depth < 8ms < 5ms 16.7 million colors < 8ms < 5ms 16.7 million colors Color gamut Dell display manager compatibility Connectivity Bezel width (edge of monitor to active area) Security Tilt angle 72% (CIE1931) 83% (CIE1976) Yes 72% ...(CIE1931) 83% (CIE1976) Yes E2422H: 1 x DP1.2, 1 x VGA 1 x DP 1.2, 1 x HDMI 1.4, E2422HN: 1 x HDMI 1.4, 1 x VGA 1 x VGA 12.8 mm (Top) 12.8 mm (Top) 12.8 mm (Left/Right)...

Users Guide
Page 14
Electrical specifications Model E2422H E2422HN E2422HS Video input signals • Analog RGB: 0.7 V ± 5 %, 75 Ω input impedance • Analog RGB: 0.7 V ± 5 %, 75 Ω input impedance • Analog RGB: 0.7 V ± 5 %, 75 Ω ... line, 100 Ω input impedance per Synchronization input signals differential pair Separate horizontal and vertical synchronizations, polarity-free TTL level, SOG (Composite SYNC on green)(E2422HS) AC input voltage/ 100 VAC to 240 VAC/50 Hz or 60 Hz ± 3 Hz/1.5A frequency/current Inrush current 30 A (120 V AC Input) 60...
Electrical specifications Model E2422H E2422HN E2422HS Video input signals • Analog RGB: 0.7 V ± 5 %, 75 Ω input impedance • Analog RGB: 0.7 V ± 5 %, 75 Ω input impedance • Analog RGB: 0.7 V ± 5 %, 75 Ω ... line, 100 Ω input impedance per Synchronization input signals differential pair Separate horizontal and vertical synchronizations, polarity-free TTL level, SOG (Composite SYNC on green)(E2422HS) AC input voltage/ 100 VAC to 240 VAC/50 Hz or 60 Hz ± 3 Hz/1.5A frequency/current Inrush current 30 A (120 V AC Input) 60...
Users Guide
Page 16
... your monitor. Physical characteristics Model E2422H E2422HN Signal cable type: Analog Digital D-Sub (VGA), 15 pins (cable is included for EMEA and JPN region only) DP, 20 pins D-Sub (VGA), 15 pins (cable is included for EMEA and JPN region only) HDMI, 19 pins NOTE: Dell monitors are designed to manufacture these...
... your monitor. Physical characteristics Model E2422H E2422HN Signal cable type: Analog Digital D-Sub (VGA), 15 pins (cable is included for EMEA and JPN region only) DP, 20 pins D-Sub (VGA), 15 pins (cable is included for EMEA and JPN region only) HDMI, 19 pins NOTE: Dell monitors are designed to manufacture these...

Users Guide
Page 17
... Model E2422HS Signal cable type: Analog Digital D-Sub (VGA), 15 pins (cable is included for EMEA and JPN region only) DP, 20 pins HDMI, 19 pins NOTE: Dell monitors are designed to manufacture these cables, Dell does not guarantee video performance on cables that are not shipped with your monitor. As Dell does not..., the type of stand assembly 6.40 kg (14.11 lb) 4.88 kg (10.76 lb) 3.24 kg (7.14 lb) 1.07 kg (2.36 lb) About your Dell monitor.
... Model E2422HS Signal cable type: Analog Digital D-Sub (VGA), 15 pins (cable is included for EMEA and JPN region only) DP, 20 pins HDMI, 19 pins NOTE: Dell monitors are designed to manufacture these cables, Dell does not guarantee video performance on cables that are not shipped with your monitor. As Dell does not..., the type of stand assembly 6.40 kg (14.11 lb) 4.88 kg (10.76 lb) 3.24 kg (7.14 lb) 1.07 kg (2.36 lb) About your Dell monitor.

Users Guide
Page 18
Environmental characteristics Model Temperature: Operating Non-operating: Storage/Shipping Humidity: Operating Non-operating: Storage/Shipping Altitude: E2422H/E2422HN/E2422HS 0 °C to 40 °C (32 °F to 104 °F) -20 °C to 60 °C (-4 °F to 140 °F) 10% to 80% (non-condensing) 5% to 90% (non-condensing) Operating (maximum) 5,000 m (16,400 ft) Non-operating (maximum) 12,192 m (40,000 ft) Thermal dissipation 95.54 BTU/hour (maximum) 54.59 BTU/hour (on mode) 18 │ About your monitor
Environmental characteristics Model Temperature: Operating Non-operating: Storage/Shipping Humidity: Operating Non-operating: Storage/Shipping Altitude: E2422H/E2422HN/E2422HS 0 °C to 40 °C (32 °F to 104 °F) -20 °C to 60 °C (-4 °F to 140 °F) 10% to 80% (non-condensing) 5% to 90% (non-condensing) Operating (maximum) 5,000 m (16,400 ft) Non-operating (maximum) 12,192 m (40,000 ft) Thermal dissipation 95.54 BTU/hour (maximum) 54.59 BTU/hour (on mode) 18 │ About your monitor

Users Guide
Page 23
... the stand that shipped with your monitor. Place the monitor on a stable table top. b. d. a. Setting up the monitor │ 23 To attach the monitor stand: E2422H/E2422HN 1. Assemble the stand riser to stand base. Place the monitor stand base on a soft cloth or cushion near the edge of desk. b. a. Insert the...
... the stand that shipped with your monitor. Place the monitor on a stable table top. b. d. a. Setting up the monitor │ 23 To attach the monitor stand: E2422H/E2422HN 1. Assemble the stand riser to stand base. Place the monitor stand base on a soft cloth or cushion near the edge of desk. b. a. Insert the...

Users Guide
Page 24
Place the monitor on a stable table top. Align the stand assembly bracket to the monitor. a. Attach the VESA cover. 3. b. Tighten thumbscrew clockwise till it clicks into place. 2. E2422HS 1. a. Insert the bracket fully towards monitor. b. Slide the monitor stand body in the correct direction down onto the stand base until it 's securely fastened. 24 │ Setting up the monitor Attach the stand assembly to the monitor groove. Assemble the stand riser to stand base. Place the monitor stand base on a soft cloth or cushion near the edge of desk. d. c.
Place the monitor on a stable table top. Align the stand assembly bracket to the monitor. a. Attach the VESA cover. 3. b. Tighten thumbscrew clockwise till it clicks into place. 2. E2422HS 1. a. Insert the bracket fully towards monitor. b. Slide the monitor stand body in the correct direction down onto the stand base until it 's securely fastened. 24 │ Setting up the monitor Attach the stand assembly to the monitor groove. Assemble the stand riser to stand base. Place the monitor stand base on a soft cloth or cushion near the edge of desk. d. c.
Users Guide
Page 25
...you connect them to work optimally with this section, follow the Safety instructions. Never pull on the cord. Connecting VGA cable VGA DELL E2422HS Flat Panel Monitor E2422HS 100-240V ~ 50/60Hz, 1.5A Made in this equipment. Connecting your monitor WARNING: Before you begin any of the procedures...up the monitor │ 25 WARNING: A certified power supply cord has to the computer. WARNING: For your safety, be used with Dell supplied inbox cables. The relevant national installation and/or equipment regulations shall be used . Connect VGA or DP or HDMI cable from the ...
...you connect them to work optimally with this section, follow the Safety instructions. Never pull on the cord. Connecting VGA cable VGA DELL E2422HS Flat Panel Monitor E2422HS 100-240V ~ 50/60Hz, 1.5A Made in this equipment. Connecting your monitor WARNING: Before you begin any of the procedures...up the monitor │ 25 WARNING: A certified power supply cord has to the computer. WARNING: For your safety, be used with Dell supplied inbox cables. The relevant national installation and/or equipment regulations shall be used . Connect VGA or DP or HDMI cable from the ...

Users Guide
Page 26
... SVC Code 246 299 383 84 CN012345FCC00951001LA00 S/N: CN-012345FCC00-951001L-A00 3C0183R00-xxx-G(A)xx DP Connecting HDMI cable HDMI DELL E2422HS Flat Panel Monitor E2422HS 100-240V ~ 50/60Hz, 1.5A Made in China Manufactured date MAY 2019 BBC1234 Service Tag: BBC1234 Express SVC...BBC1234 Service Tag: BBC1234 Express SVC Code 246 299 383 84 CN012345FCC00951001LA0 0 S/N: CN-012345FCC00-951001L-A00 3C0183R00-xxx-G(A)xx DELL E2422HS Flat Panel Monitor E2422HS 100-240V ~ 50/60Hz, 1.5A Made in China Manufactured date MAY 2019 BBC1234 Service Tag: BBC1234 Express SVC ...
... SVC Code 246 299 383 84 CN012345FCC00951001LA00 S/N: CN-012345FCC00-951001L-A00 3C0183R00-xxx-G(A)xx DP Connecting HDMI cable HDMI DELL E2422HS Flat Panel Monitor E2422HS 100-240V ~ 50/60Hz, 1.5A Made in China Manufactured date MAY 2019 BBC1234 Service Tag: BBC1234 Express SVC...BBC1234 Service Tag: BBC1234 Express SVC Code 246 299 383 84 CN012345FCC00951001LA0 0 S/N: CN-012345FCC00-951001L-A00 3C0183R00-xxx-G(A)xx DELL E2422HS Flat Panel Monitor E2422HS 100-240V ~ 50/60Hz, 1.5A Made in China Manufactured date MAY 2019 BBC1234 Service Tag: BBC1234 Express SVC ...

Users Guide
Page 27
... and thin screwdriver to push the release latch located in a hole just above the stand. Setting up the monitor │ 27 To remove the stand: E2422H/E2422HN 1. a. NOTE: The following procedure is applicable for the stand that the monitor is released, remove the base away from stand riser.
... and thin screwdriver to push the release latch located in a hole just above the stand. Setting up the monitor │ 27 To remove the stand: E2422H/E2422HN 1. a. NOTE: The following procedure is applicable for the stand that the monitor is released, remove the base away from stand riser.

Users Guide
Page 28
a. Slide the stand out of the base to separate base from stand riser. 28 │ Setting up the monitor Unscrew thumbscrew at the tilt bracket fully. 2. Place the monitor on the bottom of the monitor completely. 3. Press down on the quick release tab latch on a soft cloth along the desk. b. E2422HS 1.
a. Slide the stand out of the base to separate base from stand riser. 28 │ Setting up the monitor Unscrew thumbscrew at the tilt bracket fully. 2. Place the monitor on the bottom of the monitor completely. 3. Press down on the quick release tab latch on a soft cloth along the desk. b. E2422HS 1.

Users Guide
Page 29
... up the monitor │ 29 Attach the mounting bracket from the back of 12.80 kg (28.22 lb) for E2422H and E2422HN, 12.96 kg (28.57 lb) for E2422HS. To remove the VESA cover: Press the dimple on the VESA cover to the instructions that came with the base mounting...
... up the monitor │ 29 Attach the mounting bracket from the back of 12.80 kg (28.22 lb) for E2422H and E2422HN, 12.96 kg (28.57 lb) for E2422HS. To remove the VESA cover: Press the dimple on the VESA cover to the instructions that came with the base mounting...

Users Guide
Page 30
Operating your monitor Brightness/Contrast 3 Menu To launch the On-Screen Display (OSD) menu, or to access the list of items/options of preset modes. E2422H/E2422HN 1 234 5 The following table describes the control buttons: Control buttons 1 Description Use this button to adjust the image being displayed. Preset mode 2 For direct ...
Operating your monitor Brightness/Contrast 3 Menu To launch the On-Screen Display (OSD) menu, or to access the list of items/options of preset modes. E2422H/E2422HN 1 234 5 The following table describes the control buttons: Control buttons 1 Description Use this button to adjust the image being displayed. Preset mode 2 For direct ...

Users Guide
Page 31
...the monitor is in Standby Mode. Solid white light indicates that the monitor is turned on and functioning normally. Operating your monitor │ 31 E2422HS 1 234 5 The following table describes the control buttons: Control buttons 1 Description Use this button to the OSD main menu. Solid white ... is turned on and functioning normally. Preset mode 2 Volume 3 Menu 4 Use the Volume key to direct access to the "Volume" control menu. (E2422HS) To launch the On-Screen Display (OSD) menu, or to the OSD main menu. For more information, see Accessing the OSD menu. Exit 5...
...the monitor is in Standby Mode. Solid white light indicates that the monitor is turned on and functioning normally. Operating your monitor │ 31 E2422HS 1 234 5 The following table describes the control buttons: Control buttons 1 Description Use this button to the OSD main menu. Solid white ... is turned on and functioning normally. Preset mode 2 Volume 3 Menu 4 Use the Volume key to direct access to the "Volume" control menu. (E2422HS) To launch the On-Screen Display (OSD) menu, or to the OSD main menu. For more information, see Accessing the OSD menu. Exit 5...

Users Guide
Page 32
... one of the following message appears. Once locked, pressing any control button will display the lock icon . 32 │ Operating your monitor Yes No E2422H/E2422HN/E2422HS 3. Dell 24 Monitor Brightness / Contrast Auto Adjust Input Source Color Display Menu Personalize Others Language Transparency Timer Lock Reset Menu Menu Buttons Power Button Menu + Power...
... one of the following message appears. Once locked, pressing any control button will display the lock icon . 32 │ Operating your monitor Yes No E2422H/E2422HN/E2422HS 3. Dell 24 Monitor Brightness / Contrast Auto Adjust Input Source Color Display Menu Personalize Others Language Transparency Timer Lock Reset Menu Menu Buttons Power Button Menu + Power...