
User Guide
Page 1
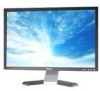
...Monitor Using Your Monitor Stand Attaching the Stand Organizing Your Cables Using the Tilt Removing the Stand Setting Up Your Monitor Connecting Your Monitor Using the Front Panel Using the OSD Setting the Optimal Resolution Using the Dell Soundbar (Optional) Solving Problems Troubleshooting Your Monitor... guidelines for property damage, personal injury, or death. Model E228WFP November 2006 Rev. Dell™ E228WFP Flat Panel Monitor User's Guide About Your Monitor Front View Back View Side View Bottom View Monitor Specifications Caring for your computer. CAUTION: A CAUTION indicates a...
...Monitor Using Your Monitor Stand Attaching the Stand Organizing Your Cables Using the Tilt Removing the Stand Setting Up Your Monitor Connecting Your Monitor Using the Front Panel Using the OSD Setting the Optimal Resolution Using the Dell Soundbar (Optional) Solving Problems Troubleshooting Your Monitor... guidelines for property damage, personal injury, or death. Model E228WFP November 2006 Rev. Dell™ E228WFP Flat Panel Monitor User's Guide About Your Monitor Front View Back View Side View Bottom View Monitor Specifications Caring for your computer. CAUTION: A CAUTION indicates a...
User Guide
Page 5
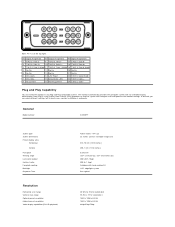
... Play-compatible system. Plug and Play Capability You can configure itself and optimize the monitor settings. Data 2- 9 T.M.D.S. Data 1- 17 T.M.D.S. Clock Shield 7 DDC Data 15 Ground (for +5V) 23 T.M.D.S. TFT LCD 22 inches (22-inch viewable image size) 473.76 mm (18.65 inches) 296.1 mm ...(DDC) protocols so that the system can install the monitor in most cases monitor installation is at 60 Hz 480p/576p/720p Clock + 8 No Connect 16 Hot Plug Detect 24 T.M.D.S. General Model number E228WFP Screen type Screen dimensions Preset display area: Horizontal Vertical ...
... Play-compatible system. Plug and Play Capability You can configure itself and optimize the monitor settings. Data 2- 9 T.M.D.S. Data 1- 17 T.M.D.S. Clock Shield 7 DDC Data 15 Ground (for +5V) 23 T.M.D.S. TFT LCD 22 inches (22-inch viewable image size) 473.76 mm (18.65 inches) 296.1 mm ...(DDC) protocols so that the system can install the monitor in most cases monitor installation is at 60 Hz 480p/576p/720p Clock + 8 No Connect 16 Hot Plug Detect 24 T.M.D.S. General Model number E228WFP Screen type Screen dimensions Preset display area: Horizontal Vertical ...

User Guide
Page 8
... and found to operate with the FCC regulations: l Product name: E228WFP l Model number: E228WFPc l Company name: Dell Inc. However, there is set to match the alternating current (AC) power available at your monitor is electrically rated to comply with Part 15 of the following two... of the FCC Rules. These limits are encouraged to try to Contents Page Appendix Dell™ E228WFP Flat Panel Monitor FCC Identification Information CAUTION: Safety Instruction Contacting Dell FCC Identification Information FCC Notice (U.S. l Never use the LCD monitor in room temperature conditions.
... and found to operate with the FCC regulations: l Product name: E228WFP l Model number: E228WFPc l Company name: Dell Inc. However, there is set to match the alternating current (AC) power available at your monitor is electrically rated to comply with Part 15 of the following two... of the FCC Rules. These limits are encouraged to try to Contents Page Appendix Dell™ E228WFP Flat Panel Monitor FCC Identification Information CAUTION: Safety Instruction Contacting Dell FCC Identification Information FCC Notice (U.S. l Never use the LCD monitor in room temperature conditions.

User Guide
Page 18
...3. excludes mobile and QUADRO chipsets). 2. NOTE: If you are unable to set the resolution to 1680x1050, please contact Dell™ to inquire about a Graphics Adapter that supports these resolutions. Select the Settings tab. 3. Identify your identified Graphics Adapter: o ATI: 1. After installing ... Contents Page Run the installation by double clicking the executable file. 3. Back to Contents Page Setting Up Your Monitor Dell™ E228WFP Flat Panel Monitor If you have a Dell™ desktop with no internet access 1. Right-click on the desktop and click Properties. 2.
...3. excludes mobile and QUADRO chipsets). 2. NOTE: If you are unable to set the resolution to 1680x1050, please contact Dell™ to inquire about a Graphics Adapter that supports these resolutions. Select the Settings tab. 3. Identify your identified Graphics Adapter: o ATI: 1. After installing ... Contents Page Run the installation by double clicking the executable file. 3. Back to Contents Page Setting Up Your Monitor Dell™ E228WFP Flat Panel Monitor If you have a Dell™ desktop with no internet access 1. Right-click on the desktop and click Properties. 2.

User Guide
Page 19
After installing the drivers for your Graphics Adapter, attempt to set the resolution to Contents Page Back to 1680x1050 again. Go to inquire about a Graphics Adapter that supports these resolutions. NOTE: If you have a Dell™ desktop or a Dell™ portable computer with internet access 1. Back to Contents Page Setting Up Your Monitor Dell™ E228WFP Flat Panel Monitor If you are unable to set the resolution to 1680x1050, please contact Dell™ to http://support.dell.com, enter your service tag, and download the latest driver for your graphics card. 2.
After installing the drivers for your Graphics Adapter, attempt to set the resolution to Contents Page Back to 1680x1050 again. Go to inquire about a Graphics Adapter that supports these resolutions. NOTE: If you have a Dell™ desktop or a Dell™ portable computer with internet access 1. Back to Contents Page Setting Up Your Monitor Dell™ E228WFP Flat Panel Monitor If you are unable to set the resolution to 1680x1050, please contact Dell™ to http://support.dell.com, enter your service tag, and download the latest driver for your graphics card. 2.

User Guide
Page 20
... Properties. 2. Please refer to Contents Page After installing the drivers for example, http://www.ATI.com OR http://www.NVIDIA.com ). 6. Back to Contents Page Setting Up Your Monitor Dell™ E228WFP Flat Panel Monitor If you are unable to set the resolution to1680x1050 again.
... Properties. 2. Please refer to Contents Page After installing the drivers for example, http://www.ATI.com OR http://www.NVIDIA.com ). 6. Back to Contents Page Setting Up Your Monitor Dell™ E228WFP Flat Panel Monitor If you are unable to set the resolution to1680x1050 again.

User Guide
Page 21
...Setting Up Your Monitor Dell™ E228WFP Flat Panel Monitor Important instructions and graphic drivers to set the display resolution to 1680 x 1050 pixels by pressing and holding left-mouse button and adjust the screen resolution to Contents Page Back to 1680X1050. 4. If you do not see 1680X1050 as an option, you have a Dell™ desktop or a Dell...Microsoft Windows® operating systems, set the display resolution to 1680X1050 (Optimal) For optimal display performance while using , and follow the provided directions: 1: If you have a Dell™ desktop with no internet access...
...Setting Up Your Monitor Dell™ E228WFP Flat Panel Monitor Important instructions and graphic drivers to set the display resolution to 1680 x 1050 pixels by pressing and holding left-mouse button and adjust the screen resolution to Contents Page Back to 1680X1050. 4. If you do not see 1680X1050 as an option, you have a Dell™ desktop or a Dell...Microsoft Windows® operating systems, set the display resolution to 1680X1050 (Optimal) For optimal display performance while using , and follow the provided directions: 1: If you have a Dell™ desktop with no internet access...
User Guide
Page 22
.... Other trademarks and trade names may be used in this product meets the ENERGY STAR guidelines for energy efficiency. Dell™ E228WFP Flat Panel Color Monitor User Guide Important instructions and graphic drivers to set the display resolution to 1680x1050 (Optimal) Information in this document is subject to either the entities claiming the marks...
.... Other trademarks and trade names may be used in this product meets the ENERGY STAR guidelines for energy efficiency. Dell™ E228WFP Flat Panel Color Monitor User Guide Important instructions and graphic drivers to set the display resolution to 1680x1050 (Optimal) Information in this document is subject to either the entities claiming the marks...

User Guide
Page 23
... the safety instructions. Back to Contents Page Setting Up Your Monitor Dell™ E228WFP Flat Panel Monitor User's Guide Connecting Your Monitor Using the Front Panel Using the OSD Menu Setting the Optimal Resolution Using the Dell Soundbar (Optional) Connecting Your Monitor CAUTION: Before you begin any of the monitor to adjust the image settings. or To connect your computer and...
... the safety instructions. Back to Contents Page Setting Up Your Monitor Dell™ E228WFP Flat Panel Monitor User's Guide Connecting Your Monitor Using the Front Panel Using the OSD Menu Setting the Optimal Resolution Using the Dell Soundbar (Optional) Connecting Your Monitor CAUTION: Before you begin any of the monitor to adjust the image settings. or To connect your computer and...

User Guide
Page 24
...appears on -screen display (OSD), and exit from the video card and the Dell Self Feature Check dialogue box will appear if the display is moved first will ...video input first. OSD menu / select C Brightness/Contrast Hot Key C, D Down (-) and Up (+) Use this monitor will activate that may be tested either + or - NOTE: You can activate automatic scroll feature by pressing and ...to two PCs, if using screen savers, best to set both VGA and DVI cables are connected to one PC, this button for direct access to your monitor. Description of auto- button. Using the input select button...
...appears on -screen display (OSD), and exit from the video card and the Dell Self Feature Check dialogue box will appear if the display is moved first will ...video input first. OSD menu / select C Brightness/Contrast Hot Key C, D Down (-) and Up (+) Use this monitor will activate that may be tested either + or - NOTE: You can activate automatic scroll feature by pressing and ...to two PCs, if using screen savers, best to set both VGA and DVI cables are connected to one PC, this button for direct access to your monitor. Description of auto- button. Using the input select button...

User Guide
Page 25
... NOTE: If you press the button while there are also saved if you can further tune your monitor by using Auto Adjustment, you change the settings and then either proceed to turn the monitor on and fully functional. Push the MENU button to the incoming video signal. The green light indicates... the monitor is on and off. NOTE: Auto Adjust will not occur if you change the settings and then wait for digital (DVI) Input Main Menu for Auto Detect Analog (VGA) Input Main ...
... NOTE: If you press the button while there are also saved if you can further tune your monitor by using Auto Adjustment, you change the settings and then either proceed to turn the monitor on and fully functional. Push the MENU button to the incoming video signal. The green light indicates... the monitor is on and off. NOTE: Auto Adjust will not occur if you change the settings and then wait for digital (DVI) Input Main Menu for Auto Detect Analog (VGA) Input Main ...

User Guide
Page 26
.../Contrast Brightness adjusts the luminance of the viewing area. Contrast adjusts the degree of all applicable settings. Positioning: Horizontal Vertical Positioning moves the viewing area around on the monitor screen. Push - Select No (-) to unlock and allow user access to the size of... select the desired parameter. 5. The image shi selection. or NOTE: Auto Adjust, Positioning and Image Settings are only available when you move between darkness and lightness on the monitor screen. and + buttons, according to the indicators on the menu, to activate the highlighted option. ...
.../Contrast Brightness adjusts the luminance of the viewing area. Contrast adjusts the degree of all applicable settings. Positioning: Horizontal Vertical Positioning moves the viewing area around on the monitor screen. Push - Select No (-) to unlock and allow user access to the size of... select the desired parameter. 5. The image shi selection. or NOTE: Auto Adjust, Positioning and Image Settings are only available when you move between darkness and lightness on the monitor screen. and + buttons, according to the indicators on the menu, to activate the highlighted option. ...

User Guide
Page 27
... is not available. Select to the incoming video signal. The color hue is not available. These settings are not obtained using Auto Adjustment, you to more closely adjust your monitor to make adjustments. (Minimum: 0 ~ Maximum: 100) If satisfactory results are acces OSD menu,... by selecting Image Settings. Use the - The following dialog appears on the screen. Color Settings adjusts the color temperature, color hue, and ...
... is not available. Select to the incoming video signal. The color hue is not available. These settings are not obtained using Auto Adjustment, you to more closely adjust your monitor to make adjustments. (Minimum: 0 ~ Maximum: 100) If satisfactory results are acces OSD menu,... by selecting Image Settings. Use the - The following dialog appears on the screen. Color Settings adjusts the color temperature, color hue, and ...

User Guide
Page 28
.... makes video image looks more monochrome. l Red Preset is typically used for HD video playback over DVI.). makes video image shade into purplish. This color setting is selected to obtain a bluish tint. l This feature can make color shift of the three colors (R, G, B) independently, in sing from '0' to 100. ... for PC RGB and HD YPbPr ( HD YPbPr is selected to green or purple. PC RGB PC graphics display over DVI. This color setting is also the "sRGB l User Preset: Use the plus and minus buttons to increase or decrease each of video image to obtain the ...
.... makes video image looks more monochrome. l Red Preset is typically used for HD video playback over DVI.). makes video image shade into purplish. This color setting is selected to obtain a bluish tint. l This feature can make color shift of the three colors (R, G, B) independently, in sing from '0' to 100. ... for PC RGB and HD YPbPr ( HD YPbPr is selected to green or purple. PC RGB PC graphics display over DVI. This color setting is also the "sRGB l User Preset: Use the plus and minus buttons to increase or decrease each of video image to obtain the ...

User Guide
Page 29
... 15 seconds. OSD Lock: Controls user access to the left and right. Select to have the OSD display in 5 second increments, from 5 to all applicable settings. l To adjust the vertical position of the OSD, use the - and + buttons, and move OSD down and up. and + buttons to adjust the ..., pressing the menu button takes the user directly to the OSD settings menu, with OSD Lo No (-) to unlock and allow user access to 60 seconds. OSD Settings: Horizontal Position Vertical Position OSD Hold Time OSD Lock Adjust the settings for the OSD, including the location and the amount of time ...
... 15 seconds. OSD Lock: Controls user access to the left and right. Select to have the OSD display in 5 second increments, from 5 to all applicable settings. l To adjust the vertical position of the OSD, use the - and + buttons, and move OSD down and up. and + buttons to adjust the ..., pressing the menu button takes the user directly to the OSD settings menu, with OSD Lo No (-) to unlock and allow user access to 60 seconds. OSD Settings: Horizontal Position Vertical Position OSD Hold Time OSD Lock Adjust the settings for the OSD, including the location and the amount of time ...

User Guide
Page 30
...Disable", display Warning message box as below. NOTE: The floating Dell Self-test Feature Check dialog appears on the screen indicating that the monitor is out of the OSD does not change. Change all the user-adjustable settings including color, position, brightness, contrast, and OSD hold time to...Display This Video Mode Optimum resolution 1680 x1050 60Hz This means that the monitor cannot synchronize with the signal that it is too high or too low for the monitor to Factory Settings" menu. or Position settings only - Color settings only - DDC/CI: - Select "Yes" disable DDC/CI and ...
...Disable", display Warning message box as below. NOTE: The floating Dell Self-test Feature Check dialog appears on the screen indicating that the monitor is out of the OSD does not change. Change all the user-adjustable settings including color, position, brightness, contrast, and OSD hold time to...Display This Video Mode Optimum resolution 1680 x1050 60Hz This means that the monitor cannot synchronize with the signal that it is too high or too low for the monitor to Factory Settings" menu. or Position settings only - Color settings only - DDC/CI: - Select "Yes" disable DDC/CI and ...

User Guide
Page 31
...to the support site for your graphics card. If you have a Dell desktop or portable computer: ¡ Go to update your computer and download the latest graphic drivers. ¡ Go to the Monitor Headphone connectors Soundbar Attachment to your computer, complete one of the ... your graphics card website and download the latest graphic drivers. Power/volume control 2. Setting the Optimal Resolution 1. Depending on the desktop and select Properties. 2. Using the Dell Soundbar (Optional) The Dell SoundBar is a stereo two channel system adaptable to adjust the overall system level, ...
...to the support site for your graphics card. If you have a Dell desktop or portable computer: ¡ Go to update your computer and download the latest graphic drivers. ¡ Go to the Monitor Headphone connectors Soundbar Attachment to your computer, complete one of the ... your graphics card website and download the latest graphic drivers. Power/volume control 2. Setting the Optimal Resolution 1. Depending on the desktop and select Properties. 2. Using the Dell Soundbar (Optional) The Dell SoundBar is a stereo two channel system adaptable to adjust the overall system level, ...

User Guide
Page 34
...off l These are pixels that you might encounter. l Adjust Phase and Clock controls via OSD. LCD Scratched Screen has scratches or smudges l Turn monitor off l Ensure monitor is dead No picture or no warning message appears, but the screen is fuzzy, blurry, or ghosting... LED on -off and this monitor. l For cleaning instruction, see Caring for bent or broken pins on "Position Settings Only". General Problems The following table contains general information about common monitor problems you have pressed the power button. l Perform monitor self-test feature check. l ...
...off l These are pixels that you might encounter. l Adjust Phase and Clock controls via OSD. LCD Scratched Screen has scratches or smudges l Turn monitor off l Ensure monitor is dead No picture or no warning message appears, but the screen is fuzzy, blurry, or ghosting... LED on -off and this monitor. l For cleaning instruction, see Caring for bent or broken pins on "Position Settings Only". General Problems The following table contains general information about common monitor problems you have pressed the power button. l Perform monitor self-test feature check. l ...

User Guide
Page 35
..., or MP3). l Clean and reseat the audio line-in plug is not covered by your monitor problem. l Confirm that the monitor has power. l Set all Windows volume controls to their midpoints. l Set all Windows audio balance controls (L-R) to their maximum. NOTE: Image Burn-In is completely inserted into... CD player). portable CD player). Distorted Sound Computer's sound card is off the monitor, unplug the power cord and then plug back and turn on the Soundbar counter setting. left on the monitor for a long period of displayed appears on the time) screen Input auto switching ...
..., or MP3). l Clean and reseat the audio line-in plug is not covered by your monitor problem. l Confirm that the monitor has power. l Set all Windows volume controls to their midpoints. l Set all Windows audio balance controls (L-R) to their maximum. NOTE: Image Burn-In is completely inserted into... CD player). portable CD player). Distorted Sound Computer's sound card is off the monitor, unplug the power cord and then plug back and turn on the Soundbar counter setting. left on the monitor for a long period of displayed appears on the time) screen Input auto switching ...


