Users Guide
Page 3
Contents About Your Monitor 5 Package Contents 5 Product Features 6 Identifying Parts and Controls 7 Monitor Specifications 9 Plug and Play Capability 14 LCD Monitor Quality & Pixel Policy 21 Maintenance Guidelines 21 Setting Up the Monitor 22 Attaching the Stand 22 Connecting Your Monitor 23 Organizing Your Cables 24 Removing the Monitor Stand 24 Wall Mounting (Optional 25 Operating the Monitor 26 Power On the Monitor 26 Using the Front-Panel Controls 26 Using the On-Screen Display (OSD) Menu 27 Setting the Maximum Resolution 54 Using the Tilt 55 3
Contents About Your Monitor 5 Package Contents 5 Product Features 6 Identifying Parts and Controls 7 Monitor Specifications 9 Plug and Play Capability 14 LCD Monitor Quality & Pixel Policy 21 Maintenance Guidelines 21 Setting Up the Monitor 22 Attaching the Stand 22 Connecting Your Monitor 23 Organizing Your Cables 24 Removing the Monitor Stand 24 Wall Mounting (Optional 25 Operating the Monitor 26 Power On the Monitor 26 Using the Front-Panel Controls 26 Using the On-Screen Display (OSD) Menu 27 Setting the Maximum Resolution 54 Using the Tilt 55 3
Users Guide
Page 24
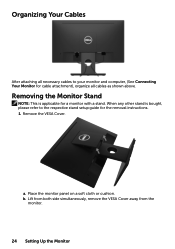
a. b. Remove the VESA Cover. Organizing Your Cables After attaching all cables as shown above. Lift from both side simultaneously, remove the VESA Cover away from the monitor. 24 Setting Up the Monitor Removing the Monitor Stand NOTE: This is bought, please refer to your monitor and computer, (See Connecting Your Monitor for cable attachment), organize all necessary cables to the respective stand setup guide for a monitor with a stand. When any other stand is applicable for the removal instructions. 1. Place the monitor panel on a soft cloth or cushion.
a. b. Remove the VESA Cover. Organizing Your Cables After attaching all cables as shown above. Lift from both side simultaneously, remove the VESA Cover away from the monitor. 24 Setting Up the Monitor Removing the Monitor Stand NOTE: This is bought, please refer to your monitor and computer, (See Connecting Your Monitor for cable attachment), organize all necessary cables to the respective stand setup guide for a monitor with a stand. When any other stand is applicable for the removal instructions. 1. Place the monitor panel on a soft cloth or cushion.
Users Guide
Page 25
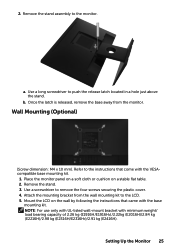
Use a long screwdriver to remove the four screws securing the plastic cover. 4. Use a screwdriver to push the release latch located in a hole just above the stand. Setting Up the Monitor 25 Attach the mounting bracket from the monitor. Mount the LCD on a stable flat table. 2. ... weight/ load bearing capacity of 2.26 kg (E1916H/E1916He)/2.22kg (E2016H)/2.84 kg (E2216H)/2.98 kg (E2316H/E2316Hr)/2.91 kg (E2416H). Once the latch is released, remove the base away from the wall mounting kit to the monitor. Remove the stand. 3. Remove the stand assembly to the LCD. 5. a.
Use a long screwdriver to remove the four screws securing the plastic cover. 4. Use a screwdriver to push the release latch located in a hole just above the stand. Setting Up the Monitor 25 Attach the mounting bracket from the monitor. Mount the LCD on a stable flat table. 2. ... weight/ load bearing capacity of 2.26 kg (E1916H/E1916He)/2.22kg (E2016H)/2.84 kg (E2216H)/2.98 kg (E2316H/E2316Hr)/2.91 kg (E2416H). Once the latch is released, remove the base away from the wall mounting kit to the monitor. Remove the stand. 3. Remove the stand assembly to the LCD. 5. a.


