User Guide
Page 14
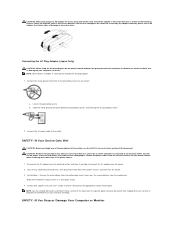
... tighten the grounding source. 2. Turn off the batteries and put them from their power sources, and then from the device. 3. Contact Dell support (see the SAFETY: General Safety section of this document or separate paper warranty document that it is connected to an electrical outlet, ...plug adapter, do so. Connect the AC power cable to your User's Guide or Owner's Manual for information on the outlet: a. SAFETY: If Your Device Gets Wet CAUTION: Before you are certain that shipped with your monitor or computer for the appropriate contact information). If the computer is...
... tighten the grounding source. 2. Turn off the batteries and put them from their power sources, and then from the device. 3. Contact Dell support (see the SAFETY: General Safety section of this document or separate paper warranty document that it is connected to an electrical outlet, ...plug adapter, do so. Connect the AC power cable to your User's Guide or Owner's Manual for information on the outlet: a. SAFETY: If Your Device Gets Wet CAUTION: Before you are certain that shipped with your monitor or computer for the appropriate contact information). If the computer is...
User Guide
Page 15
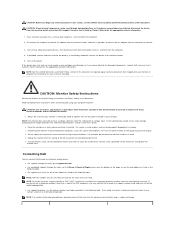
... or unusual odors are detected, disconnect the device from the electrical outlet and contact Dell support. CAUTION: Monitor Safety Instructions Review the sections on the device. Read and follow these instructions when connecting and using your User's Guide or Owner's Manual for use the phone numbers and codes provided in the following table. l Always...
... or unusual odors are detected, disconnect the device from the electrical outlet and contact Dell support. CAUTION: Monitor Safety Instructions Review the sections on the device. Read and follow these instructions when connecting and using your User's Guide or Owner's Manual for use the phone numbers and codes provided in the following table. l Always...
User Guide
Page 33
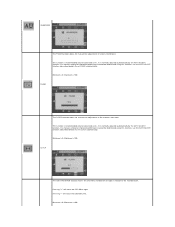
.... PHASE The CLOCK function allows for advanced users. SHARPNESS The PHASE function allows for advanced users. Maximum is 0. Maximum is 100. Maximum is 100. Pressing "+" will move the OSD Menu right. It is recommended only for manual fine adjustment of the monitor's dot clock. If a manual setting for improved performance cannot be determined using this...
.... PHASE The CLOCK function allows for advanced users. SHARPNESS The PHASE function allows for advanced users. Maximum is 0. Maximum is 100. Maximum is 100. Pressing "+" will move the OSD Menu right. It is recommended only for manual fine adjustment of the monitor's dot clock. If a manual setting for improved performance cannot be determined using this...
User Guide
Page 40
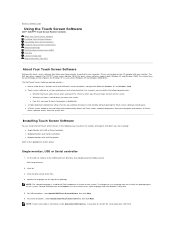
... the serial cable later, click Next. Dell Setup launches. 2. NOTE: The selected language is connected, select Auto-detect Dell devices . To change the user language you must install the package again on...XP and Windows 2000. The Dell Touch Screen Software package contains: l Native 32-bit drivers, for both Windows XP and Windows 2000, this manual uses the terminology and descriptions...driver package. Back to Contents Page Using the Touch Screen Software Dell™ E157FPT Touch Screen Monitor Contents About Your Touch Screen Software Installing Touch Screen Software Uninstalling Touch...
... the serial cable later, click Next. Dell Setup launches. 2. NOTE: The selected language is connected, select Auto-detect Dell devices . To change the user language you must install the package again on...XP and Windows 2000. The Dell Touch Screen Software package contains: l Native 32-bit drivers, for both Windows XP and Windows 2000, this manual uses the terminology and descriptions...driver package. Back to Contents Page Using the Touch Screen Software Dell™ E157FPT Touch Screen Monitor Contents About Your Touch Screen Software Installing Touch Screen Software Uninstalling Touch...
User Guide
Page 48
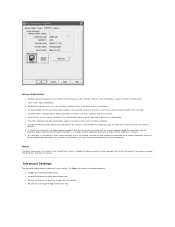
...monitor associated with the driver, and the user manual. l The EloVA icon will launch the video alignment program only for touchscreens that is not actually installed, the only information contained in a multiple monitor application when only a single monitor alignment is installed on the monitor...indicates either "Working properly" or reflects any errors reported from the Windows Display Properties control panel. l The Identify Monitor button displays the Dell logo on . l Settings for serial and USB devices as appropriate. No Screen configuration icons are displayed. l An ...
...monitor associated with the driver, and the user manual. l The EloVA icon will launch the video alignment program only for touchscreens that is not actually installed, the only information contained in a multiple monitor application when only a single monitor alignment is installed on the monitor...indicates either "Working properly" or reflects any errors reported from the Windows Display Properties control panel. l The Identify Monitor button displays the Dell logo on . l Settings for serial and USB devices as appropriate. No Screen configuration icons are displayed. l An ...
User Guide
Page 51
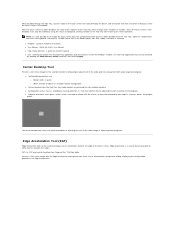
...possible to re-enable the touch screen from the Control Panel after the touch screen is available by running eloalmon /h. l http://www.dell.com - See graphic below. A quick link to allow touches towards the edge of the Tool Tray menu changes from the Windows ... bounds and a Cursor Acceleration Configuration dialog, displaying the configuration parameters for each execution of this User Manual. The Tool Tray application may be adjusted for Edge Acceleration. Only one monitor may also be removed by clearing the Show tool tray utility check box, then clicking Apply....
...possible to re-enable the touch screen from the Control Panel after the touch screen is available by running eloalmon /h. l http://www.dell.com - See graphic below. A quick link to allow touches towards the edge of the Tool Tray menu changes from the Windows ... bounds and a Cursor Acceleration Configuration dialog, displaying the configuration parameters for each execution of this User Manual. The Tool Tray application may be adjusted for Edge Acceleration. Only one monitor may also be removed by clearing the Show tool tray utility check box, then clicking Apply....


