

Appliance Deployment Guide
Page 17
...content in the USB key may be damaged and the USB key doesn't work as expected. In the Boot Manager Main Menu, select One-shot BIOS Boot Menu. 4. Navigate to prepare the USB key for future use the Windows Eject Drive function to the Appliance tab. 2. A Prerequisite Check ... to create the RASR key. 3. NOTE: To perform system recovery using RASR, see Creating the RASR USB Key section. Executing RASR NOTE: Dell recommends you have the latest RUU available and reachable on Create RASR USB Drive now. RASR is launched and welcome screen is displayed. 8.
...content in the USB key may be damaged and the USB key doesn't work as expected. In the Boot Manager Main Menu, select One-shot BIOS Boot Menu. 4. Navigate to prepare the USB key for future use the Windows Eject Drive function to the Appliance tab. 2. A Prerequisite Check ... to create the RASR key. 3. NOTE: To perform system recovery using RASR, see Creating the RASR USB Key section. Executing RASR NOTE: Dell recommends you have the latest RUU available and reachable on Create RASR USB Drive now. RASR is launched and welcome screen is displayed. 8.

ApplianceInteroperability Guide
Page 3
Contents 1 Introduction ...4 2 Supported hardware 5 BIOS versions...5 Memory...5 Processor...5 Hard drives (internal)...6 Storage enclosures...6 Hard drives (external)...6 Network Interface Controllers (NIC)...7 Fiber channel controllers...7 Network cabling...7 Fiber channel switch...8 RAID controllers...8 Display resolution...8 3 Supported software 9 Operating system...9 Applications...9 Backup software...9 Appliance software stack release...10 3
Contents 1 Introduction ...4 2 Supported hardware 5 BIOS versions...5 Memory...5 Processor...5 Hard drives (internal)...6 Storage enclosures...6 Hard drives (external)...6 Network Interface Controllers (NIC)...7 Fiber channel controllers...7 Network cabling...7 Fiber channel switch...8 RAID controllers...8 Display resolution...8 3 Supported software 9 Operating system...9 Applications...9 Backup software...9 Appliance software stack release...10 3

ApplianceInteroperability Guide
Page 5
BIOS versions System DL4300 BIOS version 2.3.0 or later Memory Table 2. 2 Supported hardware This section lists the hardware supported by DL4300 appliance. Where applicable, firmware and driver versions are also listed. Supported memory configurations System DL4300 Version Standard Edition Total 64 GB or 128 GB High Capacity Edition 128 GB... or 2133 Mhz (8) 16 GB RDIMM (8) 16 GB RDIMM or 2133 Mhz (16) 16 GB RDIMM Processor Table 3. BIOS versions Table 1. Supported processor System DL4300 (Standard Edition) DL4300 (High Capacity Edition) Processor E5-2640 v4 E5-2660 v3 5
BIOS versions System DL4300 BIOS version 2.3.0 or later Memory Table 2. 2 Supported hardware This section lists the hardware supported by DL4300 appliance. Where applicable, firmware and driver versions are also listed. Supported memory configurations System DL4300 Version Standard Edition Total 64 GB or 128 GB High Capacity Edition 128 GB... or 2133 Mhz (8) 16 GB RDIMM (8) 16 GB RDIMM or 2133 Mhz (16) 16 GB RDIMM Processor Table 3. BIOS versions Table 1. Supported processor System DL4300 (Standard Edition) DL4300 (High Capacity Edition) Processor E5-2640 v4 E5-2660 v3 5

Appliance Owners Manual
Page 4
... applications 34 Navigation keys...34 System Setup...35 Viewing System Setup...35 System Setup details...35 Entering System Setup...35 System BIOS...36 iDRAC Settings utility...54 System Information details...55 Dell Lifecycle Controller...55 Embedded system management 56 Boot Manager...56 Viewing Boot Manager...56 Boot Manager main menu...56 6 Installing...
... applications 34 Navigation keys...34 System Setup...35 Viewing System Setup...35 System Setup details...35 Entering System Setup...35 System BIOS...36 iDRAC Settings utility...54 System Information details...55 Dell Lifecycle Controller...55 Embedded system management 56 Boot Manager...56 Viewing Boot Manager...56 Boot Manager main menu...56 6 Installing...

Appliance Owners Manual
Page 10
... 3. When one of these buttons is pressed, the system status indicator on the front panel. The power button controls the power supply output to enter BIOS progress mode. Quick Sync (optional) Table 3. diagnostic LEDs or the LCD panel is prominently on the back flashes until one of the buttons is pressed...
... 3. When one of these buttons is pressed, the system status indicator on the front panel. The power button controls the power supply output to enter BIOS progress mode. Quick Sync (optional) Table 3. diagnostic LEDs or the LCD panel is prominently on the back flashes until one of the buttons is pressed...

Appliance Owners Manual
Page 12
...than 15 seconds. 2 System identification connector Connects the optional system status indicator assembly through the optional cable management arm. 12 Back panel features and indicators-DL4300 1. Power supply unit (PSU1) 11. When one of these buttons is pressed again. Serial connector 6. Back panel features and indicators Item 1 ... and hold the button for more than five seconds to toggle the system ID on and off. Press to enter BIOS progress mode. Figure 2. Half-height PCIe expansion-card slot (3) 5. USB connector (2) 8. Hard drive (2) (back) Table 4.
...than 15 seconds. 2 System identification connector Connects the optional system status indicator assembly through the optional cable management arm. 12 Back panel features and indicators-DL4300 1. Power supply unit (PSU1) 11. When one of these buttons is pressed again. Serial connector 6. Back panel features and indicators Item 1 ... and hold the button for more than five seconds to toggle the system ID on and off. Press to enter BIOS progress mode. Figure 2. Half-height PCIe expansion-card slot (3) 5. USB connector (2) 8. Hard drive (2) (back) Table 4.

Appliance Owners Manual
Page 32
... user The default user name and password are displayed. 4. NOTE: If you do not have iDRAC credentials to log in the Dell DL4300 Appliance Deployment Guide at Dell.com/idracmanuals. Click Drivers & Downloads. Log in to iDRAC You can log in the Service Tag or Express Service Code box.... to automatically detect your Service Tag, or under General support, navigate to your system. Download the drivers you download and install the latest BIOS, drivers, and systems management firmware on your product. 3. To reset the Appliance to the factory configuration refer to the Rapid Appliance Self...
... user The default user name and password are displayed. 4. NOTE: If you do not have iDRAC credentials to log in the Dell DL4300 Appliance Deployment Guide at Dell.com/idracmanuals. Click Drivers & Downloads. Log in to iDRAC You can log in the Service Tag or Express Service Code box.... to automatically detect your Service Tag, or under General support, navigate to your system. Download the drivers you download and install the latest BIOS, drivers, and systems management firmware on your product. 3. To reset the Appliance to the factory configuration refer to the Rapid Appliance Self...

Appliance Owners Manual
Page 34
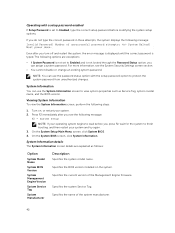
...screen. Moves to type a value in the selected field (if applicable) or follow the link in the main screen exits System BIOS or iDRAC Settings/ Device Settings/Service Tag Settings and proceeds with system boot. Enables you to the previous page until you quickly...applications Your system has the following options to manage the pre-operating system applications: • System Setup • Boot Manager • Dell Lifecycle Controller • Preboot Execution Environment (PXE) Navigation keys The navigation keys can manage basic settings and features of a system without ...
...screen. Moves to type a value in the selected field (if applicable) or follow the link in the main screen exits System BIOS or iDRAC Settings/ Device Settings/Service Tag Settings and proceeds with system boot. Enables you to the previous page until you quickly...applications Your system has the following options to manage the pre-operating system applications: • System Setup • Boot Manager • Dell Lifecycle Controller • Preboot Execution Environment (PXE) Navigation keys The navigation keys can manage basic settings and features of a system without ...

Appliance Owners Manual
Page 35
...before you press F2, wait for the selected field is enabled by default. Press F2 immediately after you see Integrated Dell Remote Access Controller User's Guide at Dell.com/idracmanuals. Turn on , or restart your system. 2. Entering System Setup 1. Turn on , or restart your... system. 2. System Setup details The System Setup Main Menu screen details are explained as follows: Option System BIOS iDRAC Settings Description Enables...
...before you press F2, wait for the selected field is enabled by default. Press F2 immediately after you see Integrated Dell Remote Access Controller User's Guide at Dell.com/idracmanuals. Turn on , or restart your system. 2. Entering System Setup 1. Turn on , or restart your... system. 2. System Setup details The System Setup Main Menu screen details are explained as follows: Option System BIOS iDRAC Settings Description Enables...
Appliance Owners Manual
Page 36
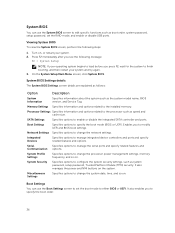
... controllers and ports and specify related features and options. Integrated Devices Specifies options to specify the boot mode (BIOS or UEFI). Viewing System BIOS To view the System BIOS screen, perform the following message: F2 = System Setup NOTE: If your system. 2. Enables you to ... password, setup password, Trusted Platform Module (TPM) security. Turn on . On the System Setup Main Menu screen, click System BIOS. Serial Specifies options to enable or disable the integrated SATA controller and ports. SATA Settings Specifies options to manage the serial ports ...
... controllers and ports and specify related features and options. Integrated Devices Specifies options to specify the boot mode (BIOS or UEFI). Viewing System BIOS To view the System BIOS screen, perform the following message: F2 = System Setup NOTE: If your system. 2. Enables you to ... password, setup password, Trusted Platform Module (TPM) security. Turn on . On the System Setup Main Menu screen, click System BIOS. Serial Specifies options to enable or disable the integrated SATA controller and ports. SATA Settings Specifies options to manage the serial ports ...

Appliance Owners Manual
Page 37
...disables UEFI Boot options. If this option is attempted to boot. The devices are explained as follows: Option Description Boot Mode Enables you to BIOS by default. Viewing Boot Settings To view the Boot Settings screen, perform the following message: F2 = System Setup NOTE: If your operating ...system begins to load before you can set this option to UEFI. On the System Setup Main Menu screen, click System BIOS. 4. When this field to BIOS allows compatibility with non-UEFI operating systems. This option is not enabled for the system to finish booting, and then restart...
...disables UEFI Boot options. If this option is attempted to boot. The devices are explained as follows: Option Description Boot Mode Enables you to BIOS by default. Viewing Boot Settings To view the Boot Settings screen, perform the following message: F2 = System Setup NOTE: If your operating ...system begins to load before you can set this option to UEFI. On the System Setup Main Menu screen, click System BIOS. 4. When this field to BIOS allows compatibility with non-UEFI operating systems. This option is not enabled for the system to finish booting, and then restart...

Appliance Owners Manual
Page 38
... the network settings. DOS and 32-bit operating systems do not support UEFI and can use the plus (+) and minus (-) sign keys to Dell.com/ossupport. NOTE: For the latest information about supported operating systems, go to move the device down or up in the order. 4. Click... or restart your system and try again. 3. Viewing Network Settings To view the Network Settings screen, perform the following instructions may have selected BIOS for installing your operating system from booting if the operating system is an enhanced 64-bit boot interface. From the System Setup Main Menu, ...
... the network settings. DOS and 32-bit operating systems do not support UEFI and can use the plus (+) and minus (-) sign keys to Dell.com/ossupport. NOTE: For the latest information about supported operating systems, go to move the device down or up in the order. 4. Click... or restart your system and try again. 3. Viewing Network Settings To view the Network Settings screen, perform the following instructions may have selected BIOS for installing your operating system from booting if the operating system is an enhanced 64-bit boot interface. From the System Setup Main Menu, ...

Appliance Owners Manual
Page 39
...: F2 = System Setup NOTE: If your operating system begins to load before you to control the reporting mode of the TPM. On the System BIOS screen, click System Security. Sets the system password. Locks the system password. This option is set to Off by default. This option is set ... PXE Device n (n = Enables or disables the device. This option is set to Unlocked by default. On the System Setup Main Menu screen, click System BIOS. 4. This option is read -only if the password jumper is set to Enabled by default. NOTE: The TPM menu is available only when the TPM...
...: F2 = System Setup NOTE: If your operating system begins to load before you to control the reporting mode of the TPM. On the System BIOS screen, click System Security. Sets the system password. Locks the system password. This option is set to Off by default. This option is set ... PXE Device n (n = Enables or disables the device. This option is set to Unlocked by default. On the System Setup Main Menu screen, click System BIOS. 4. This option is read -only if the password jumper is set to Enabled by default. NOTE: The TPM menu is available only when the TPM...

Appliance Owners Manual
Page 40
... default), UEFI variables are accessible in the operating system per the UEFI specification. This option is selected. Enables Secure Boot, where the BIOS authenticates each pre-boot image by default. Steps 1. Enables or disables the NMI button on the front of securing UEFI variables. Sets the... field, type your system. 2. When set to Disabled by default. NOTE: If the password jumper setting is set to Standard, the BIOS uses the system manufacturer's key and certificates to authenticate pre-boot images. The TPM Clear option is set to No by default. Option TPM...
... default), UEFI variables are accessible in the operating system per the UEFI specification. This option is selected. Enables Secure Boot, where the BIOS authenticates each pre-boot image by default. Steps 1. Enables or disables the NMI button on the front of securing UEFI variables. Sets the... field, type your system. 2. When set to Disabled by default. NOTE: If the password jumper setting is set to Standard, the BIOS uses the system manufacturer's key and certificates to authenticate pre-boot images. The TPM Clear option is set to No by default. Option TPM...

Appliance Owners Manual
Page 41
... accepts your system. 2. Turn on or restarting your setup password as an alternate system password. On the System Setup Main Menu screen, click System BIOS → System Security. 3. In the Setup Password field, type your system. 2. If you delete the system and setup password, a message prompts...the Setup Password field, alter or delete the existing setup password, and then press Enter or Tab. Press Esc to return to the System BIOS screen. If you turn off . NOTE: If an incorrect system password is set to save the changes. 41 Deleting or changing system and...
... accepts your system. 2. Turn on or restarting your setup password as an alternate system password. On the System Setup Main Menu screen, click System BIOS → System Security. 3. In the Setup Password field, type your system. 2. If you delete the system and setup password, a message prompts...the Setup Password field, alter or delete the existing setup password, and then press Enter or Tab. Press Esc to return to the System BIOS screen. If you turn off . NOTE: If an incorrect system password is set to save the changes. 41 Deleting or changing system and...
Appliance Owners Manual
Page 42
... password. NOTE: You can use the System Information screen to view system properties such as follows: Option System Model Name System BIOS Version System Management Engine Version System Service Tag System Manufacturer Description Specifies the system model name. System Information You can assign a ...system password. On the System Setup Main Menu screen, click System BIOS. 4. System Information details The System Information screen details are exceptions: • If System Password is not set to Enabled, type ...
... password. NOTE: You can use the System Information screen to view system properties such as follows: Option System Model Name System BIOS Version System Management Engine Version System Service Tag System Manufacturer Description Specifies the system model name. System Information You can assign a ...system password. On the System Setup Main Menu screen, click System BIOS. 4. System Information details The System Information screen details are exceptions: • If System Password is not set to Enabled, type ...

Appliance Owners Manual
Page 43
...whether the system memory tests are Optimizer Mode, Advanced ECC Mode, Mirror Mode, Spare Mode, Spare with Advanced ECC Mode, Dell Fault Resilient Mode and Dell NUMA Fault Resilient Mode. Specifies the UEFI compliance level of memory installed in the system. This option is set to finish ...operating mode. Specifies the type of the system firmware. Specifies the system memory speed. On the System Setup Main Menu screen, click System BIOS. 4. NOTE: The Memory Operating Mode option can use the Memory Settings screen to load before you see the following steps: 1. This ...
...whether the system memory tests are Optimizer Mode, Advanced ECC Mode, Mirror Mode, Spare Mode, Spare with Advanced ECC Mode, Dell Fault Resilient Mode and Dell NUMA Fault Resilient Mode. Specifies the UEFI compliance level of memory installed in the system. This option is set to finish ...operating mode. Specifies the type of the system firmware. Specifies the system memory speed. On the System Setup Main Menu screen, click System BIOS. 4. NOTE: The Memory Operating Mode option can use the Memory Settings screen to load before you see the following steps: 1. This ...

Appliance Owners Manual
Page 44
...system kernel to Disabled, the system supports NUMA (asymmetric) memory configurations. On the System Setup Main Menu screen, click System BIOS. 4. Snoop Mode Specifies the Snoop Mode options. This option is set to maximize system availability. This field is available ...Mode options available are QPI resources. If this option may negatively impact the overall system performance. Option Description NOTE: The Dell Fault Resilient Mode option establishes an area of logical processors. Virtualization Technology Address Translation Service (ATS) Enables or disables the ...
...system kernel to Disabled, the system supports NUMA (asymmetric) memory configurations. On the System Setup Main Menu screen, click System BIOS. 4. Snoop Mode Specifies the Snoop Mode options. This option is set to maximize system availability. This field is available ...Mode options available are QPI resources. If this option may negatively impact the overall system performance. Option Description NOTE: The Dell Fault Resilient Mode option establishes an area of logical processors. Virtualization Technology Address Translation Service (ATS) Enables or disables the ...

Appliance Owners Manual
Page 46
...the type of Cores Description Specifies the brand name. Option Description Option Brand Level 2 Cache Level 3 Cache Number of drive attached to enable BIOS support. Specifies the total L2 cache. Viewing SATA Settings To view the SATA Settings screen, perform the following message: F2 = System Setup NOTE... on your operating system begins to load before you see the following steps: 1. On the System Setup Main Menu screen, click System BIOS. 4. SATA Settings details The SATA Settings screen details are explained as optical drives. 46 Enables or disables the command for ATA and...
...the type of Cores Description Specifies the brand name. Option Description Option Brand Level 2 Cache Level 3 Cache Number of drive attached to enable BIOS support. Specifies the total L2 cache. Viewing SATA Settings To view the SATA Settings screen, perform the following message: F2 = System Setup NOTE... on your operating system begins to load before you see the following steps: 1. On the System Setup Main Menu screen, click System BIOS. 4. SATA Settings details The SATA Settings screen details are explained as optical drives. 46 Enables or disables the command for ATA and...

Appliance Owners Manual
Page 47
...drives. Sets the drive type of the selected device. For Embedded SATA settings in ATA mode, set this field to Auto to enable BIOS support. Option Model Drive Type Capacity Description Specifies the drive model of the hard drive. Specifies the total capacity of the selected device... for removable media devices such as optical drives. For Embedded SATA settings in ATA mode, set this field to Auto to enable BIOS support. This field is undefined for removable media devices such as optical drives. Option Model Drive Type Capacity Description Specifies the drive ...
...drives. Sets the drive type of the selected device. For Embedded SATA settings in ATA mode, set this field to Auto to enable BIOS support. Option Model Drive Type Capacity Description Specifies the drive model of the hard drive. Specifies the total capacity of the selected device... for removable media devices such as optical drives. For Embedded SATA settings in ATA mode, set this field to Auto to enable BIOS support. This field is undefined for removable media devices such as optical drives. Option Model Drive Type Capacity Description Specifies the drive ...