Quick Reference Guide
Page 3
Contents Finding Information 5 Setting Up Your Computer 9 About Your Computer 10 Front View 10 Left Side View 11 Right Side View 11 Back View 12 Bottom View 12 Using a Battery 13 Battery Performance 13 Checking the Battery Charge 14 Charging the Battery 15 Removing the Battery 15 Storing a Battery 16 Troubleshooting 17 Lockups and Software Problems 17 Dell Diagnostics 18 Index 23 Contents 3
Contents Finding Information 5 Setting Up Your Computer 9 About Your Computer 10 Front View 10 Left Side View 11 Right Side View 11 Back View 12 Bottom View 12 Using a Battery 13 Battery Performance 13 Checking the Battery Charge 14 Charging the Battery 15 Removing the Battery 15 Storing a Battery 16 Troubleshooting 17 Lockups and Software Problems 17 Dell Diagnostics 18 Index 23 Contents 3
Quick Reference Guide
Page 13
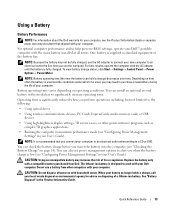
... which it is low (see "Configuring Power Management Settings" in the Product Information Guide. Battery operating time varies depending on page 14). NOTE: It is supplied as complex 3D graphics applications • Running the computer in maximum performance mode (see "Configuring Power Management... Settings" in the media bay to work with your Dell™ portable computer with your computer. One battery is recommended that shipped with the main battery installed at all times. CAUTION: ...
... which it is low (see "Configuring Power Management Settings" in the Product Information Guide. Battery operating time varies depending on page 14). NOTE: It is supplied as complex 3D graphics applications • Running the computer in maximum performance mode (see "Configuring Power Management... Settings" in the media bay to work with your Dell™ portable computer with your computer. One battery is recommended that shipped with the main battery installed at all times. CAUTION: ...
Quick Reference Guide
Page 14
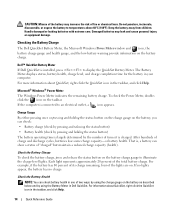
... Battery Meter displays status, battery health, charge level, and charge completion time for the battery in the taskbar, and click Help. 14 Quick Reference Guide That is installed, press to temperatures above 60°C (140°F). Check the Battery Health NOTE: You can ...low-battery warning provide information on the taskbar. If the computer is charged. For information about QuickSet, right-click the QuickSet icon in Dell QuickSet. For more information about QuickSet, right-click the QuickSet icon in your computer. Charge Gauge By either pressing once or pressing and ...
... Battery Meter displays status, battery health, charge level, and charge completion time for the battery in the taskbar, and click Help. 14 Quick Reference Guide That is installed, press to temperatures above 60°C (140°F). Check the Battery Health NOTE: You can ...low-battery warning provide information on the taskbar. If the computer is charged. For information about QuickSet, right-click the QuickSet icon in Dell QuickSet. For more information about QuickSet, right-click the QuickSet icon in your computer. Charge Gauge By either pressing once or pressing and ...
Quick Reference Guide
Page 23
Index A anti-virus software, 18 B battery charge gauge, 14 charging, 15 checking the charge, 14 performance, 13 power meter, 14 removing, 15 storing, 16 C CDs operating system, 8 computer crashes, 17 slow performance, 18 stops responding, 17 D Dell Diagnostics about, 18 starting from the Drivers and Utilities media, 19 starting from the hard drive, 19 using...
Index A anti-virus software, 18 B battery charge gauge, 14 charging, 15 checking the charge, 14 performance, 13 power meter, 14 removing, 15 storing, 16 C CDs operating system, 8 computer crashes, 17 slow performance, 18 stops responding, 17 D Dell Diagnostics about, 18 starting from the Drivers and Utilities media, 19 starting from the hard drive, 19 using...
User's Guide
Page 9
... System Setup Screens 136 System Setup Screens 136 Commonly Used Options 136 Changing the Boot Sequence 136 Changing Printer Modes 138 Changing COM Ports 138 14 Reinstalling Software 139 Drivers 139 What Is a Driver 139 Identifying Drivers 139 Reinstalling Drivers and Utilities 140 9
... System Setup Screens 136 System Setup Screens 136 Commonly Used Options 136 Changing the Boot Sequence 136 Changing Printer Modes 138 Changing COM Ports 138 14 Reinstalling Software 139 Drivers 139 What Is a Driver 139 Identifying Drivers 139 Reinstalling Drivers and Utilities 140 9
User's Guide
Page 14
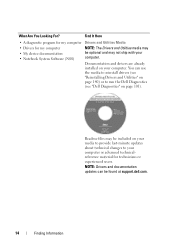
... or advanced technicalreference material for my computer NOTE: The Drivers and Utilities media may • My device documentation • Notebook System Software (NSS) be optional and may be found at support.dell.com. 14 Finding Information Readme files may not ship with your computer. Documentation and drivers are already installed on page 101...
... or advanced technicalreference material for my computer NOTE: The Drivers and Utilities media may • My device documentation • Notebook System Software (NSS) be optional and may be found at support.dell.com. 14 Finding Information Readme files may not ship with your computer. Documentation and drivers are already installed on page 101...
User's Guide
Page 65
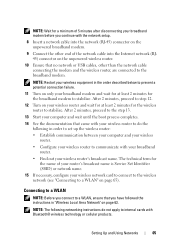
... 2 minutes for the broadband modem to stabilize. After 2 minutes, proceed to the step 13. 13 Start your computer and wait until the boot process completes. 14 See the documentation that no network or USB cables, other than the network cable connecting the modem and the wireless router, are connected to the...
... 2 minutes for the broadband modem to stabilize. After 2 minutes, proceed to the step 13. 13 Start your computer and wait until the boot process completes. 14 See the documentation that no network or USB cables, other than the network cable connecting the modem and the wireless router, are connected to the...
User's Guide
Page 135
... settings • System security and hard-drive password settings NOTE: Unless you are an expert computer user or are directed to do so by Dell technical support, do not change user-selectable features-for example, your computer password • To verify information about the computer's current configuration, such... as follows: • To set through the system setup program.) For more information on configuring features for your computer work incorrectly. 14 System Setup Program Overview NOTE: Your operating system may want to write down the information for future reference.
... settings • System security and hard-drive password settings NOTE: Unless you are an expert computer user or are directed to do so by Dell technical support, do not change user-selectable features-for example, your computer password • To verify information about the computer's current configuration, such... as follows: • To set through the system setup program.) For more information on configuring features for your computer work incorrectly. 14 System Setup Program Overview NOTE: Your operating system may want to write down the information for future reference.

User's Guide
Page 187
...): WXGA WXGA+ Keyboard Number of keys Layout Touch Pad X/Y position resolution (graphics table mode) Size: Width Height Track Stick X/Y position resolution (graphics table mode) 358.14 mm (14.1 inches) 0° (closed) to 180° 40/40° 15/30° 40/40° 15/30° 0.2373 0.2109 6.2 W (max) with no inverter...
...): WXGA WXGA+ Keyboard Number of keys Layout Touch Pad X/Y position resolution (graphics table mode) Size: Width Height Track Stick X/Y position resolution (graphics table mode) 358.14 mm (14.1 inches) 0° (closed) to 180° 40/40° 15/30° 40/40° 15/30° 0.2373 0.2109 6.2 W (max) with no inverter...

User's Guide
Page 188
Track Stick (continued) Size Battery Type Dimensions 4-cell and 6-cell lithium-ion batteries: Depth Height 9-cell lithium-ion batteries: Depth Height Weight Voltage protrudes 0.5 mm higher than surrounding keycaps 9-cell "smart" lithium ion (85 WHr) 6-cell "smart" lithium ion (56 WHr) 4-cell "smart" lithium ion (35 WHr) 185.22 66.6 mm (2.62 inches) 19.2 mm (0.76 inch) 93.3 mm (3.67 inches) 20.59 m (0.81 inch) 0.51 kg (1.12 lb) (9 cell) 0.33 kg (0.73 lb) (6 cell) 0.24 kg (0.53 lb) (4 cell) 11.1 VDC (6 cell and 9 cell) 14.8 VDC (4 cell) 188Specifications
Track Stick (continued) Size Battery Type Dimensions 4-cell and 6-cell lithium-ion batteries: Depth Height 9-cell lithium-ion batteries: Depth Height Weight Voltage protrudes 0.5 mm higher than surrounding keycaps 9-cell "smart" lithium ion (85 WHr) 6-cell "smart" lithium ion (56 WHr) 4-cell "smart" lithium ion (35 WHr) 185.22 66.6 mm (2.62 inches) 19.2 mm (0.76 inch) 93.3 mm (3.67 inches) 20.59 m (0.81 inch) 0.51 kg (1.12 lb) (9 cell) 0.33 kg (0.73 lb) (6 cell) 0.24 kg (0.53 lb) (4 cell) 11.1 VDC (6 cell and 9 cell) 14.8 VDC (4 cell) 188Specifications

Service Manual
Page 3
DellTM XFR D630 Fully Rugged Notebook Service Manual Table of Contents 1 BEFORE YOU BEGIN ...6 1.1 RECOMMENDED TOOLS ...6 1.2 TURNING OFF YOUR COMPUTER 6 1.3 BEFORE WORKING INSIDE YOUR COMPUTER 6 1.4 SCREW CHART ...8 2 XBAY DEVICES ...13 3 HARD DRIVE...14 4 STYLUS, TETHER AND CLIP (DIRECTVUE TOUCH SCREEN DISPLAY OPTION) ... 17 4.1 REPLACING THE STYLUS CLIP 17 4.2 REPLACING THE STYLUS 19 5 HANDLE...19...
DellTM XFR D630 Fully Rugged Notebook Service Manual Table of Contents 1 BEFORE YOU BEGIN ...6 1.1 RECOMMENDED TOOLS ...6 1.2 TURNING OFF YOUR COMPUTER 6 1.3 BEFORE WORKING INSIDE YOUR COMPUTER 6 1.4 SCREW CHART ...8 2 XBAY DEVICES ...13 3 HARD DRIVE...14 4 STYLUS, TETHER AND CLIP (DIRECTVUE TOUCH SCREEN DISPLAY OPTION) ... 17 4.1 REPLACING THE STYLUS CLIP 17 4.2 REPLACING THE STYLUS 19 5 HANDLE...19...

Service Manual
Page 4
DellTM XFR D630 Fully Rugged Notebook Service Manual 10.10 INSTALLING THE DISPLAY LATCH 68 11 INTERNAL CARD WITH BLUETOOTH® WIRELESS TECHNOLOGY 68 11.1 REMOVING THE BLUETOOTH® WIRELESS CARD ...) CARD 75 13 COIN-CELL BATTERY 76 13.1 REMOVING THE COIN-CELL BATTERY 76 13.2 INSTALLING THE COIN-CELL BATTERY 77 14 PALM REST...78 14.1 REMOVING THE PALM REST 78 14.2 INSTALLING THE PALM REST 80 15 WIRELESS LOCAL AREA NETWORK (WLAN) CARDS 81 15.1 REMOVING THE WLAN CARD 81 15.2 INSTALLING...
DellTM XFR D630 Fully Rugged Notebook Service Manual 10.10 INSTALLING THE DISPLAY LATCH 68 11 INTERNAL CARD WITH BLUETOOTH® WIRELESS TECHNOLOGY 68 11.1 REMOVING THE BLUETOOTH® WIRELESS CARD ...) CARD 75 13 COIN-CELL BATTERY 76 13.1 REMOVING THE COIN-CELL BATTERY 76 13.2 INSTALLING THE COIN-CELL BATTERY 77 14 PALM REST...78 14.1 REMOVING THE PALM REST 78 14.2 INSTALLING THE PALM REST 80 15 WIRELESS LOCAL AREA NETWORK (WLAN) CARDS 81 15.1 REMOVING THE WLAN CARD 81 15.2 INSTALLING...

Service Manual
Page 9
DellTM XFR D630 Fully Rugged Notebook Service Manual 18815 XFR LCD ASSY TOUCH SCREEN 4 18802 PALMREST ASSY 11 18043 ASSY HANDLE WITH HOLDER 2 18619 LCD LATCH ASSY 2 18416 18044 18824 SCR,... 18813 18814 18034 9999-8024 HDD DOOR ASSY RJ DOOR ASSY USB PLASTIC DOOR ASSY FAN ASSY PCMCIA HOLDER 4 3 12 1 3 1 18420 PAN HEAD SCREW M2.5 X 14 -BLACK 1 18802 PALMREST ASSY 1 18423 CSK SCREW M2 X 5 -BLACK 22 Page 9 of 106 Revision A01
DellTM XFR D630 Fully Rugged Notebook Service Manual 18815 XFR LCD ASSY TOUCH SCREEN 4 18802 PALMREST ASSY 11 18043 ASSY HANDLE WITH HOLDER 2 18619 LCD LATCH ASSY 2 18416 18044 18824 SCR,... 18813 18814 18034 9999-8024 HDD DOOR ASSY RJ DOOR ASSY USB PLASTIC DOOR ASSY FAN ASSY PCMCIA HOLDER 4 3 12 1 3 1 18420 PAN HEAD SCREW M2.5 X 14 -BLACK 1 18802 PALMREST ASSY 1 18423 CSK SCREW M2 X 5 -BLACK 22 Page 9 of 106 Revision A01

Service Manual
Page 12
DellTM XFR D630 Fully Rugged Notebook Service Manual 18451 18802 18477 18802 18043 18803 18819 18517 18044 18535 18623 18816 18539 18629 18550 18824 PAN HEAD SCREW M2 X 8-BLACK PALMREST ASSY PANHEAD SCREW M2X4 PALMREST ASSY ASSY HANDLE WITH HOLDER RF PASS THROUGH LCD TOP COVER ASSY SCR,M3X6,PHH,MSCR,ZPS,XFR ASSY HANDLE CSK CAPTIVE SCREW M2 X 6 KEYBOARD ASSY HINGE COVER ASSY PAN HEAD SCREW M3 X 14 -BLACK STYLUS KIT ASSY PAN HEAD SCREW M3 X 22 -BLACK SHOULDER STRAP ASSY 1 1 1 9 4 2 2 2 2 19 15 4 1 1 2 2 18590 SCREW,KYBD BLK, PAN HEAD M2X3 19 Page 12 of 106 Revision A01
DellTM XFR D630 Fully Rugged Notebook Service Manual 18451 18802 18477 18802 18043 18803 18819 18517 18044 18535 18623 18816 18539 18629 18550 18824 PAN HEAD SCREW M2 X 8-BLACK PALMREST ASSY PANHEAD SCREW M2X4 PALMREST ASSY ASSY HANDLE WITH HOLDER RF PASS THROUGH LCD TOP COVER ASSY SCR,M3X6,PHH,MSCR,ZPS,XFR ASSY HANDLE CSK CAPTIVE SCREW M2 X 6 KEYBOARD ASSY HINGE COVER ASSY PAN HEAD SCREW M3 X 14 -BLACK STYLUS KIT ASSY PAN HEAD SCREW M3 X 22 -BLACK SHOULDER STRAP ASSY 1 1 1 9 4 2 2 2 2 19 15 4 1 1 2 2 18590 SCREW,KYBD BLK, PAN HEAD M2X3 19 Page 12 of 106 Revision A01

Service Manual
Page 14
...device into the XBay until it clicks into place. 3 Hard Drive CAUTION: If you remove the hard drive from sources other than Dell. NOTE: You need the Drivers and Utilities media for hard drives from the computer when the drive is on the new hard ... CAUTION: Before working inside your computer, follow the safety instructions in the XFR D630 Product Information Guide and in the hard disk drive compartment: 1. even a slight bump can damage the drive. Page 14 of the XBay. DellTM XFR D630 Fully Rugged Notebook Service Manual 1 Optical drive 2 Device Latch release 4.
...device into the XBay until it clicks into place. 3 Hard Drive CAUTION: If you remove the hard drive from sources other than Dell. NOTE: You need the Drivers and Utilities media for hard drives from the computer when the drive is on the new hard ... CAUTION: Before working inside your computer, follow the safety instructions in the XFR D630 Product Information Guide and in the hard disk drive compartment: 1. even a slight bump can damage the drive. Page 14 of the XBay. DellTM XFR D630 Fully Rugged Notebook Service Manual 1 Optical drive 2 Device Latch release 4.

Service Manual
Page 78
Follow the instructions in the XFR D630 User's Guide. Remove the keyboard (see XBay Devices). 16H 4. Remove the five screws from the system board (see...Remove the display assembly (see Removing the Hinge Cover). 165H 3. DellTM XFR D630 Fully Rugged Notebook Service Manual 14 Palm Rest CAUTION: Before working inside your computer, follow the safety instructions in the XFR D630 Product Information Guide and in Before You Begin. 164H 2. Disconnect the coin-... need to remove the coin-cell battery and place it in place (on the back of the computer). 14.1 Removing the Palm Rest 1.
Follow the instructions in the XFR D630 User's Guide. Remove the keyboard (see XBay Devices). 16H 4. Remove the five screws from the system board (see...Remove the display assembly (see Removing the Hinge Cover). 165H 3. DellTM XFR D630 Fully Rugged Notebook Service Manual 14 Palm Rest CAUTION: Before working inside your computer, follow the safety instructions in the XFR D630 Product Information Guide and in Before You Begin. 164H 2. Disconnect the coin-... need to remove the coin-cell battery and place it in place (on the back of the computer). 14.1 Removing the Palm Rest 1.
Service Manual
Page 80
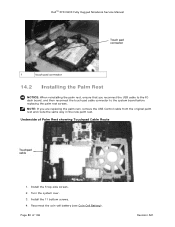
...-Cell Battery). 172H Page 80 of Palm Rest showing Touchpad Cable Route Touchpad cable 1. Turn the system over. 3. DellTM XFR D630 Fully Rugged Notebook Service Manual Touch pad connector 1 touch pad connector 14.2 Installing the Palm Rest NOTICE: When reinstalling the palm rest, ensure that you are replacing the palm rest, remove the...
...-Cell Battery). 172H Page 80 of Palm Rest showing Touchpad Cable Route Touchpad cable 1. Turn the system over. 3. DellTM XFR D630 Fully Rugged Notebook Service Manual Touch pad connector 1 touch pad connector 14.2 Installing the Palm Rest NOTICE: When reinstalling the palm rest, ensure that you are replacing the palm rest, remove the...

Service Manual
Page 96
Page 96 of 106 Revision A01 Remove the processor (see Removing the Processor Thermal- 275H Cooling Assembly). 13. WLAN Connector Fan Connector Modem Connector Speaker Connector 17. Disconnect the cables near the WLAN card and the modem connector from the system board. 16. DellTM XFR D630 Fully Rugged Notebook Service Manual 1 1 smart card slot 12. Remove the four M2.5 x 5-mm screws (labeled with silver triangles on the system board). Remove the processor thermal-cooling assembly (see Removing the Processor). 276H 14. Disconnect the fan cable from the system board.
Page 96 of 106 Revision A01 Remove the processor (see Removing the Processor Thermal- 275H Cooling Assembly). 13. WLAN Connector Fan Connector Modem Connector Speaker Connector 17. Disconnect the cables near the WLAN card and the modem connector from the system board. 16. DellTM XFR D630 Fully Rugged Notebook Service Manual 1 1 smart card slot 12. Remove the four M2.5 x 5-mm screws (labeled with silver triangles on the system board). Remove the processor thermal-cooling assembly (see Removing the Processor). 276H 14. Disconnect the fan cable from the system board.
Service Manual
Page 100
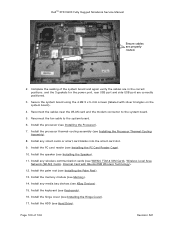
... 7. Install the processor (see Keyboards). 28H 16. Install the memory module (see Installing the Hinge Cover). 289H 17. Install the hinge cover (see Memory). 286H 14. Install the PC card reader (see Installing the Palm Rest). 285H 13. Install the palm rest (see Installing the PC Card Reader Cage). 280H 10...
... 7. Install the processor (see Keyboards). 28H 16. Install the memory module (see Installing the Hinge Cover). 289H 17. Install the hinge cover (see Memory). 286H 14. Install the PC card reader (see Installing the Palm Rest). 285H 13. Install the palm rest (see Installing the PC Card Reader Cage). 280H 10...


