User's Guide
Page 215
... storms. SVGA - T TAPI - text editor - A program used to attach a TV or digital audio device to configure user-selectable options in the BIOS, such as the motherboard. for video cards and controllers. Strike Zone™ - S-video TV-out - A connector used to create and edit files that supports resolutions up to operate with...
... storms. SVGA - T TAPI - text editor - A program used to attach a TV or digital audio device to configure user-selectable options in the BIOS, such as the motherboard. for video cards and controllers. Strike Zone™ - S-video TV-out - A connector used to create and edit files that supports resolutions up to operate with...

Service Manual
Page 11
DellTM XFR D630 Fully Rugged Notebook Service Manual 18808 18812 18428 18815 18808 18802 18813 18814 18429 18810 18807 18630 18809 18631 18632 18628 18444 18815 18803 VGA DOOR ASSY DVD DOOR ASSY CSK SCREW M2 X 8 -BLACK XFR LCD ASSY TOUCH SCREEN VGA DOOR ASSY PALMREST ASSY RJ DOOR ASSY USB PLASTIC DOOR ASSY CSK SCREW M2 X 6 -BLACK HDD DOOR ASSY BATTERY DOOR ASSY USB SIDE DOOR ASSY DIMMS DOOR ASSY POWER DOOR ASSY PCMCIA DOOR ASSY RUBBER KEYBOARD ASSY SCR,M2.5X5,PHH,TF,BCS XFR LCD ASSY TOUCH SCREEN MOTHERBOARD TO CHASSIS 1 2 2 2 10 2 2 2 2 2 2 30 4 2 3 15 10 6 4 Page 11 of 106 Revision A01
DellTM XFR D630 Fully Rugged Notebook Service Manual 18808 18812 18428 18815 18808 18802 18813 18814 18429 18810 18807 18630 18809 18631 18632 18628 18444 18815 18803 VGA DOOR ASSY DVD DOOR ASSY CSK SCREW M2 X 8 -BLACK XFR LCD ASSY TOUCH SCREEN VGA DOOR ASSY PALMREST ASSY RJ DOOR ASSY USB PLASTIC DOOR ASSY CSK SCREW M2 X 6 -BLACK HDD DOOR ASSY BATTERY DOOR ASSY USB SIDE DOOR ASSY DIMMS DOOR ASSY POWER DOOR ASSY PCMCIA DOOR ASSY RUBBER KEYBOARD ASSY SCR,M2.5X5,PHH,TF,BCS XFR LCD ASSY TOUCH SCREEN MOTHERBOARD TO CHASSIS 1 2 2 2 10 2 2 2 2 2 2 30 4 2 3 15 10 6 4 Page 11 of 106 Revision A01

Service Manual
Page 13
..., remove the device locking screw from the bottom of 106 Revision A01 DellTM XFR D630 Fully Rugged Notebook Service Manual 18815 XFR LCD ASSY TOUCH SCREEN 8 18802 PALMREST ASSY 2 18803 CARD CAGE ON BASE CHASSIS 4 18623 KEYBOARD ASSY 3 18823 MOTHERBOARD ASSY 2 18591 18802 PAN HEAD SCREW M2.5X8 PALMREST ASSY 2 2 18634 JACK SCREW...
..., remove the device locking screw from the bottom of 106 Revision A01 DellTM XFR D630 Fully Rugged Notebook Service Manual 18815 XFR LCD ASSY TOUCH SCREEN 8 18802 PALMREST ASSY 2 18803 CARD CAGE ON BASE CHASSIS 4 18623 KEYBOARD ASSY 3 18823 MOTHERBOARD ASSY 2 18591 18802 PAN HEAD SCREW M2.5X8 PALMREST ASSY 2 2 18634 JACK SCREW...

Service Manual
Page 16
NOTICE: Use firm and even pressure to assist in removing the hard disk drive from the motherboard. 7. Page 16 of 106 Revision A01 Remove the compartment cover from its packaging. Locate the tab on the hard disk drive and pull it in ... slide the drive into place. Remove the new drive from the computer. 6. NOTICE: When the hard drive is not in protective antistatic packaging. 8. DellTM XFR D630 Fully Rugged Notebook Service Manual 5. Save the original packaging for storing or shipping the hard drive. If you use excessive force, you may damage the connector.
NOTICE: Use firm and even pressure to assist in removing the hard disk drive from the motherboard. 7. Page 16 of 106 Revision A01 Remove the compartment cover from its packaging. Locate the tab on the hard disk drive and pull it in ... slide the drive into place. Remove the new drive from the computer. 6. NOTICE: When the hard drive is not in protective antistatic packaging. 8. DellTM XFR D630 Fully Rugged Notebook Service Manual 5. Save the original packaging for storing or shipping the hard drive. If you use excessive force, you may damage the connector.

Service Manual
Page 41
... right-side up and open it. 3. Follow the instructions in image below) around the keyboard. Attach the keyboard cable to the motherboard. 2. Page 41 of the computer). 1. DellTM XFR D630 Fully Rugged Notebook Service Manual 8.1.2 Installing the Standard Keyboard 1. Remove the top and bottom metal brackets. Remove the hinge cover (see Installing the...
... right-side up and open it. 3. Follow the instructions in image below) around the keyboard. Attach the keyboard cable to the motherboard. 2. Page 41 of the computer). 1. DellTM XFR D630 Fully Rugged Notebook Service Manual 8.1.2 Installing the Standard Keyboard 1. Remove the top and bottom metal brackets. Remove the hinge cover (see Installing the...
Service Manual
Page 44
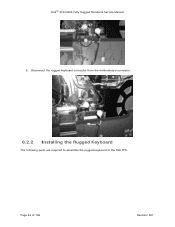
DellTM XFR D630 Fully Rugged Notebook Service Manual 9. Disconnect the rugged keyboard connector from the motherboard connector. 8.2.2 Installing the Rugged Keyboard The following parts are required to assemble the rugged keyboard to the Dell XFR. Page 44 of 106 Revision A01
DellTM XFR D630 Fully Rugged Notebook Service Manual 9. Disconnect the rugged keyboard connector from the motherboard connector. 8.2.2 Installing the Rugged Keyboard The following parts are required to assemble the rugged keyboard to the Dell XFR. Page 44 of 106 Revision A01
Service Manual
Page 56
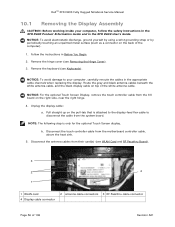
... touch controller cable from the system board. Pull straight up on top of the computer). 1. Disconnect the antenna cables from the motherboard controller cable, above the heat sink. 5. NOTE: The following step is attached to the display-feed flex cable to your computer... display. Unplug the display cable: a. Follow the instructions in the appropriate cable channels when replacing the display. DellTM XFR D630 Fully Rugged Notebook Service Manual 10.1 Removing the Display Assembly CAUTION: Before working inside your computer, carefully reroute the cables in Before You Begin...
... touch controller cable from the system board. Pull straight up on top of the computer). 1. Disconnect the antenna cables from the motherboard controller cable, above the heat sink. 5. NOTE: The following step is attached to the display-feed flex cable to your computer... display. Unplug the display cable: a. Follow the instructions in the appropriate cable channels when replacing the display. DellTM XFR D630 Fully Rugged Notebook Service Manual 10.1 Removing the Display Assembly CAUTION: Before working inside your computer, carefully reroute the cables in Before You Begin...

Service Manual
Page 61
Attach the display-feed flex cable to the motherboard controller cable, above the heat sink. 7. Page 61 of the computer, install the two M2.5 x 8-mm screws. 3. NOTE: The following step is only for the ... system board. Connect the antenna cables to their routing guides. 3 1 4 2 5 1 Left side grommet 4 Antenna cables 2 Antenna cable 5 Display cable 3 Right side grommet 5. DellTM XFR D630 Fully Rugged Notebook Service Manual Location of the palm rest base. From the back of the computer, install the two M2.5 x 8-mm screws. 4. Connect the display cable: a.
Attach the display-feed flex cable to the motherboard controller cable, above the heat sink. 7. Page 61 of the computer, install the two M2.5 x 8-mm screws. 3. NOTE: The following step is only for the ... system board. Connect the antenna cables to their routing guides. 3 1 4 2 5 1 Left side grommet 4 Antenna cables 2 Antenna cable 5 Display cable 3 Right side grommet 5. DellTM XFR D630 Fully Rugged Notebook Service Manual Location of the palm rest base. From the back of the computer, install the two M2.5 x 8-mm screws. 4. Connect the display cable: a.

Service Manual
Page 87
...any thermal pads on top of your computer, follow the safety instructions in the XFR D630 Product Information Guide and in a spiral pattern to step 5; otherwise continue to apply thermal grease in the XFR D630 User's Guide. NOTICE: To prevent static damage to components inside your computer's electronic... the cleaning pad provided with the processor thermalcooling assembly kit when using the syringe to the next step. 2. Check the motherboard. Lift the processor thermal-cooling assembly out of 106 Revision A01 DellTM XFR D630 Fully Rugged Notebook Service Manual 9.
...any thermal pads on top of your computer, follow the safety instructions in the XFR D630 Product Information Guide and in a spiral pattern to step 5; otherwise continue to apply thermal grease in the XFR D630 User's Guide. NOTICE: To prevent static damage to components inside your computer's electronic... the cleaning pad provided with the processor thermalcooling assembly kit when using the syringe to the next step. 2. Check the motherboard. Lift the processor thermal-cooling assembly out of 106 Revision A01 DellTM XFR D630 Fully Rugged Notebook Service Manual 9.


