Users Guide
Page 3
... parts and controls 7 Front view 7 Back view 8 Bottom view 9 Monitor specifications 10 Display modes 12 Power management modes 13 LCD monitor quality and pixel policy 13 Maintenance guidelines 14 Cleaning your monitor 14 Setting up the monitor 15 Attaching the stand 15 Connecting your monitor 16 Connecting the HDMI cable 16 Connecting the DisplayPort (DisplayPort...
... parts and controls 7 Front view 7 Back view 8 Bottom view 9 Monitor specifications 10 Display modes 12 Power management modes 13 LCD monitor quality and pixel policy 13 Maintenance guidelines 14 Cleaning your monitor 14 Setting up the monitor 15 Attaching the stand 15 Connecting your monitor 16 Connecting the HDMI cable 16 Connecting the DisplayPort (DisplayPort...
Users Guide
Page 5
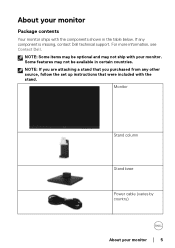
Some features may not be optional and may be available in the table below. Monitor Stand column Stand base Power cable (varies by country) About your monitor. NOTE: Some items may not ship with the components shown in certain countries. For more information, see Contact Dell. About your monitor Package contents Your monitor ships with your monitor │ 5 NOTE: If you are attaching a stand that you purchased from any component is missing, contact Dell technical support. If any other source, follow the set up instructions that were included with the stand.
Some features may not be optional and may be available in the table below. Monitor Stand column Stand base Power cable (varies by country) About your monitor. NOTE: Some items may not ship with the components shown in certain countries. For more information, see Contact Dell. About your monitor Package contents Your monitor ships with your monitor │ 5 NOTE: If you are attaching a stand that you purchased from any component is missing, contact Dell technical support. If any other source, follow the set up instructions that were included with the stand.
Users Guide
Page 6
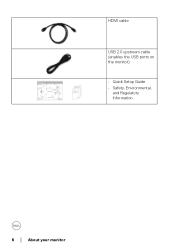
HDMI cable USB 2.0 upstream cable (enables the USB ports on the monitor) • Quick Setup Guide • Safety, Environmental, and Regulatory Information 6 │ About your monitor
HDMI cable USB 2.0 upstream cable (enables the USB ports on the monitor) • Quick Setup Guide • Safety, Environmental, and Regulatory Information 6 │ About your monitor

Users Guide
Page 7
Identifying parts and controls Front view Front panel controls Label 1 2 Description Function buttons (For more information, see Operating the monitor) Power On/Off button (with LED indicator) About your monitor │ 7
Identifying parts and controls Front view Front panel controls Label 1 2 Description Function buttons (For more information, see Operating the monitor) Power On/Off button (with LED indicator) About your monitor │ 7
Users Guide
Page 8
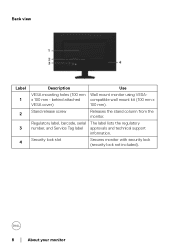
behind attached compatible wall mount kit (100 mm x VESA cover) 100 mm). Regulatory label, barcode, serial The label lists the regulatory number, and Service Tag label approvals and technical support information. Stand release screw Releases the stand column from the monitor. Security lock slot Secures monitor with security lock (security lock not included). 8 │ About your monitor x 100 mm - Back view Label 1 2 3 4 Description Use VESA mounting holes (100 mm Wall mount monitor using VESA-
behind attached compatible wall mount kit (100 mm x VESA cover) 100 mm). Regulatory label, barcode, serial The label lists the regulatory number, and Service Tag label approvals and technical support information. Stand release screw Releases the stand column from the monitor. Security lock slot Secures monitor with security lock (security lock not included). 8 │ About your monitor x 100 mm - Back view Label 1 2 3 4 Description Use VESA mounting holes (100 mm Wall mount monitor using VESA-
Users Guide
Page 9
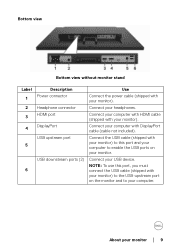
Connect your computer with HDMI cable (shipped with your monitor │ 9 About your monitor). Bottom view Bottom view without monitor stand Label 1 2 3 4 5 6 Description Power connector Headphone connector HDMI port DisplayPort USB upstream port USB downstream ports (2) Use Connect the ...computer with DisplayPort cable (cable not included). Connect the USB cable (shipped with your monitor) to this port, you must connect the USB cable (shipped with your monitor) to your monitor. Connect your monitor). NOTE: To use this port and your computer to enable the USB ports on the...
Connect your computer with HDMI cable (shipped with your monitor │ 9 About your monitor). Bottom view Bottom view without monitor stand Label 1 2 3 4 5 6 Description Power connector Headphone connector HDMI port DisplayPort USB upstream port USB downstream ports (2) Use Connect the ...computer with DisplayPort cable (cable not included). Connect the USB cable (shipped with your monitor) to this port, you must connect the USB cable (shipped with your monitor) to your monitor. Connect your monitor). NOTE: To use this port and your computer to enable the USB ports on the...
Users Guide
Page 10
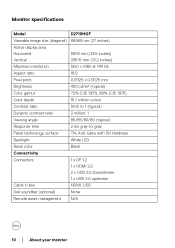
Monitor specifications Model D2719HGF Viewable image size (diagonal) 68.565 cm (27 inches) Active display area Horizontal 597.6 mm (23.5 inches) Vertical 336.15 mm (13.2 inches) Maximum resolution ... TN, Anti-Glare with 3H Hardness Backlight White LED Bezel color Black Connectivity Connectors 1 x DP 1.2 1 x HDMI 2.0 2 x USB 2.0 downstream 1 x USB 2.0 upstream Cable in box HDMI, USB Dell soundbar (optional) None Remote asset management N/A 10 │ About your...
Monitor specifications Model D2719HGF Viewable image size (diagonal) 68.565 cm (27 inches) Active display area Horizontal 597.6 mm (23.5 inches) Vertical 336.15 mm (13.2 inches) Maximum resolution ... TN, Anti-Glare with 3H Hardness Backlight White LED Bezel color Black Connectivity Connectors 1 x DP 1.2 1 x HDMI 2.0 2 x USB 2.0 downstream 1 x USB 2.0 upstream Cable in box HDMI, USB Dell soundbar (optional) None Remote asset management N/A 10 │ About your...
Users Guide
Page 11
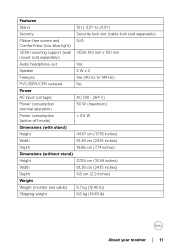
... cm (7.74 inches) Dimensions (without stand) Height 37.05 cm (14.59 inches) Width 61.36 cm (24.15 inches) Depth 5.6 cm (2.2 inches) Weight Weight (monitor and cable) 5.7 kg (12.45 lb) Shipping weight 6.6 kg (14.49 lb) About your...
... cm (7.74 inches) Dimensions (without stand) Height 37.05 cm (14.59 inches) Width 61.36 cm (24.15 inches) Depth 5.6 cm (2.2 inches) Weight Weight (monitor and cable) 5.7 kg (12.45 lb) Shipping weight 6.6 kg (14.49 lb) About your...
Users Guide
Page 13
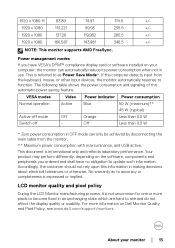
... in OFF mode can automatically reduce its power consumption when not in an unchanging state which are hard to see www.dell.com/support/monitors. No warranty as to accuracy or completeness is referred to become fixed in use. For more pixels to as Power Save...have VESA's DPM™ compliance display card or software installed on Dell Monitor Quality and Pixel Policy, see and do not affect the display quality or usability. LCD monitor quality and pixel policy During the LCD Monitor manufacturing process, it is informational only and reflects laboratory performance. About ...
... in OFF mode can automatically reduce its power consumption when not in an unchanging state which are hard to see www.dell.com/support/monitors. No warranty as to accuracy or completeness is referred to become fixed in use. For more pixels to as Power Save...have VESA's DPM™ compliance display card or software installed on Dell Monitor Quality and Pixel Policy, see and do not affect the display quality or usability. LCD monitor quality and pixel policy During the LCD Monitor manufacturing process, it is informational only and reflects laboratory performance. About ...
Users Guide
Page 14
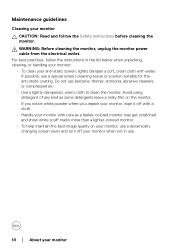
... any kind as some detergents leave a milky film on the monitor. • If you notice white powder when you unpack your monitor, wipe it off with a cloth. • Handle your monitor with care as a darker-colored monitor may get scratched and show white scuff marks more than a lighter... the instructions in the list below when unpacking, cleaning, or handling your monitor: • To clean your anti-static screen, lightly dampen a soft, clean cloth with water. WARNING: Before cleaning the monitor, unplug the monitor power cable from the electrical outlet. For best practices, follow the Safety ...
... any kind as some detergents leave a milky film on the monitor. • If you notice white powder when you unpack your monitor, wipe it off with a cloth. • Handle your monitor with care as a darker-colored monitor may get scratched and show white scuff marks more than a lighter... the instructions in the list below when unpacking, cleaning, or handling your monitor: • To clean your anti-static screen, lightly dampen a soft, clean cloth with water. WARNING: Before cleaning the monitor, unplug the monitor power cable from the electrical outlet. For best practices, follow the Safety ...
Users Guide
Page 15
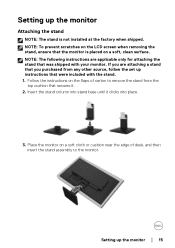
... not installed at the factory when shipped. If you are applicable only for attaching the stand that were included with your monitor. Insert the stand column into place. 3. Follow the instructions on the flaps of desk, and then insert the stand assembly to remove the stand from ...any other source, follow the set up instructions that was shipped with the stand. 1. Setting up the monitor │ 15 NOTE: To prevent scratches on the LCD screen when removing the stand, ensure that secures it clicks into stand base until it . 2. Setting...
... not installed at the factory when shipped. If you are applicable only for attaching the stand that were included with your monitor. Insert the stand column into place. 3. Follow the instructions on the flaps of desk, and then insert the stand assembly to remove the stand from ...any other source, follow the set up instructions that was shipped with the stand. 1. Setting up the monitor │ 15 NOTE: To prevent scratches on the LCD screen when removing the stand, ensure that secures it clicks into stand base until it . 2. Setting...
Users Guide
Page 16
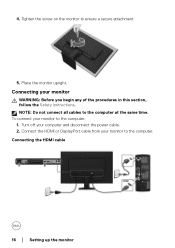
NOTE: Do not connect all cables to the computer. Connect the HDMI or DisplayPort cable from your monitor to ensure a secure attachment. 5. Turn off your monitor WARNING: Before you begin any of the procedures in this section, follow the Safety instructions. Connecting the HDMI cable 16 │ Setting up the monitor Tighten the screw on the monitor to the computer: 1. Connecting your computer and disconnect the power cable. 2. 4. Place the monitor upright. To connect your monitor to the computer at the same time.
NOTE: Do not connect all cables to the computer. Connect the HDMI or DisplayPort cable from your monitor to ensure a secure attachment. 5. Turn off your monitor WARNING: Before you begin any of the procedures in this section, follow the Safety instructions. Connecting the HDMI cable 16 │ Setting up the monitor Tighten the screw on the monitor to the computer: 1. Connecting your computer and disconnect the power cable. 2. 4. Place the monitor upright. To connect your monitor to the computer at the same time.
Users Guide
Page 17
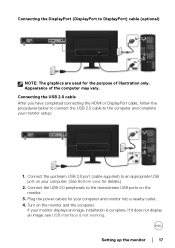
Connect the USB 2.0 peripherals to the downstream USB ports on the monitor and the computer. If your computer and monitor into a nearby outlet. 4. Setting up the monitor │ 17 Plug the power cables for your monitor displays an image, installation is not working. Connecting the USB 2.0 cable ...your computer. (See Bottom view for details.) 2. If it does not display an image, see USB interface is complete. Turn on the monitor. 3. Connecting the DisplayPort (DisplayPort to DisplayPort) cable (optional) NOTE: The graphics are used for the purpose of the computer may vary....
Connect the USB 2.0 peripherals to the downstream USB ports on the monitor and the computer. If your computer and monitor into a nearby outlet. 4. Setting up the monitor │ 17 Plug the power cables for your monitor displays an image, installation is not working. Connecting the USB 2.0 cable ...your computer. (See Bottom view for details.) 2. If it does not display an image, see USB interface is complete. Turn on the monitor. 3. Connecting the DisplayPort (DisplayPort to DisplayPort) cable (optional) NOTE: The graphics are used for the purpose of the computer may vary....

Users Guide
Page 18
...Click OK. If you may need to your graphics card website and download the latest graphic drivers. 18 │ Setting up the monitor Setting the maximum resolution To set the maximum resolution for your graphics driver. Right-click on your computer, complete one of the .... 4. For Windows® 8 and Windows® 8.1 only, select the Desktop tile to switch to http://www.dell.com/support, enter your service tag, and download the latest driver for the monitor: In Windows® 7, Windows® 8, and Windows® 8.1: 1. Depending on the desktop and click Screen Resolution...
...Click OK. If you may need to your graphics card website and download the latest graphic drivers. 18 │ Setting up the monitor Setting the maximum resolution To set the maximum resolution for your graphics driver. Right-click on your computer, complete one of the .... 4. For Windows® 8 and Windows® 8.1 only, select the Desktop tile to switch to http://www.dell.com/support, enter your service tag, and download the latest driver for the monitor: In Windows® 7, Windows® 8, and Windows® 8.1: 1. Depending on the desktop and click Screen Resolution...
Users Guide
Page 19
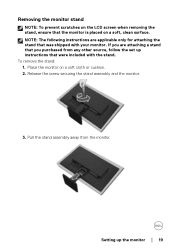
... only for attaching the stand that were included with your monitor. Place the monitor on a soft, clean surface. Removing the monitor stand NOTE: To prevent scratches on the LCD screen when removing the stand, ensure that the monitor is placed on a soft cloth or cushion. 2. To... remove the stand: 1. NOTE: The following instructions are attaching a stand that you purchased from the monitor. Release the screw securing the stand assembly and the monitor. 3. Setting up instructions that was shipped with the stand. Pull the stand assembly away from any other source...
... only for attaching the stand that were included with your monitor. Place the monitor on a soft, clean surface. Removing the monitor stand NOTE: To prevent scratches on the LCD screen when removing the stand, ensure that the monitor is placed on a soft cloth or cushion. 2. To... remove the stand: 1. NOTE: The following instructions are attaching a stand that you purchased from the monitor. Release the screw securing the stand assembly and the monitor. 3. Setting up instructions that was shipped with the stand. Pull the stand assembly away from any other source...
Users Guide
Page 20
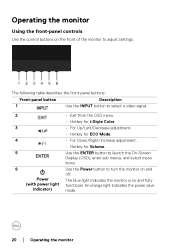
An orange light indicates the power save mode. 20 │ Operating the monitor Power (with power light indicator) The blue light indicates the monitor is on and off. The following table describes the front-panel buttons: Front-panel button Description 1 Use the INPUT button to select a video signal. 2 • ... ENTER button to launch the On-Screen Display (OSD), enter sub menus, and select menu items. 6 Use the Power button to adjust settings. Operating the monitor Using the front-panel controls Use the control buttons on the front of the...
An orange light indicates the power save mode. 20 │ Operating the monitor Power (with power light indicator) The blue light indicates the monitor is on and off. The following table describes the front-panel buttons: Front-panel button Description 1 Use the INPUT button to select a video signal. 2 • ... ENTER button to launch the On-Screen Display (OSD), enter sub menus, and select menu items. 6 Use the Power button to adjust settings. Operating the monitor Using the front-panel controls Use the control buttons on the front of the...
Users Guide
Page 21
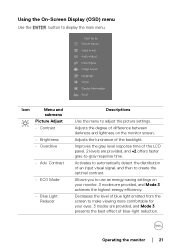
... luminance of difference between darkness and lightness on your eyes. 3 modes are provided, and Mode 3 achieves the highest energy efficiency. Operating the monitor │ 21 Icon Menu and submenu Picture Adjust • Contrast • Brightness • Overdrive • Adv. Improves the gray level ...response time of the LCD panel. 2 levels are provided, and +2 offers faster gray-to make viewing more comfortable for your monitor. 3 modes are provided, and Mode 3 presents the best effect of blue-light reduction. Decreases the level of blue light emitted from the...
... luminance of difference between darkness and lightness on your eyes. 3 modes are provided, and Mode 3 achieves the highest energy efficiency. Operating the monitor │ 21 Icon Menu and submenu Picture Adjust • Contrast • Brightness • Overdrive • Adv. Improves the gray level ...response time of the LCD panel. 2 levels are provided, and +2 offers faster gray-to make viewing more comfortable for your monitor. 3 modes are provided, and Mode 3 presents the best effect of blue-light reduction. Decreases the level of blue light emitted from the...
Users Guide
Page 22
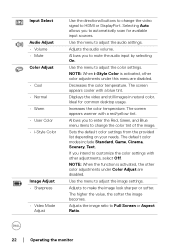
..., and Blue menu items to customize the color settings with a blue tint. Use the menu to Full Screen or Aspect Ratio. 22 │ Operating the monitor Input Select Audio Adjust • Volume • Mute Color Adjust • Cool • Normal • Warm • User Color • i-Style Color Image Adjust •...
..., and Blue menu items to customize the color settings with a blue tint. Use the menu to Full Screen or Aspect Ratio. 22 │ Operating the monitor Input Select Audio Adjust • Volume • Mute Color Adjust • Cool • Normal • Warm • User Color • i-Style Color Image Adjust •...
Users Guide
Page 23
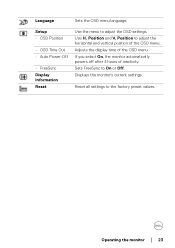
If you select On, the monitor automatically powers off after 3 hours of the OSD menu. Operating the monitor │ 23 Sets FreeSync to adjust the OSD settings. Language Sets the OSD menu language. Setup • OSD Position • OSD Time Out • Auto Power-Off • FreeSync Display Information Reset Use the menu to On or Off. Position to the factory preset values. Adjusts the display time of the OSD menu. Position and V. Displays the monitor's current settings. Reset all settings to adjust the horizontal and vertical position of inactivity. Use H.
If you select On, the monitor automatically powers off after 3 hours of the OSD menu. Operating the monitor │ 23 Sets FreeSync to adjust the OSD settings. Language Sets the OSD menu language. Setup • OSD Position • OSD Time Out • Auto Power-Off • FreeSync Display Information Reset Use the menu to On or Off. Position to the factory preset values. Adjusts the display time of the OSD menu. Position and V. Displays the monitor's current settings. Reset all settings to adjust the horizontal and vertical position of inactivity. Use H.
Users Guide
Page 24
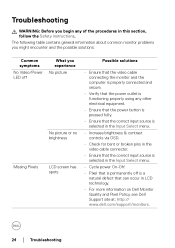
...No picture or no brightness Missing Pixels LCD screen has spots Possible solutions • Ensure that the video cable connecting the monitor and the computer is properly connected and secure. • Verify that the power outlet is functioning properly using any other electrical...in LCD technology. • For more information on Dell Monitor Quality and Pixel Policy, see Dell Support site at: http:// www.de l l.com/support/monitors. 24 │ Troubleshooting The following table contains general information about common monitor problems you might encounter and the possible solutions: ...
...No picture or no brightness Missing Pixels LCD screen has spots Possible solutions • Ensure that the video cable connecting the monitor and the computer is properly connected and secure. • Verify that the power outlet is functioning properly using any other electrical...in LCD technology. • For more information on Dell Monitor Quality and Pixel Policy, see Dell Support site at: http:// www.de l l.com/support/monitors. 24 │ Troubleshooting The following table contains general information about common monitor problems you might encounter and the possible solutions: ...


