

Users Guide
Page 3
... Safety instructions 5 About your display 6 Package contents 6 Product features 8 Identifying parts and controls 9 Front view 9 Back view 10 Side view 11 Bottom view 12 Display specifications 13 Touch 14 Support OS 14 Touch sensor input accuracy 14 Speaker specifications 15 Resolution specifications 15 Preset display modes 15 Electrical specifications 16 Physical characteristics 17 Environmental characteristics 18 Pin assignments 19 Plug-and-Play 25 LCD display quality and pixel policy 25 Maintenance guidelines 25 Cleaning your display 25 Setting...
... Safety instructions 5 About your display 6 Package contents 6 Product features 8 Identifying parts and controls 9 Front view 9 Back view 10 Side view 11 Bottom view 12 Display specifications 13 Touch 14 Support OS 14 Touch sensor input accuracy 14 Speaker specifications 15 Resolution specifications 15 Preset display modes 15 Electrical specifications 16 Physical characteristics 17 Environmental characteristics 18 Pin assignments 19 Plug-and-Play 25 LCD display quality and pixel policy 25 Maintenance guidelines 25 Cleaning your display 25 Setting...
Users Guide
Page 4
... Touch OSD launcher 38 Using the touch control launcher 39 Using the OSD lock function 40 Using the On-Screen Display (OSD) menu 41 Accessing the menu system 41 Touch OSD control 42 OSD warning messages 52 Setting the maximum resolution 56 Dell web management for energy label and product information sheet 72 4 | Contents Inserting the batteries in diagnostics 64 Common problems 65 Product specific problems 67 Touchscreen problems 69 Universal Serial Bus (USB) specific problems 70 Ethernet problems...
... Touch OSD launcher 38 Using the touch control launcher 39 Using the OSD lock function 40 Using the On-Screen Display (OSD) menu 41 Accessing the menu system 41 Touch OSD control 42 OSD warning messages 52 Setting the maximum resolution 56 Dell web management for energy label and product information sheet 72 4 | Contents Inserting the batteries in diagnostics 64 Common problems 65 Product specific problems 67 Touchscreen problems 69 Universal Serial Bus (USB) specific problems 70 Ethernet problems...
Users Guide
Page 8
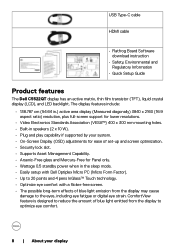
... in.) active area display (Measured diagonally) 3840 x 2160 (16:9 aspect ratio) resolution, plus full-screen support for Panel only. • Wattage 0.5 standby power when in speakers (2 x 10 W). • Plug and play capability if supported by your display USB Type-C cable HDMI cable • Flatfrog Board Software download instruction • Safety, Environmental and Regulatory Information • Quick Setup Guide Product features The Dell C5522QT display has an active matrix, thin film transistor (TFT), liquid crystal display (LCD), and LED backlight.
... in.) active area display (Measured diagonally) 3840 x 2160 (16:9 aspect ratio) resolution, plus full-screen support for Panel only. • Wattage 0.5 standby power when in speakers (2 x 10 W). • Plug and play capability if supported by your display USB Type-C cable HDMI cable • Flatfrog Board Software download instruction • Safety, Environmental and Regulatory Information • Quick Setup Guide Product features The Dell C5522QT display has an active matrix, thin film transistor (TFT), liquid crystal display (LCD), and LED backlight.

Users Guide
Page 12
...can use this connector after you have connected the USB cable to the computer and USB upstream connector on the display. Input sources and USB pairing Input sources HDMI 1 HDMI 2 HDMI 3 DP USB upstream USB 1 USB 2 USB 3 Bottom view 1 Label Description 1, 2 Speakers 3 Power on "Input sources and USB pairing". 7 USB 3.1 downstream Connect your display 2 3 Once this cable is connected, you can only use the USB downstream connectors on the display and the touch screen function on the display. 8 USB charging port USB 3.1 downstream port with your display ports (3) to...
...can use this connector after you have connected the USB cable to the computer and USB upstream connector on the display. Input sources and USB pairing Input sources HDMI 1 HDMI 2 HDMI 3 DP USB upstream USB 1 USB 2 USB 3 Bottom view 1 Label Description 1, 2 Speakers 3 Power on "Input sources and USB pairing". 7 USB 3.1 downstream Connect your display 2 3 Once this cable is connected, you can only use the USB downstream connectors on the display and the touch screen function on the display. 8 USB charging port USB 3.1 downstream port with your display ports (3) to...

Users Guide
Page 25
... changing the display settings, see Operating the Display. Maintenance guidelines Cleaning your display | 25 Plug-and-Play You can install the display in use. LCD display quality and pixel policy During the LCD display manufacturing process, it off your anti-static screen, lightly dampen a soft, clean cloth with water. colored display. • To help maintain the best image quality on your display, use a dynamically changing screen saver and turn off with a cloth. • Handle your display with its extended display...
... changing the display settings, see Operating the Display. Maintenance guidelines Cleaning your display | 25 Plug-and-Play You can install the display in use. LCD display quality and pixel policy During the LCD display manufacturing process, it off your anti-static screen, lightly dampen a soft, clean cloth with water. colored display. • To help maintain the best image quality on your display, use a dynamically changing screen saver and turn off with a cloth. • Handle your display with its extended display...

Users Guide
Page 26
... Display OSD Menu and turn on your computer. Plug in this section, follow the Safety Instructions. To connect your display to the computer: 1. Connect the HDMI/DP/USB Type-C/USB cable from your display to the computer. 3. Optiplex (Optional) Attaching the Optiplex • Open the carton, take out the Optiplex holder and accessories box . • Included accessories: Cables, Remote Control & Batteries, Remote control holder , Stylus, Wire Saddle and manual. 1 2 3 1. Switch on your display. 4. Remove cable cover...
... Display OSD Menu and turn on your computer. Plug in this section, follow the Safety Instructions. To connect your display to the computer: 1. Connect the HDMI/DP/USB Type-C/USB cable from your display to the computer. 3. Optiplex (Optional) Attaching the Optiplex • Open the carton, take out the Optiplex holder and accessories box . • Included accessories: Cables, Remote Control & Batteries, Remote control holder , Stylus, Wire Saddle and manual. 1 2 3 1. Switch on your display. 4. Remove cable cover...

Users Guide
Page 41
... the remote control or OSD Launcher touch key to adjust the image settings. Touch control icon 1 Description Use the Up (increase) and Down (decrease) icons to adjust items in the OSD menu. Left Right Operating the display | 41 Up 2 Down Use the Left (decrease) and Right (increase) icons to adjust items in the OSD menu. Dell 55 Monitor Brightness/Contrast Input Source Color Display Audio Menu Personalize Others 75% 75% Use the icons to launch the OSD menu. Dell 55 Monitor Select Option: Using...
... the remote control or OSD Launcher touch key to adjust the image settings. Touch control icon 1 Description Use the Up (increase) and Down (decrease) icons to adjust items in the OSD menu. Left Right Operating the display | 41 Up 2 Down Use the Left (decrease) and Right (increase) icons to adjust items in the OSD menu. Dell 55 Monitor Brightness/Contrast Input Source Color Display Audio Menu Personalize Others 75% 75% Use the icons to launch the OSD menu. Dell 55 Monitor Select Option: Using...
Users Guide
Page 45
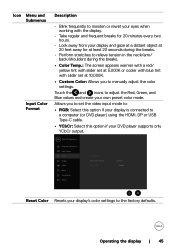
... video input mode to: • RGB: Select this option if your display is connected to a computer (or DVD player) using the HDMI, DP or USB Type-C cable. • YCbCr: Select this option if your own preset color mode. Dell 55 Monitor Brightness/Contrast Input Source Color Display Audio Menu Personalize Others Preset Modes Input Color Format Reset Color RGB YCbCr Reset Color Resets your display's color settings to adjust the Red, Green, and Blue values and create your DVD player supports only YCbCr output. Touch the and icons to the factory defaults...
... video input mode to: • RGB: Select this option if your display is connected to a computer (or DVD player) using the HDMI, DP or USB Type-C cable. • YCbCr: Select this option if your own preset color mode. Dell 55 Monitor Brightness/Contrast Input Source Color Display Audio Menu Personalize Others Preset Modes Input Color Format Reset Color RGB YCbCr Reset Color Resets your display's color settings to adjust the Red, Green, and Blue values and create your DVD player supports only YCbCr output. Touch the and icons to the factory defaults...

Users Guide
Page 49
... to adjust the OSD settings, such as the DDC/CI, LCD conditioning, and so on. Dell 55 Monitor Brightness/Contrast Input Source Color Display Audio Menu Personalize Others Display Info DDC/CI HDMI CEC LCD Conditioning Firmware IP Address Service Tag Reset Others Factory Reset On O O M2T101 10.0.50.100 ABCDEFG ENERGY STAR® Display Info Select this feature. Operating the display | 49 Icon Menu and Submenus Wake On Touch Reset Personalization Other Description Select On to turn...
... to adjust the OSD settings, such as the DDC/CI, LCD conditioning, and so on. Dell 55 Monitor Brightness/Contrast Input Source Color Display Audio Menu Personalize Others Display Info DDC/CI HDMI CEC LCD Conditioning Firmware IP Address Service Tag Reset Others Factory Reset On O O M2T101 10.0.50.100 ABCDEFG ENERGY STAR® Display Info Select this feature. Operating the display | 49 Icon Menu and Submenus Wake On Touch Reset Personalization Other Description Select On to turn...

Users Guide
Page 50
Select On to turn off this feature for best user experience and optimum performance of your computer. Show IP Address. 50 | Operating the display Dell 55 Monitor Brightness/Contrast Display Info Input Source DDC/CI On Color HDMI CEC Display LCD Conditioning Audio Firmware Menu Personalize Others IP Address Service Tag Reset Others Factory Reset HDMI CEC Allows you to adjust the display settings using software on Conditioning the degree of image retention. Icon Menu and Submenus DDC/CI Description DDC...
Select On to turn off this feature for best user experience and optimum performance of your computer. Show IP Address. 50 | Operating the display Dell 55 Monitor Brightness/Contrast Display Info Input Source DDC/CI On Color HDMI CEC Display LCD Conditioning Audio Firmware Menu Personalize Others IP Address Service Tag Reset Others Factory Reset HDMI CEC Allows you to adjust the display settings using software on Conditioning the degree of image retention. Icon Menu and Submenus DDC/CI Description DDC...

Users Guide
Page 53
... the selected input: Dell 55 Monitor No HDMI 1 signal from your device. If there is no display, press the monitor button again to select the correct input source. Do you want to continue? Press any button other than the power button, the following messages will Increase power consumption, Do you want to continue? Yes No C5522QT If adjust the Brightness level above the default level. Select OSD items of...
... the selected input: Dell 55 Monitor No HDMI 1 signal from your device. If there is no display, press the monitor button again to select the correct input source. Do you want to continue? Press any button other than the power button, the following messages will Increase power consumption, Do you want to continue? Yes No C5522QT If adjust the Brightness level above the default level. Select OSD items of...
Users Guide
Page 60
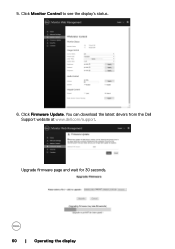
5. Click Monitor Control to see the display's status. 6. C5522QT 60 | Operating the display Upgrade firmware page and wait for 30 seconds. You can download the latest drivers from the Dell Support website at www.dell.com/support. Click Firmware Update.
5. Click Monitor Control to see the display's status. 6. C5522QT 60 | Operating the display Upgrade firmware page and wait for 30 seconds. You can download the latest drivers from the Dell Support website at www.dell.com/support. Click Firmware Update.

Users Guide
Page 62
.... www.dell.com/C5522QT C5522QT 62 | Troubleshooting If your computer and the display. 2. Dell 55 Monitor No HDMI 1 Cable The display will go into Standby Mode in self-test mode, the power LED remains white. Turn off both your display and computer are properly connected but the display screen remains dark, run the display self-test by performing the following steps: 1. To ensure proper Self-Test operation, remove all digital and the analog cables from...
.... www.dell.com/C5522QT C5522QT 62 | Troubleshooting If your computer and the display. 2. Dell 55 Monitor No HDMI 1 Cable The display will go into Standby Mode in self-test mode, the power LED remains white. Turn off both your display and computer are properly connected but the display screen remains dark, run the display self-test by performing the following steps: 1. To ensure proper Self-Test operation, remove all digital and the analog cables from...

Users Guide
Page 65
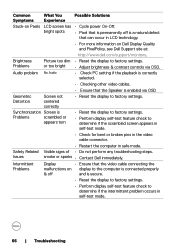
... ratio. LCD screen has • Cycle power on Dell Display Quality and Pixel Policy, see Dell Support site at: http://www.dell.com/support/monitors. Troubleshooting | 65 fine movement • Check environmental factors. • Relocate the display and test in diagnostics. • Ensure that the correct input source is fuzzy, blurry, or ghosting • Eliminate video extension cables. • Reset the display to factory settings. • Change the video resolution to factory settings. spots • Pixel that is...
... ratio. LCD screen has • Cycle power on Dell Display Quality and Pixel Policy, see Dell Support site at: http://www.dell.com/support/monitors. Troubleshooting | 65 fine movement • Check environmental factors. • Relocate the display and test in diagnostics. • Ensure that the correct input source is fuzzy, blurry, or ghosting • Eliminate video extension cables. • Reset the display to factory settings. • Change the video resolution to factory settings. spots • Pixel that is...
Users Guide
Page 66
... video cable connector. • Restart the computer in LCD technology. • For more information on Dell Display Quality and PixelPolicy, see Dell Support site at: http://www.dell.com/support/monitors. or too bright • Adjust brightness & contrast controls via OSD Geometric Distortion Screen not centered correctly • Reset the display to factory settings. Safety Related Visible signs of • Do not perform any troubleshooting steps. Issues smoke or sparks • Contact Dell immediately. Brightness Problems Picture...
... video cable connector. • Restart the computer in LCD technology. • For more information on Dell Display Quality and PixelPolicy, see Dell Support site at: http://www.dell.com/support/monitors. or too bright • Adjust brightness & contrast controls via OSD Geometric Distortion Screen not centered correctly • Reset the display to factory settings. Safety Related Visible signs of • Do not perform any troubleshooting steps. Issues smoke or sparks • Contact Dell immediately. Brightness Problems Picture...

Users Guide
Page 67
... Color Picture missing color • Perform display self-test. • Ensure that the video cable connecting the display to the computer is connected properly and is enabled via OSD. a long period of the Preset Modes in image left on image displayed Windows Power Options or Mac Energy Saver the display for bent or broken pins in diagnostics. Color in Color menu OSD. • Change the Input Color Format to turn off . These can be adjusted in the Color menu OSD...
... Color Picture missing color • Perform display self-test. • Ensure that the video cable connecting the display to the computer is connected properly and is enabled via OSD. a long period of the Preset Modes in image left on image displayed Windows Power Options or Mac Energy Saver the display for bent or broken pins in diagnostics. Color in Color menu OSD. • Change the Input Color Format to turn off . These can be adjusted in the Color menu OSD...

Users Guide
Page 68
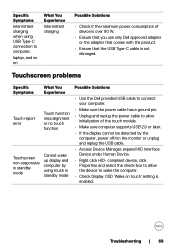
... video formats (aspect ratio) of DVDs, the display may not charge with the USB Type-C connection. • Ensure that you use only Dell approved adapter or the adapter that the USB Type-C cable is not damaged. • Verify if the device can support one of the screen Black screen No charging • Check the signal source. No Input Signal when user controls are pressed The picture does not fill the entire screen No image...
... video formats (aspect ratio) of DVDs, the display may not charge with the USB Type-C connection. • Ensure that you use only Dell approved adapter or the adapter that the USB Type-C cable is not damaged. • Verify if the device can support one of the screen Black screen No charging • Check the signal source. No Input Signal when user controls are pressed The picture does not fill the entire screen No image...
Users Guide
Page 69
.... • Right click HID- Touchscreen problems Specific Symptoms What You Experience Touch report error Touch function miss alignment or no touch function Touchscreen non-responsive in standby mode Possible Solutions • Use the Dell provided USB cable to connect your computer. • Make sure the power cable has a ground pin. • Unplug and replug the power cable to wake the computer. • Check Display OSD 'Wake on What You Experience...
.... • Right click HID- Touchscreen problems Specific Symptoms What You Experience Touch report error Touch function miss alignment or no touch function Touchscreen non-responsive in standby mode Possible Solutions • Use the Dell provided USB cable to connect your computer. • Make sure the power cable has a ground pin. • Unplug and replug the power cable to wake the computer. • Check Display OSD 'Wake on What You Experience...
Display Manager Users Guide
Page 4
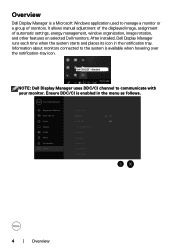
After installed, Dell Display Manager runs each time when the system starts and places its icon in the menu as follows. Information about monitors connected to the system is enabled in the notification tray. It allows manual adjustment of the displayed image, assignment of monitors. Dell C5522QT - Dell 55 Monitor Brightness/Contrast Display Info Input Source DDC/CI On Color HDMI CEC Display LCD Conditioning Audio Firmware Menu IP Address Personalize Service Tag Others Reset Others Factory Reset 4 | Overview Ensure DDC/CI is...
After installed, Dell Display Manager runs each time when the system starts and places its icon in the menu as follows. Information about monitors connected to the system is enabled in the notification tray. It allows manual adjustment of the displayed image, assignment of monitors. Dell C5522QT - Dell 55 Monitor Brightness/Contrast Display Info Input Source DDC/CI On Color HDMI CEC Display LCD Conditioning Audio Firmware Menu IP Address Personalize Service Tag Others Reset Others Factory Reset 4 | Overview Ensure DDC/CI is...

Display Manager Users Guide
Page 5
... under the mouse pointer. Control • Select the monitor from the dropdown box. Dell C5522QT The Quick Settings dialog box also provides access to Dell Display Manager's advanced user interface that is connected to the computer, a specific target monitors can be controlled. • Press Ctrl+Shift+D to select a preset mode manually. individual • If more than one supported Dell monitors are connected to your computer, display in an icon appears...
... under the mouse pointer. Control • Select the monitor from the dropdown box. Dell C5522QT The Quick Settings dialog box also provides access to Dell Display Manager's advanced user interface that is connected to the computer, a specific target monitors can be controlled. • Press Ctrl+Shift+D to select a preset mode manually. individual • If more than one supported Dell monitors are connected to your computer, display in an icon appears...


