
User's Guide
Page 4
... Panel (Dell™ C1660w Color Printer Only 37 Printer Setup Using the Software and Documentation Disc 38 7 Setting the IP Address 39 Assigning an IP Address 39 The Operator Panel 39 The Tool Box 40 Verifying the IP Settings 41 The Operator Panel 41 The System Settings Report 41 The Ping Command 41 8 Loading Paper 43...
... Panel (Dell™ C1660w Color Printer Only 37 Printer Setup Using the Software and Documentation Disc 38 7 Setting the IP Address 39 Assigning an IP Address 39 The Operator Panel 39 The Tool Box 40 Verifying the IP Settings 41 The Operator Panel 41 The System Settings Report 41 The Ping Command 41 8 Loading Paper 43...
User's Guide
Page 6
... Tool Box to Change the Printer Settings 111 Printer Settings Report 112 Printer Information 112 Menu Settings 112 Reports 114 TCP/IP Settings 114 Printer Maintenance 114 System Settings 114 Paper Density 116 Adjust BTR 116 Adjust Fusing Unit 117 Color Registration Adjustment 117 Adjust Altitude 118 Reset Defaults 119 Non-Dell Toner 119 BTR Refresh Mode...
... Tool Box to Change the Printer Settings 111 Printer Settings Report 112 Printer Information 112 Menu Settings 112 Reports 114 TCP/IP Settings 114 Printer Maintenance 114 System Settings 114 Paper Density 116 Adjust BTR 116 Adjust Fusing Unit 117 Color Registration Adjustment 117 Adjust Altitude 118 Reset Defaults 119 Non-Dell Toner 119 BTR Refresh Mode...
User's Guide
Page 7
Job History 125 Error History 125 Color Test Page 125 Printing a Report/List Using the Operator Panel 125 Printing a Report/List Using the Tool Box 126 Admin Menu 126 Network 126 USB ... Panel Language 140 Panel Lock Function 140 Enabling the Panel Lock 140 Disabling the Panel Lock 140 Resetting Defaults 141 15 Print Media Guidelines 143 Paper 143 Paper Characteristics 143 Recommended Paper 144 Unacceptable Paper 144 Selecting Paper 144 Selecting Preprinted Media and Letterhead 145 Printing on Letterhead 145 Loading Letterhead 145 Selecting Pre-Punched...
Job History 125 Error History 125 Color Test Page 125 Printing a Report/List Using the Operator Panel 125 Printing a Report/List Using the Tool Box 126 Admin Menu 126 Network 126 USB ... Panel Language 140 Panel Lock Function 140 Enabling the Panel Lock 140 Disabling the Panel Lock 140 Resetting Defaults 141 15 Print Media Guidelines 143 Paper 143 Paper Characteristics 143 Recommended Paper 144 Unacceptable Paper 144 Selecting Paper 144 Selecting Preprinted Media and Letterhead 145 Printing on Letterhead 145 Loading Letterhead 145 Selecting Pre-Punched...

User's Guide
Page 8
...in the Multipurpose Feeder (MPF 156 Loading Letterhead 158 Loading Print Media in the Priority Sheet Inserter (PSI) (Dell C1760nw Color Printer only 159 Loading an Envelope in the Priority Sheet Inserter (PSI 161 Loading Letterhead 163 Loading Print Media When ...Paper Jams 169 Sending a Job to Print 169 Canceling a Print Job 170 Canceling From the Operator Panel 170 Canceling a Job From the Computer Running Windows 170 Printing a Report Page 170 Know Your Printer 171 18 Understanding Your Printer Software 173 Windows 173 Printer Status Window 173 Status Monitor Console 173 Dell...
...in the Multipurpose Feeder (MPF 156 Loading Letterhead 158 Loading Print Media in the Priority Sheet Inserter (PSI) (Dell C1760nw Color Printer only 159 Loading an Envelope in the Priority Sheet Inserter (PSI 161 Loading Letterhead 163 Loading Print Media When ...Paper Jams 169 Sending a Job to Print 169 Canceling a Print Job 170 Canceling From the Operator Panel 170 Canceling a Job From the Computer Running Windows 170 Printing a Report Page 170 Know Your Printer 171 18 Understanding Your Printer Software 173 Windows 173 Printer Status Window 173 Status Monitor Console 173 Dell...
User's Guide
Page 10
... Jams 201 Identifying the Location of Paper Jams 202 Clearing Paper Jams From the Front of the Printer 203 Clearing Paper Jams From the Back of the Printer 204 Clearing Paper Jams From the Output Tray 206 Troubleshooting 209 23 Troubleshooting 211 Basic Printer Problems 211 Display Problems 211 Printing ...216 Ghosting 217 Fog 218 Bead-Carry-Out (BCO 218 Auger mark 219 Wrinkled/Stained paper 219 The top margins is incorrect 220 Color registration is out of alignment 220 Protrudent / Bumpy paper 221 Noise 222 Jam 223 Misfeed jam 223 Multi-feed jam 224 Wireless Problems 224...
... Jams 201 Identifying the Location of Paper Jams 202 Clearing Paper Jams From the Front of the Printer 203 Clearing Paper Jams From the Back of the Printer 204 Clearing Paper Jams From the Output Tray 206 Troubleshooting 209 23 Troubleshooting 211 Basic Printer Problems 211 Display Problems 211 Printing ...216 Ghosting 217 Fog 218 Bead-Carry-Out (BCO 218 Auger mark 219 Wrinkled/Stained paper 219 The top margins is incorrect 220 Color registration is out of alignment 220 Protrudent / Bumpy paper 221 Noise 222 Jam 223 Misfeed jam 223 Multi-feed jam 224 Wireless Problems 224...
User's Guide
Page 15
...software and documentation are either potential damage to hardware or loss of the Rights in applicable FAR provisions: Dell Inc., One Dell Way, Round Rock, Texas, 78682, USA. XML Paper Specification (XPS): This product may be found at DFARS 252.227-7013 and in Technical Data and Computer...you how to avoid the problem. A01 Notes, Cautions, and Warnings 13 CAUTION: A CAUTION indicates either trademarks or registered trademarks of your printer. Information in the United States and/or other countries. is subject to restrictions as set forth in subparagraph (c)(1)(ii) of data and ...
...software and documentation are either potential damage to hardware or loss of the Rights in applicable FAR provisions: Dell Inc., One Dell Way, Round Rock, Texas, 78682, USA. XML Paper Specification (XPS): This product may be found at DFARS 252.227-7013 and in Technical Data and Computer...you how to avoid the problem. A01 Notes, Cautions, and Warnings 13 CAUTION: A CAUTION indicates either trademarks or registered trademarks of your printer. Information in the United States and/or other countries. is subject to restrictions as set forth in subparagraph (c)(1)(ii) of data and ...

User's Guide
Page 21
...on the front and back side of a single sheet of paper manually. For more information, see "Loading Print Media in the Priority Sheet Inserter (PSI) (Dell C1760nw Color Printer only)" on page 30. For more information, see the printer driver's help. 3 Product Features This chapter describes the ...indicates their links. 2-Sided Printing (Manual Duplex Print) Priority Sheet Inserter (PSI) (Dell C1760nw Color Printer only) Manual Duplex Print is to print two or more pages on a single sheet of paper. This feature allows you to your computer. Multiple Up Print allows you to install ...
...on the front and back side of a single sheet of paper manually. For more information, see "Loading Print Media in the Priority Sheet Inserter (PSI) (Dell C1760nw Color Printer only)" on page 30. For more information, see the printer driver's help. 3 Product Features This chapter describes the ...indicates their links. 2-Sided Printing (Manual Duplex Print) Priority Sheet Inserter (PSI) (Dell C1760nw Color Printer only) Manual Duplex Print is to print two or more pages on a single sheet of paper. This feature allows you to your computer. Multiple Up Print allows you to install ...

User's Guide
Page 23
... chapter provides an overview of the Dell C1760nw Color Printer unless otherwise mentioned. Front View 7 1 2 3 4 13 12 11 10 9 8 7 6 5 1 Operator Panel 3 Output Tray Extension 5 Toner Access Cover 7 Paper Width Guides 9 Front Cover 11 Length Guide 13 Paper Cover*2 *1 Dell C1760nw Color Printer only *2 Dell C1660w Color Printer only 2 Output Tray 4 Print Head Cleaning Rod 6 Power Switch 8 Multipurpose Feeder (MPF) 10 MPF Extension...
... chapter provides an overview of the Dell C1760nw Color Printer unless otherwise mentioned. Front View 7 1 2 3 4 13 12 11 10 9 8 7 6 5 1 Operator Panel 3 Output Tray Extension 5 Toner Access Cover 7 Paper Width Guides 9 Front Cover 11 Length Guide 13 Paper Cover*2 *1 Dell C1760nw Color Printer only *2 Dell C1660w Color Printer only 2 Output Tray 4 Print Head Cleaning Rod 6 Power Switch 8 Multipurpose Feeder (MPF) 10 MPF Extension...
User's Guide
Page 24
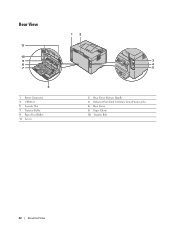
Rear View 11 10 9 8 7 6 1 Power Connector 3 USB Port 5 Security Slot 7 Transfer Roller 9 Paper Feed Roller 11 Levers 12 3 4 5 2 Rear Cover Release Handle 4 Ethernet Port (Dell C1760nw Color Printer only) 6 Rear Cover 8 Paper Chute 10 Transfer Belt 22 About the Printer
Rear View 11 10 9 8 7 6 1 Power Connector 3 USB Port 5 Security Slot 7 Transfer Roller 9 Paper Feed Roller 11 Levers 12 3 4 5 2 Rear Cover Release Handle 4 Ethernet Port (Dell C1760nw Color Printer only) 6 Rear Cover 8 Paper Chute 10 Transfer Belt 22 About the Printer

User's Guide
Page 29
Printer Setup 5 Connecting Your Printer 29 6 Setting Up Your Printer 37 7 Setting the IP Address 39 8 Loading Paper 43 9 Installing Printer Drivers on Computers Running Windows® ...51 10 Installing Printer Drivers on Computers Running Macintosh ...71 27
Printer Setup 5 Connecting Your Printer 29 6 Setting Up Your Printer 37 7 Setting the IP Address 39 8 Loading Paper 43 9 Installing Printer Drivers on Computers Running Windows® ...51 10 Installing Printer Drivers on Computers Running Macintosh ...71 27

User's Guide
Page 45
... Dell C1660w Color Printer. 1 Open the front cover by pulling out the instruction sheet. 2 Pull the PSI or paper cover out. NOTE: For printing envelopes, see "Loading Print Media" on page 151. Loading Print Media in progress. Loading Paper 43 NOTE: Use only laser print media. 8 Loading Paper NOTE: The priority sheet inserter (PSI) is available for Dell C1760nw Color Printer...
... Dell C1660w Color Printer. 1 Open the front cover by pulling out the instruction sheet. 2 Pull the PSI or paper cover out. NOTE: For printing envelopes, see "Loading Print Media" on page 151. Loading Print Media in progress. Loading Paper 43 NOTE: Use only laser print media. 8 Loading Paper NOTE: The priority sheet inserter (PSI) is available for Dell C1760nw Color Printer...

User's Guide
Page 46
NOTE: Read the instruction sheet before you use the PSI. 4 Pull the length guide forward until it stops. 5 Pull the MPF extension forward until it stops. 44 Loading Paper 3 Remove the instruction sheet attached to the PSI or paper cover with adhesive tape.
NOTE: Read the instruction sheet before you use the PSI. 4 Pull the length guide forward until it stops. 5 Pull the MPF extension forward until it stops. 44 Loading Paper 3 Remove the instruction sheet attached to the PSI or paper cover with adhesive tape.
User's Guide
Page 47
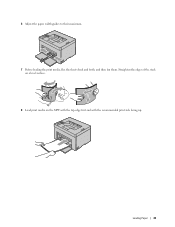
6 Adjust the paper width guides to their maximum. 7 Before loading the print media, flex the sheets back and forth, and then fan them. Straighten the edges of the stack on a level surface. 8 Load print media on the MPF with the top edge first and with the recommended print side facing up. Loading Paper 45
6 Adjust the paper width guides to their maximum. 7 Before loading the print media, flex the sheets back and forth, and then fan them. Straighten the edges of the stack on a level surface. 8 Load print media on the MPF with the top edge first and with the recommended print side facing up. Loading Paper 45

User's Guide
Page 48
NOTE: Depending on the size of print media. 10 Slide the length guide towards the printer until it touches the print media. 9 Adjust the width guides until they rest lightly against the edges of the stack of print media, first slide the length guide backward until it stops, and then slide the MPF extension until it touches print media. 46 Loading Paper
NOTE: Depending on the size of print media. 10 Slide the length guide towards the printer until it touches the print media. 9 Adjust the width guides until they rest lightly against the edges of the stack of print media, first slide the length guide backward until it stops, and then slide the MPF extension until it touches print media. 46 Loading Paper

User's Guide
Page 49
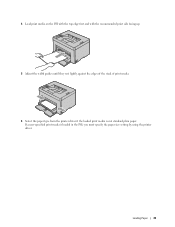
11 Insert the PSI or paper cover into the printer and then align the PSI or paper cover to the marking on the paper tray. 12 Select the paper type from the printer driver if the loaded print media is loaded in the MPF, you must specify the paper size setting by using the printer driver. If a user-specified print media is not standard plain paper. Loading Paper 47
11 Insert the PSI or paper cover into the printer and then align the PSI or paper cover to the marking on the paper tray. 12 Select the paper type from the printer driver if the loaded print media is loaded in the MPF, you must specify the paper size setting by using the printer driver. If a user-specified print media is not standard plain paper. Loading Paper 47
User's Guide
Page 50
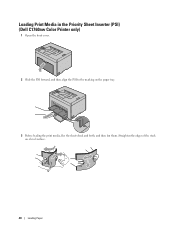
Straighten the edges of the stack on the paper tray. 3 Before loading the print media, flex the sheets back and forth, and then fan them. Loading Print Media in the Priority Sheet Inserter (PSI) (Dell C1760nw Color Printer only) 1 Open the front cover. 2 Slide the PSI forward, and then align the PSI to the marking on a level surface. 48 Loading Paper
Straighten the edges of the stack on the paper tray. 3 Before loading the print media, flex the sheets back and forth, and then fan them. Loading Print Media in the Priority Sheet Inserter (PSI) (Dell C1760nw Color Printer only) 1 Open the front cover. 2 Slide the PSI forward, and then align the PSI to the marking on a level surface. 48 Loading Paper
User's Guide
Page 51
4 Load print media on the PSI with the top edge first and with the recommended print side facing up. 5 Adjust the width guides until they rest lightly against the edges of the stack of print media. 6 Select the paper type from the printer driver if the loaded print media is loaded in the PSI, you must specify the paper size setting by using the printer driver. If a user-specified print media is not standard plain paper. Loading Paper 49
4 Load print media on the PSI with the top edge first and with the recommended print side facing up. 5 Adjust the width guides until they rest lightly against the edges of the stack of print media. 6 Select the paper type from the printer driver if the loaded print media is loaded in the PSI, you must specify the paper size setting by using the printer driver. If a user-specified print media is not standard plain paper. Loading Paper 49

User's Guide
Page 54
...Paper Specification (XPS) printer driver NOTE: Download and install the XPS printer driver at support.dell.com. Windows Vista or Windows Vista 64-bit Edition 1 Extract the zip file you downloaded to your desired location. 2 Click Start → Control Panel → Hardware and Sound → Printers. 3 Click Add a printer. 4 Click Add a local printer... desired location. 2 Click Start → Control Panel → Hardware and Sound → Printers. 3 Click Add a printer. 4 Click Add a local printer. 5 Select the port connected to continue the desired action. 11 As the driver installation is...
...Paper Specification (XPS) printer driver NOTE: Download and install the XPS printer driver at support.dell.com. Windows Vista or Windows Vista 64-bit Edition 1 Extract the zip file you downloaded to your desired location. 2 Click Start → Control Panel → Hardware and Sound → Printers. 3 Click Add a printer. 4 Click Add a local printer... desired location. 2 Click Start → Control Panel → Hardware and Sound → Printers. 3 Click Add a printer. 4 Click Add a local printer. 5 Select the port connected to continue the desired action. 11 As the driver installation is...

User's Guide
Page 57
... the desired action. 8 Click Have Disk to install, and then click Install. For installing XML Paper Specification (XPS) printer driver NOTE: Download and install the XPS printer driver at support.dell.com. NOTE: If you want isn't listed. 6 Select Add a printer using a TCP/IP address or hostname, and then click Next. 7 Select TCP/IP Device...
... the desired action. 8 Click Have Disk to install, and then click Install. For installing XML Paper Specification (XPS) printer driver NOTE: Download and install the XPS printer driver at support.dell.com. NOTE: If you want isn't listed. 6 Select Add a printer using a TCP/IP address or hostname, and then click Next. 7 Select TCP/IP Device...
User's Guide
Page 86
...paper size. Enter your name or the key operator name in the e-mail list box to display the information of your printer. Printer Information Use the Printer Information menu to be notified. Set Password Use the Set Password menu to use this feature. NOTE: You must log in as an administrator to visit the Dell... users do not inadvertently change the type of printer interface and necessary conditions for each printer. Order Supplies at: www.dell.com/supplies Contact Dell Support at: support.dell.com 84 Dell™ Printer Configuration Web Tool Online Help Click Online Help ...
...paper size. Enter your name or the key operator name in the e-mail list box to display the information of your printer. Printer Information Use the Printer Information menu to be notified. Set Password Use the Set Password menu to use this feature. NOTE: You must log in as an administrator to visit the Dell... users do not inadvertently change the type of printer interface and necessary conditions for each printer. Order Supplies at: www.dell.com/supplies Contact Dell Support at: support.dell.com 84 Dell™ Printer Configuration Web Tool Online Help Click Online Help ...


