
User Guide
Page 5
Contents 5 Security menu...155 Settings menu...160 Help menu...204 Saving money and the environment 206 Saving paper and toner...206 Using recycled paper ...206 Conserving supplies ...206 Saving energy...206 Using Eco‑Mode...206 Reducing printer noise...207 ...Hibernate Mode...208 Setting Hibernate Timeout ...209 Using Schedule Power Modes ...209 Adjusting the brightness of the display ...210 Recycling...210 Recycling Dell products...210 Securing the printer 211 Statement of Volatility...211 Erasing volatile memory...211 Erasing non‑volatile memory...212 Erasing printer hard disk...
Contents 5 Security menu...155 Settings menu...160 Help menu...204 Saving money and the environment 206 Saving paper and toner...206 Using recycled paper ...206 Conserving supplies ...206 Saving energy...206 Using Eco‑Mode...206 Reducing printer noise...207 ...Hibernate Mode...208 Setting Hibernate Timeout ...209 Using Schedule Power Modes ...209 Adjusting the brightness of the display ...210 Recycling...210 Recycling Dell products...210 Securing the printer 211 Statement of Volatility...211 Erasing volatile memory...211 Erasing non‑volatile memory...212 Erasing printer hard disk...

User Guide
Page 6
... 241 [x]-page jam, remove all pages from the finisher's accumulator. Contents 6 Ordering an ADF separator roller ...218 Storing supplies...218 Replacing supplies...219 Replacing the toner cartridge ...219 Replacing the imaging unit ...220 Replacing the staple cartridge ...223 Moving the printer...225 Before moving the printer ...225 Moving the printer to...
... 241 [x]-page jam, remove all pages from the finisher's accumulator. Contents 6 Ordering an ADF separator roller ...218 Storing supplies...218 Replacing supplies...219 Replacing the toner cartridge ...219 Replacing the imaging unit ...220 Replacing the staple cartridge ...223 Moving the printer...225 Before moving the printer ...225 Moving the printer to...

User Guide
Page 19
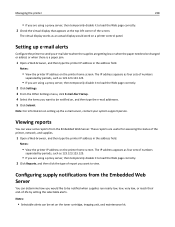
... screen, icons, and buttons may vary, depending on your network printer is located at the upper left corner of the home screen and appears as Toner Low or Cartridge Low. • Show intervention messages so the printer can view and remotely configure printer settings even when you can continue processing. Status...
... screen, icons, and buttons may vary, depending on your network printer is located at the upper left corner of the home screen and appears as Toner Low or Cartridge Low. • Show intervention messages so the printer can view and remotely configure printer settings even when you can continue processing. Status...
User Guide
Page 71
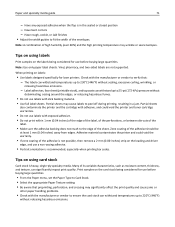
... a non‑oozing adhesive. • Portrait orientation is heavy, single‑ply specialty media. Adhesive material contaminates the printer and could void the printer and toner cartridge warranties. • Do not use labels with adhesive, and could void the warranty. • If zone coating of the label. • Make sure the...
... a non‑oozing adhesive. • Portrait orientation is heavy, single‑ply specialty media. Adhesive material contaminates the printer and could void the printer and toner cartridge warranties. • Do not use labels with adhesive, and could void the warranty. • If zone coating of the label. • Make sure the...
User Guide
Page 72
... can automatically feed paper weights up to 163‑g/m2 (43‑lb) bond grain long paper. Note: Two‑sided printing is too rough, toner cannot fuse to it is exposed to the alignment of the paper fibers in its performance. If paper is supported only for 24-48 hours...
... can automatically feed paper weights up to 163‑g/m2 (43‑lb) bond grain long paper. Note: Two‑sided printing is too rough, toner cannot fuse to it is exposed to the alignment of the paper fibers in its performance. If paper is supported only for 24-48 hours...
User Guide
Page 74
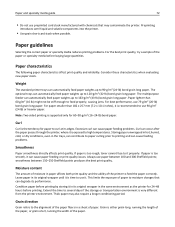
...°F) without melting or releasing hazardous emissions. Paper and specialty media guide 74 Use papers printed with heat‑resistant inks designed for use in toner. Preprinted papers such as premium cotton papers, 200-300 Sheffield units) have been engineered to -sheet coefficient of friction (0.4-0.6) • Sufficient bending resistance in the...
...°F) without melting or releasing hazardous emissions. Paper and specialty media guide 74 Use papers printed with heat‑resistant inks designed for use in toner. Preprinted papers such as premium cotton papers, 200-300 Sheffield units) have been engineered to -sheet coefficient of friction (0.4-0.6) • Sufficient bending resistance in the...
User Guide
Page 79
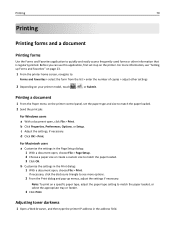
... use this application, first set the paper type and size to match the paper loaded, or select the appropriate tray or feeder. 3 Click Print. Adjusting toner darkness 1 Open a Web browser, and then type the printer IP address in the Page Setup dialog: 1 With a document open , choose File > Print. If necessary, click...
... use this application, first set the paper type and size to match the paper loaded, or select the appropriate tray or feeder. 3 Click Print. Adjusting toner darkness 1 Open a Web browser, and then type the printer IP address in the Page Setup dialog: 1 With a document open , choose File > Print. If necessary, click...
User Guide
Page 80
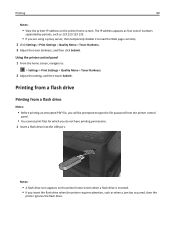
...You cannot print files for which you are using a proxy server, then temporarily disable it to : > Settings > Print Settings > Quality Menu > Toner Darkness 2 Adjust the setting, and then touch Submit. The IP address appears as four sets of numbers separated by periods, such as when a jam... control panel 1 From the home screen, navigate to load the Web page correctly. 2 Click Settings > Print Settings > Quality Menu > Toner Darkness. 3 Adjust the toner darkness, and then click Submit. Printing 80 Notes: • View the printer IP address on the printer home screen when a flash drive...
...You cannot print files for which you are using a proxy server, then temporarily disable it to : > Settings > Print Settings > Quality Menu > Toner Darkness 2 Adjust the setting, and then touch Submit. The IP address appears as four sets of numbers separated by periods, such as when a jam... control panel 1 From the home screen, navigate to load the Web page correctly. 2 Click Settings > Print Settings > Quality Menu > Toner Darkness. 3 Adjust the toner darkness, and then click Submit. Printing 80 Notes: • View the printer IP address on the printer home screen when a flash drive...
User Guide
Page 163
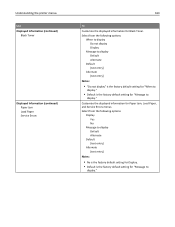
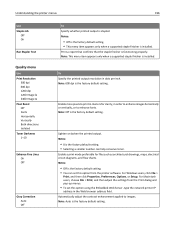
Customize the displayed information for Black Toner. Select from the following options: When to display Do not display Display Message to display Default Alternate Default [text entry] Alternate [text entry] Notes: • "... setting for "When to display." • Default is the factory default setting for "Message to display." Understanding the printer menus Use Displayed Information (continued) Black Toner Displayed Information (continued) Paper Jam Load Paper Service Errors 163 To Customize the displayed information for Paper Jam, Load Paper, and Service Errors menus. Select...
Customize the displayed information for Black Toner. Select from the following options: When to display Do not display Display Message to display Default Alternate Default [text entry] Alternate [text entry] Notes: • "... setting for "When to display." • Default is the factory default setting for "Message to display." Understanding the printer menus Use Displayed Information (continued) Black Toner Displayed Information (continued) Paper Jam Load Paper Service Errors 163 To Customize the displayed information for Paper Jam, Load Paper, and Service Errors menus. Select...
User Guide
Page 177
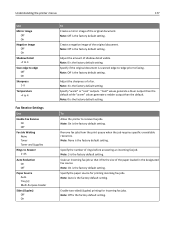
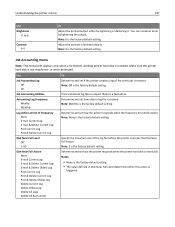
... ‑4 to 4 Scan edge to edge Off On Sharpness 1-5 Temperature ‑4 to 4 Fax Receive Settings Use Enable Fax Receive On Off Fax Job Waiting None Toner Toner and Supplies Rings to Answer 1-25 Auto Reduction On Off Paper Source Auto Tray [x] Multi‑Purpose Feeder Sides (Duplex) Off On To Create a mirror...
... ‑4 to 4 Scan edge to edge Off On Sharpness 1-5 Temperature ‑4 to 4 Fax Receive Settings Use Enable Fax Receive On Off Fax Job Waiting None Toner Toner and Supplies Rings to Answer 1-25 Auto Reduction On Off Paper Source Auto Tray [x] Multi‑Purpose Feeder Sides (Duplex) Off On To Create a mirror...
User Guide
Page 196
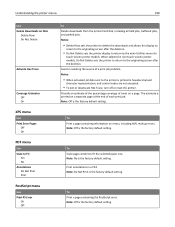
... printed output resolution in the Web browser address field. Notes: • Off is the factory default setting. • You can help conserve toner. For Macintosh users, choose File > Print, and then adjust the settings from the printer software. Enable more pixels to print in order to...menu Use Print Resolution 300 dpi 600 dpi 1200 dpi 1200 Image Q 2400 Image Q Pixel Boost Off Fonts Horizontally Vertically Both directions Isolated Toner Darkness 1-10 Enhance Fine Lines On Off Gray Correction Auto Off To Specify whether printed output is the factory default setting. Notes: •...
... printed output resolution in the Web browser address field. Notes: • Off is the factory default setting. • You can help conserve toner. For Macintosh users, choose File > Print, and then adjust the settings from the printer software. Enable more pixels to print in order to...menu Use Print Resolution 300 dpi 600 dpi 1200 dpi 1200 Image Q 2400 Image Q Pixel Boost Off Fonts Horizontally Vertically Both directions Isolated Toner Darkness 1-10 Enhance Fine Lines On Off Gray Correction Auto Off To Specify whether printed output is the factory default setting. Notes: •...
User Guide
Page 197
... & Delete Current Log Post Current Log Post & Delete Current Log Determine and set how the printer responds when the frequency threshold expires. You can conserve toner by lightening or darkening it receives. Note: 0 is created.
... & Delete Current Log Post Current Log Post & Delete Current Log Determine and set how the printer responds when the frequency threshold expires. You can conserve toner by lightening or darkening it receives. Note: 0 is created.
User Guide
Page 199
... off or reset the printer. Notes: • When activated, all held jobs, buffered jobs, and parked jobs. Provide an estimate of the percentage coverage of toner on errors, including XML markup errors. Note: Off is the factory default setting. Note: Off is the factory default setting. Note: No is the factory...
... off or reset the printer. Notes: • When activated, all held jobs, buffered jobs, and parked jobs. Provide an estimate of the percentage coverage of toner on errors, including XML markup errors. Note: Off is the factory default setting. Note: Off is the factory default setting. Note: No is the factory...

User Guide
Page 206
... sheet of paper by periods, such as 123.123.123.123. Saving money and the environment 206 Saving money and the environment Saving paper and toner Studies show that as much as printing on both sides of the paper If your printer model supports duplex printing, then you can significantly reduce...
... sheet of paper by periods, such as 123.123.123.123. Saving money and the environment 206 Saving money and the environment Saving paper and toner Studies show that as much as printing on both sides of the paper If your printer model supports duplex printing, then you can significantly reduce...
User Guide
Page 218
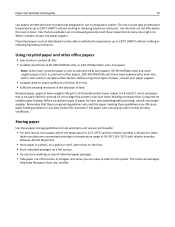
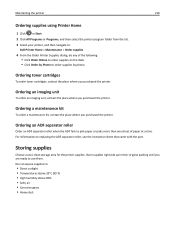
... 1 Click or Start. 2 Click All Programs or Programs, and then select the printer program folder from the list. 3 Select your printer, and then navigate to: Dell Printer Home > Maintenance > Order supplies 4 From the Order Printer Supplies dialog, do any of paper at a time. Storing supplies Choose a cool, clean storage area ... • Direct sunlight • Temperatures above 35°C (95°F) • High humidity above 80% • Salty air • Corrosive gases • Heavy dust Ordering toner cartridges To order toner cartridges, contact the place where you are ready to use them.
... 1 Click or Start. 2 Click All Programs or Programs, and then select the printer program folder from the list. 3 Select your printer, and then navigate to: Dell Printer Home > Maintenance > Order supplies 4 From the Order Printer Supplies dialog, do any of paper at a time. Storing supplies Choose a cool, clean storage area ... • Direct sunlight • Temperatures above 35°C (95°F) • High humidity above 80% • Salty air • Corrosive gases • Heavy dust Ordering toner cartridges To order toner cartridges, contact the place where you are ready to use them.
User Guide
Page 219
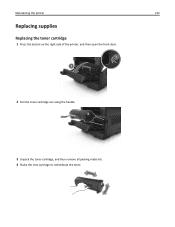
Maintaining the printer 219 Replacing supplies Replacing the toner cartridge 1 Press the button on the right side of the printer, and then open the front door. 1 2 2 Pull the toner cartridge out using the handle. 3 Unpack the toner cartridge, and then remove all packing materials. 4 Shake the new cartridge to redistribute the toner.
Maintaining the printer 219 Replacing supplies Replacing the toner cartridge 1 Press the button on the right side of the printer, and then open the front door. 1 2 2 Pull the toner cartridge out using the handle. 3 Unpack the toner cartridge, and then remove all packing materials. 4 Shake the new cartridge to redistribute the toner.
User Guide
Page 220
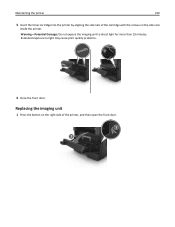
Warning-Potential Damage: Do not expose the imaging unit to light may cause print quality problems. 6 Close the front door. Maintaining the printer 220 5 Insert the toner cartridge into the printer by aligning the side rails of the printer, and then open the front door. 1 2 Extended exposure to direct light for more than 10 minutes. Replacing the imaging unit 1 Press the button on the right side of the cartridge with the arrows on the side rails inside the printer.
Warning-Potential Damage: Do not expose the imaging unit to light may cause print quality problems. 6 Close the front door. Maintaining the printer 220 5 Insert the toner cartridge into the printer by aligning the side rails of the printer, and then open the front door. 1 2 Extended exposure to direct light for more than 10 minutes. Replacing the imaging unit 1 Press the button on the right side of the cartridge with the arrows on the side rails inside the printer.

User Guide
Page 221
Maintaining the printer 221 2 Pull the toner cartridge out using the handle. 3 Lift the blue handle, and then pull the imaging unit out of the printer. 4 Unpack the new imaging unit, and then shake it.
Maintaining the printer 221 2 Pull the toner cartridge out using the handle. 3 Lift the blue handle, and then pull the imaging unit out of the printer. 4 Unpack the new imaging unit, and then shake it.

User Guide
Page 223
Maintaining the printer 223 7 Insert the toner cartridge into the printer by aligning the side rails of the cartridge with the arrows on the side rails inside the printer. 8 Close the front door. Replacing the staple cartridge 1 Open the stapler door.
Maintaining the printer 223 7 Insert the toner cartridge into the printer by aligning the side rails of the cartridge with the arrows on the side rails inside the printer. 8 Close the front door. Replacing the staple cartridge 1 Open the stapler door.
User Guide
Page 228
... the printer IP address in the address field. Notes: • View the printer IP address on the printer home screen. Note: For information on the toner cartridge, imaging unit, and maintenance kit. The IP address appears as an actual display would like to load the Web page correctly. 2 Check the virtual...
... the printer IP address in the address field. Notes: • View the printer IP address on the printer home screen. Note: For information on the toner cartridge, imaging unit, and maintenance kit. The IP address appears as an actual display would like to load the Web page correctly. 2 Check the virtual...


