Service Manual
Page 4
......59 Intel Virtual Button driver...59 Wireless and Bluetooth drivers...59 4 System setup...60 System setup...60 Entering BIOS setup program...60 Navigation keys...60 Boot Sequence...60 System setup options...61 Clearing CMOS settings...64 Clearing BIOS (System Setup) and System passwords...64 5 Troubleshooting...66 Enhanced Pre-Boot System Assessment (ePSA) diagnostics 66 Running the ePSA diagnostics...66 System diagnostic lights...66 Flashing BIOS (USB key)...67 Flashing the BIOS...67 Backup media and recovery options...68 WiFi power cycle...68 Flea power release...68 Disconnecting...
......59 Intel Virtual Button driver...59 Wireless and Bluetooth drivers...59 4 System setup...60 System setup...60 Entering BIOS setup program...60 Navigation keys...60 Boot Sequence...60 System setup options...61 Clearing CMOS settings...64 Clearing BIOS (System Setup) and System passwords...64 5 Troubleshooting...66 Enhanced Pre-Boot System Assessment (ePSA) diagnostics 66 Running the ePSA diagnostics...66 System diagnostic lights...66 Flashing BIOS (USB key)...67 Flashing the BIOS...67 Backup media and recovery options...68 WiFi power cycle...68 Flea power release...68 Disconnecting...
Service Manual
Page 5
... shown in this document assumes that you must disengage before opening the computer cover or panels. Hold a component such as keyboard, mouse, and monitor from your computer. 5. Damage due to servicing that may differ from your computer depending on a card. Before working inside the computer, replace all power sources before disconnecting the cable. Click Start > Power > Shut down your computer. NOTE: If you disconnect...
... shown in this document assumes that you must disengage before opening the computer cover or panels. Hold a component such as keyboard, mouse, and monitor from your computer. 5. Damage due to servicing that may differ from your computer depending on a card. Before working inside the computer, replace all power sources before disconnecting the cable. Click Start > Power > Shut down your computer. NOTE: If you disconnect...
Service Manual
Page 6
... example of catastrophic failure is a memory DIMM that you should be used in the original box that the new part arrived in. The more difficult type of damage to recognize and troubleshoot is the most of the time when damage occurs, it is not immediately recognizable. Always look for a large open flat work area, insulators such as Styrofoam...
... example of catastrophic failure is a memory DIMM that you should be used in the original box that the new part arrived in. The more difficult type of damage to recognize and troubleshoot is the most of the time when damage occurs, it is not immediately recognizable. Always look for a large open flat work area, insulators such as Styrofoam...
Service Manual
Page 7
.... 2. Turn on your back upright, whether lifting or setting down . Lifting equipment Adhere to Dell, it is recommended that no stray screws remain inside an anti-static bag. • Transporting Sensitive Components - Get a firm balanced footing. Keep the load close. Connect any other parts that they use a mechanical lifting device. 1. Replace any media cards, discs, or any external devices, peripherals, or cables you removed before working...
.... 2. Turn on your back upright, whether lifting or setting down . Lifting equipment Adhere to Dell, it is recommended that no stray screws remain inside an anti-static bag. • Transporting Sensitive Components - Get a firm balanced footing. Keep the load close. Connect any other parts that they use a mechanical lifting device. 1. Replace any media cards, discs, or any external devices, peripherals, or cables you removed before working...
Service Manual
Page 27
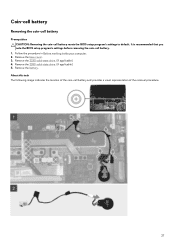
... battery Removing the coin-cell battery Prerequisites CAUTION: Removing the coin-cell battery resets the BIOS setup program's settings to default. Remove the 2230 solid-state drive. (if applicable) 4. Remove the 2280 solid-state drive. (if applicable) 5. About this task The following image indicates the location of the coin-cell battery and provides a visual representation of the removal procedure. 27 Follow the procedure in Before working inside your computer. 2. Remove...
... battery Removing the coin-cell battery Prerequisites CAUTION: Removing the coin-cell battery resets the BIOS setup program's settings to default. Remove the 2230 solid-state drive. (if applicable) 4. Remove the 2280 solid-state drive. (if applicable) 5. About this task The following image indicates the location of the coin-cell battery and provides a visual representation of the removal procedure. 27 Follow the procedure in Before working inside your computer. 2. Remove...
Service Manual
Page 59
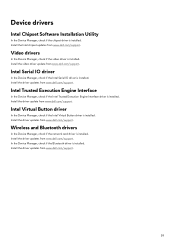
...driver is installed. Install the driver update from www.dell.com/support. Install the Intel chipset updates from www.dell.com/support. Wireless and Bluetooth drivers In the Device Manager, check if the network card driver is installed. Install the driver updates from www.dell.com/support. 59 Install the driver updates from www.dell.com/support. Install the video driver update from www.dell.com/support. Device drivers Intel Chipset Software Installation Utility In the Device Manager, check if the chipset driver is installed. Video drivers In the Device Manager, check if the video...
...driver is installed. Install the driver update from www.dell.com/support. Install the Intel chipset updates from www.dell.com/support. Wireless and Bluetooth drivers In the Device Manager, check if the network card driver is installed. Install the driver updates from www.dell.com/support. 59 Install the driver updates from www.dell.com/support. Install the video driver update from www.dell.com/support. Device drivers Intel Chipset Software Installation Utility In the Device Manager, check if the chipset driver is installed. Video drivers In the Device Manager, check if the video...
Service Manual
Page 60
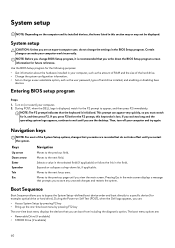
... F12 key The one-time boot menu displays the devices that you make your computer work incorrectly. NOTE: Before you change a user-selectable option, such as the user password, type of hard drive installed, and enabling or disabling base devices. During POST, when the DELL logo is recommended that you to appear, and then press F2 immediately. Navigation keys NOTE: For most of the hard drive. • Change the system configuration information. • Set or change BIOS Setup program...
... F12 key The one-time boot menu displays the devices that you make your computer work incorrectly. NOTE: Before you change a user-selectable option, such as the user password, type of hard drive installed, and enabling or disabling base devices. During POST, when the DELL logo is recommended that you to appear, and then press F2 immediately. Navigation keys NOTE: For most of the hard drive. • Change the system configuration information. • Set or change BIOS Setup program...
Service Manual
Page 61
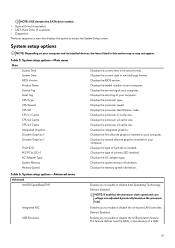
... type of a USB- 61 System setup options NOTE: Depending on the processor load. Table 5. Displays the service tag of hard drive installed. Displays the first discrete graphics installed on your computer. System setup options-Advanced menu Advanced Intel(R) SpeedStep(TM) Integrated NIC USB Emulation Enables you to enable or disable the on your computer and its installed devices, the items listed in the absence of primary SSD installed. Default: Enabled Enables you to access the System Setup screen...
... type of a USB- 61 System setup options NOTE: Depending on the processor load. Table 5. Displays the service tag of hard drive installed. Displays the first discrete graphics installed on your computer. System setup options-Advanced menu Advanced Intel(R) SpeedStep(TM) Integrated NIC USB Emulation Enables you to enable or disable the on your computer and its installed devices, the items listed in the absence of primary SSD installed. Default: Enabled Enables you to access the System Setup screen...

Service Manual
Page 62
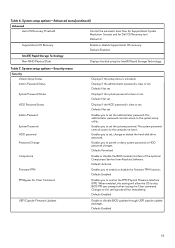
... from a recovery file on the user primary hard drive Default: Enabled BIOS Auto-Recovery Enable or disable BIOS Auto-Recovery. Enable/disable Intel Speed Shift Technology support. Default: Enabled Function Key Behavior Enables you to the USB PowerShare connector may not wake the computer. Default: Software Controlled Intel(R) Software Guard Extensions allocated memory size BIOS Recovery from Standby. Default: Disabled SupportAssist System Resolution 62 USB emulation is turned off . Setting this option is enabled, a device connected to charge USB devices when the...
... from a recovery file on the user primary hard drive Default: Enabled BIOS Auto-Recovery Enable or disable BIOS Auto-Recovery. Enable/disable Intel Speed Shift Technology support. Default: Enabled Function Key Behavior Enables you to the USB PowerShare connector may not wake the computer. Default: Software Controlled Intel(R) Software Guard Extensions allocated memory size BIOS Recovery from Standby. Default: Disabled SupportAssist System Resolution 62 USB emulation is turned off . Setting this option is enabled, a device connected to charge USB devices when the...
Service Manual
Page 63
System setup options-Security menu Security Unlock Setup Status Admin Password Status System Password Status HDD Password Status Admin Password System Password HDD password Password Change Computrace Firmware TPM PPI Bypass for Dell OS Recovery tool. Displays if the administrator password is clear or set . Default: Not set Displays if the HDD password is clear or set . The system password controls access to skip BIOS PPI user prompts when issuing the Clear command. Default: Permitted Enable or disable the BIOS module interface of the optional Computrace Service from Absolute Software....
System setup options-Security menu Security Unlock Setup Status Admin Password Status System Password Status HDD Password Status Admin Password System Password HDD password Password Change Computrace Firmware TPM PPI Bypass for Dell OS Recovery tool. Displays if the administrator password is clear or set . Default: Not set Displays if the HDD password is clear or set . The system password controls access to skip BIOS PPI user prompts when issuing the Clear command. Default: Permitted Enable or disable the BIOS module interface of the optional Computrace Service from Absolute Software....

Service Manual
Page 64
...cell battery to restore default values for all system setup options. Replace the back cover. Allows you to disconnect the coin-cell battery cable from the system board. 3. Table 8. Displays the available first boot option. Displays the available second boot option. Remove the base cover. 2. System setup options-Exit menu Exit Save Changes and Reset Discard Changes and Reset Restore Defaults Discard Changes Save Changes Clearing CMOS settings Displays the available boot options. Default: Disabled Displays the boot sequence. Allows you to delete the boot options Enable or...
...cell battery to restore default values for all system setup options. Replace the back cover. Allows you to disconnect the coin-cell battery cable from the system board. 3. Table 8. Displays the available first boot option. Displays the available second boot option. Remove the base cover. 2. System setup options-Exit menu Exit Save Changes and Reset Discard Changes and Reset Restore Defaults Discard Changes Save Changes Clearing CMOS settings Displays the available boot options. Default: Disabled Displays the boot sequence. Allows you to delete the boot options Enable or...
Service Manual
Page 66
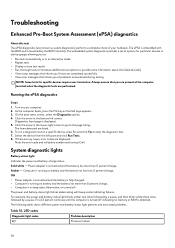
... error messages that inform you of options for specific devices require user interaction. The items detected are displayed. To run a diagnostic test on battery and the battery has less than 5 percent charge. The power and battery-status light blinks amber along with the BIOS and is launched by a pause. The following table shows different power and battery-status light patterns and associated problems. Table 10. Troubleshooting Enhanced Pre-Boot System...
... error messages that inform you of options for specific devices require user interaction. The items detected are displayed. To run a diagnostic test on battery and the battery has less than 5 percent charge. The power and battery-status light blinks amber along with the BIOS and is launched by a pause. The following table shows different power and battery-status light patterns and associated problems. Table 10. Troubleshooting Enhanced Pre-Boot System...
Service Manual
Page 67
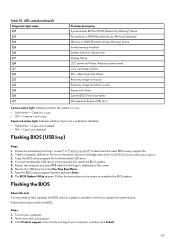
... Memory or RAM (Random-Access Memory) failure Invalid memory installed System-board or chipset error Display failure LCD power rail failure. Connect the bootable USB drive to www.dell.com/support. 3. Camera is available or when you replace the system board. Go to the computer that needs the BIOS update. 5. Caps Lock disabled. Follow the procedure from the One Time Boot Menu. 7. Copy the BIOS setup program file to download the latest BIOS setup program file. 2. Replace system board Coin-cell battery failure PCI, video card...
... Memory or RAM (Random-Access Memory) failure Invalid memory installed System-board or chipset error Display failure LCD power rail failure. Connect the bootable USB drive to www.dell.com/support. 3. Camera is available or when you replace the system board. Go to the computer that needs the BIOS update. 5. Caps Lock disabled. Follow the procedure from the One Time Boot Menu. 7. Copy the BIOS setup program file to download the latest BIOS setup program file. 2. Replace system board Coin-cell battery failure PCI, video card...
Service Manual
Page 68
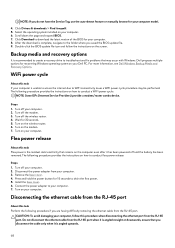
... the power button for 15 seconds to conduct a WiFi power cycle: NOTE: Some ISPs (Internet Service Providers) provide a modem/router combo device. Turn off your Dell PC. Turn off the modem. 3. After the download is recommended to create a recovery drive to WiFi connectivity issues a WiFi power cycle procedure may occur with Windows. Turn off the wireless router. 4. Turn off and the battery has been removed. Install the base cover. 6. Turn on your computer. 2. Disconnecting the ethernet cable from...
... the power button for 15 seconds to conduct a WiFi power cycle: NOTE: Some ISPs (Internet Service Providers) provide a modem/router combo device. Turn off your Dell PC. Turn off the modem. 3. After the download is recommended to create a recovery drive to WiFi connectivity issues a WiFi power cycle procedure may occur with Windows. Turn off the wireless router. 4. Turn off and the battery has been removed. Install the base cover. 6. Turn on your computer. 2. Disconnecting the ethernet cable from...

Service Manual
Page 70
... View Products. • Enter the Service Tag number or Product ID in your product through one of the following information about your product: • Product specifications • Operating system • Setting up instructions, product specifications, technical help blogs, drivers, software updates, and so on Dell products and services using your product • Data backup • Troubleshooting and diagnostics • Factory and system restore • BIOS information See Me and...
... View Products. • Enter the Service Tag number or Product ID in your product through one of the following information about your product: • Product specifications • Operating system • Setting up instructions, product specifications, technical help blogs, drivers, software updates, and so on Dell products and services using your product • Data backup • Troubleshooting and diagnostics • Factory and system restore • BIOS information See Me and...

Setup and Specifications
Page 5
... to charge the device. 4. Security-cable slot (wedge-shaped) Connect a security cable to prevent unauthorized movement of Alienware m15 R2 Left 1. USB 3.1 Gen 1 port with PowerShare Connect peripherals such as external storage devices and printers. Provides data transfer speeds up to charge your devices using the PowerShare port. Network port Connect an Ethernet (RJ45) cable from your computer. 3. Headset port Connect headphones or a headset (headphone and microphone combo). Views of your computer. 2. You must connect the power adapter...
... to charge the device. 4. Security-cable slot (wedge-shaped) Connect a security cable to prevent unauthorized movement of Alienware m15 R2 Left 1. USB 3.1 Gen 1 port with PowerShare Connect peripherals such as external storage devices and printers. Provides data transfer speeds up to charge your devices using the PowerShare port. Network port Connect an Ethernet (RJ45) cable from your computer. 3. Headset port Connect headphones or a headset (headphone and microphone combo). Views of your computer. 2. You must connect the power adapter...
Setup and Specifications
Page 10
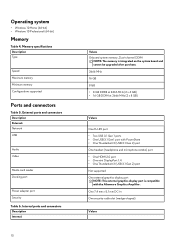
...USB 3.1 Gen 2) port Not supported One external graphics display port NOTE: This external graphics display port is compatible with the Alienware Graphics Amplifier. One 7.4 mm x 5.1 mm DC-in One security-cable slot (wedge-shaped) Values External ports and connectors Description External: Network USB Audio Video Media card reader Docking port Power adapter port Security Table 6. Operating system • Windows 10 Home (64-bit) • Windows 10 Professional (64-bit) Memory Table 4. Memory specifications Description Type Speed Maximum memory Minimum memory Configurations supported Ports...
...USB 3.1 Gen 2) port Not supported One external graphics display port NOTE: This external graphics display port is compatible with the Alienware Graphics Amplifier. One 7.4 mm x 5.1 mm DC-in One security-cable slot (wedge-shaped) Values External ports and connectors Description External: Network USB Audio Video Media card reader Docking port Power adapter port Security Table 6. Operating system • Windows 10 Home (64-bit) • Windows 10 Professional (64-bit) Memory Table 4. Memory specifications Description Type Speed Maximum memory Minimum memory Configurations supported Ports...

Setup and Specifications
Page 16
... GeForce RTX 2080 • One HDMI 2.0 port Max-Q • One mini DisplayPort 1.4 Table 18. Display specifications (continued) Description Power Consumption (maximum) 6.20 W Anti-glare vs glossy finish Anti-glare Touch options Not supported 7.80 W Anti-glare Not supported Values 4.41 W Anti-glare Not supported 14.80 W TrueLife Not supported Video Table 17. Computer environment Description Temperature range Operating 0°C to 35°C (32...
... GeForce RTX 2080 • One HDMI 2.0 port Max-Q • One mini DisplayPort 1.4 Table 18. Display specifications (continued) Description Power Consumption (maximum) 6.20 W Anti-glare vs glossy finish Anti-glare Touch options Not supported 7.80 W Anti-glare Not supported Values 4.41 W Anti-glare Not supported 14.80 W TrueLife Not supported Video Table 17. Computer environment Description Temperature range Operating 0°C to 35°C (32...
Setup and Specifications
Page 19
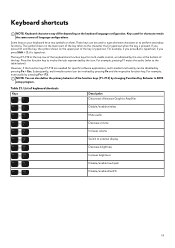
..., multi-media control can be disabled by changing Function Key Behavior in BIOS setup program. List of the key is typed out. Keyboard shortcuts NOTE: Keyboard characters may differ depending on them. These keys can also define the primary behavior of the key refers to external display Decrease brightness Increase brightness Disable/enable touchpad Disable/enable AlienFX 19 The symbol shown on the upper part of keyboard shortcuts Keys Description Disconnect Alienware Graphics Amplifier Disable/enable wireless Mute audio Decrease volume Increase volume Switch to...
..., multi-media control can be disabled by changing Function Key Behavior in BIOS setup program. List of the key is typed out. Keyboard shortcuts NOTE: Keyboard characters may differ depending on them. These keys can also define the primary behavior of the key refers to external display Decrease brightness Increase brightness Disable/enable touchpad Disable/enable AlienFX 19 The symbol shown on the upper part of keyboard shortcuts Keys Description Disconnect Alienware Graphics Amplifier Disable/enable wireless Mute audio Decrease volume Increase volume Switch to...
Setup and Specifications
Page 20
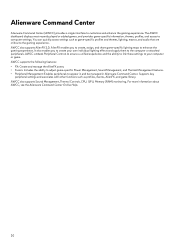
... the Alienware Command Center Online Help. 20 AlienFX enables you to create your computer or game. Supports key peripheral settings and associates with other functions such as game-specific profiles and themes, lighting, macros, and audio that are critical to the gaming experience. AWCC supports the following features: • FX: Create and manage the AlienFX zones. • Fusion: Includes the ability to adjust game-specific Power Management, Sound Management...
... the Alienware Command Center Online Help. 20 AlienFX enables you to create your computer or game. Supports key peripheral settings and associates with other functions such as game-specific profiles and themes, lighting, macros, and audio that are critical to the gaming experience. AWCC supports the following features: • FX: Create and manage the AlienFX zones. • Fusion: Includes the ability to adjust game-specific Power Management, Sound Management...


