
Comprehensive Specifications
Page 4
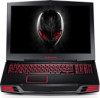
Computer Model Alienware M17x-R2 Dimensions Height (Front to 2.11 inches) 405.89 mm (15.98 inches) 321.31 mm (12.65 inches) 5.3 kg (11.8 lb) NOTE: The weight of DDR3 memory up to 1333 MHz Processor address bus width 32 bits Processor data width 64 bits BIOS EPROM 16 Mbit Graphics bus PCIe x16...
Computer Model Alienware M17x-R2 Dimensions Height (Front to 2.11 inches) 405.89 mm (15.98 inches) 321.31 mm (12.65 inches) 5.3 kg (11.8 lb) NOTE: The weight of DDR3 memory up to 1333 MHz Processor address bus width 32 bits Processor data width 64 bits BIOS EPROM 16 Mbit Graphics bus PCIe x16...
Mobile Manual
Page 3
... Optical Drive 25 Using the Integrated Camera 26 Using the Wireless Control 26 Battery Pack 26 Power Management 26 Alienware Command Center 27 Stealth Mode 27 Free Fall Sensor 28 Configuring the BIOS 28 CHAPTER 4: INSTALLING ADDITIONAL OR REPLACEMENT COMPONENTS 33 Before You Begin 34 Replacing the Battery Pack 36 Upgrading or...
... Optical Drive 25 Using the Integrated Camera 26 Using the Wireless Control 26 Battery Pack 26 Power Management 26 Alienware Command Center 27 Stealth Mode 27 Free Fall Sensor 28 Configuring the BIOS 28 CHAPTER 4: INSTALLING ADDITIONAL OR REPLACEMENT COMPONENTS 33 Before You Begin 34 Replacing the Battery Pack 36 Upgrading or...

Mobile Manual
Page 10
... modem and to the telephone wall jack before you need to connect to the Internet (Optional) • If you download and install the latest BIOS and drivers for setup instructions. Click Start → Control Panel→ Network and Sharing Center→ Connect to a wireless router: 1. To ...complete the setup. Save and close any open files, and exit any open programs. 3. Doing so may render your computer available at support.dell.com. Connect to your Internet connection. 10 CHAPTER 1: SETTING UP YOUR LAPTOP Set Up Microsoft Windows CAUTION: Do not interrupt the operating system...
... modem and to the telephone wall jack before you need to connect to the Internet (Optional) • If you download and install the latest BIOS and drivers for setup instructions. Click Start → Control Panel→ Network and Sharing Center→ Connect to a wireless router: 1. To ...complete the setup. Save and close any open files, and exit any open programs. 3. Doing so may render your computer available at support.dell.com. Connect to your Internet connection. 10 CHAPTER 1: SETTING UP YOUR LAPTOP Set Up Microsoft Windows CAUTION: Do not interrupt the operating system...

Mobile Manual
Page 28
...and try again. If an error occurs during POST (Power On Self Test), you write down for your laptop. System Setup Screens The BIOS Setup Utility window displays current or changeable configuration information for extended periods of time. Before you use System Setup, it is recommended that ...Boot, and Exit. CAUTION: Do not change a user-selectable option. • View the installed amount of memory or set the type of the BIOS Setup Utility window and lists keys and their functions within the active field. 28 CHAPTER 3: USING YOUR LAPTOP Information is placed in even intervals until...
...and try again. If an error occurs during POST (Power On Self Test), you write down for your laptop. System Setup Screens The BIOS Setup Utility window displays current or changeable configuration information for extended periods of time. Before you use System Setup, it is recommended that ...Boot, and Exit. CAUTION: Do not change a user-selectable option. • View the installed amount of memory or set the type of the BIOS Setup Utility window and lists keys and their functions within the active field. 28 CHAPTER 3: USING YOUR LAPTOP Information is placed in even intervals until...

Mobile Manual
Page 29
..., see the Service Manual at support.dell.com/manuals. Displays the system date. Displays the model number of your computer and installed devices, the items listed in your computer. Main Menu System Time System Date Alienware Service Tag BIOS Version EC Version CPU CPU Speed CPU... wireless device is disabled and is not visible to the operating system. • Enabled: The internal wireless device is enabled. Displays the BIOS revision. Displays the processor cache size. Allows you to enable or disable the on your computer. Displays the memory size installed in memory...
..., see the Service Manual at support.dell.com/manuals. Displays the system date. Displays the model number of your computer and installed devices, the items listed in your computer. Main Menu System Time System Date Alienware Service Tag BIOS Version EC Version CPU CPU Speed CPU... wireless device is disabled and is not visible to the operating system. • Enabled: The internal wireless device is enabled. Displays the BIOS revision. Displays the processor cache size. Allows you to enable or disable the on your computer. Displays the memory size installed in memory...
Mobile Manual
Page 30
... to configure fields in the absence of USB device (floppy, hard drive, or memory key) when this option is enabled. This feature defines how the BIOS, in the Performance Options sub-menu (for RAID mode. USB emulation is enabled. Allows you to enable or disable the USB emulation feature. Displays the...
... to configure fields in the absence of USB device (floppy, hard drive, or memory key) when this option is enabled. This feature defines how the BIOS, in the Performance Options sub-menu (for RAID mode. USB emulation is enabled. Allows you to enable or disable the USB emulation feature. Displays the...
Mobile Manual
Page 44
... passwords and keep copies of your laptop. This is especially important if you are no loose connections anywhere. • Power Savings: Ensure that your computer's BIOS and operating system. • Document vital settings such as you can use those provided with your operating system and software safe. If connected to a power...
... passwords and keep copies of your laptop. This is especially important if you are no loose connections anywhere. • Power Savings: Ensure that your computer's BIOS and operating system. • Document vital settings such as you can use those provided with your operating system and software safe. If connected to a power...
Service Manual
Page 5
CHAPTER 22: SYSTEM BOARD 98 Removing the System Board 100 Replacing the System Board 102 CHAPTER 23: SPEAKERS 103 Removing the Speakers 105 Replacing the Speakers 105 CHAPTER 24: CONSUMER IR BOARD 106 Removing the Consumer IR Board 108 Replacing the Consumer IR Board 108 CHAPTER 25: BATTERY LATCH ASSEMBLY 109 Removing the Battery Latch Assembly 111 Replacing the Battery Latch Assembly 111 CHAPTER 26: BIOS 112 Configuring the BIOS 113 Flashing the BIOS 118 CONTENTS 05 /05
CHAPTER 22: SYSTEM BOARD 98 Removing the System Board 100 Replacing the System Board 102 CHAPTER 23: SPEAKERS 103 Removing the Speakers 105 Replacing the Speakers 105 CHAPTER 24: CONSUMER IR BOARD 106 Removing the Consumer IR Board 108 Replacing the Consumer IR Board 108 CHAPTER 25: BATTERY LATCH ASSEMBLY 109 Removing the Battery Latch Assembly 111 Replacing the Battery Latch Assembly 111 CHAPTER 26: BIOS 112 Configuring the BIOS 113 Flashing the BIOS 118 CONTENTS 05 /05

Service Manual
Page 98
CHAPTER 22: SYSTEM BOARD CHAPTER 20: SYSTEM BOARD CHAPTER 22: SYSTEM BOARD The system board's BIOS chip contains the Service Tag, which is also visible on a barcode label on the bottom of the computer. The Service Tag has to be entered in the replacement system board's BIOS chip using the System Setup utility. 098 /098
CHAPTER 22: SYSTEM BOARD CHAPTER 20: SYSTEM BOARD CHAPTER 22: SYSTEM BOARD The system board's BIOS chip contains the Service Tag, which is also visible on a barcode label on the bottom of the computer. The Service Tag has to be entered in the replacement system board's BIOS chip using the System Setup utility. 098 /098

Service Manual
Page 102
.... Connect the processor thermal fan cable to the computer. 25. NOTE: After you have replaced the system board, enter the computer Service Tag into the BIOS of the replacement system board. 0102 /0102 Connect the left and right brackets (see "Replacing the Optical Drive" on the system board and the consumer...
.... Connect the processor thermal fan cable to the computer. 25. NOTE: After you have replaced the system board, enter the computer Service Tag into the BIOS of the replacement system board. 0102 /0102 Connect the left and right brackets (see "Replacing the Optical Drive" on the system board and the consumer...

Service Manual
Page 113
.... To avoid possible keyboard failure, press and release in System Setup unless you write down your computer to access the BIOS Setup Utility. Configuring the BIOS System Setup The System Setup options allow you to: • Change the system configuration information after you may result when... restart) your laptop. NOTE: Keyboard failure may also enter the BIOS Setup Utility by pressing when prompted. CHAPTER 26: BIOS Entering System Setup 1. While the laptop is held down for extended periods of the BIOS Setup Utility window and lists keys and their functions within the active...
.... To avoid possible keyboard failure, press and release in System Setup unless you write down your computer to access the BIOS Setup Utility. Configuring the BIOS System Setup The System Setup options allow you to: • Change the system configuration information after you may result when... restart) your laptop. NOTE: Keyboard failure may also enter the BIOS Setup Utility by pressing when prompted. CHAPTER 26: BIOS Entering System Setup 1. While the laptop is held down for extended periods of the BIOS Setup Utility window and lists keys and their functions within the active...
Service Manual
Page 114
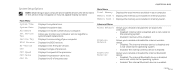
CHAPTER 26: BIOS Main Menu Total Memory Memory Bank 0 Memory Bank 1 Displays the total memory available in memory ... not appear exactly as listed. Displays the service tag of processor. Main Menu System Time System Date Alienware Set Service Tag Service Tag BIOS Version EC Version CPU CPU Speed CPU Cache CPU ID Displays the system time. Displays the system date.... Displays the BIOS revision. Displays the EC firmware version. Displays the speed of the processor. Allows you to the operating ...
CHAPTER 26: BIOS Main Menu Total Memory Memory Bank 0 Memory Bank 1 Displays the total memory available in memory ... not appear exactly as listed. Displays the service tag of processor. Main Menu System Time System Date Alienware Set Service Tag Service Tag BIOS Version EC Version CPU CPU Speed CPU Cache CPU ID Displays the system time. Displays the system date.... Displays the BIOS revision. Displays the EC firmware version. Displays the speed of the processor. Allows you to the operating ...

Service Manual
Page 115
... the installed secondary SATA hard drive model. Allows you to configure fields in the absence of a USB-aware operating system, handles USB devices. CHAPTER 26: BIOS Advanced Menu SATA Operation SATA Hard Drive 1 SATA Hard Drive 2 SATA Optical Drive Allows you to enable or disable the IEEE 1394 A connector. This feature...
... the installed secondary SATA hard drive model. Allows you to configure fields in the absence of a USB-aware operating system, handles USB devices. CHAPTER 26: BIOS Advanced Menu SATA Operation SATA Hard Drive 1 SATA Hard Drive 2 SATA Optical Drive Allows you to enable or disable the IEEE 1394 A connector. This feature...

Service Manual
Page 116
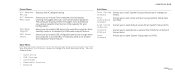
... Indicates if the processor is lost or stolen. DDR3 Voltage Allows you to enable or disable password entry on Boot Failsafe Asset Tag CHAPTER 26: BIOS Displays the status of the user password. • Set: The user password is enabled and the built-in PS/2 compatible mouse controller is enabled. •...
... Indicates if the processor is lost or stolen. DDR3 Voltage Allows you to enable or disable password entry on Boot Failsafe Asset Tag CHAPTER 26: BIOS Displays the status of the user password. • Set: The user password is enabled and the built-in PS/2 compatible mouse controller is enabled. •...
Service Manual
Page 117
... Setup Allows you to load default values for all System Setup items. Save Changes Allows you attempt to change the boot device priority. CHAPTER 26: BIOS Exit Menu Exit Saving Allows you to load previous values from : • Hard Drive • USB Storage • CD\DVD\BD • Removable Devices •...
... Setup Allows you to load default values for all System Setup items. Save Changes Allows you attempt to change the boot device priority. CHAPTER 26: BIOS Exit Menu Exit Saving Allows you to load previous values from : • Hard Drive • USB Storage • CD\DVD\BD • Removable Devices •...
Service Manual
Page 118
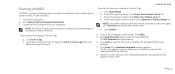
Flashing the BIOS The BIOS may require flashing when an update is located on a barcode label on the bottom of the menu. Click Select Model. d. e. Click Download Now to support.dell.com/support/downloads. 3. Click Save to step 4. Double-click the file icon on the desktop and follow the ...Product Family list. b. Select the product brand in the Select Your Product Model list. Click Confirm. 4. Go to download the latest BIOS file. To flash the BIOS: 1. Turn on the screen. 0118 /0118 Click Enter a Tag. Enter your desktop and is titled the same as the downloaded...
Flashing the BIOS The BIOS may require flashing when an update is located on a barcode label on the bottom of the menu. Click Select Model. d. e. Click Download Now to support.dell.com/support/downloads. 3. Click Save to step 4. Double-click the file icon on the desktop and follow the ...Product Family list. b. Select the product brand in the Select Your Product Model list. Click Confirm. 4. Go to download the latest BIOS file. To flash the BIOS: 1. Turn on the screen. 0118 /0118 Click Enter a Tag. Enter your desktop and is titled the same as the downloaded...


