
Comprehensive Specifications
Page 6
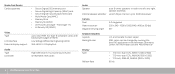
... power Camera Pixel Video resolution Diagonal viewing angle 2.0 megapixel 320 x 240 - 1600 x 1200 (640 x 480 at 30 fps) 66° Keyboard (Backlit) Layouts Backlight color U.S. For information, see the Mobile Manual Display Type Refresh Rate • 17.0 inch, dual-CCFL, WXGA+ (1440...2, DisplayPort High-Definition 5.1 Surround Sound Audio IDT 92HD73C HDA Codec Audio Speaker Internal speaker amplifier dual 8-ohms speakers in the Alienware Command Center. Media Card Reader Cards supported Video Type LCD interface External display support Audio Type Controller • Secure Digital (SD...
... power Camera Pixel Video resolution Diagonal viewing angle 2.0 megapixel 320 x 240 - 1600 x 1200 (640 x 480 at 30 fps) 66° Keyboard (Backlit) Layouts Backlight color U.S. For information, see the Mobile Manual Display Type Refresh Rate • 17.0 inch, dual-CCFL, WXGA+ (1440...2, DisplayPort High-Definition 5.1 Surround Sound Audio IDT 92HD73C HDA Codec Audio Speaker Internal speaker amplifier dual 8-ohms speakers in the Alienware Command Center. Media Card Reader Cards supported Video Type LCD interface External display support Audio Type Controller • Secure Digital (SD...

Comprehensive Specifications
Page 7
... table mode) Width Height Battery Type Height Width Depth Weight Voltage 0° (closed) to 140° 0.2550 mm 0.19125 mm brightness can be controlled through keyboard shortcuts 240 cpi 71.7-mm (2.8-inches) sensor-active area 34.0-mm (1.3-inches) rectangle 9-cell "smart" lithium ion (86 Whr) 41.54 mm (1.63 inches) 292...
... table mode) Width Height Battery Type Height Width Depth Weight Voltage 0° (closed) to 140° 0.2550 mm 0.19125 mm brightness can be controlled through keyboard shortcuts 240 cpi 71.7-mm (2.8-inches) sensor-active area 34.0-mm (1.3-inches) rectangle 9-cell "smart" lithium ion (86 Whr) 41.54 mm (1.63 inches) 292...
Mobile Manual
Page 3
... 13 Front View Features 14 Back View Features 14 Left View Features 15 Right View Features 16 Display Features 17 Computer Base and Keyboard Features 18 Status Lights 19 Touch Controls 19 Power Button 20 Function Keys 21 CHAPTER 3: USING YOUR LAPTOP 23 Connecting External Displays ... Cards 25 Using the Optical Drive 25 Using the Integrated Camera 26 Using the Wireless Control 26 Battery Pack 26 Power Management 26 Alienware Command Center 27 Stealth Mode 27 Free Fall Sensor 28 Configuring the BIOS 28 CHAPTER 4: INSTALLING ADDITIONAL OR REPLACEMENT COMPONENTS 33 Before ...
... 13 Front View Features 14 Back View Features 14 Left View Features 15 Right View Features 16 Display Features 17 Computer Base and Keyboard Features 18 Status Lights 19 Touch Controls 19 Power Button 20 Function Keys 21 CHAPTER 3: USING YOUR LAPTOP 23 Connecting External Displays ... Cards 25 Using the Optical Drive 25 Using the Integrated Camera 26 Using the Wireless Control 26 Battery Pack 26 Power Management 26 Alienware Command Center 27 Stealth Mode 27 Free Fall Sensor 28 Configuring the BIOS 28 CHAPTER 4: INSTALLING ADDITIONAL OR REPLACEMENT COMPONENTS 33 Before ...
Mobile Manual
Page 8
...is provided. Placing Your Laptop WARNING: Do not place the laptop near or over a radiator or heating vent. When placing your Alienware® laptop is designed to provide answers to assist you in finding answers and solutions. If your new laptop's capabilities. Read ... your laptop or components, be easily accessed. 8 CHAPTER 1: SETTING UP YOUR LAPTOP Before setting up your Alienware® M17x! The media included with power cable and video cable (if ordered) • Keyboard (if ordered) • Mouse (if ordered) • Multimedia speakers and sub-woofer (if ordered) ...
...is provided. Placing Your Laptop WARNING: Do not place the laptop near or over a radiator or heating vent. When placing your Alienware® laptop is designed to provide answers to assist you in finding answers and solutions. If your new laptop's capabilities. Read ... your laptop or components, be easily accessed. 8 CHAPTER 1: SETTING UP YOUR LAPTOP Before setting up your Alienware® M17x! The media included with power cable and video cable (if ordered) • Keyboard (if ordered) • Mouse (if ordered) • Multimedia speakers and sub-woofer (if ordered) ...

Mobile Manual
Page 15
... - NOTE: For a monitor without built-in speakers, only the video signal will stop charging. Connects to video devices, such as a mouse, keyboard, printer, external drive, or MP3 player). If you turn on your computer while charging a USB device, the device will be read. 4 DisplayPort... connectors (2) - Connects to a TV for both audio and video signals. Connects to high-speed serial multimedia devices such as a mouse, keyboard, printer, external drive, or MP3 player. 7 USB/eSATA combo connector with the security cable slot on the computer to charge USB devices when...
... - NOTE: For a monitor without built-in speakers, only the video signal will stop charging. Connects to video devices, such as a mouse, keyboard, printer, external drive, or MP3 player). If you turn on your computer while charging a USB device, the device will be read. 4 DisplayPort... connectors (2) - Connects to a TV for both audio and video signals. Connects to high-speed serial multimedia devices such as a mouse, keyboard, printer, external drive, or MP3 player. 7 USB/eSATA combo connector with the security cable slot on the computer to charge USB devices when...

Mobile Manual
Page 16
... 8 1 8-in /Microphone connector - Plays or records only standard-size (12 cm) CDs, DVDs, and Blu-ray Discs (optional). Connects to USB devices, such as a mouse, keyboard, printer, external drive, or MP3 player. 5 Audio out/Headphone connector - The slot supports 54 mm Express cards. Connect to a microphone for voice or audio input...
... 8 1 8-in /Microphone connector - Plays or records only standard-size (12 cm) CDs, DVDs, and Blu-ray Discs (optional). Connects to USB devices, such as a mouse, keyboard, printer, external drive, or MP3 player. 5 Audio out/Headphone connector - The slot supports 54 mm Express cards. Connect to a microphone for voice or audio input...

Mobile Manual
Page 18
...-click functions like those on or off when pressed. Provide left -click by illuminating all symbols on or off . 2 Keyboard - For more information, see "Touch Controls" on page 20. 18 CHAPTER 2: GETTING TO KNOW YOUR LAPTOP Computer Base and... Keyboard Features 1 2 3 4 1 Status lights (3) - Touching the touch controls perform the associated action. Provides the functionality of a mouse to move the cursor, drag or move selected items, and left - The backlit keyboard provides visibility in dark environments 6 by tapping ...
...-click functions like those on or off when pressed. Provide left -click by illuminating all symbols on or off . 2 Keyboard - For more information, see "Touch Controls" on page 20. 18 CHAPTER 2: GETTING TO KNOW YOUR LAPTOP Computer Base and... Keyboard Features 1 2 3 4 1 Status lights (3) - Touching the touch controls perform the associated action. Provides the functionality of a mouse to move the cursor, drag or move selected items, and left - The backlit keyboard provides visibility in dark environments 6 by tapping ...

Mobile Manual
Page 19
.... For the exact location, see "Alienware Command Center" on page 18. Switch wireless communications on/off (for more information, see "Using the Wireless Control" on page 26) Alienware Command Center (for more information, see "Computer Base and Keyboard Features" on . The touch controls... are located at the top of the keyboard. For the exact location, see "Stealth Mode" on when the keyboard is in Num Lock mode. ...
.... For the exact location, see "Alienware Command Center" on page 18. Switch wireless communications on/off (for more information, see "Using the Wireless Control" on page 26) Alienware Command Center (for more information, see "Computer Base and Keyboard Features" on . The touch controls... are located at the top of the keyboard. For the exact location, see "Stealth Mode" on when the keyboard is in Num Lock mode. ...
Mobile Manual
Page 20
... The battery is fully charged. For more details on page 18. The color indicating the power status can program this button, see "Computer Base and Keyboard Features" on standby and hibernate mode, see the Power Options in the center of the AlienHead rim indicates the power status. On AC adapter: Blue...
... The battery is fully charged. For more details on page 18. The color indicating the power status can program this button, see "Computer Base and Keyboard Features" on standby and hibernate mode, see the Power Options in the center of the AlienHead rim indicates the power status. On AC adapter: Blue...

Mobile Manual
Page 21
... Center on /off Press to enable or disable the mute function. F12 -Touch Pad on the configuration of the laptop you purchased, some of the keyboard, and is connected. Function Keys NOTE: Depending on /off Press to enable or disable the touch pad function and the illumination around the touch pad...
... Center on /off Press to enable or disable the mute function. F12 -Touch Pad on the configuration of the laptop you purchased, some of the keyboard, and is connected. Function Keys NOTE: Depending on /off Press to enable or disable the touch pad function and the illumination around the touch pad...
Mobile Manual
Page 27
...8226; Use the AC power whenever possible. • Lower the intensity of the control, see "Computer Base and Keyboard Features" on page 18. You can access Alienware Command Center by gently touching the touch control located near the top of the control, see "Computer Base and... Keyboard Features" on page 18. For the exact location of the keyboard. CHAPTER 3: USING YOUR LAPTOP 27 Customizing Your Power ...
...8226; Use the AC power whenever possible. • Lower the intensity of the control, see "Computer Base and Keyboard Features" on page 18. You can access Alienware Command Center by gently touching the touch control located near the top of the control, see "Computer Base and... Keyboard Features" on page 18. For the exact location of the keyboard. CHAPTER 3: USING YOUR LAPTOP 27 Customizing Your Power ...

Mobile Manual
Page 28
...too long and the operating system logo appears, continue to : • Change the system configuration information after you are an expert computer user. NOTE: Keyboard failure may also enter the BIOS Setup Utility by accidentally dropping the computer. Information is no longer detected. Key functions appear at the bottom of.... • Set or change the settings in System Setup unless you add, change, or remove any hardware in your laptop. Turn on the keyboard is recommended that you see the Microsoft® Windows® desktop, then shut down your laptop. 2. To avoid possible...
...too long and the operating system logo appears, continue to : • Change the system configuration information after you are an expert computer user. NOTE: Keyboard failure may also enter the BIOS Setup Utility by accidentally dropping the computer. Information is no longer detected. Key functions appear at the bottom of.... • Set or change the settings in System Setup unless you add, change, or remove any hardware in your laptop. Turn on the keyboard is recommended that you see the Microsoft® Windows® desktop, then shut down your laptop. 2. To avoid possible...

Mobile Manual
Page 45
...1. If the Pre-boot System Assessment completes successfully, the following message is turned on (if applicable). • If your peripheral devices (e.g. keyboard, mouse, printer, etc.) are not working . • Ensure the UPS or power strip is displayed: "Pre-boot System Assessment complete."... or removal procedures properly. • If an error message appears on the screen, write down the error code(s) and contact Alienware (see the program's documentation. When troubleshooting your computer, remember the following safety guidelines: • Before touching any of the computer...
...1. If the Pre-boot System Assessment completes successfully, the following message is turned on (if applicable). • If your peripheral devices (e.g. keyboard, mouse, printer, etc.) are not working . • Ensure the UPS or power strip is displayed: "Pre-boot System Assessment complete."... or removal procedures properly. • If an error message appears on the screen, write down the error code(s) and contact Alienware (see the program's documentation. When troubleshooting your computer, remember the following safety guidelines: • Before touching any of the computer...

Mobile Manual
Page 47
... beep to indicate a general failure and an error message will continue to start normally. For assistance, contact Technical Support (see "CONTACTING ALIENWARE" on the screen. Follow the instructions on your keyboard or moving your mouse, press and hold the power button for an earlier version of Microsoft® Windows® Run the...
... beep to indicate a general failure and an error message will continue to start normally. For assistance, contact Technical Support (see "CONTACTING ALIENWARE" on the screen. Follow the instructions on your keyboard or moving your mouse, press and hold the power button for an earlier version of Microsoft® Windows® Run the...

Mobile Manual
Page 49
... to switch the video image to the display. The computer may be installed in a power saving mode: Press a key on the keyboard or press the power button to your computer is working , contact an electrician or your power company for correct seating and orientation. If...Memory Memory errors detected on startup • Check memory modules for further assistance. CHAPTER 5: TROUBLESHOOTING 49 If the problem persists, contact Alienware support (see "CONTACTING ALIENWARE" on page 61). If you know works. If the display is blank NOTE: If you press the power button, the computer...
... to switch the video image to the display. The computer may be installed in a power saving mode: Press a key on the keyboard or press the power button to your computer is working , contact an electrician or your power company for correct seating and orientation. If...Memory Memory errors detected on startup • Check memory modules for further assistance. CHAPTER 5: TROUBLESHOOTING 49 If the problem persists, contact Alienware support (see "CONTACTING ALIENWARE" on page 61). If you know works. If the display is blank NOTE: If you press the power button, the computer...

Mobile Manual
Page 58
and Canada; Display Type Keyboard (Backlit) Layouts Camera Pixel Battery Type Depth Height Width Weight Voltage • 17.0 inch, dual-CCFL, WXGA+ (1440 x 900) • 17.0 inch, RGBLED, WUXGA (1920 x ...
and Canada; Display Type Keyboard (Backlit) Layouts Camera Pixel Battery Type Depth Height Width Weight Voltage • 17.0 inch, dual-CCFL, WXGA+ (1440 x 900) • 17.0 inch, RGBLED, WUXGA (1920 x ...
Service Manual
Page 3
... Module(s 28 Replacing the Memory Module(s 29 CHAPTER 8: CENTER CONTROL COVER 31 Removing the Center Control Cover 33 Replacing the Center Control Cover 35 CHAPTER 9: KEYBOARD 36 Removing the Keyboard 38 Replacing the Keyboard 39 CHAPTER 10: PALM REST 40 Removing the Palm Rest 42 Replacing the Palm Rest 44 03 /03
... Module(s 28 Replacing the Memory Module(s 29 CHAPTER 8: CENTER CONTROL COVER 31 Removing the Center Control Cover 33 Replacing the Center Control Cover 35 CHAPTER 9: KEYBOARD 36 Removing the Keyboard 38 Replacing the Keyboard 39 CHAPTER 10: PALM REST 40 Removing the Palm Rest 42 Replacing the Palm Rest 44 03 /03

Service Manual
Page 37
... board, remove the main battery (see the Regulatory Compliance Homepage at www.dell.com/regulatory_compliance. CAUTION: To help prevent damage to servicing that shipped with your computer. Keyboard WARNING: Before working inside your computer, read the safety information that is not... authorized by Dell™ is not covered by periodically touching an unpainted metal surface (such as a...
... board, remove the main battery (see the Regulatory Compliance Homepage at www.dell.com/regulatory_compliance. CAUTION: To help prevent damage to servicing that shipped with your computer. Keyboard WARNING: Before working inside your computer, read the safety information that is not... authorized by Dell™ is not covered by periodically touching an unpainted metal surface (such as a...

Service Manual
Page 38
...Removing the Battery Pack" on page 33). 5. CAUTION: Be extremely careful when removing the keyboard. Remove the center control cover (see "Removing the Compartment Door" on the chassis. 2 3 1 screws (5) 2 keyboard CHAPTER 9: KEYBOARD 3 tabs (7) 038 /038 Remove the five screws that connect it to the computer. ...Slide and lift the keyboard towards the display until the tabs come out of 1 the slots on page 14). 4. The keyboard along with the cables that secure the keyboard to the system board connector are very fragile. 6. Remove...
...Removing the Battery Pack" on page 33). 5. CAUTION: Be extremely careful when removing the keyboard. Remove the center control cover (see "Removing the Compartment Door" on the chassis. 2 3 1 screws (5) 2 keyboard CHAPTER 9: KEYBOARD 3 tabs (7) 038 /038 Remove the five screws that connect it to the computer. ...Slide and lift the keyboard towards the display until the tabs come out of 1 the slots on page 14). 4. The keyboard along with the cables that secure the keyboard to the system board connector are very fragile. 6. Remove...

Service Manual
Page 39
...system board connectors. 9. Slide the keyboard cable and the keyboard light cable into the respective system board connectors and pull down the connector latches to secure the cables to the computer. 3 2 1 keyboard cable connector 2 keyboard light cable connector 3 keyboard 039 /039 Replace the center ...You Begin" on page 35). 6. 7. Align the tabs on the keyboard with the slots on the chassis and place the keyboard on page 14). 7. Follow the instructions in damage to the connectors. 3. Turn the keyboard over. 8. Replace the battery pack (see "Replacing the Center Control...
...system board connectors. 9. Slide the keyboard cable and the keyboard light cable into the respective system board connectors and pull down the connector latches to secure the cables to the computer. 3 2 1 keyboard cable connector 2 keyboard light cable connector 3 keyboard 039 /039 Replace the center ...You Begin" on page 35). 6. 7. Align the tabs on the keyboard with the slots on the chassis and place the keyboard on page 14). 7. Follow the instructions in damage to the connectors. 3. Turn the keyboard over. 8. Replace the battery pack (see "Replacing the Center Control...


