Monitor Users Guide
Page 3
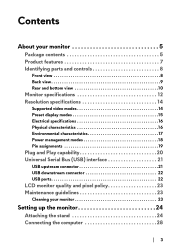
... view 9 Rear and bottom view 10 Monitor specifications 12 Resolution specifications 14 Supported video modes 14 Preset display modes 15 Electrical specifications 16 Physical characteristics 16 Environmental characteristics 17 Power management modes 18 Pin assignments 19 Plug and Play capability 20 Universal Serial Bus (USB) interface 21 USB upstream connector 21 USB downstream connector 22 USB ports 22 LCD monitor quality and pixel policy 23 Maintenance guidelines 23 Cleaning your monitor 23 Setting up the monitor 24 Attaching the stand 24 Connecting...
... view 9 Rear and bottom view 10 Monitor specifications 12 Resolution specifications 14 Supported video modes 14 Preset display modes 15 Electrical specifications 16 Physical characteristics 16 Environmental characteristics 17 Power management modes 18 Pin assignments 19 Plug and Play capability 20 Universal Serial Bus (USB) interface 21 USB upstream connector 21 USB downstream connector 22 USB ports 22 LCD monitor quality and pixel policy 23 Maintenance guidelines 23 Cleaning your monitor 23 Setting up the monitor 24 Attaching the stand 24 Connecting...
Monitor Users Guide
Page 4
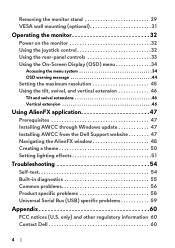
... Contact Dell 60 4| Removing the monitor stand 29 VESA wall mounting (optional 31 Operating the monitor 32 Power on the monitor 32 Using the joystick control 32 Using the rear-panel controls 33 Using the On-Screen Display (OSD) menu 34 Accessing the menu system 34 OSD warning message 44 Setting the maximum resolution 45 Using the tilt, swivel, and vertical extension 46 Tilt and swivel extensions 46 Vertical extension 46 Using AlienFX application 47 Prerequisites 47 Installing AWCC through Windows update 47 Installing...
... Contact Dell 60 4| Removing the monitor stand 29 VESA wall mounting (optional 31 Operating the monitor 32 Power on the monitor 32 Using the joystick control 32 Using the rear-panel controls 33 Using the On-Screen Display (OSD) menu 34 Accessing the menu system 34 OSD warning message 44 Setting the maximum resolution 45 Using the tilt, swivel, and vertical extension 46 Tilt and swivel extensions 46 Vertical extension 46 Using AlienFX application 47 Prerequisites 47 Installing AWCC through Windows update 47 Installing...
Monitor Users Guide
Page 7
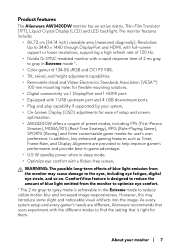
... mode is right for them. About your system. • On-Screen Display (OSD) adjustments for ease of setup and screen optimization. • AW3420DW offers a couple of blue light emission from the monitor to optimize eye comfort. * The 2 ms gray-to the eyes, including eye fatigue, digital eye strain, and so on. Product features The Alienware AW3420DW monitor has an active matrix, Thin-Film Transistor (TFT), Liquid Crystal Display (LCD) and LED backlight...
... mode is right for them. About your system. • On-Screen Display (OSD) adjustments for ease of setup and screen optimization. • AW3420DW offers a couple of blue light emission from the monitor to optimize eye comfort. * The 2 ms gray-to the eyes, including eye fatigue, digital eye strain, and so on. Product features The Alienware AW3420DW monitor has an active matrix, Thin-Film Transistor (TFT), Liquid Crystal Display (LCD) and LED backlight...
Monitor Users Guide
Page 9
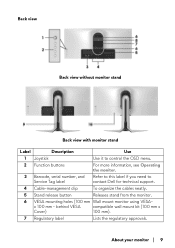
behind VESA compatible wall mount kit (100 mm x Cover) 100 mm). 7 Regulatory label Lists the regulatory approvals. About your monitor | 9 x 100 mm - Back view Back view without monitor stand Back view with monitor stand Label Description Use 1 Joystick Use it to control the OSD menu. 2 Function buttons For more information, see Operating the monitor. 3 Barcode, serial number, and Service Tag label Refer to this label if you need to contact Dell for technical support. 4 Cable-management clip To...
behind VESA compatible wall mount kit (100 mm x Cover) 100 mm). 7 Regulatory label Lists the regulatory approvals. About your monitor | 9 x 100 mm - Back view Back view without monitor stand Back view with monitor stand Label Description Use 1 Joystick Use it to control the OSD menu. 2 Function buttons For more information, see Operating the monitor. 3 Barcode, serial number, and Service Tag label Refer to this label if you need to contact Dell for technical support. 4 Cable-management clip To...

Monitor Users Guide
Page 10
... connector When the stand riser is attached to the monitor, the dock supplies power to the light on the stand. 9 Cable-management slot (at the To organize cables by routing them back of the stand) through this slot. 10 I/O cover Protects the I/O ports. NOTE: This port does not support headphones. Connect your monitor). Rear and bottom view Rear and bottom view without monitor stand Label 1 2 3 4 Description Power connector Line-out port HDMI port DisplayPort Use Connect the power cable...
... connector When the stand riser is attached to the monitor, the dock supplies power to the light on the stand. 9 Cable-management slot (at the To organize cables by routing them back of the stand) through this slot. 10 I/O cover Protects the I/O ports. NOTE: This port does not support headphones. Connect your monitor). Rear and bottom view Rear and bottom view without monitor stand Label 1 2 3 4 Description Power connector Line-out port HDMI port DisplayPort Use Connect the power cable...
Monitor Users Guide
Page 12
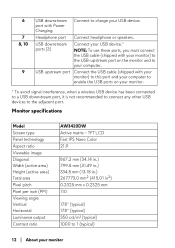
Monitor specifications Model Screen type Panel technology Aspect ratio Viewable image Diagonal Width (active area) Height (active area) Total area Pixel pitch Pixel per inch (PPI) Viewing angle Vertical Horizontal Luminance output Contrast ratio AW3420DW Active matrix - Connect your USB device.* NOTE: To use these ports, you must connect the USB cable (shipped with your monitor) to the USB-upstream port on your monitor. * To avoid signal interference, when a wireless USB device has been connected to a USB downstream port, it is not...
Monitor specifications Model Screen type Panel technology Aspect ratio Viewable image Diagonal Width (active area) Height (active area) Total area Pixel pitch Pixel per inch (PPI) Viewing angle Vertical Horizontal Luminance output Contrast ratio AW3420DW Active matrix - Connect your USB device.* NOTE: To use these ports, you must connect the USB cable (shipped with your monitor) to the USB-upstream port on your monitor. * To avoid signal interference, when a wireless USB device has been connected to a USB downstream port, it is not...
Monitor Users Guide
Page 14
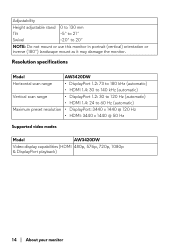
...° NOTE: Do not mount or use this monitor in portrait (vertical) orientation or inverse (180°) landscape mount as it may damage the monitor. Adjustability Height adjustable stand 0 to 130 mm Tilt -5° to 21° Swivel -20° to 60 Hz (automatic) Maximum preset resolution • DisplayPort: 3440 x 1440 @ 120 Hz • HDMI: 3440 x 1440 @ 50 Hz Supported video modes Model AW3420DW Video display capabilities (HDMI 480p, 576p, 720p...
...° NOTE: Do not mount or use this monitor in portrait (vertical) orientation or inverse (180°) landscape mount as it may damage the monitor. Adjustability Height adjustable stand 0 to 130 mm Tilt -5° to 21° Swivel -20° to 60 Hz (automatic) Maximum preset resolution • DisplayPort: 3440 x 1440 @ 120 Hz • HDMI: 3440 x 1440 @ 50 Hz Supported video modes Model AW3420DW Video display capabilities (HDMI 480p, 576p, 720p...

Monitor Users Guide
Page 18
... power saving feature: VESA modes Normal operation Horizontal Vertical sync sync Active Active Video Active Active-off Inactive mode Switch off - TEC: Total energy consumption in kWh measured with max luminance, and USB active. If the computer detects input from the monitor. ** Maximum power consumption with reference to Energy Star test method. 18 | About your computer, the monitor can only be achieved by disconnecting the main cable...
... power saving feature: VESA modes Normal operation Horizontal Vertical sync sync Active Active Video Active Active-off Inactive mode Switch off - TEC: Total energy consumption in kWh measured with max luminance, and USB active. If the computer detects input from the monitor. ** Maximum power consumption with reference to Energy Star test method. 18 | About your computer, the monitor can only be achieved by disconnecting the main cable...
Monitor Users Guide
Page 23
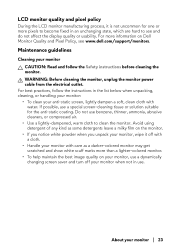
....dell.com/support/monitors. If possible, use a special screen-cleaning tissue or solution suitable for one or more pixels to clean the monitor. For best practices, follow the Safety instructions before cleaning the monitor. For more than a lighter-colored monitor. • To help maintain the best image quality on Dell Monitor Quality and Pixel Policy, see and do not affect the display quality or usability. Avoid using detergent of any kind as a darker-colored monitor...
....dell.com/support/monitors. If possible, use a special screen-cleaning tissue or solution suitable for one or more pixels to clean the monitor. For best practices, follow the Safety instructions before cleaning the monitor. For more than a lighter-colored monitor. • To help maintain the best image quality on Dell Monitor Quality and Pixel Policy, see and do not affect the display quality or usability. Avoid using detergent of any kind as a darker-colored monitor...

Monitor Users Guide
Page 29
... of the USB 3.0 upstream cable to the USB 3.0 downstream ports on your monitor. Plug the power cables for attaching the stand that you are applicable only for your monitor displays an image, installation is placed on the display when removing the stand, ensure that were included with your computer. 3. If it does not display an image, see Universal Serial Bus (USB) specific problems. Removing the monitor stand NOTE: To prevent scratches on a soft, clean surface. Turn on...
... of the USB 3.0 upstream cable to the USB 3.0 downstream ports on your monitor. Plug the power cables for attaching the stand that you are applicable only for your monitor displays an image, installation is placed on the display when removing the stand, ensure that were included with your computer. 3. If it does not display an image, see Universal Serial Bus (USB) specific problems. Removing the monitor stand NOTE: To prevent scratches on a soft, clean surface. Turn on...
Monitor Users Guide
Page 35
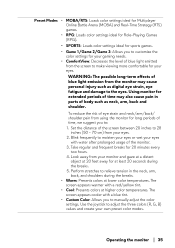
... for Role-Playing Games (RPG). • SPORTS: Loads color settings ideal for sports games. • Game 1/Game 2/Game 3: Allows you to customize the color settings for your gaming needs. • ComfortView: Decreases the level of blue light emitted from the screen to make viewing more comfortable for your own preset color modes. Using monitor for extended periods of time may cause personal injury such...
... for Role-Playing Games (RPG). • SPORTS: Loads color settings ideal for sports games. • Game 1/Game 2/Game 3: Allows you to customize the color settings for your gaming needs. • ComfortView: Decreases the level of blue light emitted from the screen to make viewing more comfortable for your own preset color modes. Using monitor for extended periods of time may cause personal injury such...
Monitor Users Guide
Page 45
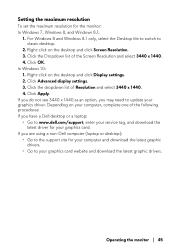
... see 3440 x 1440 as an option, you are using a non-Dell computer (laptop or desktop): • Go to the support site for your computer and download the latest graphic drivers. • Go to www.dell.com/support, enter your service tag, and download the latest driver for the monitor: In Windows 7, Windows 8, and Windows 8.1: 1. Click Advanced display settings. 3. Depending on your computer, complete one of the...
... see 3440 x 1440 as an option, you are using a non-Dell computer (laptop or desktop): • Go to the support site for your computer and download the latest graphic drivers. • Go to www.dell.com/support, enter your service tag, and download the latest driver for the monitor: In Windows 7, Windows 8, and Windows 8.1: 1. Click Advanced display settings. 3. Depending on your computer, complete one of the...

Monitor Users Guide
Page 47
... download the additional software components: • In the Settings window, click Windows Update, and then click Check for updates to complete the installation. The installation takes a few minutes to control the lightings. Double-click the setup file and follow the on-screen instructions to check the Alienware driver update progress. • If the driver update is successful. Navigate to the program folder to ensure that the supplied USB cable is downloaded and will be automatically installed. Download...
... download the additional software components: • In the Settings window, click Windows Update, and then click Check for updates to complete the installation. The installation takes a few minutes to control the lightings. Double-click the setup file and follow the on-screen instructions to check the Alienware driver update progress. • If the driver update is successful. Navigate to the program folder to ensure that the supplied USB cable is downloaded and will be automatically installed. Download...

Monitor Users Guide
Page 48
... view or grid view. C Theme components You can use these components (LIGHTING, MACROS, SETTINGS) to make the selected theme as an active master theme. Navigating the AlienFX window With the Alienware Command Center, AlienFX allows you to customize lighting settings for your theme. • GO DIM: Makes the light dimmer. • GO DARK: Turns off the light. G Window controls You can use the buttons to access the AWCC Online Help...
... view or grid view. C Theme components You can use these components (LIGHTING, MACROS, SETTINGS) to make the selected theme as an active master theme. Navigating the AlienFX window With the Alienware Command Center, AlienFX allows you to customize lighting settings for your theme. • GO DIM: Makes the light dimmer. • GO DARK: Turns off the light. G Window controls You can use the buttons to access the AWCC Online Help...

Monitor Users Guide
Page 54
..., follow the Safety instructions. If your monitor screen remains blank after you to check whether your computer and the monitor. 2. Unplug the video cable from the back of computer. 3. To ensure proper Self-Test operation, remove all digital cables from the back of the procedures in self-test mode, the power LED blinks white. Turn on -screen (against a black background), if the monitor cannot sense a video signal and is disconnected or...
..., follow the Safety instructions. If your monitor screen remains blank after you to check whether your computer and the monitor. 2. Unplug the video cable from the back of computer. 3. To ensure proper Self-Test operation, remove all digital cables from the back of the procedures in self-test mode, the power LED blinks white. Turn on -screen (against a black background), if the monitor cannot sense a video signal and is disconnected or...

Monitor Users Guide
Page 55
... the video cable(s) from the back of the screen changes to inspect the display in green, blue, black, and white screens. Inspect the display for any screen abnormalities upon using the built-in diagnostic tool, the monitor is functioning properly. A gray screen appears after 1 second. 4. The test is in self-test mode. If you are experiencing is clean (no dust particles on the surface of the screen). 2. Check the video card...
... the video cable(s) from the back of the screen changes to inspect the display in green, blue, black, and white screens. Inspect the display for any screen abnormalities upon using the built-in diagnostic tool, the monitor is functioning properly. A gray screen appears after 1 second. 4. The test is in self-test mode. If you are experiencing is clean (no dust particles on the surface of the screen). 2. Check the video card...
Monitor Users Guide
Page 56
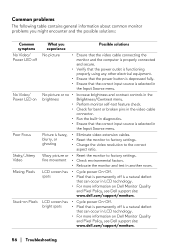
... brightness and contrast controls in the video cable connector. Reset the monitor to the correct aspect ratio. For more information on Dell Monitor Quality and Pixel Policy, see Dell support site: www.dell.com/support/monitors. Check for bent or broken pins in the Brightness/Contrast menu. Pixel that is permanently off is a natural defect that can occur in diagnostics. Ensure that can occur in the Input Source menu. Change the video resolution to factory settings. Cycle power On-Off. Pixel...
... brightness and contrast controls in the video cable connector. Reset the monitor to the correct aspect ratio. For more information on Dell Monitor Quality and Pixel Policy, see Dell support site: www.dell.com/support/monitors. Check for bent or broken pins in the Brightness/Contrast menu. Pixel that is permanently off is a natural defect that can occur in diagnostics. Ensure that can occur in the Input Source menu. Change the video resolution to factory settings. Cycle power On-Off. Pixel...
Monitor Users Guide
Page 57
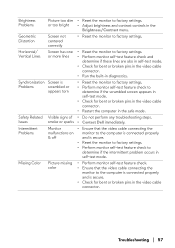
...; Reset the monitor to factory settings. • Perform monitor self-test feature check to determine if the scrambled screen appears in self-test mode. • Check for bent or broken pins in the video cable connector. • Restart the computer in the Brightness/Contrast menu. Geometric Distortion Screen not centered correctly • Reset the monitor to factory settings. Brightness Problems Picture too dim • Reset the monitor to factory settings. or too bright • Adjust brightness and contrast controls in the safe mode...
...; Reset the monitor to factory settings. • Perform monitor self-test feature check to determine if the scrambled screen appears in self-test mode. • Check for bent or broken pins in the video cable connector. • Restart the computer in the Brightness/Contrast menu. Geometric Distortion Screen not centered correctly • Reset the monitor to factory settings. Brightness Problems Picture too dim • Reset the monitor to factory settings. or too bright • Adjust brightness and contrast controls in the safe mode...

Monitor Users Guide
Page 58
... image displayed monitor for more information, see Power management modes). Product specific problems Specific symptoms What you experience Screen image is too small Image is • centered on screen, but does not fill entire viewing area Cannot adjust OSD does not • the monitor with appear on the the buttons on screen the rear panel No Input Signal when user controls are pressed No picture, the • LED light is plugged in use a dynamically changing screensaver. Check whether the signal cable is blue...
... image displayed monitor for more information, see Power management modes). Product specific problems Specific symptoms What you experience Screen image is too small Image is • centered on screen, but does not fill entire viewing area Cannot adjust OSD does not • the monitor with appear on the the buttons on screen the rear panel No Input Signal when user controls are pressed No picture, the • LED light is plugged in use a dynamically changing screensaver. Check whether the signal cable is blue...

Monitor Users Guide
Page 59
... then turn on . Some USB devices like external portable HDD require higher electric current; Some computers have USB 3.0, USB 2.0, and USB 1.1 ports. Reboot the computer. Use a USB-extender cable to the computer system. Universal Serial Bus (USB) specific problems Specific symptoms USB interface is not working Super Speed USB 3.0 interface is slow Wireless USB peripherals stop working when a USB 3.0 device is plugged in What you experience USB peripherals • are not working •...
... then turn on . Some USB devices like external portable HDD require higher electric current; Some computers have USB 3.0, USB 2.0, and USB 1.1 ports. Reboot the computer. Use a USB-extender cable to the computer system. Universal Serial Bus (USB) specific problems Specific symptoms USB interface is not working Super Speed USB 3.0 interface is slow Wireless USB peripherals stop working when a USB 3.0 device is plugged in What you experience USB peripherals • are not working •...


