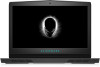

Handling swollen Lithium-ion batteries
Page 1
... performance of the applicable warranty or service contract, including options for assistance and further instructions. ● Using a non-Dell or incompatible battery may be replaced and disposed of Dell Inc. or its subsidiaries. Lithium-ion polymer batteries have increased in popularity in recent years and have become standard in a device as a result of the laptop...
... performance of the applicable warranty or service contract, including options for assistance and further instructions. ● Using a non-Dell or incompatible battery may be replaced and disposed of Dell Inc. or its subsidiaries. Lithium-ion polymer batteries have increased in popularity in recent years and have become standard in a device as a result of the laptop...
Service Manual
Page 5
Replacing the computer base 47 Procedure 47 Post-requisites 49 Removing the coin-cell battery 50 Prerequisites 50 Procedure 50 Replacing the coin-cell battery 52 Procedure 52 Post-requisites 53 Removing the speakers 54 Prerequisites 54 Procedure 54 Replacing the speakers 56 Procedure 56 Post-requisites 57 Removing the I/O board 58 Prerequisites 58 Procedure 58 Replacing the I/O board 61 Procedure 61 Post-requisites 62 Removing the subwoofer 63 Prerequisites 63 Procedure 63 5
Replacing the computer base 47 Procedure 47 Post-requisites 49 Removing the coin-cell battery 50 Prerequisites 50 Procedure 50 Replacing the coin-cell battery 52 Procedure 52 Post-requisites 53 Removing the speakers 54 Prerequisites 54 Procedure 54 Replacing the speakers 56 Procedure 56 Post-requisites 57 Removing the I/O board 58 Prerequisites 58 Procedure 58 Replacing the I/O board 61 Procedure 61 Post-requisites 62 Removing the subwoofer 63 Prerequisites 63 Procedure 63 5
Service Manual
Page 7
Replacing the power-button board 90 Procedure 90 Post-requisites 91 Removing the display assembly 92 Prerequisites 92 Procedure 93 Replacing the display assembly 96 Procedure 96 Post-requisites 98 Removing the battery 99 Prerequisites 99 Procedure 99 Replacing the battery 101 Procedure 101 Post-requisites 102 Removing the touchpad 103 Prerequisites 103 Procedure 103 Replacing the touchpad 106 Procedure 106 Post-requisites 107 Removing the keyboard 109 Prerequisites 109 Procedure 109 7
Replacing the power-button board 90 Procedure 90 Post-requisites 91 Removing the display assembly 92 Prerequisites 92 Procedure 93 Replacing the display assembly 96 Procedure 96 Post-requisites 98 Removing the battery 99 Prerequisites 99 Procedure 99 Replacing the battery 101 Procedure 101 Post-requisites 102 Removing the touchpad 103 Prerequisites 103 Procedure 103 Replacing the touchpad 106 Procedure 106 Post-requisites 107 Removing the keyboard 109 Prerequisites 109 Procedure 109 7
Service Manual
Page 18
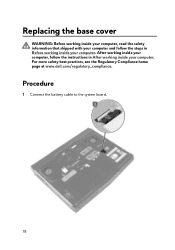
Procedure 1 Connect the battery cable to the system board. 18 Replacing the base cover WARNING: Before working inside your computer, read the safety information that shipped with your computer and follow the instructions in Before working inside your computer. After working inside your computer, follow the steps in After working inside your computer. For more safety best practices, see the Regulatory Compliance home page at www.dell.com/regulatory_compliance.
Procedure 1 Connect the battery cable to the system board. 18 Replacing the base cover WARNING: Before working inside your computer, read the safety information that shipped with your computer and follow the instructions in Before working inside your computer. After working inside your computer, follow the steps in After working inside your computer. For more safety best practices, see the Regulatory Compliance home page at www.dell.com/regulatory_compliance.
Service Manual
Page 52
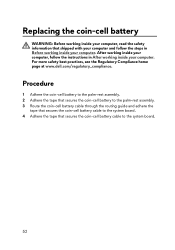
... Compliance home page at www.dell.com/regulatory_compliance. After working inside your computer, follow the steps in After working inside your computer. Procedure 1 Adhere the coin-cell battery to the palm-rest assembly. 2 Adhere the tape that secures the coin-cell battery to the palm-rest assembly.... and adhere the tape that secures the coin-cell battery cable to the system board. 4 Adhere the tape that shipped with your computer and follow the instructions in Before working inside your computer. Replacing the coin-cell battery WARNING: Before working inside your computer, read the...
... Compliance home page at www.dell.com/regulatory_compliance. After working inside your computer, follow the steps in After working inside your computer. Procedure 1 Adhere the coin-cell battery to the palm-rest assembly. 2 Adhere the tape that secures the coin-cell battery to the palm-rest assembly.... and adhere the tape that secures the coin-cell battery cable to the system board. 4 Adhere the tape that shipped with your computer and follow the instructions in Before working inside your computer. Replacing the coin-cell battery WARNING: Before working inside your computer, read the...
Service Manual
Page 53
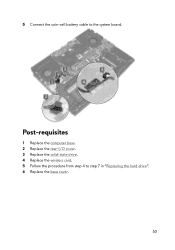
5 Connect the coin-cell battery cable to step 7 in "Replacing the hard drive". 6 Replace the base cover. 53 Post-requisites 1 Replace the computer base. 2 Replace the rear-I/O cover. 3 Replace the solid-state drive. 4 Replace the wireless card. 5 Follow the procedure from step 4 to the system board.
5 Connect the coin-cell battery cable to step 7 in "Replacing the hard drive". 6 Replace the base cover. 53 Post-requisites 1 Replace the computer base. 2 Replace the rear-I/O cover. 3 Replace the solid-state drive. 4 Replace the wireless card. 5 Follow the procedure from step 4 to the system board.
Service Manual
Page 74
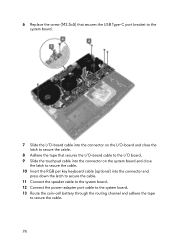
6 Replace the screw (M2.5x5) that secures the USB Type-C port bracket to the system board. 7 Slide the I/O-board cable into the connector on the I/O-board .... 11 Connect the speaker cable to the system board. 12 Connect the power-adapter port cable to the system board. 13 Route the coin-cell battery through the routing channel and adhere the tape to secure the cable. 74
6 Replace the screw (M2.5x5) that secures the USB Type-C port bracket to the system board. 7 Slide the I/O-board cable into the connector on the I/O-board .... 11 Connect the speaker cable to the system board. 12 Connect the power-adapter port cable to the system board. 13 Route the coin-cell battery through the routing channel and adhere the tape to secure the cable. 74
Service Manual
Page 101
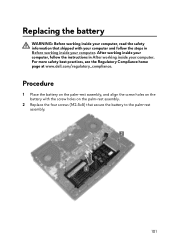
... palm-rest assembly. 101 For more safety best practices, see the Regulatory Compliance home page at www.dell.com/regulatory_compliance. Procedure 1 Place the battery on the palm-rest assembly, and align the screw holes on the palm-rest assembly. 2 Replace the four screws (M2.5x5) that shipped with the screw holes on the...
... palm-rest assembly. 101 For more safety best practices, see the Regulatory Compliance home page at www.dell.com/regulatory_compliance. Procedure 1 Place the battery on the palm-rest assembly, and align the screw holes on the palm-rest assembly. 2 Replace the four screws (M2.5x5) that shipped with the screw holes on the...
Service Manual
Page 107
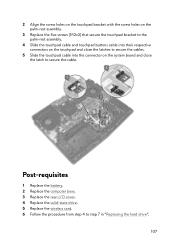
Post-requisites 1 Replace the battery. 2 Replace the computer base. 3 Replace the rear-I/O cover. 4 Replace the solid-state drive. 5 Replace the wireless card. 6 Follow the procedure from step 4 to secure the cable. 2 Align the screw holes on the touchpad bracket with the screw holes on the palm-rest assembly. 3 Replace the five screws (M2x3) that secure the touchpad bracket... close the latches to secure the cables. 5 Slide the touchpad cable into the connector on the system board and close the latch to step 7 in "Replacing the hard drive". 107
Post-requisites 1 Replace the battery. 2 Replace the computer base. 3 Replace the rear-I/O cover. 4 Replace the solid-state drive. 5 Replace the wireless card. 6 Follow the procedure from step 4 to secure the cable. 2 Align the screw holes on the touchpad bracket with the screw holes on the palm-rest assembly. 3 Replace the five screws (M2x3) that secure the touchpad bracket... close the latches to secure the cables. 5 Slide the touchpad cable into the connector on the system board and close the latch to step 7 in "Replacing the hard drive". 107
Service Manual
Page 115
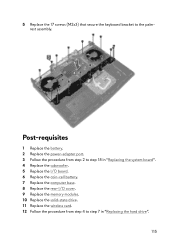
Post-requisites 1 Replace the battery. 2 Replace the power-adapter port. 3 Follow the procedure from step 4 to the palmrest assembly. 5 Replace the 17 screws (M2x3) that secure the keyboard bracket to step 7 in "Replacing the system board". 4 Replace the subwoofer. 5 Replace the I/O board. 6 Replace the coin-cell battery. 7 Replace the computer base. 8 Replace the rear-I/O cover. 9 Replace the memory modules. 10 Replace the solid-state drive. 11 Replace the wireless card. 12 Follow the procedure from step 2 to step 18 in "Replacing the hard drive". 115
Post-requisites 1 Replace the battery. 2 Replace the power-adapter port. 3 Follow the procedure from step 4 to the palmrest assembly. 5 Replace the 17 screws (M2x3) that secure the keyboard bracket to step 7 in "Replacing the system board". 4 Replace the subwoofer. 5 Replace the I/O board. 6 Replace the coin-cell battery. 7 Replace the computer base. 8 Replace the rear-I/O cover. 9 Replace the memory modules. 10 Replace the solid-state drive. 11 Replace the wireless card. 12 Follow the procedure from step 2 to step 18 in "Replacing the hard drive". 115
Service Manual
Page 120
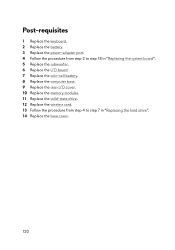
Post-requisites 1 Replace the keyboard. 2 Replace the battery. 3 Replace the power-adapter port. 4 Follow the procedure from step 2 to step 18 in "Replacing the system board". 5 Replace the subwoofer. 6 Replace the I/O board. 7 Replace the coin-cell battery. 8 Replace the computer base. 9 Replace the rear-I/O cover. 10 Replace the memory modules. 11 Replace the solid-state drive. 12 Replace the wireless card. 13 Follow the procedure from step 4 to step 7 in "Replacing the hard drive". 14 Replace the base cover. 120
Post-requisites 1 Replace the keyboard. 2 Replace the battery. 3 Replace the power-adapter port. 4 Follow the procedure from step 2 to step 18 in "Replacing the system board". 5 Replace the subwoofer. 6 Replace the I/O board. 7 Replace the coin-cell battery. 8 Replace the computer base. 9 Replace the rear-I/O cover. 10 Replace the memory modules. 11 Replace the solid-state drive. 12 Replace the wireless card. 13 Follow the procedure from step 4 to step 7 in "Replacing the hard drive". 14 Replace the base cover. 120
Service Manual
Page 123
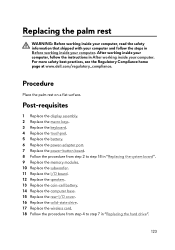
... more safety best practices, see the Regulatory Compliance home page at www.dell.com/regulatory_compliance. Procedure Place the palm rest on a flat surface. Post-requisites 1 Replace the display assembly. 2 Replace the macro keys. 3 Replace the keyboard. 4 Replace the touchpad. 5 Replace the battery. 6 Replace the power-adapter port. 7 Replace the power-button board. 8 Follow the procedure from step 2 to step...
... more safety best practices, see the Regulatory Compliance home page at www.dell.com/regulatory_compliance. Procedure Place the palm rest on a flat surface. Post-requisites 1 Replace the display assembly. 2 Replace the macro keys. 3 Replace the keyboard. 4 Replace the touchpad. 5 Replace the battery. 6 Replace the power-adapter port. 7 Replace the power-button board. 8 Follow the procedure from step 2 to step...
Service Manual
Page 149
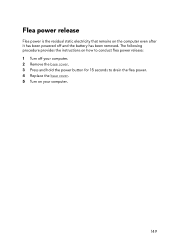
The following procedure provides the instructions on how to drain the flea power. 4 Replace the base cover. 5 Turn on the computer even after it has been powered off your computer. 149 Flea power release Flea power is the residual static electricity that remains on your computer. 2 Remove the base cover. 3 Press and hold the power button for 15 seconds to conduct flea power release: 1 Turn off and the battery has been removed.
The following procedure provides the instructions on how to drain the flea power. 4 Replace the base cover. 5 Turn on the computer even after it has been powered off your computer. 149 Flea power release Flea power is the residual static electricity that remains on your computer. 2 Remove the base cover. 3 Press and hold the power button for 15 seconds to conduct flea power release: 1 Turn off and the battery has been removed.


