
Owner's Manual
Page 5
... a potential for property damage, personal, injury, or death. Microsoft and Windows are registered trademarks of the Rights in Technical Data and Computer Software clause at DFARS 252.227-7013 and in this text: Dell and DELL logo are provided with RESTRICTED RIGHTS. Information in applicable FAR provisions: Dell Computer Corporation, One Dell Way, Round Rock, Texas, 78682...
... a potential for property damage, personal, injury, or death. Microsoft and Windows are registered trademarks of the Rights in Technical Data and Computer Software clause at DFARS 252.227-7013 and in this text: Dell and DELL logo are provided with RESTRICTED RIGHTS. Information in applicable FAR provisions: Dell Computer Corporation, One Dell Way, Round Rock, Texas, 78682...
Owner's Manual
Page 19
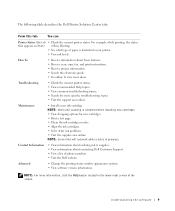
...Visit the support area online. NOTE: For more information, click the Help button located in progress. The following table describes the Dell Printer Solution Center tabs. NOTE: Some links will not work while a job is in the lower right corner of the screen. NOTE...Change the printing status window appearance options. • View software version information. For example, while printing, the status that appears on Start) is Busy Printing. • See what type of phone numbers. • Visit the Dell website. Troubleshooting • Check the current printer status. • View...
...Visit the support area online. NOTE: For more information, click the Help button located in progress. The following table describes the Dell Printer Solution Center tabs. NOTE: Some links will not work while a job is in the lower right corner of the screen. NOTE...Change the printing status window appearance options. • View software version information. For example, while printing, the status that appears on Start) is Busy Printing. • See what type of phone numbers. • Visit the Dell website. Troubleshooting • Check the current printer status. • View...
Owner's Manual
Page 31
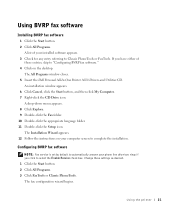
...appropriate language folder. 11 Double-click the Setup icon. Change these entries, skip to select the Enable Receive check box. An installation window appears. 6 Click Cancel, click the Start button, and then click My Computer. 7 Right-click the CD Drive icon. The ... settings as desired. 1 Click the Start button. 2 Click All Programs. 3 Click FaxTools or Classic PhoneTools. The All Programs window closes. 5 Insert the Dell Personal All-In-One Printer A920 Drivers and Utilities CD. If you click to "Configuring BVRP fax software." 4 Click on your installed software appears. 3 Check ...
...appropriate language folder. 11 Double-click the Setup icon. Change these entries, skip to select the Enable Receive check box. An installation window appears. 6 Click Cancel, click the Start button, and then click My Computer. 7 Right-click the CD Drive icon. The ... settings as desired. 1 Click the Start button. 2 Click All Programs. 3 Click FaxTools or Classic PhoneTools. The All Programs window closes. 5 Insert the Dell Personal All-In-One Printer A920 Drivers and Utilities CD. If you click to "Configuring BVRP fax software." 4 Click on your installed software appears. 3 Check ...

Owner's Manual
Page 34
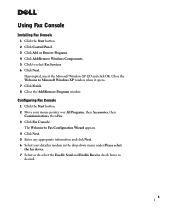
...Click Fax Console. www.dell.com/supplies | support.dell.com Using Fax Console Installing Fax Console 1 Click the Start button. 2 Click Control Panel. 3 Click Add or Remove Programs. 4 Click Add/Remove Windows Components. 5 Click to Microsoft Windows XP window when it opens. 7... Click Finish. 8 Close the Add/Remove Programs window. The Welcome to receive faxes. 8 Enter your TSID information and click Next. 9 Enter your CSID information and click Next. 24 Using the printer If prompted, insert the Microsoft Windows...
...Click Fax Console. www.dell.com/supplies | support.dell.com Using Fax Console Installing Fax Console 1 Click the Start button. 2 Click Control Panel. 3 Click Add or Remove Programs. 4 Click Add/Remove Windows Components. 5 Click to Microsoft Windows XP window when it opens. 7... Click Finish. 8 Close the Add/Remove Programs window. The Welcome to receive faxes. 8 Enter your TSID information and click Next. 9 Enter your CSID information and click Next. 24 Using the printer If prompted, insert the Microsoft Windows...
Owner's Manual
Page 44
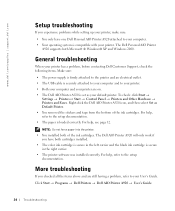
...; The USB cable is compatible with your default printer. The Dell Personal AIO Printer A920 supports both of the ink cartridges. The Dell AIO Printer A920 will only work if you checked all the items above and are on. • The Dell AIO Printer A920 is loaded correctly. More troubleshooting If you have one Dell Personal AIO Printer A920 attached to the setup documentation. • The...
...; The USB cable is compatible with your default printer. The Dell Personal AIO Printer A920 supports both of the ink cartridges. The Dell AIO Printer A920 will only work if you checked all the items above and are on. • The Dell AIO Printer A920 is loaded correctly. More troubleshooting If you have one Dell Personal AIO Printer A920 attached to the setup documentation. • The...
Owner's Manual
Page 80
..., 13 iron-on transfers, 13 labels, 13 loading, 16 photo, 13 plain, 13 transparencies, 13 Paper Setup tab, 7 parts of your printer, i photo cards loading, 13 photo paper loading, 13 photos printing, 7 scanning, 18 postcards loading, 13 posters, printing, 7 70 Index ...Print Layout tab, 7 Quality/Copies tab, 7 Save Settings menu, 8 tabs, 7 printing, 16 banners, 7 envelopes, 7 photos, 7 posters, 7 Printing Status window changing appearance of, 9 Q Quality/Copies tab, 7 R removing ink cartridges, 30 replacing ink cartridges, 30 S safety information, iv Save Settings menu, 8 saved images, viewing, 5
..., 13 iron-on transfers, 13 labels, 13 loading, 16 photo, 13 plain, 13 transparencies, 13 Paper Setup tab, 7 parts of your printer, i photo cards loading, 13 photo paper loading, 13 photos printing, 7 scanning, 18 postcards loading, 13 posters, printing, 7 70 Index ...Print Layout tab, 7 Quality/Copies tab, 7 Save Settings menu, 8 tabs, 7 printing, 16 banners, 7 envelopes, 7 photos, 7 posters, 7 Printing Status window changing appearance of, 9 Q Quality/Copies tab, 7 R removing ink cartridges, 30 replacing ink cartridges, 30 S safety information, iv Save Settings menu, 8 saved images, viewing, 5
Faxing instructions
Page 2
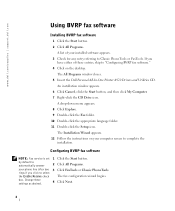
...the Start button. Change these entries, skip to "Configuring BVRP fax software." 4 Click on your computer screen to complete the installation. www.dell.com/supplies | support.dell.com Using BVRP fax software Installing BVRP fax software 1 Click the Start button. 2 Click All Programs. A list of these settings as .... 3 Check for any entry referring to select the Enable Receive check The fax configuration wizard begins. The All Programs window closes. 5 Insert the Dell Personal All-In-One Printer A920 Drivers and Utilities CD. If you click to Classic PhoneTools or FaxTools.
...the Start button. Change these entries, skip to "Configuring BVRP fax software." 4 Click on your computer screen to complete the installation. www.dell.com/supplies | support.dell.com Using BVRP fax software Installing BVRP fax software 1 Click the Start button. 2 Click All Programs. A list of these settings as .... 3 Check for any entry referring to select the Enable Receive check The fax configuration wizard begins. The All Programs window closes. 5 Insert the Dell Personal All-In-One Printer A920 Drivers and Utilities CD. If you click to Classic PhoneTools or FaxTools.
Faxing instructions
Page 5
... Console 1 Click the Start button. 2 Click Control Panel. 3 Click Add or Remove Programs. 4 Click Add/Remove Windows Components. 5 Click to Microsoft Windows XP window when it opens. 7 Click Finish. 8 Close the Add/Remove Programs window. If prompted, insert the Microsoft Windows XP CD and click OK. Close the Welcome to select Fax Services. 6 Click Next.
... Console 1 Click the Start button. 2 Click Control Panel. 3 Click Add or Remove Programs. 4 Click Add/Remove Windows Components. 5 Click to Microsoft Windows XP window when it opens. 7 Click Finish. 8 Close the Add/Remove Programs window. If prompted, insert the Microsoft Windows XP CD and click OK. Close the Welcome to select Fax Services. 6 Click Next.


