User Guide
Page 1
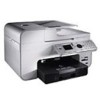
Finding Information Faxing About Your Printer Understanding the Software Understanding the Operator Installing the Dell 966 Internal Panel Menus Wireless/Ethernet Adapter Loading Paper and Originals Maintenance Printing Troubleshooting Printing From a Memory Card or USB Key ... Dell Inc. Double-click the icon on your printer. CAUTION: A CAUTION indicates a potential for property damage, personal injury, or death. Windows Vista is a registered trademark of data and tells you have the Dell printer Service Tag available. Dell™ Photo All-In-One Printer 966 ...
Finding Information Faxing About Your Printer Understanding the Software Understanding the Operator Installing the Dell 966 Internal Panel Menus Wireless/Ethernet Adapter Loading Paper and Originals Maintenance Printing Troubleshooting Printing From a Memory Card or USB Key ... Dell Inc. Double-click the icon on your printer. CAUTION: A CAUTION indicates a potential for property damage, personal injury, or death. Windows Vista is a registered trademark of data and tells you have the Dell printer Service Tag available. Dell™ Photo All-In-One Printer 966 ...
User Guide
Page 9
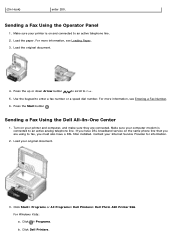
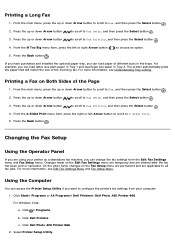
...One Center 1. If you must also have DSL broadband service on and connected to an active analog telephone line. Load your Internet Service Provider for information. 2. Click ® Programs. b. (On Hook) enter 200. Make sure your printer is connected to an active telephone line. 2. For more information, see Loading Paper. 3. Make sure your printer... the original document. 4. Load the paper. Use the keypad to Fax. 5. Contact your original document. 3. Click Start® Programs or All Programs® Dell Printers® Dell Photo AIO Printer 966. Click Dell Printers.
...One Center 1. If you must also have DSL broadband service on and connected to an active analog telephone line. Load your Internet Service Provider for information. 2. Click ® Programs. b. (On Hook) enter 200. Make sure your printer is connected to an active telephone line. 2. For more information, see Loading Paper. 3. Make sure your printer... the original document. 4. Load the paper. Use the keypad to Fax. 5. Contact your original document. 3. Click Start® Programs or All Programs® Dell Printers® Dell Photo AIO Printer 966. Click Dell Printers.
User Guide
Page 13
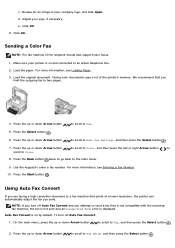
e. Sending a Color Fax NOTE: The fax machine of the printer's memory. Load the original document. Adjust your company logo, and click Open. Click OK. For more information, see Loading Paper. 3. Press the up or down Arrow button to scroll to Color. 8. Press the up or down Arrow ...to Fax. 5. Press the Start button . Auto Fax Convert is on by default. Click OK. 9. Make sure your printer is on and connected to the main menu. 9. Load the paper. Press the Select button . 6. Faxing color documents uses a lot of the recipient should also support color faxes. 1....
e. Sending a Color Fax NOTE: The fax machine of the printer's memory. Load the original document. Adjust your company logo, and click Open. Click OK. For more information, see Loading Paper. 3. Press the up or down Arrow button to scroll to Color. 8. Press the up or down Arrow ...to Fax. 5. Press the Start button . Auto Fax Convert is on by default. Click OK. 9. Make sure your printer is on and connected to the main menu. 9. Load the paper. Press the Select button . 6. Faxing color documents uses a lot of the recipient should also support color faxes. 1....
User Guide
Page 16
...Fax Setup Using the Operator Panel If you can load letter size plain paper in Tray 1 and load legal size paper in the trays. Click Start® Programs or All Programs® Dell Printers® Dell Photo AIO Printer 966. Click ® Programs. b. From the If Too Big menu item,...For more information, see Understanding Tray Linking. Click Dell Photo AIO Printer 966. 2. If you have purchased and installed the optional paper tray, you can change the fax settings from your printer as a standalone fax machine, you can access the Printer Setup Utility if you want to Fax, and...
...Fax Setup Using the Operator Panel If you can load letter size plain paper in Tray 1 and load legal size paper in the trays. Click Start® Programs or All Programs® Dell Printers® Dell Photo AIO Printer 966. Click ® Programs. b. From the If Too Big menu item,...For more information, see Understanding Tray Linking. Click Dell Photo AIO Printer 966. 2. If you have purchased and installed the optional paper tray, you can change the fax settings from your printer as a standalone fax machine, you can access the Printer Setup Utility if you want to Fax, and...

User Guide
Page 17
...pattern using DTMF). Fax Printing/Reports Choose to automatically resize oversize faxes so they print on one page, or keep the oversized fax to scale and print on your outgoing fax. Include ... using FSK or 2 if telephones in your telecommunications company to know which tray the printer picks paper. The default code is determined by the country or region you can assign a speed...the size of rings before or after dialing the number. The Caller ID detection pattern is DELL# (3355#). Specify when to Fax, and then press the Select button 2. Choose whether ...
...pattern using DTMF). Fax Printing/Reports Choose to automatically resize oversize faxes so they print on one page, or keep the oversized fax to scale and print on your outgoing fax. Include ... using FSK or 2 if telephones in your telecommunications company to know which tray the printer picks paper. The default code is determined by the country or region you can assign a speed...the size of rings before or after dialing the number. The Caller ID detection pattern is DELL# (3355#). Specify when to Fax, and then press the Select button 2. Choose whether ...

User Guide
Page 21
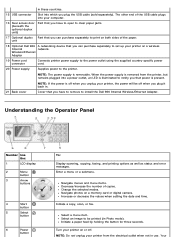
... connected to increase the amount of things. Tray that feeds original documents into the printer. You do not need to connect your printer to a computer to print, scan, or use the Save Photos to produce quality documents. NOTE: If you use a DSL modem for your computer...a PictBridge-enabled camera. NOTE: Pull the paper exit tray stop straight out to do need to connect your printer to a computer to your printer can hold. For more information, see Understanding the Operator Panel. About Your Printer Understanding the Printer Parts Understanding the Operator Panel You can use...
... connected to increase the amount of things. Tray that feeds original documents into the printer. You do not need to connect your printer to a computer to print, scan, or use the Save Photos to produce quality documents. NOTE: If you use a DSL modem for your computer...a PictBridge-enabled camera. NOTE: Pull the paper exit tray stop straight out to do need to connect your printer to a computer to your printer can hold. For more information, see Understanding the Operator Panel. About Your Printer Understanding the Printer Parts Understanding the Operator Panel You can use...

User Guide
Page 22
... displays JPG files found on the memory card, open the Memory Card Manager. exit tray 10 ADF input tray Tray that holds your document or photo flat while you insert a memory card containing digital pictures. upper connector) 14 PHONE jack connector ( - upper connector), and do not connect a...Service Code is serial in all countries. 12 Supplies Reorder Label To order ink cartridges or paper, visit www.dell.com/supplies. 13 FAX connector ( - Slot on your printer into which you use support.dell.com or contact technical support. Remove the blue plug before use. You can also pick ...
... displays JPG files found on the memory card, open the Memory Card Manager. exit tray 10 ADF input tray Tray that holds your document or photo flat while you insert a memory card containing digital pictures. upper connector) 14 PHONE jack connector ( - upper connector), and do not connect a...Service Code is serial in all countries. 12 Supplies Reorder Label To order ink cartridges or paper, visit www.dell.com/supplies. 13 FAX connector ( - Slot on your printer into which you use support.dell.com or contact technical support. Remove the blue plug before use. You can also pick ...
User Guide
Page 23
...to clear paper jams. 17 Optional duplex Part that you have to remove to the printer. Wireless/Ethernet Adapter 19 Power cord connector Connects printer power supply to the power outlet using the supplied country-specific power cord. 20 Power supply Supplies power to install the Dell 966 Internal ... end of the USB cable plugs into your printer from the printer, but remains plugged into which you can purchase separately to print on both sides of copies. Cover that you plug the USB cable (sold separately). Navigate photos on or off when you can purchase separately ...
...to clear paper jams. 17 Optional duplex Part that you have to remove to the printer. Wireless/Ethernet Adapter 19 Power cord connector Connects printer power supply to the power outlet using the supplied country-specific power cord. 20 Power supply Supplies power to install the Dell 966 Internal ... end of the USB cable plugs into your printer from the printer, but remains plugged into which you can purchase separately to print on both sides of copies. Cover that you plug the USB cable (sold separately). Navigate photos on or off when you can purchase separately ...
User Guide
Page 26
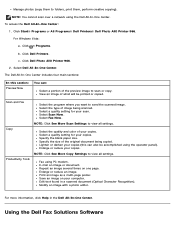
.... c. E-mail an image or document. Print an image as a multi-page poster. Click Dell Printers. Click Dell Photo AIO Printer 966. 2. Edit text found in the Dell All-In-One Center. Select Fax Now. Repeat an image several times on your copies. View an image of the original document being scanned. Scan and Fax... view all settings. NOTE: Click See More Scan Settings to folders, print them to view all settings. Select Scan Now. Specify the blank paper size. Manage photos (copy them , perform creative copying). To access the Dell All-In-One Center: 1.
.... c. E-mail an image or document. Print an image as a multi-page poster. Click Dell Printers. Click Dell Photo AIO Printer 966. 2. Edit text found in the Dell All-In-One Center. Select Fax Now. Repeat an image several times on your copies. View an image of the original document being scanned. Scan and Fax... view all settings. NOTE: Click See More Scan Settings to folders, print them to view all settings. Select Scan Now. Specify the blank paper size. Manage photos (copy them , perform creative copying). To access the Dell All-In-One Center: 1.

User Guide
Page 29
..., N-up, Poster, Booklet, or Borderless. Select the size of your status in black and white - Borderless - Allows you have a photo cartridge installed. You can also view the paper type that the printer detects. Dell Customer Experience Improvement Program - You can print using portrait or landscape orientation. Allows you to access information about, and change...
..., N-up, Poster, Booklet, or Borderless. Select the size of your status in black and white - Borderless - Allows you have a photo cartridge installed. You can also view the paper type that the printer detects. Dell Customer Experience Improvement Program - You can print using portrait or landscape orientation. Allows you to access information about, and change...
User Guide
Page 32
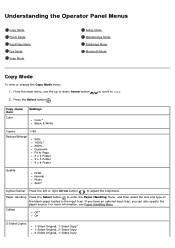
If you have an optional input tray, you can also specify the paper source. Understanding the Operator Panel Menus Copy Mode Photo Mode Print Files Mode Fax Mode Scan Mode Setup Mode Maintenance Mode PictBridge Mode Bluetooth Mode Copy Mode To view or change ...Press the Select button to Copy. For more information, see Paper Handling Menu. Copy menu item Color Settings Color* Black & White Copies 1-99 Reduce/Enlarge 50% 100%* 200% Custom% Fit to Page 2 x 2 Poster 3 x 3 Poster 4 x 4 Poster Quality Draft Normal Photo Auto* Lighter/Darker Press the left or right Arrow button ...
If you have an optional input tray, you can also specify the paper source. Understanding the Operator Panel Menus Copy Mode Photo Mode Print Files Mode Fax Mode Scan Mode Setup Mode Maintenance Mode PictBridge Mode Bluetooth Mode Copy Mode To view or change ...Press the Select button to Copy. For more information, see Paper Handling Menu. Copy menu item Color Settings Color* Black & White Copies 1-99 Reduce/Enlarge 50% 100%* 200% Custom% Fit to Page 2 x 2 Poster 3 x 3 Poster 4 x 4 Poster Quality Draft Normal Photo Auto* Lighter/Darker Press the left or right Arrow button ...
User Guide
Page 35
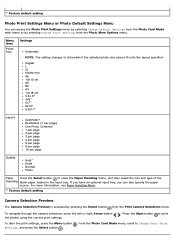
... settings. . Menu item Photo Size Settings Automatic NOTE: The setting changes to Change Photo Print Settings, and press the Select button . Hagaki L 2L 60x80 mm A6 10x15 cm A5 B5 A4 13x18 cm 3.5x 5" 4x6" 5x7" 8x10" 8.5x11" Layout Automatic* Borderless (1 per page) One Photo Centered 1 per page 2... per page 3 per page 4 per page 6 per page 8 per page 16 per page Quality Auto* Draft Normal Photo Paper Press the Select button to print To alter the print settings, press the Menu button...
... settings. . Menu item Photo Size Settings Automatic NOTE: The setting changes to Change Photo Print Settings, and press the Select button . Hagaki L 2L 60x80 mm A6 10x15 cm A5 B5 A4 13x18 cm 3.5x 5" 4x6" 5x7" 8x10" 8.5x11" Layout Automatic* Borderless (1 per page) One Photo Centered 1 per page 2... per page 3 per page 4 per page 6 per page 8 per page 16 per page Quality Auto* Draft Normal Photo Paper Press the Select button to print To alter the print settings, press the Menu button...
User Guide
Page 36
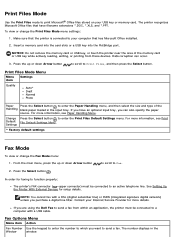
...card or USB key, or touch the printer near the area of the Handling blank paper loaded in the Window window. Print Files Mode Menu Menu item Settings Quality Auto* Draft Normal Photo Paper Press the Select button to enter the Paper Handling menu, and then select the ...size and type of the memory card or USB key while actively reading, writing, or printing from within an application, the printer must be connected to a computer with a DSL (digital subscriber line) or ISDN (integrated signature digital network) unless you are using the Dell...
...card or USB key, or touch the printer near the area of the Handling blank paper loaded in the Window window. Print Files Mode Menu Menu item Settings Quality Auto* Draft Normal Photo Paper Press the Select button to enter the Paper Handling menu, and then select the ...size and type of the memory card or USB key while actively reading, writing, or printing from within an application, the printer must be connected to a computer with a DSL (digital subscriber line) or ISDN (integrated signature digital network) unless you are using the Dell...
User Guide
Page 42
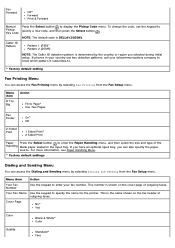
... The Caller ID detection pattern is DELL# (3355#). This is shown on the fax header of the Handling blank paper loaded in the input tray. For more information, see Paper Handling Menu. * Factory default settings Dialing and Sending Menu You can also specify the paper source. Your Fax Name Use the ... Pickup Key Code Press the Select button to specify the name for the printer. Menu item If Too Big Action Fit to Page* Use Two Pages Fax Footer On* Off 2-Sided Print 1 Sided Print* 2 Sided Print Paper Press the Select button to . * Factory default setting Fax Printing Menu ...
... The Caller ID detection pattern is DELL# (3355#). This is shown on the fax header of the Handling blank paper loaded in the input tray. For more information, see Paper Handling Menu. * Factory default settings Dialing and Sending Menu You can also specify the paper source. Your Fax Name Use the ... Pickup Key Code Press the Select button to specify the name for the printer. Menu item If Too Big Action Fit to Page* Use Two Pages Fax Footer On* Off 2-Sided Print 1 Sided Print* 2 Sided Print Paper Press the Select button to . * Factory default setting Fax Printing Menu ...
User Guide
Page 46
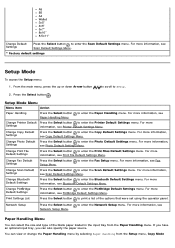
...of the options that were set using the operator panel. Change Bluetooth Default Settings Press the Select button to enter the Paper Handling menu. Change Photo Default Settings Press the Select button to enter the Copy Default Settings menu. For more information, see Scan Default Settings Menu... menu. For more information, see Copy Default Settings Menu. to enter the Print Files Default Settings menu. For more information, see Printer Default Settings Menu. From the main menu, press the up or down Arrow button to scroll to enter the Network Setup menu. ...
...of the options that were set using the operator panel. Change Bluetooth Default Settings Press the Select button to enter the Paper Handling menu. Change Photo Default Settings Press the Select button to enter the Copy Default Settings menu. For more information, see Scan Default Settings Menu... menu. For more information, see Copy Default Settings Menu. to enter the Print Files Default Settings menu. For more information, see Printer Default Settings Menu. From the main menu, press the up or down Arrow button to scroll to enter the Network Setup menu. ...

User Guide
Page 47
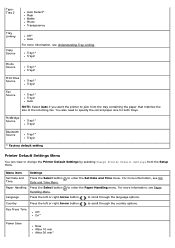
... Default Settings menu. Changing size from any menu changes the option selected in all other menus. Type Auto Detect* Plain Matte Photo Transparency * Factory default setting Paper Handling menu for printer with one input tray Menu Settings item Size Hagaki L 2L A6 10x15 cm A5 13x18 cm B5 A4 3x5 4x6 5x7 8.5x11 8.5x14...
... Default Settings menu. Changing size from any menu changes the option selected in all other menus. Type Auto Detect* Plain Matte Photo Transparency * Factory default setting Paper Handling menu for printer with one input tray Menu Settings item Size Hagaki L 2L A6 10x15 cm A5 13x18 cm B5 A4 3x5 4x6 5x7 8.5x11 8.5x14...
User Guide
Page 48
...Source Tray1* Tray2 Bluetooth Source Tray1* Tray2 * Factory default setting Printer Default Settings Menu You can view or change the Printer Default Settings by selecting Change Printer Default Settings from the tray containing the paper that matches the size of the incoming fax. Key Press Tone ..., see Understanding Tray Linking. Type Tray 2 Auto Detect* Plain Matte Photo Transparency Tray Linking Copy Source Off* Auto For more information, see Set Press the Select button Handling Menu. Tray1* Tray2 Photo Source Tray1* Tray2 Print Files Source Tray1* Tray2 Fax Source Tray1* ...
...Source Tray1* Tray2 Bluetooth Source Tray1* Tray2 * Factory default setting Printer Default Settings Menu You can view or change the Printer Default Settings by selecting Change Printer Default Settings from the tray containing the paper that matches the size of the incoming fax. Key Press Tone ..., see Understanding Tray Linking. Type Tray 2 Auto Detect* Plain Matte Photo Transparency Tray Linking Copy Source Off* Auto For more information, see Set Press the Select button Handling Menu. Tray1* Tray2 Photo Source Tray1* Tray2 Print Files Source Tray1* Tray2 Fax Source Tray1* ...
User Guide
Page 49
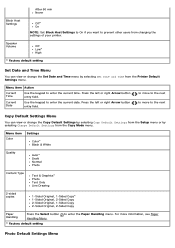
... Date and Time Menu You can view or change the Set Date and Time menu by selecting Change Default Settings from the Printer Default Settings menu. For more information, see Paper Photo Default Settings Menu After 60 min Never Block Host Settings Off* On NOTE: Set Block Host Settings to On if you...
... Date and Time Menu You can view or change the Set Date and Time menu by selecting Change Default Settings from the Printer Default Settings menu. For more information, see Paper Photo Default Settings Menu After 60 min Never Block Host Settings Off* On NOTE: Set Block Host Settings to On if you...

User Guide
Page 50
...be printed, unless you restore the settings to enter the Paper Handling menu. Menu item Photo Size Settings Hagaki L 2L 60x80 mm A6 10x15 cm A5 B5 A4 13x18 cm 3.5x 5" 4x6" 5x7" 8x10" 8.5x11" Layout Automatic* Borderless (1 per page) One Photo Centered 1 per page 2 per page 3 per page... 4 per page 6 per page 8 per page 16 per page Quality Auto* Draft Normal Photo Paper Handling Press the Select button Handling Menu. * Factory default setting to factory defaults. ...
...be printed, unless you restore the settings to enter the Paper Handling menu. Menu item Photo Size Settings Hagaki L 2L 60x80 mm A6 10x15 cm A5 B5 A4 13x18 cm 3.5x 5" 4x6" 5x7" 8x10" 8.5x11" Layout Automatic* Borderless (1 per page) One Photo Centered 1 per page 2 per page 3 per page... 4 per page 6 per page 8 per page 16 per page Quality Auto* Draft Normal Photo Paper Handling Press the Select button Handling Menu. * Factory default setting to factory defaults. ...

User Guide
Page 52
...Time NOTE: When Time Server is enabled, the wireless Ethernet card updates the printer's time once a day or every time the printer is powered on. Network Time Menu Press the Select button to enter the Paper Handling menu. One Photo Centered 1 per page 2 per page 3 per page 4 per page ...6 per page 8 per page 16 per page Quality Auto* Draft Normal Photo Paper Handling Press the Select button...
...Time NOTE: When Time Server is enabled, the wireless Ethernet card updates the printer's time once a day or every time the printer is powered on. Network Time Menu Press the Select button to enter the Paper Handling menu. One Photo Centered 1 per page 2 per page 3 per page 4 per page ...6 per page 8 per page 16 per page Quality Auto* Draft Normal Photo Paper Handling Press the Select button...


