User Guide
Page 3
Contents 1 Your Dell Projector 6 About Your Projector 7 2 Connecting Your Projector 8 Connecting to a Computer 9 Connecting a Computer with an M1 to D-sub/USB Cable 9 Connecting a Computer with a D-sub to D-sub Cable 10 Connecting to a DVD Player 11 Connecting a DVD Player with an M1 to HDTV Cable 11 Connecting a DVD Player with a D-sub to YPbPr Cable 11 Connecting a DVD Player with a RCA...
Contents 1 Your Dell Projector 6 About Your Projector 7 2 Connecting Your Projector 8 Connecting to a Computer 9 Connecting a Computer with an M1 to D-sub/USB Cable 9 Connecting a Computer with a D-sub to D-sub Cable 10 Connecting to a DVD Player 11 Connecting a DVD Player with an M1 to HDTV Cable 11 Connecting a DVD Player with a D-sub to YPbPr Cable 11 Connecting a DVD Player with a RCA...

User Guide
Page 6
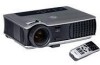
www.dell.com | support.dell.com 1 Your Dell Projector Your projector comes with all the items, and contact Dell if anything is missing. Package Contents 1.8 m power cord (3.0 m in Americas) 1.8 m M1 to D-sub/USB cable 2.0 m S-video cable 1.8 m Composite Video cable 1.8 m RCA to Audio cable 1.8 m mini pin to mini pin cable 1.8 m M1-A to HDTV cable Remote control 6 Your Dell Projector Ensure that you have all the items shown below.
www.dell.com | support.dell.com 1 Your Dell Projector Your projector comes with all the items, and contact Dell if anything is missing. Package Contents 1.8 m power cord (3.0 m in Americas) 1.8 m M1 to D-sub/USB cable 2.0 m S-video cable 1.8 m Composite Video cable 1.8 m RCA to Audio cable 1.8 m mini pin to mini pin cable 1.8 m M1-A to HDTV cable Remote control 6 Your Dell Projector Ensure that you have all the items shown below.
User Guide
Page 9
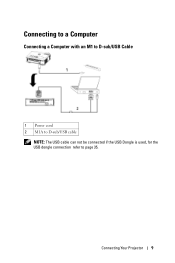
Connecting to a Computer Connecting a Computer with an M1 to D-sub/USB Cable 1 Power cord 2 M1A to D-sub/USB cable NOTE: The USB cable can not be connected if the USB Dongle is used, for the USB dongle connection refer to page 35. Connecting Your Projector 9
Connecting to a Computer Connecting a Computer with an M1 to D-sub/USB Cable 1 Power cord 2 M1A to D-sub/USB cable NOTE: The USB cable can not be connected if the USB Dongle is used, for the USB dongle connection refer to page 35. Connecting Your Projector 9

User Guide
Page 10
www.dell.com | support.dell.com Connecting a Computer with a D-sub to D-sub Cable 1 Power cord 2 D-sub to D-sub cable NOTE: The USB cable can not be connected if the USB Dongle is used, for the USB dongle connection refer to page 35. 10 Connecting Your Projector
www.dell.com | support.dell.com Connecting a Computer with a D-sub to D-sub Cable 1 Power cord 2 D-sub to D-sub cable NOTE: The USB cable can not be connected if the USB Dongle is used, for the USB dongle connection refer to page 35. 10 Connecting Your Projector
User Guide
Page 11
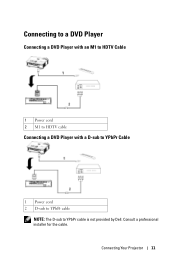
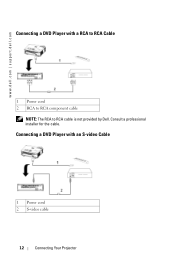
Consult a professional installer for the cable. Connecting Your Projector 11 Connecting to a DVD Player Connecting a DVD Player with an M1 to HDTV Cable 1 Power cord 2 M1 to HDTV cable Connecting a DVD Player with a D-sub to YPbPr Cable 1 Power cord 2 D-sub to YPbPr cable NOTE: The D-sub to YPbPr cable is not provided by Dell.
Consult a professional installer for the cable. Connecting Your Projector 11 Connecting to a DVD Player Connecting a DVD Player with an M1 to HDTV Cable 1 Power cord 2 M1 to HDTV cable Connecting a DVD Player with a D-sub to YPbPr Cable 1 Power cord 2 D-sub to YPbPr cable NOTE: The D-sub to YPbPr cable is not provided by Dell.
User Guide
Page 12
Consult a professional installer for the cable. Connecting a DVD Player with a RCA to RCA Cable 1 Power cord 2 RCA to RCA component cable NOTE: The RCA to RCA cable is not provided by Dell. www.dell.com | support.dell.com Connecting a DVD Player with an S-video Cable 1 Power cord 2 S-video cable 12 Connecting Your Projector
Consult a professional installer for the cable. Connecting a DVD Player with a RCA to RCA Cable 1 Power cord 2 RCA to RCA component cable NOTE: The RCA to RCA cable is not provided by Dell. www.dell.com | support.dell.com Connecting a DVD Player with an S-video Cable 1 Power cord 2 S-video cable 12 Connecting Your Projector
User Guide
Page 13
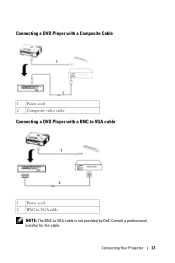
Connecting Your Projector 13 Connecting a DVD Player with a Composite Cable 1 Power cord 2 Composite video cable Connecting a DVD Player with a BNC to VGA cable 1 Power cord 2 BNC to VGA cable NOTE: The BNC to VGA cable is not provided by Dell. Consult a professional installer for the cable.
Connecting Your Projector 13 Connecting a DVD Player with a Composite Cable 1 Power cord 2 Composite video cable Connecting a DVD Player with a BNC to VGA cable 1 Power cord 2 BNC to VGA cable NOTE: The BNC to VGA cable is not provided by Dell. Consult a professional installer for the cable.
User Guide
Page 15
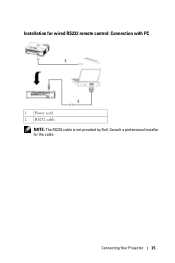
Installation for the cable. Connecting Your Projector 15 Consult a professional installer for wired RS232 remote control: Connection with PC 1 Power cord 2 RS232 cable NOTE: The RS232 cable is not provided by Dell.
Installation for the cable. Connecting Your Projector 15 Consult a professional installer for wired RS232 remote control: Connection with PC 1 Power cord 2 RS232 cable NOTE: The RS232 cable is not provided by Dell.
User Guide
Page 16
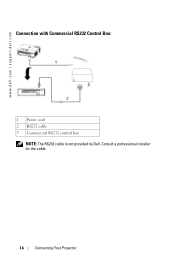
Consult a professional installer for the cable. 16 Connecting Your Projector www.dell.com | support.dell.com Connection with Commercial RS232 Control Box: 1 Power cord 2 RS232 cable 3 Commercial RS232 control box NOTE: The RS232 cable is not provided by Dell.
Consult a professional installer for the cable. 16 Connecting Your Projector www.dell.com | support.dell.com Connection with Commercial RS232 Control Box: 1 Power cord 2 RS232 cable 3 Commercial RS232 control box NOTE: The RS232 cable is not provided by Dell.
User Guide
Page 17
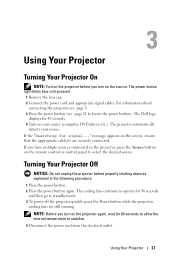
...lens cap. 2 Connect the power cord and appropriate signal cables. If the "Searching for 30 seconds. 4 Turn on the screen, ensure that the appropriate cable(s) are still running. message appears on your source. For information about connecting the projector, see page 8. 3 Press the power button (see... page 21 to locate the power button). The Dell logo displays for signal..." If you turn on...
...lens cap. 2 Connect the power cord and appropriate signal cables. If the "Searching for 30 seconds. 4 Turn on the screen, ensure that the appropriate cable(s) are still running. message appears on your source. For information about connecting the projector, see page 8. 3 Press the power button (see... page 21 to locate the power button). The Dell logo displays for signal..." If you turn on...
User Guide
Page 24
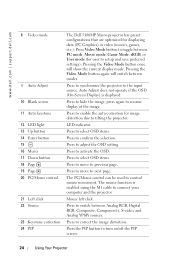
... switch between modes. Auto Adjust does not operate if the OSD (On-Screen Display) is enabled using the M1 cable to previous page. Press to move to connect your computer and the projector. LED indicator. Pressing the Video Mode button again will show the current display mode. Press to switch between PC... 15 16 Menu 17 Down button 18 Page 19 Page 20 PC/Mouse control 21 Left click 22 Source 23 Keystone correction 24 PIP The Dell 5100MP Micro-projector has preset configurations that are optimized for displaying data (PC Graphics) or video (movies, games, etc.).
... switch between modes. Auto Adjust does not operate if the OSD (On-Screen Display) is enabled using the M1 cable to previous page. Press to move to connect your computer and the projector. LED indicator. Pressing the Video Mode button again will show the current display mode. Press to switch between PC... 15 16 Menu 17 Down button 18 Page 19 Page 20 PC/Mouse control 21 Left click 22 Source 23 Keystone correction 24 PIP The Dell 5100MP Micro-projector has preset configurations that are optimized for displaying data (PC Graphics) or video (movies, games, etc.).
User Guide
Page 27
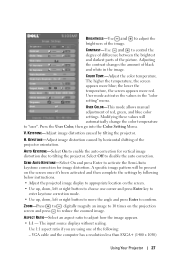
... the auto correction. AUTO KEYSTONE-Select On to enable the auto correction for image distortion. VGA cable and the computer has a resolution less than SXGA+ (1400 x 1050) Using Your Projector 27 BRIGHTNESS-Use and to adjust the brightness of red, green, and blue color settings. V.... CONTRAST-Use and to control the degree of difference between the brightest and darkest parts of the projector orientation. H. Select Off...
... the auto correction. AUTO KEYSTONE-Select On to enable the auto correction for image distortion. VGA cable and the computer has a resolution less than SXGA+ (1400 x 1050) Using Your Projector 27 BRIGHTNESS-Use and to adjust the brightness of red, green, and blue color settings. V.... CONTRAST-Use and to control the degree of difference between the brightest and darkest parts of the projector orientation. H. Select Off...
User Guide
Page 28
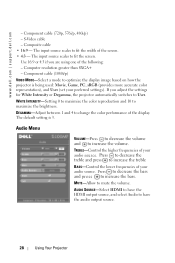
... decrease the treble and press to optimize the display image based on how the projector is 3. DEGAMMA-Adjust between 1 and 4 to maximize the brightness. Composite cable • 16:9 - Computer resolution greater than SXGA+ - Audio Menu VOLUME-Press to decrease the volume and to mute the volume...to have the HDMI output source, and select Audio to increase the bass. www.dell.com | support.dell.com - Press to decrease the bass and press to have the audio output source. 28 Using Your Projector Component cable (720p, 576i/p, 480i/p) - If you are using one of the screen. ...
... decrease the treble and press to optimize the display image based on how the projector is 3. DEGAMMA-Adjust between 1 and 4 to maximize the brightness. Composite cable • 16:9 - Computer resolution greater than SXGA+ - Audio Menu VOLUME-Press to decrease the volume and to mute the volume...to have the HDMI output source, and select Audio to increase the bass. www.dell.com | support.dell.com - Press to decrease the bass and press to have the audio output source. 28 Using Your Projector Component cable (720p, 576i/p, 480i/p) - If you are using one of the screen. ...
User Guide
Page 43
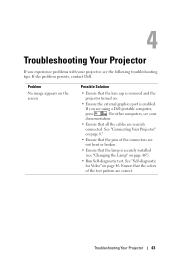
... • Ensure the external graphics port is enabled. If the problem persists, contact Dell. See "Connecting Your Projector" on page 8." • Ensure that the lamp is removed and the projector turned on page 46. Problem No image appears on the screen Possible Solution • ... problems with your documentation. • Ensure that all the cables are not bent or broken. • Ensure that the pins of the test pattern are using a Dell portable computer, press . Troubleshooting Your Projector 43 Ensure that the lens cap is securely installed (see the...
... • Ensure the external graphics port is enabled. If the problem persists, contact Dell. See "Connecting Your Projector" on page 8." • Ensure that the lamp is removed and the projector turned on page 46. Problem No image appears on the screen Possible Solution • ... problems with your documentation. • Ensure that all the cables are not bent or broken. • Ensure that the pins of the test pattern are using a Dell portable computer, press . Troubleshooting Your Projector 43 Ensure that the lens cap is securely installed (see the...
User Guide
Page 59
... 15, 16 RCA to YPbPr cable 11 Installation for Driving Auto- Index A Adjusting the Projected Image 18 Adjusting the Projector Height 18 lower the projector Elevator button 18 Elevator foot 18 Tilt adjustment wheel 18 Lowering the Projector Height 18 Adjusting the Projector Zoom and Focus 19 Focus ring... the Lamp 46 Connecting the Projector 12V DC power cord 14 Automatic screen 14 BNC to VGA cable 13 Commercial RS232 control box 16 Composite video cable 13 Connecting a Computer with a D-sub to D-sub Cable 10 Connecting a Computer with an M1 to D-sub/USB Cable 9 Connecting a DVD Player with...
... 15, 16 RCA to YPbPr cable 11 Installation for Driving Auto- Index A Adjusting the Projected Image 18 Adjusting the Projector Height 18 lower the projector Elevator button 18 Elevator foot 18 Tilt adjustment wheel 18 Lowering the Projector Height 18 Adjusting the Projector Zoom and Focus 19 Focus ring... the Lamp 46 Connecting the Projector 12V DC power cord 14 Automatic screen 14 BNC to VGA cable 13 Commercial RS232 control box 16 Composite video cable 13 Connecting a Computer with a D-sub to D-sub Cable 10 Connecting a Computer with an M1 to D-sub/USB Cable 9 Connecting a DVD Player with...
Protocol Document
Page 1
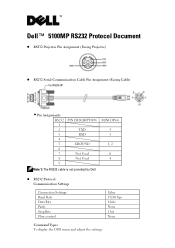
MINI DIN-6 5 3 1, 2 6 4 RS232 Protocol Communication Settings Connection Settings Baud Rate Data Bits Parity Stop Bits Flow control Value 19200 bps 8 bits None 1 bit None Command Types To display the OSD menu and adjust the settings. Dell™ 5100MP RS232 Protocol Document RS232 Projector Pin Assignment (Facing Projector) RS232 Serial Communication Cable Pin Assignment (Facing Cable) Pin Assignments RS232 PIN DESCRIPTION 1 2 TXD 3 RXD 4 5 GROUND 6 7 Not Used 8 Not Used 9 Note 1: The RS232 cable is not provided by Dell.
MINI DIN-6 5 3 1, 2 6 4 RS232 Protocol Communication Settings Connection Settings Baud Rate Data Bits Parity Stop Bits Flow control Value 19200 bps 8 bits None 1 bit None Command Types To display the OSD menu and adjust the settings. Dell™ 5100MP RS232 Protocol Document RS232 Projector Pin Assignment (Facing Projector) RS232 Serial Communication Cable Pin Assignment (Facing Cable) Pin Assignments RS232 PIN DESCRIPTION 1 2 TXD 3 RXD 4 5 GROUND 6 7 Not Used 8 Not Used 9 Note 1: The RS232 cable is not provided by Dell.

