Owner's Manual
Page 3
Contents 1 Your Dell Projector About Your Projector 6 2 Connecting Your Projector Connecting to a Computer 8 Connecting to a DVD Player 8 Connecting a DVD Player with an S-video Cable . . 8 Connecting a DVD Player with a Composite Cable . 9 Connecting a DVD Player with a Component Cable 9 3 Using Your Projector Turning Your Projector On 11 Turning Your Projector Off 11 Adjusting the Projected Image 12 Raising the Projector Height 12 Lowering the Projector Height 12 Adjusting the Projector Zoom and Focus 13 Adjusting Projection Image Size 14 Using the Control Panel 15 Contents 3
Contents 1 Your Dell Projector About Your Projector 6 2 Connecting Your Projector Connecting to a Computer 8 Connecting to a DVD Player 8 Connecting a DVD Player with an S-video Cable . . 8 Connecting a DVD Player with a Composite Cable . 9 Connecting a DVD Player with a Component Cable 9 3 Using Your Projector Turning Your Projector On 11 Turning Your Projector Off 11 Adjusting the Projected Image 12 Raising the Projector Height 12 Lowering the Projector Height 12 Adjusting the Projector Zoom and Focus 13 Adjusting Projection Image Size 14 Using the Control Panel 15 Contents 3
Owner's Manual
Page 5
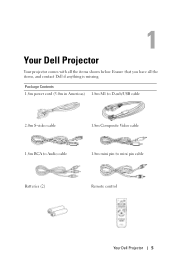
1 Your Dell Projector Your projector comes with all the items, and contact Dell if anything is missing. Ensure that you have all the items shown below. Package Contents 1.8m power cord (3.0m in Americas) 1.8m M1 to D-sub/USB cable 2.0m S-video cable 1.8m Composite Video cable 1.8m RCA to Audio cable 1.8m mini pin to mini pin cable Batteries (2) Remote control Your Dell Projector 5
1 Your Dell Projector Your projector comes with all the items, and contact Dell if anything is missing. Ensure that you have all the items shown below. Package Contents 1.8m power cord (3.0m in Americas) 1.8m M1 to D-sub/USB cable 2.0m S-video cable 1.8m Composite Video cable 1.8m RCA to Audio cable 1.8m mini pin to mini pin cable Batteries (2) Remote control Your Dell Projector 5

Owner's Manual
Page 9
Consult a professional installer for the cable. Connecting Your Projector 9 Connecting a DVD Player with a Composite Cable 1 Power cord 2 Composite video cable Connecting a DVD Player with a Component Cable 1 Power cord 2 M1-A to HDTV cable NOTE: The M1-A to HDTV cable is not provided by Dell.
Consult a professional installer for the cable. Connecting Your Projector 9 Connecting a DVD Player with a Composite Cable 1 Power cord 2 Composite video cable Connecting a DVD Player with a Component Cable 1 Power cord 2 M1-A to HDTV cable NOTE: The M1-A to HDTV cable is not provided by Dell.
Owner's Manual
Page 11
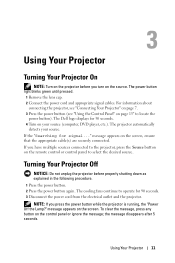
...source. Using Your Projector 11 The Dell logo displays for 30 seconds. 4 Turn on your source. Turning Your Projector Off NOTICE: Do not unplug the projector before you press the power button while the projector is running, the "Power Off the Lamp?" The projector automatically detects your ... the lens cap. 2 Connect the power cord and appropriate signal cables. message appears on the remote control or control panel to the projector, press the Source button on the screen, ensure that the appropriate cable(s) are securely connected. message appears on page 15" to operate ...
...source. Using Your Projector 11 The Dell logo displays for 30 seconds. 4 Turn on your source. Turning Your Projector Off NOTICE: Do not unplug the projector before you press the power button while the projector is running, the "Power Off the Lamp?" The projector automatically detects your ... the lens cap. 2 Connect the power cord and appropriate signal cables. message appears on the remote control or control panel to the projector, press the Source button on the screen, ensure that the appropriate cable(s) are securely connected. message appears on page 15" to operate ...
Owner's Manual
Page 17
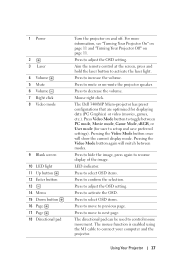
... used to adjust the OSD setting. The mouse function is enabled using the M1 cable to next page. LED indicator. Press to move to increase the volume. The Dell 3400MP Micro-projector has preset configurations that are optimized for user to decrease the volume. Press to... resume display of the image. Using Your Projector 17 1 Power 2 3 Laser 4 Volume 5 Mute 6 Volume 7 Right click 8 Video...
... used to adjust the OSD setting. The mouse function is enabled using the M1 cable to next page. LED indicator. Press to move to increase the volume. The Dell 3400MP Micro-projector has preset configurations that are optimized for user to decrease the volume. Press to... resume display of the image. Using Your Projector 17 1 Power 2 3 Laser 4 Volume 5 Mute 6 Volume 7 Right click 8 Video...
Owner's Manual
Page 19
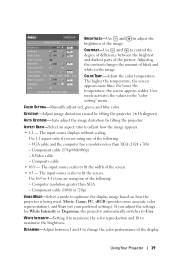
...optimize the display image based on how the projector is being used: Movie, Game, PC, sRGB (provides more blue; DEGAMMA-Adjust between the brightest and darkest parts of the picture. VGA cable and the computer has a resolution less than XGA - COLOR SETTING-Manually adjust red, green, ...and blue color. AUTO KEYSTONE-Auto adjust the image distortion by tilting the projector (±16 degrees). Use 16:9 or 4:3 if you...
...optimize the display image based on how the projector is being used: Movie, Game, PC, sRGB (provides more blue; DEGAMMA-Adjust between the brightest and darkest parts of the picture. VGA cable and the computer has a resolution less than XGA - COLOR SETTING-Manually adjust red, green, ...and blue color. AUTO KEYSTONE-Auto adjust the image distortion by tilting the projector (±16 degrees). Use 16:9 or 4:3 if you...
Owner's Manual
Page 23
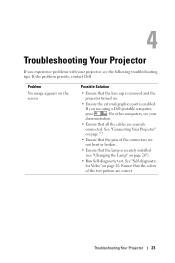
... page 7." • Ensure that the pins of the test pattern are using a Dell portable computer, press . Troubleshooting Your Projector 23 If you experience problems with your documentation. • Ensure that all the cables are securely connected. For other computers, see "Changing the Lamp" on . • Ensure the external graphics port is securely installed...
... page 7." • Ensure that the pins of the test pattern are using a Dell portable computer, press . Troubleshooting Your Projector 23 If you experience problems with your documentation. • Ensure that all the cables are securely connected. For other computers, see "Changing the Lamp" on . • Ensure the external graphics port is securely installed...
Owner's Manual
Page 67
... foot 12 Tilt adjustment wheel 12 Adjusting the Projector Zoom and Focus 13 Focus ring 13 Zoom tab 13 C Changing the Lamp 26 Connecting the Projector Composite video cable 9 Connecting with a Com- tor 7 IR receiver 7 M1-DA connector 7 Power cord connector 7 S-video connector 7 Control Panel 15 D Dell contacting 33 M Main Unit 6 Control panel 6 Elevator...
... foot 12 Tilt adjustment wheel 12 Adjusting the Projector Zoom and Focus 13 Focus ring 13 Zoom tab 13 C Changing the Lamp 26 Connecting the Projector Composite video cable 9 Connecting with a Com- tor 7 IR receiver 7 M1-DA connector 7 Power cord connector 7 S-video connector 7 Control Panel 15 D Dell contacting 33 M Main Unit 6 Control panel 6 Elevator...


