
User Guide
Page 1
Dell™ 2130cn Color Laser Printer User's Guide Dell™ 2130cn Color Laser Printer User's Guide Finding Information About Your Printer Installing the Print Head Device (PHD) Unit and Toner Cartridges Connecting Your Printer Dell Printer Configuration Web Tool Installing Optional Modules Print Media Guidelines Loading Print Media Operator Panel Printer Settings Understanding the Tool Box Menus Understanding the Printer Menus Understanding Your Printer Software Printing Setting Up for Shared Printing Understanding Fonts Understanding Printer Messages...
Dell™ 2130cn Color Laser Printer User's Guide Dell™ 2130cn Color Laser Printer User's Guide Finding Information About Your Printer Installing the Print Head Device (PHD) Unit and Toner Cartridges Connecting Your Printer Dell Printer Configuration Web Tool Installing Optional Modules Print Media Guidelines Loading Print Media Operator Panel Printer Settings Understanding the Tool Box Menus Understanding the Printer Menus Understanding Your Printer Software Printing Setting Up for Shared Printing Understanding Fonts Understanding Printer Messages...

User Guide
Page 65
... relates to re-install the network protocol adapter, and then turn the printer back on toner. See "Replacing Toner Cartridges". See "Replacing the Print Head Device (PHD) Unit". If you do not replace the toner cartridge, print quality problems may occur. See "Contacting Dell". XXX is one of its life. The specified toner cartridge is one...
... relates to re-install the network protocol adapter, and then turn the printer back on toner. See "Replacing Toner Cartridges". See "Replacing the Print Head Device (PHD) Unit". If you do not replace the toner cartridge, print quality problems may occur. See "Contacting Dell". XXX is one of its life. The specified toner cartridge is one...

User Guide
Page 66
...cannot continue processing the current print job. The eight yellow ribbons are correctly removed from the PHD unit. If this does not solve the problem, contact Dell. See "Replacing the Print Head Device (PHD) Unit". See "Cleaning the CTD Sensor Inside the Printer". XXX indicates the number of... its life. Load the specified paper in the specified tray. The printer memory is full and cannot continue processing...
...cannot continue processing the current print job. The eight yellow ribbons are correctly removed from the PHD unit. If this does not solve the problem, contact Dell. See "Replacing the Print Head Device (PHD) Unit". See "Cleaning the CTD Sensor Inside the Printer". XXX indicates the number of... its life. Load the specified paper in the specified tray. The printer memory is full and cannot continue processing...
User Guide
Page 78
...action 6. Does the dispense motor function properly? Repeat step 2 for the printer. 5 Is the problem recovered? Replace the PHD unit if you have a spare. 1. Is the problem recovered? Action If printing many low density images, execute the Toner Refresh Mode. 1. Click the ...3. Is the problem recovered? See "Replacing the Print Head Device (PHD) Unit" and "Installing the PHD Unit". 2. Repeat step 2 for the rest of the output is too light. The 4 Colors Configuration Chart is complete. See "Supported Paper Sizes". Dell. Replace the PHD unit. Go to action 7. ...
...action 6. Does the dispense motor function properly? Repeat step 2 for the printer. 5 Is the problem recovered? Replace the PHD unit if you have a spare. 1. Is the problem recovered? Action If printing many low density images, execute the Toner Refresh Mode. 1. Click the ...3. Is the problem recovered? See "Replacing the Print Head Device (PHD) Unit" and "Installing the PHD Unit". 2. Repeat step 2 for the rest of the output is too light. The 4 Colors Configuration Chart is complete. See "Supported Paper Sizes". Dell. Replace the PHD unit. Go to action 7. ...

User Guide
Page 79
... No Go to action 4. Click the 4 Colors Configuration Chart button. Is the problem recovered? Try changing the Paper Type setting in the printer driver. See "Supported Paper Sizes". If not, use the print media recommended for the printer. 2 Is the problem recovered? Replace the PHD...For example, change the Paper Type setting. Verify that the correct print media is printed. Contact Dell. Replace the PHD unit. After you replace the PHD unit, click Chart Print on the Diagnosis tab. 3 3. See "Replacing the Print Head Device (PHD) Unit" and "Installing the PHD Unit". 2 Is the...
... No Go to action 4. Click the 4 Colors Configuration Chart button. Is the problem recovered? Try changing the Paper Type setting in the printer driver. See "Supported Paper Sizes". If not, use the print media recommended for the printer. 2 Is the problem recovered? Replace the PHD...For example, change the Paper Type setting. Verify that the correct print media is printed. Contact Dell. Replace the PHD unit. After you replace the PHD unit, click Chart Print on the Diagnosis tab. 3 3. See "Replacing the Print Head Device (PHD) Unit" and "Installing the PHD Unit". 2 Is the...

User Guide
Page 80
..., and click Machine Check on the output. Dell. The 4 Colors Configuration Chart is using non-Dell brand toner cartridges, disable the Non-Dell Toner option. 1. Action Yes No The toner cartridges may be replaced. Is the problem recovered? See "Replacing the Print Head Device (PHD) Unit" and "Installing the PHD Unit... appear on the Diagnosis tab. 2. No Go to action 3. Contact Go to action 2. Launch the Tool Box, and click Non-Dell Toner on the Printer Maintenance tab. 2 2. Action Ensure that the dispense motor for the rest of toner in the Status Monitor. 1 2. Confirm the ...
..., and click Machine Check on the output. Dell. The 4 Colors Configuration Chart is using non-Dell brand toner cartridges, disable the Non-Dell Toner option. 1. Action Yes No The toner cartridges may be replaced. Is the problem recovered? See "Replacing the Print Head Device (PHD) Unit" and "Installing the PHD Unit... appear on the Diagnosis tab. 2. No Go to action 3. Contact Go to action 2. Launch the Tool Box, and click Non-Dell Toner on the Printer Maintenance tab. 2 2. Action Ensure that the dispense motor for the rest of toner in the Status Monitor. 1 2. Confirm the ...

User Guide
Page 81
...Print Head Device (PHD) Unit" and "Installing the PHD Unit". 2. Contact Dell. Is the problem recovered? Click the Pitch Configuration Chart button. 1 The Pitch Configuration Chart is printed. contact Dell. Contact Dell. Replace the PHD unit if you have a spare. 1. Replace the PHD unit. Is the cause of the printer...Chart Print on the Diagnosis tab. 2a 3. The 4 Colors Configuration Chart is set to Color (Auto). Action Ensure Output Color is set to Color (Auto) in the printer driver. After you replace the PHD unit, click Chart Print on...
...Print Head Device (PHD) Unit" and "Installing the PHD Unit". 2. Contact Dell. Is the problem recovered? Click the Pitch Configuration Chart button. 1 The Pitch Configuration Chart is printed. contact Dell. Contact Dell. Replace the PHD unit if you have a spare. 1. Replace the PHD unit. Is the cause of the printer...Chart Print on the Diagnosis tab. 2a 3. The 4 Colors Configuration Chart is set to Color (Auto). Action Ensure Output Color is set to Color (Auto) in the printer driver. After you replace the PHD unit, click Chart Print on...

User Guide
Page 82
... bias. 1. Adjust the setting for the printer. 2b Is the problem recovered? Click the Ghost Configuration Chart button. Yes No Proceed to the action corresponding to action 3. See "Replacing the Print Head Device (PHD) Unit". 2. Contact Dell. Click the Ghost Configuration Chart button. 1 The Ghost Configuration Chart is printed. Contact Dell. 2. Vertical blanks The task is complete...
... bias. 1. Adjust the setting for the printer. 2b Is the problem recovered? Click the Ghost Configuration Chart button. Yes No Proceed to the action corresponding to action 3. See "Replacing the Print Head Device (PHD) Unit". 2. Contact Dell. Click the Ghost Configuration Chart button. 1 The Ghost Configuration Chart is printed. Contact Dell. 2. Vertical blanks The task is complete...

User Guide
Page 83
... tab. 2. Click the Pitch Configuration Chart button. 1 The Pitch Configuration Chart is printed. Go to action 2. Click the 4 Colors Configuration Chart button. The 4 Colors Configuration Chart is printed. Is the problem recovered? Contact Dell. Click the 4 Colors Configuration Chart button. Is the problem recovered? See "Replacing the Print Head Device (PHD) Unit" and "Installing the PHD Unit". 2. Click the...
... tab. 2. Click the Pitch Configuration Chart button. 1 The Pitch Configuration Chart is printed. Go to action 2. Click the 4 Colors Configuration Chart button. The 4 Colors Configuration Chart is printed. Is the problem recovered? Contact Dell. Click the 4 Colors Configuration Chart button. Is the problem recovered? See "Replacing the Print Head Device (PHD) Unit" and "Installing the PHD Unit". 2. Click the...

User Guide
Page 84
...Replacing the Print Head Device (PHD) Unit" and "Installing the PHD Unit". 2 Is the problem recovered? No Go to action 3. Is the cause of the location. Action If the printer is installed in a high altitude location, set Bitmap Text Smoothing under Items to High Quality in the printer driver. ... the action corresponding to action 2. The task is complete. contact Dell. Jagged characters No Go to the location of the problem: l PHD unit - 2a l Fuser - 2b l Main unit of the printer - Action Set Print Mode to On. Click the Pitch Configuration Chart button. 1 The...
...Replacing the Print Head Device (PHD) Unit" and "Installing the PHD Unit". 2 Is the problem recovered? No Go to action 3. Is the cause of the location. Action If the printer is installed in a high altitude location, set Bitmap Text Smoothing under Items to High Quality in the printer driver. ... the action corresponding to action 2. The task is complete. contact Dell. Jagged characters No Go to the location of the problem: l PHD unit - 2a l Fuser - 2b l Main unit of the printer - Action Set Print Mode to On. Click the Pitch Configuration Chart button. 1 The...

User Guide
Page 85
...Developer Stir Mode. 1. Is the problem recovered? No Contact Dell. Is the problem recovered? See the fuser replacement guide, Replacing the Fuser. 2. Go to action 2a. Click the Pitch Configuration Chart button. See "Replacing the Print Head Device (PHD) Unit" and "Installing the PHD Unit". 3 ... 2b. Does the output match with the pattern for the printer. 1 The task is complete. Launch the Tool Box, and click Developer Stir Mode on the Diagnosis tab. 2. If the envelope is printed. Click the Pitch Configuration Chart button. Click the Pitch Configuration...
...Developer Stir Mode. 1. Is the problem recovered? No Contact Dell. Is the problem recovered? See the fuser replacement guide, Replacing the Fuser. 2. Go to action 2a. Click the Pitch Configuration Chart button. See "Replacing the Print Head Device (PHD) Unit" and "Installing the PHD Unit". 3 ... 2b. Does the output match with the pattern for the printer. 1 The task is complete. Launch the Tool Box, and click Developer Stir Mode on the Diagnosis tab. 2. If the envelope is printed. Click the Pitch Configuration Chart button. Click the Pitch Configuration...

User Guide
Page 86
... the following procedures that use the operator panel and Dell Configuration Web Tool, see "Understanding the Printer Menus" and "Dell Printer Configuration Web Tool". Yes No Contact Dell. Contact Dell. Does the noise generated from the printer match with the noise from the drop-down list ... 250-sheet tray with the noise from the Play of the toner cartridges. Contact Dell. Abnormal Noise NOTE: Some of Sound button? 1. See "Removing the Used Toner Cartridge", "Replacing the Print Head Device (PHD) Unit" and the fuser replacement guide, Replacing the Fuser. 1 2....
... the following procedures that use the operator panel and Dell Configuration Web Tool, see "Understanding the Printer Menus" and "Dell Printer Configuration Web Tool". Yes No Contact Dell. Contact Dell. Does the noise generated from the printer match with the noise from the drop-down list ... 250-sheet tray with the noise from the Play of the toner cartridges. Contact Dell. Abnormal Noise NOTE: Some of Sound button? 1. See "Removing the Used Toner Cartridge", "Replacing the Print Head Device (PHD) Unit" and the fuser replacement guide, Replacing the Fuser. 1 2....
User Guide
Page 87
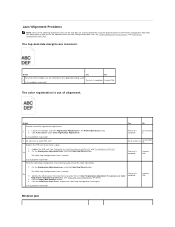
... task is complete. See "Replacing the Print Head Device (PHD) Unit" and "Installing the PHD Unit". 2. On the Registration Adjustment page, click the Color Regi Chart button. Registration Adjustment 2 (Process). Contact Dell. Click Auto Correct under Color Registration Adjustments. Jam/Alignment Problems NOTE: Some of alignment. For information on the Printer Maintenance tab. 1 2. On the Registration Adjustment...
... task is complete. See "Replacing the Print Head Device (PHD) Unit" and "Installing the PHD Unit". 2. On the Registration Adjustment page, click the Color Regi Chart button. Registration Adjustment 2 (Process). Contact Dell. Click Auto Correct under Color Registration Adjustments. Jam/Alignment Problems NOTE: Some of alignment. For information on the Printer Maintenance tab. 1 2. On the Registration Adjustment...

User Guide
Page 88
... 3a. Go to action 3a. Go to action 3a. Go to action 3b. Replace the PHD unit if you have a spare. See "Replacing the Print Head Device (PHD) Unit" and "Installing the PHD Unit". 2 Is the problem recovered? If the envelope is complete. The task is complete. Yes The task ...Thick paper that the PHD unit is 216 gsm or less. 2a Is the problem recovered? The task is complete. The task is complete. Contact Dell. Exit Jam Ensure the fuser is complete. Wipe the retard roller in "Loading Envelopes" or "Loading an Envelope". 2c Is the problem recovered?...
... 3a. Go to action 3a. Go to action 3a. Go to action 3b. Replace the PHD unit if you have a spare. See "Replacing the Print Head Device (PHD) Unit" and "Installing the PHD Unit". 2 Is the problem recovered? If the envelope is complete. The task is complete. Yes The task ...Thick paper that the PHD unit is 216 gsm or less. 2a Is the problem recovered? The task is complete. The task is complete. Contact Dell. Exit Jam Ensure the fuser is complete. Wipe the retard roller in "Loading Envelopes" or "Loading an Envelope". 2c Is the problem recovered?...

User Guide
Page 89
...Print Head Device (PHD) Unit" and "Installing the PHD Unit". 2 Is the problem recovered? The task is not listed, reinstall it. Option Problem If an option does not operate correctly following table lists printer's option and corrective action for 10 seconds, and then turn on the display. If the option is complete. See "Printing a Printer... Multi-feed jam Action Yes No Ensure that the print media damp? Contact Dell. Is the problem recovered? The following installation or stops working: l Turn off the printer, wait for related problem. Reinstall the duplexer. Other...
...Print Head Device (PHD) Unit" and "Installing the PHD Unit". 2 Is the problem recovered? The task is not listed, reinstall it. Option Problem If an option does not operate correctly following table lists printer's option and corrective action for 10 seconds, and then turn on the display. If the option is complete. See "Printing a Printer... Multi-feed jam Action Yes No Ensure that the print media damp? Contact Dell. Is the problem recovered? The following installation or stops working: l Turn off the printer, wait for related problem. Reinstall the duplexer. Other...

User Guide
Page 100
... a networked printer. Click Visit Dell printer supplies ordering web site. Back to Contents Page Maintaining Your Printer Determining the Status of Supplies Conserving Supplies Ordering Supplies Storing Print Media Storing Consumables Replacing Toner Cartridges Replacing the Print Head Device (PHD) Unit Replacing Retard Roller Cleaning the Feed Roller Inside the Printer Cleaning the CTD Sensor Inside the Printer Adjusting Color Registration...
... a networked printer. Click Visit Dell printer supplies ordering web site. Back to Contents Page Maintaining Your Printer Determining the Status of Supplies Conserving Supplies Ordering Supplies Storing Print Media Storing Consumables Replacing Toner Cartridges Replacing the Print Head Device (PHD) Unit Replacing Retard Roller Cleaning the Feed Roller Inside the Printer Cleaning the CTD Sensor Inside the Printer Adjusting Color Registration...

User Guide
Page 103
...Scratches, dirt, or oil from the printer. 3. Ensure that nothing touches or scratches the surface (black-colored film) of the printer carefully. Press the side button and open for more than three minutes, print quality may affect print quality. 1. NOTICE: Ensure that the printer is turned off. 2. Pull the ... side cover. Hold the tray with both hands, and remove it from your Product Information Guide. Replacing the Print Head Device (PHD) Unit CAUTION: Before performing any of the Print Head Device (PHD) against bright light, close the belt unit within three minutes. 3.
...Scratches, dirt, or oil from the printer. 3. Ensure that nothing touches or scratches the surface (black-colored film) of the printer carefully. Press the side button and open for more than three minutes, print quality may affect print quality. 1. NOTICE: Ensure that the printer is turned off. 2. Pull the ... side cover. Hold the tray with both hands, and remove it from your Product Information Guide. Replacing the Print Head Device (PHD) Unit CAUTION: Before performing any of the Print Head Device (PHD) against bright light, close the belt unit within three minutes. 3.

User Guide
Page 108
... Print Head Device (PHD) against bright light, close the belt unit within three minutes. Open the belt unit. Load paper and place it from your hands on the tray. Push the side button and open for more than three minutes, print quality may affect print quality. 1. Ensure that nothing touches or scratches the surface (black-colored...
... Print Head Device (PHD) against bright light, close the belt unit within three minutes. Open the belt unit. Load paper and place it from your hands on the tray. Push the side button and open for more than three minutes, print quality may affect print quality. 1. Ensure that nothing touches or scratches the surface (black-colored...

User Guide
Page 110
...only when an alert for more than three minutes, print quality may affect print quality. 1. NOTICE: To protect the drums of the printer carefully. NOTICE: Ensure that the printer is shown on the tray. Ensure that nothing touches or scratches the surface (black-colored film) of the belt unit. Close the belt .... Hold the tray with both hands, and remove it from your hands on the film of the printer. Close the front cover. 10. Pull the standard 250-sheet tray out of the Print Head Device (PHD) against bright light, close the belt unit within three minutes. Doing so could damage the...
...only when an alert for more than three minutes, print quality may affect print quality. 1. NOTICE: To protect the drums of the printer carefully. NOTICE: Ensure that the printer is shown on the tray. Ensure that nothing touches or scratches the surface (black-colored film) of the belt unit. Close the belt .... Hold the tray with both hands, and remove it from your hands on the film of the printer. Close the front cover. 10. Pull the standard 250-sheet tray out of the Print Head Device (PHD) against bright light, close the belt unit within three minutes. Doing so could damage the...

User Guide
Page 135
... and slide the blue latches of the printer. Completely remove the eight yellow ribbons. 3. Installing the Print Head Device (PHD) Unit 1. Remove the tape from the printer and pull the protective sheet out of four toner cartridges to Contents Page Installing the Print Head Device (PHD) Unit and Toner Cartridges Installing the Print Head Device (PHD) Unit Installing the Toner Cartridges...
... and slide the blue latches of the printer. Completely remove the eight yellow ribbons. 3. Installing the Print Head Device (PHD) Unit 1. Remove the tape from the printer and pull the protective sheet out of four toner cartridges to Contents Page Installing the Print Head Device (PHD) Unit and Toner Cartridges Installing the Print Head Device (PHD) Unit Installing the Toner Cartridges...


