
Owner's Manual
Page 7
6 Printing Manually Feeding a Print Job 47 Printing on Both Sides of the Paper (Manual Duplex 49 Printing Multiple Page Images on One Page (N-Up Printing) . . . 50 Printing a Booklet 51 Printing a Poster 52 Printing on Letterhead 53 Canceling a Print Job 54 From the printer operator panel 54 From your computer 54 7 Maintaining Your Printer Replacing the Toner Cartridge 55 Replacing the Imaging Drum 59 8 Troubleshooting 9 Contacting Dell Technical Assistance 69 Automated Order-Status Service 69 Contacting Dell 70 Contents 7
6 Printing Manually Feeding a Print Job 47 Printing on Both Sides of the Paper (Manual Duplex 49 Printing Multiple Page Images on One Page (N-Up Printing) . . . 50 Printing a Booklet 51 Printing a Poster 52 Printing on Letterhead 53 Canceling a Print Job 54 From the printer operator panel 54 From your computer 54 7 Maintaining Your Printer Replacing the Toner Cartridge 55 Replacing the Imaging Drum 59 8 Troubleshooting 9 Contacting Dell Technical Assistance 69 Automated Order-Status Service 69 Contacting Dell 70 Contents 7

Owner's Manual
Page 63
...DRUM LIGHT IS ON (NOT BLINKING). T H E P R I N T I S G E T T I N G L I G H T , B U T T H E TO N E R LO W /REPLACE DRUM LIGHT IS NOT ON. The printer will need replacing. Remove the toner cartridge and firmly shake it from side-to-side and front-to-back several to use the remaining toner...the Imaging Drum" on page 59 for more information. 8 Troubleshooting Use the following table to find solutions for printing problems you cannot fix the problem, contact Dell at support.dell.com. Troubleshooting 63 The imaging drum is full and needs replacing. Immediately order...
...DRUM LIGHT IS ON (NOT BLINKING). T H E P R I N T I S G E T T I N G L I G H T , B U T T H E TO N E R LO W /REPLACE DRUM LIGHT IS NOT ON. The printer will need replacing. Remove the toner cartridge and firmly shake it from side-to-side and front-to-back several to use the remaining toner...the Imaging Drum" on page 59 for more information. 8 Troubleshooting Use the following table to find solutions for printing problems you cannot fix the problem, contact Dell at support.dell.com. Troubleshooting 63 The imaging drum is full and needs replacing. Immediately order...
Owner's Manual
Page 64
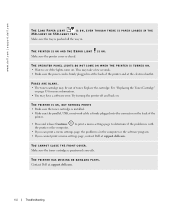
... may have a software error. See "Replacing the Toner Cartridge" on the back of the printer and at support.dell.com. 64 Troubleshooting Make sure the toner cartridge is closed. THE PRINTER IS ON AND THE ERROR LIGHT Make sure the printer cover is positioned correctly. to print a menu settings page to see if the lights...
... may have a software error. See "Replacing the Toner Cartridge" on the back of the printer and at support.dell.com. 64 Troubleshooting Make sure the toner cartridge is closed. THE PRINTER IS ON AND THE ERROR LIGHT Make sure the printer cover is positioned correctly. to print a menu settings page to see if the lights...

Owner's Manual
Page 65
Press and release Continue twice quickly to your User's Guide for more information. To clear a paper jam: 1 If you clear the entire paper path when a paper jam occurs. PA PE R IS JA MM E D I N T H E P RI N T ER. When a paper jam occurs, the printer stops and the operator panel's Paper Jam and Continue lights come on. Refer to display the specific secondary error paper jam light sequence. We recommend that you are feeding paper from a tray, remove the tray, and then remove any jams. Troubleshooting 65
Press and release Continue twice quickly to your User's Guide for more information. To clear a paper jam: 1 If you clear the entire paper path when a paper jam occurs. PA PE R IS JA MM E D I N T H E P RI N T ER. When a paper jam occurs, the printer stops and the operator panel's Paper Jam and Continue lights come on. Refer to display the specific secondary error paper jam light sequence. We recommend that you are feeding paper from a tray, remove the tray, and then remove any jams. Troubleshooting 65

Owner's Manual
Page 67
4 Lift the flap at the front of the printer and remove any jams beneath the flap. 5 Open the rear exit and remove any jams. 6 After you have cleared the jams, reinstall the toner cartridge assembly, make sure all printer covers and trays are closed, and then press Continue to your User's Guide. Troubleshooting 67 For information on operator panel lights or solving print quality problems, refer to resume printing. NOTE: The printer reprints the pages that caused the paper jam.
4 Lift the flap at the front of the printer and remove any jams beneath the flap. 5 Open the rear exit and remove any jams. 6 After you have cleared the jams, reinstall the toner cartridge assembly, make sure all printer covers and trays are closed, and then press Continue to your User's Guide. Troubleshooting 67 For information on operator panel lights or solving print quality problems, refer to resume printing. NOTE: The printer reprints the pages that caused the paper jam.

Service Manual
Page 47
Hex Trace Ready Light pattern Meaning Action Printer is in the Ready mode and Hex Trace is waiting until a print timeout occurs, or until it receives additional data. • Press and release to ... to cancel the print job. • Press and hold to reset the printer. Diagnostics-E238, E240, and E240n 2-15 Waiting Light pattern Meaning Action Printer is active. • Hex Trace helps troubleshoot printing problems. After resolving the problem, turn off the printer to exit Hex Trace. • Or, press and hold to reset the...
Hex Trace Ready Light pattern Meaning Action Printer is in the Ready mode and Hex Trace is waiting until a print timeout occurs, or until it receives additional data. • Press and release to ... to cancel the print job. • Press and hold to reset the printer. Diagnostics-E238, E240, and E240n 2-15 Waiting Light pattern Meaning Action Printer is active. • Hex Trace helps troubleshoot printing problems. After resolving the problem, turn off the printer to exit Hex Trace. • Or, press and hold to reset the...
Service Manual
Page 100
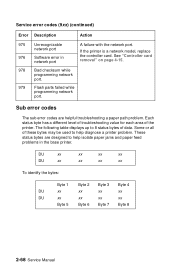
...) Error Description Action 975 Unrecognizable network port 976 Software error in the base printer. Each status byte has a different level of troubleshooting value for each area of data. The following table displays up to 8 status bytes of the printer. DU xx DU xx xx xx xx xx xx xx To identify the bytes...
...) Error Description Action 975 Unrecognizable network port 976 Software error in the base printer. Each status byte has a different level of troubleshooting value for each area of data. The following table displays up to 8 status bytes of the printer. DU xx DU xx xx xx xx xx xx xx To identify the bytes...

Service Manual
Page 150
...unaffected. To exit Hex Trace, turn off the printer, open the front access cover, turn off the printer. Utilities Use the Utilities menu to troubleshoot printer problems. Setting Reset Factory Defaults Hex Trace Use setting to Values Return the printer settings to the factory default values except: &#.... • All downloaded resources (fonts, macros, and symbol sets) in flash memory are deleted. Sometimes resetting the printer to the original settings solves formatting problems. All menu items are reset to factory default values. Print menus by providing information about...
...unaffected. To exit Hex Trace, turn off the printer, open the front access cover, turn off the printer. Utilities Use the Utilities menu to troubleshoot printer problems. Setting Reset Factory Defaults Hex Trace Use setting to Values Return the printer settings to the factory default values except: &#.... • All downloaded resources (fonts, macros, and symbol sets) in flash memory are deleted. Sometimes resetting the printer to the original settings solves formatting problems. All menu items are reset to factory default values. Print menus by providing information about...


