User Guide
Page 4
Adjusting the Projected Image 18 Raising the Projector Height 18 Lowering the Projector Height 18 Adjusting the Projector Zoom and Focus 19 Adjusting Projection Image Size 20 Using the Control Panel 21 Using the Remote Control 24 Using the On-Screen Display 25 Main Menu 26 INPUT SELECT 26 AUTO-ADJUST 27 SET UP 27 PICTURE (in PC Mode 28 PICTURE (in Video Mode 29 DISPLAY (in PC Mode 30 DISPLAY (in Video Mode 31 LAMP 32 LANGUAGE 33 OTHERS 34 4 Troubleshooting Your Projector 37 Changing the Lamp 41 5 Specifications 43 6 Contacting Dell 47 7 Appendix...
Adjusting the Projected Image 18 Raising the Projector Height 18 Lowering the Projector Height 18 Adjusting the Projector Zoom and Focus 19 Adjusting Projection Image Size 20 Using the Control Panel 21 Using the Remote Control 24 Using the On-Screen Display 25 Main Menu 26 INPUT SELECT 26 AUTO-ADJUST 27 SET UP 27 PICTURE (in PC Mode 28 PICTURE (in Video Mode 29 DISPLAY (in PC Mode 30 DISPLAY (in Video Mode 31 LAMP 32 LANGUAGE 33 OTHERS 34 4 Troubleshooting Your Projector 37 Changing the Lamp 41 5 Specifications 43 6 Contacting Dell 47 7 Appendix...
User Guide
Page 7
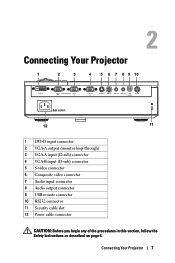
Connecting Your Projector 7 B In S-Video In Video In Audio In Audio Out USB Remote RS-232 Dell 1609WX 12 11 1 DVI-D input connector 2 VGA-A output (monitor loop-through) 3 VGA-A input (D-sub) connector 4 VGA-B input (D-sub) connector 5 S-video connector 6 Composite video connector 7 Audio input connector 8 Audio output connector 9 USB remote connector 10 RS232 connector 11 Security cable slot 12 Power cable connector CAUTION: Before you begin any of the procedures in this section, follow the Safety Instructions as described...
Connecting Your Projector 7 B In S-Video In Video In Audio In Audio Out USB Remote RS-232 Dell 1609WX 12 11 1 DVI-D input connector 2 VGA-A output (monitor loop-through) 3 VGA-A input (D-sub) connector 4 VGA-B input (D-sub) connector 5 S-video connector 6 Composite video connector 7 Audio input connector 8 Audio output connector 9 USB remote connector 10 RS232 connector 11 Security cable slot 12 Power cable connector CAUTION: Before you begin any of the procedures in this section, follow the Safety Instructions as described...
User Guide
Page 14
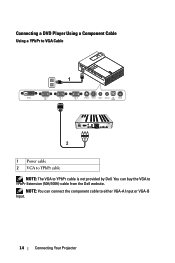
You can connect the component cable to VGA Cable 1 DVI-D In VGA - B In S-Video In Video In Audio In Audio Out USB Remote RS-232 2 1 Power cable 2 VGA to YPbPr cable NOTE: The VGA to YPbPr Extension (50ft/100ft) cable from the Dell website. A In VGA - NOTE: You can buy the VGA to YPbPr cable is not provided by Dell. A Out VGA - Connecting a DVD Player Using a Component Cable Using a YPbPr to either VGA-A Input or VGA-B Input. 14 Connecting Your Projector
You can connect the component cable to VGA Cable 1 DVI-D In VGA - B In S-Video In Video In Audio In Audio Out USB Remote RS-232 2 1 Power cable 2 VGA to YPbPr cable NOTE: The VGA to YPbPr Extension (50ft/100ft) cable from the Dell website. A In VGA - NOTE: You can buy the VGA to YPbPr cable is not provided by Dell. A Out VGA - Connecting a DVD Player Using a Component Cable Using a YPbPr to either VGA-A Input or VGA-B Input. 14 Connecting Your Projector
User Guide
Page 15
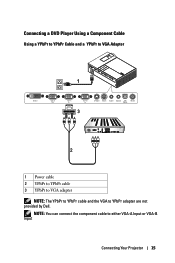
A In VGA - Connecting a DVD Player Using a Component Cable Using a YPbPr to YPbPr Cable and a YPbPr to either VGA-A Input or VGA-B Input Connecting Your Projector 15 NOTE: You can connect the component cable to VGA Adapter 1 DVI-D In VGA - B In S-Video In Video In Audio In Audio Out USB Remote RS-232 3 2 1 Power cable 2 YPbPr to YPbPr cable 3 YPbPr to VGA adapter NOTE: The YPbPr to YPbPr cable and the VGA to YPbPr adapter are not provided by Dell. A Out VGA -
A In VGA - Connecting a DVD Player Using a Component Cable Using a YPbPr to YPbPr Cable and a YPbPr to either VGA-A Input or VGA-B Input Connecting Your Projector 15 NOTE: You can connect the component cable to VGA Adapter 1 DVI-D In VGA - B In S-Video In Video In Audio In Audio Out USB Remote RS-232 3 2 1 Power cable 2 YPbPr to YPbPr cable 3 YPbPr to VGA adapter NOTE: The YPbPr to YPbPr cable and the VGA to YPbPr adapter are not provided by Dell. A Out VGA -
User Guide
Page 17
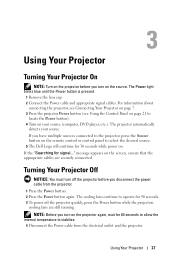
... internal temperature to select the desired source. 5 The Dell Logo will continue for 30 seconds while power on. 3 Using Your Projector Turning Your Projector On NOTE: Turn on the projector before you turn on the source. message appears on page 21 to operate for signal..." Using Your Projector 17 For information about connecting the projector, see Connecting Your Projector on page 7. 3 Press the projector Power button (see Using the Control Panel on the screen, ensure that the appropriate cables...
... internal temperature to select the desired source. 5 The Dell Logo will continue for 30 seconds while power on. 3 Using Your Projector Turning Your Projector On NOTE: Turn on the projector before you turn on the source. message appears on page 21 to operate for signal..." Using Your Projector 17 For information about connecting the projector, see Connecting Your Projector on page 7. 3 Press the projector Power button (see Using the Control Panel on the screen, ensure that the appropriate cables...
User Guide
Page 22
... image distortion caused by tilting the projector. 5 Right / Auto Adjust Allows you to the input source. The display automatically shuts down indicating a system failure. You can also use the Right button to synchronize the projector to adjust the OSD setting. Auto adjust does not operate if the OSD is blinking amber, the projector automatically shuts down . If this problem persists, contact Dell (see Contacting Dell on page 47). • A blinking amber TEMP light indicates that the projector, lamp, or lamp driver are overheated...
... image distortion caused by tilting the projector. 5 Right / Auto Adjust Allows you to the input source. The display automatically shuts down indicating a system failure. You can also use the Right button to synchronize the projector to adjust the OSD setting. Auto adjust does not operate if the OSD is blinking amber, the projector automatically shuts down . If this problem persists, contact Dell (see Contacting Dell on page 47). • A blinking amber TEMP light indicates that the projector, lamp, or lamp driver are overheated...

User Guide
Page 25
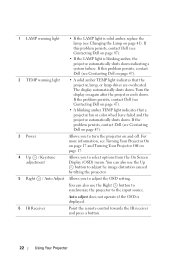
... the Video Mode button once will switch between PC mode, Movie mode, Game Mode, sRGB, or CUSTOM mode (for user to adjust image distortion caused by tilting the projector. (+40/-35 degrees) Using the On-Screen Display The projector has a multi-language On-Screen Display (OSD) that are optimized for displaying data (PC Graphics) or video (movies, games, etc.). Use or on the control panel or remote control to change the aspect ratio of a displayed image. 11 Power Turns the projector on...
... the Video Mode button once will switch between PC mode, Movie mode, Game Mode, sRGB, or CUSTOM mode (for user to adjust image distortion caused by tilting the projector. (+40/-35 degrees) Using the On-Screen Display The projector has a multi-language On-Screen Display (OSD) that are optimized for displaying data (PC Graphics) or video (movies, games, etc.). Use or on the control panel or remote control to change the aspect ratio of a displayed image. 11 Power Turns the projector on...

User Guide
Page 26
... the Menu button directly on the control panel or the remote control. manually select the input signal. adjust the settings. To go back to Main menu, go to Back tab and press the Enter button on the control panel or the remote control. Main Menu INPUT SELECT The Input Select menu allows you press the Source button when the Auto Source mode is on, it automatically finds the next available input signal. AUTO SOURCE-Select On (the default) to lock the current input signal.
... the Menu button directly on the control panel or the remote control. manually select the input signal. adjust the settings. To go back to Main menu, go to Back tab and press the Enter button on the control panel or the remote control. Main Menu INPUT SELECT The Input Select menu allows you press the Source button when the Auto Source mode is on, it automatically finds the next available input signal. AUTO SOURCE-Select On (the default) to lock the current input signal.
User Guide
Page 27
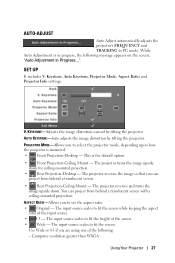
... screen with a ceiling-mounted projection. Keystone, Auto Keystone, Projector Mode, Aspect Ratio and Projector Info settings. The projector reverses and turns the image upside down for ceiling-mounted projection. • Rear Projection-Desktop - KEYSTONE-Adjusts the image distortion caused by tilting the projector. V. AUTO KEYSTONE-Auto adjusts the image distortion by tilting the projector. The input source scales to fit the screen while keeping the aspect ratio of the following message appears on the screen, "Auto Adjustment in Progress...". The projector turns the image upside...
... screen with a ceiling-mounted projection. Keystone, Auto Keystone, Projector Mode, Aspect Ratio and Projector Info settings. The projector reverses and turns the image upside down for ceiling-mounted projection. • Rear Projection-Desktop - KEYSTONE-Adjusts the image distortion caused by tilting the projector. V. AUTO KEYSTONE-Auto adjusts the image distortion by tilting the projector. The input source scales to fit the screen while keeping the aspect ratio of the following message appears on the screen, "Auto Adjustment in Progress...". The projector turns the image upside...

User Guide
Page 28
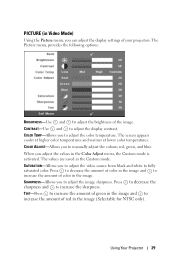
The screen appears cooler at higher color temperatures and warmer at lower color temperatures. When you can adjust the display settings of the image. PICTURE (in PC Mode) Using the Picture menu, you adjust the values in the Custom mode. 28 Using Your Projector The Picture menu, provides the following options: BRIGHTNESS-Use and to manually adjust the colours red, green, and blue. COLOR ADJUST-Allows you to adjust the display contrast. COLOR TEMP-Allows you to adjust the brightness of your projectors. The values...
The screen appears cooler at higher color temperatures and warmer at lower color temperatures. When you can adjust the display settings of the image. PICTURE (in PC Mode) Using the Picture menu, you adjust the values in the Custom mode. 28 Using Your Projector The Picture menu, provides the following options: BRIGHTNESS-Use and to manually adjust the colours red, green, and blue. COLOR ADJUST-Allows you to adjust the display contrast. COLOR TEMP-Allows you to adjust the brightness of your projectors. The values...
User Guide
Page 29
... mode. Press to decrease the sharpness and to adjust the display contrast. When you to adjust the brightness of your projectors. The Picture menu, provides the following options: BRIGHTNESS-Use and to adjust the image sharpness. COLOR ADJUST-Allows you to adjust the video source from black and white to manually adjust the colours red, green, and blue. SATURATION-Allows you to fully saturated color. CONTRAST-Use and to increase the sharpness. Using Your Projector...
... mode. Press to decrease the sharpness and to adjust the display contrast. When you to adjust the brightness of your projectors. The Picture menu, provides the following options: BRIGHTNESS-Use and to adjust the image sharpness. COLOR ADJUST-Allows you to adjust the video source from black and white to manually adjust the colours red, green, and blue. SATURATION-Allows you to fully saturated color. CONTRAST-Use and to increase the sharpness. Using Your Projector...
User Guide
Page 31
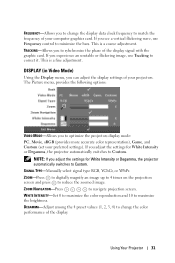
... the zoomed image. DISPLAY (in Video Mode) Using the Display menu, you adjust the settings for White Intensity or Degamma, the projector automatically switches to Custom. DEGAMMA-Adjust among the 4 preset values (1, 2, 3, 4) to change the display data clock frequency to match the frequency of the display signal with the graphic card. If you can adjust the display settings of the display. This is a coarse adjustment. ZOOM NAVIGATION-Press to navigate projection screen. This is a fine adjustment. The Picture menu, provides...
... the zoomed image. DISPLAY (in Video Mode) Using the Display menu, you adjust the settings for White Intensity or Degamma, the projector automatically switches to Custom. DEGAMMA-Adjust among the 4 preset values (1, 2, 3, 4) to change the display data clock frequency to match the frequency of the display signal with the graphic card. If you can adjust the display settings of the display. This is a coarse adjustment. ZOOM NAVIGATION-Press to navigate projection screen. This is a fine adjustment. The Picture menu, provides...
User Guide
Page 32
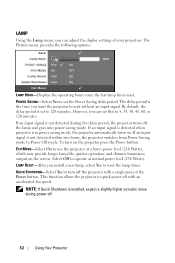
... your projectors. The Picture menu, provides the following options: LAMP HOUR-Displays the operating hours since the last lamp timer reset. Select Off to operate at a lower power level (216 Watts), which may provide longer lamp life, quieter operation, and dimmer luminance output on the screen. LAMP RESET-After you install a new lamp, select Yes to set the Power Saving delay period. To turn off . 32 Using Your Projector This function allows the projector to quick power off the lamp...
... your projectors. The Picture menu, provides the following options: LAMP HOUR-Displays the operating hours since the last lamp timer reset. Select Off to operate at a lower power level (216 Watts), which may provide longer lamp life, quieter operation, and dimmer luminance output on the screen. LAMP RESET-After you install a new lamp, select Yes to set the Power Saving delay period. To turn off . 32 Using Your Projector This function allows the projector to quick power off the lamp...
User Guide
Page 34
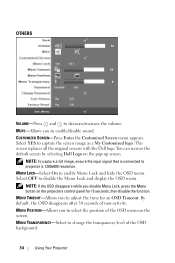
... to adjust the time for 15 seconds, then disable the function. MENU TIMEOUT-Allows you to enable/disable sound. MENU POSITION-Allows you to enable Menu Lock and hide the OSD menu. MUTE-Allows you disable Menu Lock, press the Menu button on the pop-up screen. This screen replaces all the original screens with the Dell logo. You can recover the default screen by selecting Dell Logo on the projectors control panel...
... to adjust the time for 15 seconds, then disable the function. MENU TIMEOUT-Allows you to enable/disable sound. MENU POSITION-Allows you to enable Menu Lock and hide the OSD menu. MUTE-Allows you disable Menu Lock, press the Menu button on the pop-up screen. This screen replaces all the original screens with the Dell logo. You can recover the default screen by selecting Dell Logo on the projectors control panel...

User Guide
Page 38
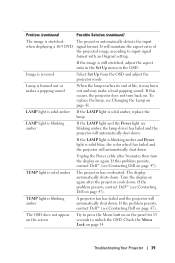
... XGA (1024 x 768): a Right-click the unused portion of your Windows desktop, click Properties and then select Settings tab. Problem (continued) Partial, scrolling, or incorrectly displayed image The screen does not display your presentation Image is unstable or flickering Image has vertical flickering bar Image color is incorrect Image is out of focus Possible Solution (continued) 1 Press the Auto Adjust button on the remote control or the control panel. 2 If you are using a Dell™...
... XGA (1024 x 768): a Right-click the unused portion of your Windows desktop, click Properties and then select Settings tab. Problem (continued) Partial, scrolling, or incorrectly displayed image The screen does not display your presentation Image is unstable or flickering Image has vertical flickering bar Image color is incorrect Image is out of focus Possible Solution (continued) 1 Press the Auto Adjust button on the remote control or the control panel. 2 If you are using a Dell™...
User Guide
Page 39
... The projector has overheated. If the LAMP light is blinking amber and Power light is blinking amber A projector fan has failed and the projector will automatically shut down . TEMP light is solid amber, replace the lamp. The display automatically shuts down . Turn the display on page 47). TEMP light is solid blue, the color wheel has failed and the projector will maintain the aspect ratio of life, it may burn out and may make a loud popping sound. Check the Menu Lock...
... The projector has overheated. If the LAMP light is blinking amber and Power light is blinking amber A projector fan has failed and the projector will automatically shut down . TEMP light is solid amber, replace the lamp. The display automatically shuts down . Turn the display on page 47). TEMP light is solid blue, the color wheel has failed and the projector will maintain the aspect ratio of life, it may burn out and may make a loud popping sound. Check the Menu Lock...
User Guide
Page 41
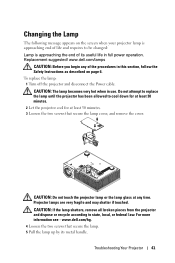
.... Changing the Lamp The following message appears on page 6. To replace the lamp: 1 Turn off the projector and disconnect the Power cable. CAUTION: Do not touch the projector lamp or the lamp glass at least 30 minutes. 3 Loosen the two screws that secure the lamp. 5 Pull the lamp up by its useful life in use. www.dell.com/hg. 4 Loosen the two screws that secure the lamp cover, and remove the cover. CAUTION: The lamp...
.... Changing the Lamp The following message appears on page 6. To replace the lamp: 1 Turn off the projector and disconnect the Power cable. CAUTION: Do not touch the projector lamp or the lamp glass at least 30 minutes. 3 Loosen the two screws that secure the lamp. 5 Pull the lamp up by its useful life in use. www.dell.com/hg. 4 Loosen the two screws that secure the lamp cover, and remove the cover. CAUTION: The lamp...

User Guide
Page 44
... input signals Computer output: one 15-pin D-sub Video input: one composite video RCA and one Svideo Audio input: one phone jack (diameter 3.5 mm) Audio output: one phone jack (diameter 3.5 mm) USB port: One USB slave for remote support One mini-DIN RS232 for wired remote control from PC DVI-D input: one DVI-D connector for DVI-D signal (HDCP compliant). 200-watt user-replaceable 3000-hour lamp (up to 4000 hours in a lamp's shortened operating life...
... input signals Computer output: one 15-pin D-sub Video input: one composite video RCA and one Svideo Audio input: one phone jack (diameter 3.5 mm) Audio output: one phone jack (diameter 3.5 mm) USB port: One USB slave for remote support One mini-DIN RS232 for wired remote control from PC DVI-D input: one DVI-D connector for DVI-D signal (HDCP compliant). 200-watt user-replaceable 3000-hour lamp (up to 4000 hours in a lamp's shortened operating life...
User Guide
Page 50
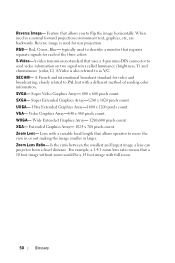
...,-1280 x 1024 pixels count. WXGA- Zoom Lens- typically used to PAL but with full zoom. 50 Glossary SXGA- Wide Extended Graphics Array- 1280x800 pixels count. Is the ratio between the smallest and largest image a lens can projector from a fixed distance. Super Video Graphics Array- 800 x 600 pixels count. VGA- Extended Graphics Array- 1024 x 768 pixels count. Red, Green, Blue- XGA- For example, a 1.4:1 zoom lens ratio means that allows...
...,-1280 x 1024 pixels count. WXGA- Zoom Lens- typically used to PAL but with full zoom. 50 Glossary SXGA- Wide Extended Graphics Array- 1280x800 pixels count. Is the ratio between the smallest and largest image a lens can projector from a fixed distance. Super Video Graphics Array- 800 x 600 pixels count. VGA- Extended Graphics Array- 1024 x 768 pixels count. Red, Green, Blue- XGA- For example, a 1.4:1 zoom lens ratio means that allows...
User Guide
Page 52
... Unit 6 Control panel 6 Elevator button 6 Focus ring 6 IR receiver 6 Lens 6 Zoom tab 6 O On-Screen Display 25 Auto-Adjust 27 Display (in PC Mode) 30 Display (in Video Mode) 31 Input Select 26 Lamp 32 Language 33 Main Menu 26 Others 34 Picture (in PC Mode) 28 Picture (in Video Mode) 29 Set Up 27 P phone numbers 47 Powering On/Off the Projector Powering Off the Projector 17 Powering On the Projector 17 R Remote Control 24 IR receiver 22 S Specifications Audio 43 Brightness 43 Color Wheel Speed 43...
... Unit 6 Control panel 6 Elevator button 6 Focus ring 6 IR receiver 6 Lens 6 Zoom tab 6 O On-Screen Display 25 Auto-Adjust 27 Display (in PC Mode) 30 Display (in Video Mode) 31 Input Select 26 Lamp 32 Language 33 Main Menu 26 Others 34 Picture (in PC Mode) 28 Picture (in Video Mode) 29 Set Up 27 P phone numbers 47 Powering On/Off the Projector Powering Off the Projector 17 Powering On the Projector 17 R Remote Control 24 IR receiver 22 S Specifications Audio 43 Brightness 43 Color Wheel Speed 43...


